HoloLens(第一代)和 Azure 311 - Microsoft Graph
注意
混合现实学院教程在制作时考虑到了 HoloLens(第一代)和混合现实沉浸式头戴显示设备。 因此,对于仍在寻求这些设备的开发指导的开发人员而言,我们觉得很有必要保留这些教程。 我们不会在这些教程中更新 HoloLens 2 所用的最新工具集或集成相关的内容。 我们将维护这些教程,使之持续适用于支持的设备。 将来会发布一系列演示如何针对 HoloLens 2 进行开发的新教程。 此通知将在教程发布时通过指向这些教程的链接进行更新。
本课程将介绍如何使用 Microsoft Graph 在混合现实应用程序中使用安全身份验证登录 Microsoft 帐户。 然后,你将在应用程序界面中检索并显示计划的会议。
Microsoft Graph 是一组 API,旨在启用对许多 Microsoft 服务的访问权限。 Microsoft 将 Microsoft Graph 描述为通过关系连接的资源矩阵,这意味着它允许应用程序访问各种连接的用户数据。 有关详细信息,请访问 Microsoft Graph 页面。
开发过程中,将会创建一个应用,在该应用中,将指示用户凝视并点击一个球体,这将提示用户安全登录到 Microsoft 帐户。 登录到帐户后,用户将能够看到当天计划的会议列表。
完成本课程后,你将获得一个可执行以下操作的混合现实 HoloLens 应用程序:
- 使用点击手势,点击一个对象,这将提示用户登录 Microsoft 帐户(退出应用以登录,然后再次返回应用)。
- 查看当天计划的会议列表。
在应用程序中,由你决定结果与设计的集成方式。 本课程旨在介绍如何将 Azure 服务与 Unity 项目集成。 你的任务是运用从本课程中学到的知识来增强混合现实应用程序。
设备支持
| 课程 | HoloLens | 沉浸式头戴显示设备 |
|---|---|---|
| MR 和 Azure 311:Microsoft Graph | ✔ |
先决条件
注意
本教程专为具有 Unity 和 C# 基本经验的开发人员设计。 另请注意,本文档中的先决条件和书面说明在编写时(2018 年 7 月)已经过测试和验证。 可以随意使用最新的软件(如安装工具一文所列),但不应假设本课程中的信息将与你在较新的软件中找到的信息(而不是下面列出的内容)完全匹配。
建议在本课程中使用以下硬件和软件:
- 一台开发电脑
- 已启用开发人员模式的 Windows 10 Fall Creators Update(或更高版本)
- 最新的 Windows 10 SDK
- Unity 2017.4
- Visual Studio 2017
- 已启用开发人员模式的 Microsoft HoloLens
- Azure 设置和 Microsoft Graph 数据检索的 Internet 访问
- 有效的 “Microsoft 帐户”(个人或工作/学校)
- 使用相同的 Microsoft 帐户计划在当天开展的几次会议
开始之前
- 为了避免在生成此项目时遇到问题,强烈建议在根文件夹或接近根的文件夹中创建本教程中提到的项目(长文件夹路径会在生成时导致问题)。
- 设置并测试 HoloLens。 如需有关设置 HoloLens 的支持,请确保参阅“HoloLens 设置”一文。
- 在开始开发新的 HoloLens 应用时,建议执行校准和传感器优化(有时 HoloLens 应用可以帮助为每个用户执行这些任务)。
有关校准的帮助信息,请单击此链接访问“HoloLens 校准”一文。
有关传感器优化的帮助信息,请单击此链接访问“HoloLens 传感器优化”一文。
第 1 章 - 在应用程序注册门户中创建你的应用
首先,需要在“应用程序注册门户”中创建和注册你的应用程序。
在本章中,你还将找到服务密钥,可以使用该密钥调用 Microsoft Graph 来访问帐户内容。
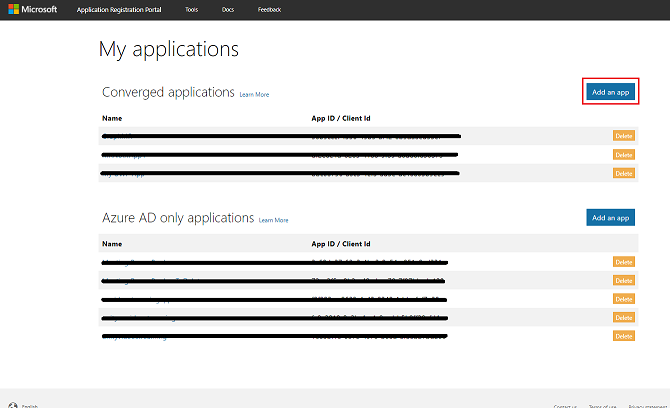
导航到 Microsoft 应用程序注册门户并使用你的 Microsoft 帐户登录。 登录后,你将被重定向到“应用程序注册门户”。
在“我的应用程序”部分,单击“添加应用”按钮。
重要
“应用程序注册门户”的外观可能有所不同,具体取决于你之前是否使用过 Microsoft Graph。 下面的屏幕截图显示了这些不同的版本。
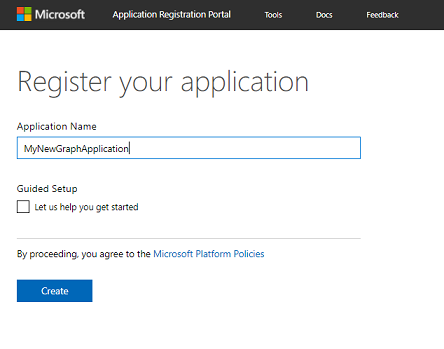
为应用程序添加一个名称,然后单击“创建”。
创建应用程序后,你将被重定向到应用程序主页。 复制“应用程序 ID” 并确保在安全的位置记下该值,你很快会在代码中用到它。
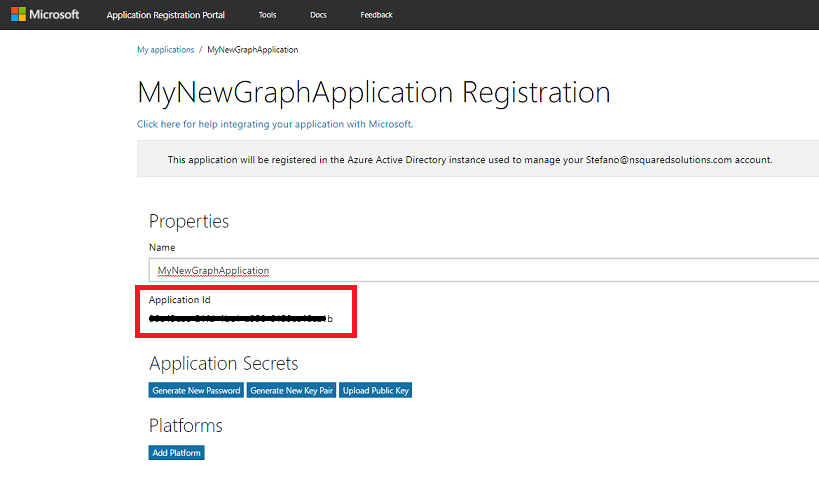
请确保“平台”部分显示了“本机应用程序”。 如果未显示,请单击“添加平台”并选择“本机应用程序”。
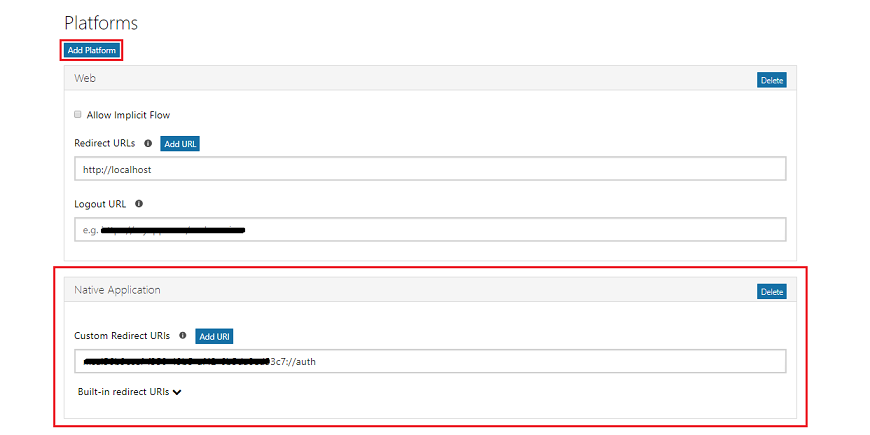
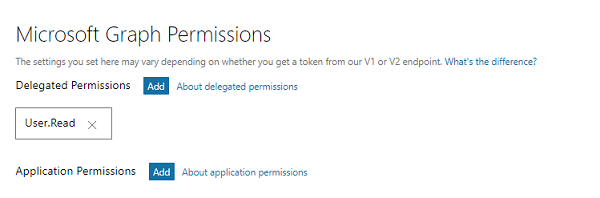
在同一页面中向下滚动,在名为“Microsoft Graph 权限”的部分中,需要为应用程序添加其他权限。 单击“委派权限”旁边的“添加”。
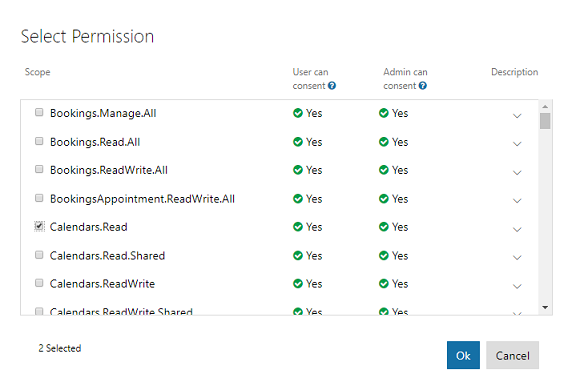
由于你希望应用程序访问用户的日历,因此请选中名为 “Calendars.Read” 的框,然后单击“确定”。
向下滚动到底部并单击“保存”按钮。
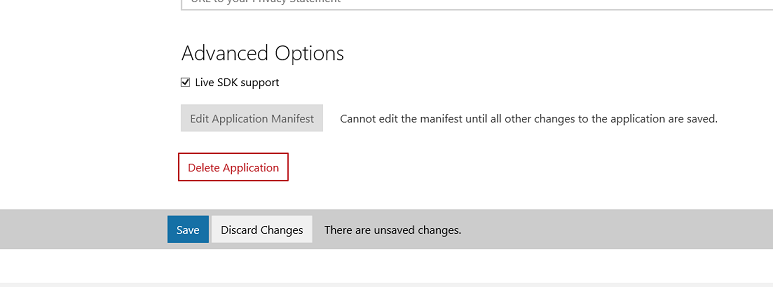
你的保存随即确认,你可以从“应用程序注册门户”注销。
第 2 章 - 设置 Unity 项目
下面是用于使用混合现实进行开发的典型设置,因此,这对其他项目来说是一个不错的模板。
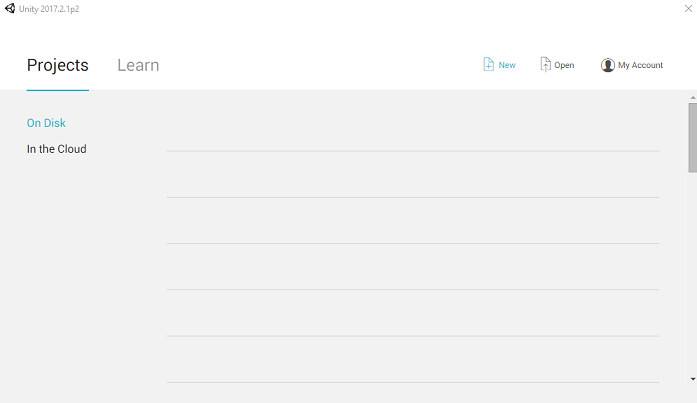
打开 Unity,单击“新建”。
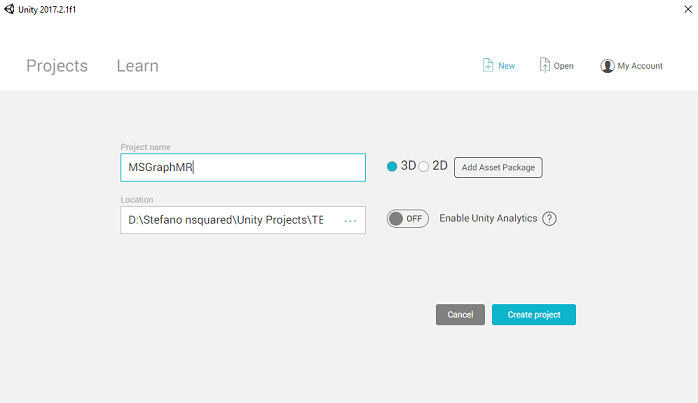
需要提供 Unity 项目名称。 插入 “MSGraphMR”。 请确保将项目模板设置为“3D”。 将“位置”设置为适合你的位置(请记住,越接近根目录越好)。 然后,单击“创建项目”。
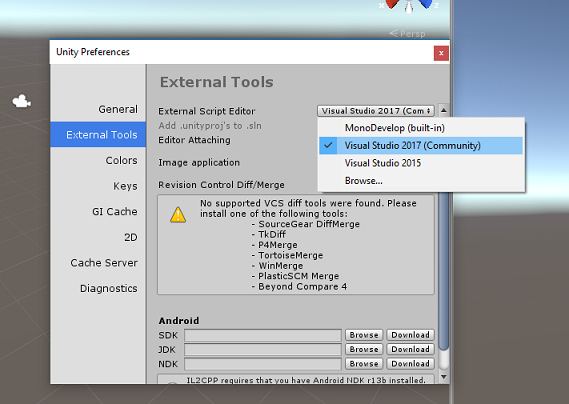
当 Unity 处于打开状态时,有必要检查默认“脚本编辑器”是否设置为“Visual Studio”。 转到“编辑”>“首选项”,然后在新窗口中导航到“外部工具”。 将外部脚本编辑器更改为 Visual Studio 2017。 关闭“首选项”窗口。
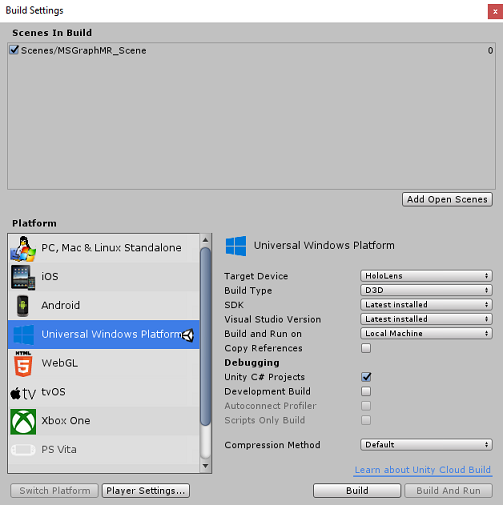
转到“文件”>“生成设置”,选择“通用 Windows 平台”,然后单击“切换平台”按钮以应用你的选择。
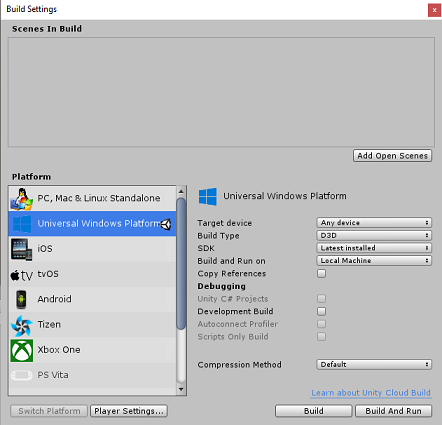
仍处于“文件”>“生成设置”中时,请确保:
将“目标设备”设置为“HoloLens”
将“生成类型”设置为“D3D”
将“SDK”设置为“最新安装的版本”
将“Visual Studio 版本”设置为“最新安装的版本”
将“生成并运行”设置为“本地计算机”
保存场景并将其添加到生成。
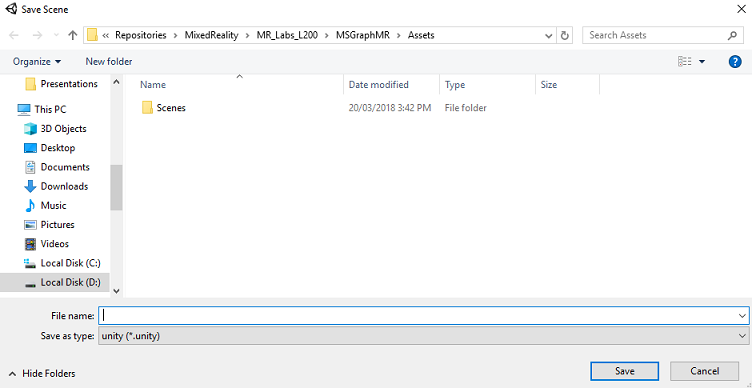
通过选择“添加开放场景”来执行此操作。 将出现一个保存窗口。

为此场景和任何未来场景创建一个新文件夹。 选择“新建文件夹”按钮以创建新文件夹,将其命名为“场景”。
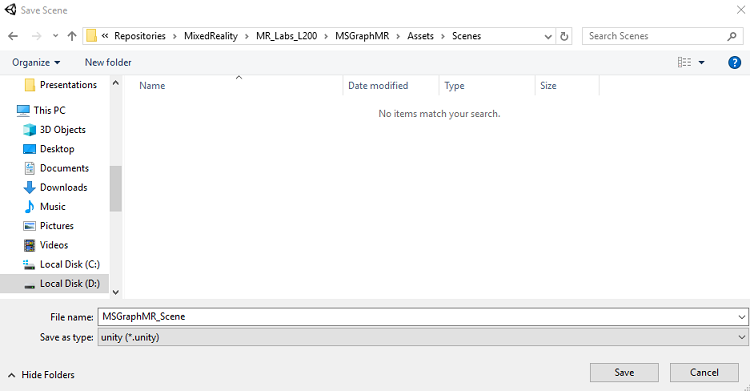
打开新创建的“场景”文件夹,然后在“文件名:”文本字段中,键入“MR_ComputerVisionScene”,然后单击“保存”。
重要
请注意,必须将 Unity 场景保存在资产文件夹中,因为它们必须与 Unity 项目关联。 创建场景文件夹(和其他类似文件夹)是构建 Unity 项目的典型方式。
在“生成设置”中,其余设置目前应保留为默认值。
在“生成设置”窗口中,单击“播放器设置”按钮,这会在检查器所在的空间中打开相关面板。
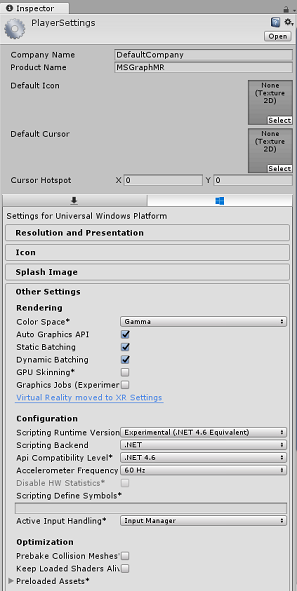
在此面板中,需要验证一些设置:
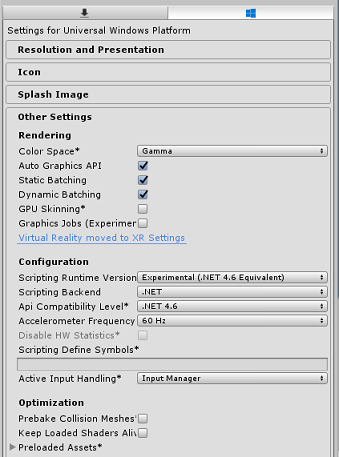
在“其他设置”选项卡中:
“脚本”“运行时版本”应为“试验版(等效于 .Net 4.6)”,这将导致需要重启编辑器。
“脚本后端”应为 “.NET”
“API 兼容性级别”应为“.NET 4.6”
在“发布设置”选项卡的“功能”下,检查以下内容:
InternetClient

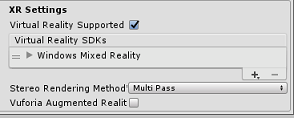
面板再往下的“XR 设置”(在“发布设置”下方)中,选中“支持的虚拟现实”,确保已添加“Windows Mixed Reality SDK”。
返回“生成设置”,Unity C# 项目不再灰显;选中此框旁边的复选框。
关闭“生成设置”窗口 。
保存场景和项目(“文件”>“保存场景/文件”>“保存项目”)。
第 3 章 - 在 Unity 中导入库
重要
如果要跳过本课程的“Unity 设置”组件,直接继续学习代码,请根据需要下载此 Azure-MR-311.unitypackage,并将其作为自定义包导入项目中,然后从第 5 章继续。
要在 Unity 中使用 Microsoft Graph,需要使用 “Microsoft.Identity.Client” DLL。 可以使用 Microsoft Graph SDK,但是,它需要在生成 Unity 项目后添加 NuGet 包(意味着在生成后编辑项目)。 将所需的 DLL 直接导入 Unity 会更简单。
注意
Unity 中当前存在一个已知问题,即需要在导入后重新配置插件。 解决 bug 后不再需要执行这些步骤(本部分的 4-7)。
若要将 Microsoft Graph 导入你自己的项目,请下载 MSGraph_LabPlugins.zip 文件。 此包是使用经过测试的库版本创建的。
若要详细了解如何将自定义 DLL 添加到 Unity 项目,请点击此链接。
导入包:
通过使用“资产”>“导入包”>“自定义包”菜单选项,将 Unity 包添加到 Unity。 选择刚下载的包。
在弹出的“导入 Unity 包”框中,确保“插件”下面的所有内容(包括插件)都被选中。
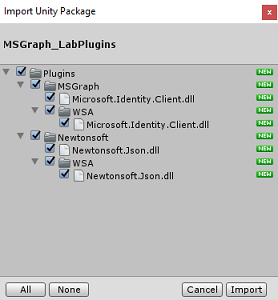
单击“导入”按钮,将项添加到项目。
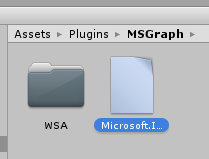
转到“项目面板”中“插件”下的 MSGraph 文件夹,然后选择名为 Microsoft.Identity.Client 的插件。
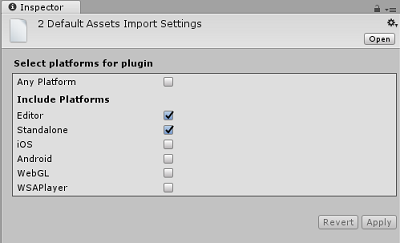
选中插件后,请确保“任何平台”处于未选中状态,并确保“WSAPlayer”也处于未选中状态,然后单击“应用”。 这样做只是为了确认文件配置正确。
注意
标记这些插件,会将它们配置为仅在 Unity 编辑器中使用。 WSA 文件夹中有一组不同的 DLL,这些 DLL 将在项目作为通用 Windows 应用程序从 Unity 导出后使用。
接下来,需要打开 “MSGraph” 文件夹中的 “WSA” 文件夹。 你将看到刚刚配置的同一文件的副本。 选择该文件,然后在检查器中:
确保“任何平台”处于未选中状态,并且仅“WSAPlayer”处于选中状态。
确保“SDK”设置为“UWP”,“脚本后端”设置为“.NET”
确保“不处理”处于选中状态。
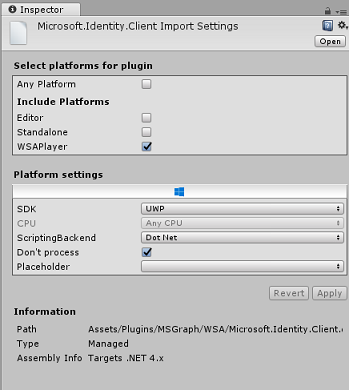
单击“应用”。
第 4 章 - 相机设置
在本章中,你将设置场景的主相机:
在“层次结构”面板中选择“主摄像头”。
选择后,你将能够在“检查器面板”中查看“主摄像头”的所有组件。
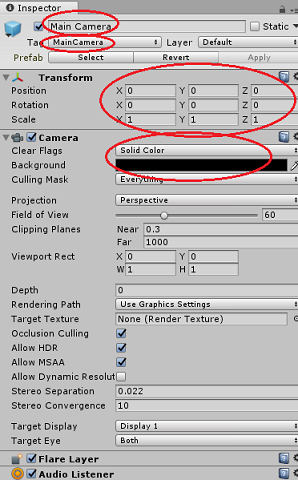
Camera 对象必须命名为“主相机”(注意拼写!)
“主摄像头”标记必须设置为“MainCamera”(注意拼写!)
请确保将“转换位置”设置为“0, 0, 0”
将“清除标志”设置为“纯色”
将相机组件的“背景色”设置为“黑色,Alpha 0”(十六进制代码:#00000000)
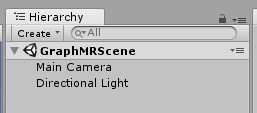
层次结构面板中的最终对象结构应与下图所示类似:
第 5 章 - 创建 MeetingsUI 类
需要创建的第一个脚本是 “MeetingsUI”,它负责托管和填充应用程序的 UI(欢迎消息、说明和会议详细信息)。
若要创建此类,请执行以下操作:
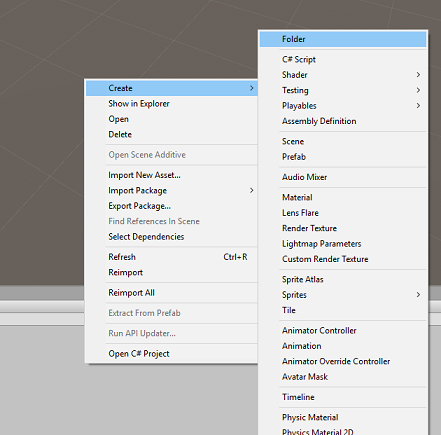
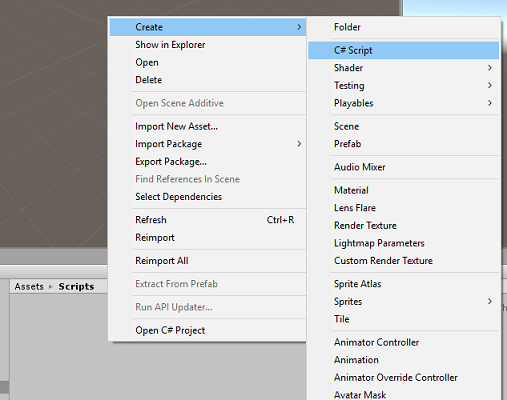
在“项目面板”中右键单击“资产”文件夹,然后选择“创建”>“文件夹”。 将文件夹命名为“脚本”。
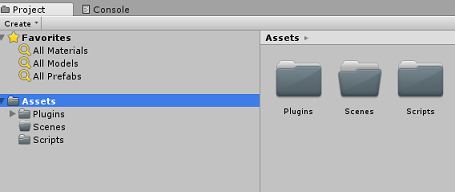
然后打开“脚本”文件夹,在该文件夹中右键单击“创建”>“C# 脚本”。 将脚本命名为 “MeetingsUI”。
双击新的 “MeetingsUI” 脚本,使用 Visual Studio 打开它。
插入以下命名空间:
using System;
using UnityEngine;
在该类中插入以下变量:
    /// <summary>
    /// Allows this class to behave like a singleton
    /// </summary>
    public static MeetingsUI Instance;

    /// <summary>
    /// The 3D text of the scene
    /// </summary>
    private TextMesh _meetingDisplayTextMesh;
然后替换 “Start()” 方法并添加一个 “Awake()” 方法。 类初始化时,将调用这些方法:
    /// <summary>
    /// Called on initialization
    /// </summary>
    void Awake()
    {
        Instance = this;
    }

    /// <summary>
    /// Called on initialization, after Awake
    /// </summary>
    void Start ()
    {
        // Creating the text mesh within the scene
        _meetingDisplayTextMesh = CreateMeetingsDisplay();
    }
添加负责创建会议 UI 的方法,并在请求时使用当前会议填充它:
    /// <summary>
    /// Set the welcome message for the user
    /// </summary>
    internal void WelcomeUser(string userName)
    {
        if(!string.IsNullOrEmpty(userName))
        {
            _meetingDisplayTextMesh.text = $"Welcome {userName}";
        }
        else
        {
            _meetingDisplayTextMesh.text = "Welcome";
        }
    }

    /// <summary>
    /// Set up the parameters for the UI text
    /// </summary>
    /// <returns>Returns the 3D text in the scene</returns>
    private TextMesh CreateMeetingsDisplay()
    {
        GameObject display = new GameObject();
        display.transform.localScale = new Vector3(0.03f, 0.03f, 0.03f);
        display.transform.position = new Vector3(-3.5f, 2f, 9f);
        TextMesh textMesh = display.AddComponent<TextMesh>();
        textMesh.anchor = TextAnchor.MiddleLeft;
        textMesh.alignment = TextAlignment.Left;
        textMesh.fontSize = 80;
        textMesh.text = "Welcome! \nPlease gaze at the button" +
            "\nand use the Tap Gesture to display your meetings";

        return textMesh;
    }

    /// <summary>
    /// Adds a new Meeting in the UI by chaining the existing UI text
    /// </summary>
    internal void AddMeeting(string subject, DateTime dateTime, string location)
    {
        string newText = $"\n{_meetingDisplayTextMesh.text}\n\n Meeting,\nSubject: {subject},\nToday at {dateTime},\nLocation: {location}";

        _meetingDisplayTextMesh.text = newText;
    }
“删除” “Update()” 方法,并在返回 Unity 之前在 Visual Studio 中“保存所做的更改”。
第 6 章 - 创建 Graph 类
下一个要创建的脚本是“Graph”脚本。 该脚本负责进行调用以对用户进行身份验证,并从用户的日历中检索当天计划的会议。
若要创建此类,请执行以下操作:
双击“脚本”文件夹,将其打开。
右键单击“脚本”文件夹,然后单击“创建”>“C# 脚本”。 将脚本命名为“Graph”。
双击该脚本以通过 Visual Studio 打开它。
插入以下命名空间:
using System.Collections.Generic;
using UnityEngine;
using Microsoft.Identity.Client;
using System;
using System.Threading.Tasks;

#if !UNITY_EDITOR && UNITY_WSA
using System.Net.Http;
using System.Net.Http.Headers;
using Windows.Storage;
#endif
重要
你会注意到此脚本中的部分代码环绕着预编译指令,这是为了避免在生成 Visual Studio 解决方案时出现库问题。
删除 Start() 和 Update() 方法,因为不会用到它们。
在 “Graph” 类之外,插入以下对象,这些对象是反序列化代表每日计划会议的 JSON 对象所必需的:
/// <summary>
/// The object hosting the scheduled meetings
/// </summary>
[Serializable]
public class Rootobject
{
    public List<Value> value;
}

[Serializable]
public class Value
{
    public string subject { get; set; }
    public StartTime start { get; set; }
    public Location location { get; set; }
}

[Serializable]
public class StartTime
{
    public string dateTime;

    private DateTime? _startDateTime;
    public DateTime StartDateTime
    {
        get
        {
            if (_startDateTime != null)
                return _startDateTime.Value;
            DateTime dt;
            DateTime.TryParse(dateTime, out dt);
            _startDateTime = dt;
            return _startDateTime.Value;
        }
    }
}

[Serializable]
public class Location
{
    public string displayName { get; set; }
}
在 “Graph” 类中,添加以下变量:
    /// <summary>
    /// Insert your Application Id here
    /// </summary>
    private string _appId = "-- Insert your Application Id here --";

    /// <summary>
    /// Application scopes, determine Microsoft Graph accessibility level to user account
    /// </summary>
    private IEnumerable<string> _scopes = new List<string>() { "User.Read", "Calendars.Read" };

    /// <summary>
    /// Microsoft Graph API, user reference
    /// </summary>
    private PublicClientApplication _client;

    /// <summary>
    /// Microsoft Graph API, authentication
    /// </summary>
    private AuthenticationResult _authResult;
注意
将 “appId” 值更改为你在第 1 章第 4 步中记下的“应用 ID”。 此值应与应用程序注册页上的“应用程序注册门户”中显示的值相同。
在 “Graph” 类中,添加 “SignInAsync()” 和 “AquireTokenAsync()” 方法,这将提示用户插入登录凭据。
    /// <summary>
    /// Begin the Sign In process using Microsoft Graph Library
    /// </summary>
    internal async void SignInAsync()
    {
#if !UNITY_EDITOR && UNITY_WSA
        // Set up Grap user settings, determine if needs auth
        ApplicationDataContainer localSettings = ApplicationData.Current.LocalSettings;
        string userId = localSettings.Values["UserId"] as string;
        _client = new PublicClientApplication(_appId);

        // Attempt authentication
        _authResult = await AcquireTokenAsync(_client, _scopes, userId);

        // If authentication is successful, retrieve the meetings
        if (!string.IsNullOrEmpty(_authResult.AccessToken))
        {
            // Once Auth as been completed, find the meetings for the day
            await ListMeetingsAsync(_authResult.AccessToken);
        }
#endif
    }

    /// <summary>
    /// Attempt to retrieve the Access Token by either retrieving
    /// previously stored credentials or by prompting user to Login
    /// </summary>
    private async Task<AuthenticationResult> AcquireTokenAsync(
        IPublicClientApplication app, IEnumerable<string> scopes, string userId)
    {
        IUser user = !string.IsNullOrEmpty(userId) ? app.GetUser(userId) : null;
        string userName = user != null ? user.Name : "null";

        // Once the User name is found, display it as a welcome message
        MeetingsUI.Instance.WelcomeUser(userName);

        // Attempt to Log In the user with a pre-stored token. Only happens
        // in case the user Logged In with this app on this device previously
        try
        {
            _authResult = await app.AcquireTokenSilentAsync(scopes, user);
        }
        catch (MsalUiRequiredException)
        {
            // Pre-stored token not found, prompt the user to log-in
            try
            {
                _authResult = await app.AcquireTokenAsync(scopes);
            }
            catch (MsalException msalex)
            {
                Debug.Log($"Error Acquiring Token: {msalex.Message}");
                return _authResult;
            }
        }

        MeetingsUI.Instance.WelcomeUser(_authResult.User.Name);

#if !UNITY_EDITOR && UNITY_WSA
        ApplicationData.Current.LocalSettings.Values["UserId"] =
        _authResult.User.Identifier;
#endif
        return _authResult;
    }
添加以下两种方法:
“BuildTodayCalendarEndpoint()”,用于生成指定日期和时间跨度的 URI,可在其中检索计划的会议。
“ListMeetingsAsync()”,用于从 Microsoft Graph 请求计划的会议。
    /// <summary>
    /// Build the endpoint to retrieve the meetings for the current day.
    /// </summary>
    /// <returns>Returns the Calendar Endpoint</returns>
    public string BuildTodayCalendarEndpoint()
    {
        DateTime startOfTheDay = DateTime.Today.AddDays(0);
        DateTime endOfTheDay = DateTime.Today.AddDays(1);
        DateTime startOfTheDayUTC = startOfTheDay.ToUniversalTime();
        DateTime endOfTheDayUTC = endOfTheDay.ToUniversalTime();

        string todayDate = startOfTheDayUTC.ToString("o");
        string tomorrowDate = endOfTheDayUTC.ToString("o");
        string todayCalendarEndpoint = string.Format(
            "https://graph.microsoft.com/v1.0/me/calendarview?startdatetime={0}&enddatetime={1}",
            todayDate,
            tomorrowDate);

        return todayCalendarEndpoint;
    }

    /// <summary>
    /// Request all the scheduled meetings for the current day.
    /// </summary>
    private async Task ListMeetingsAsync(string accessToken)
    {
#if !UNITY_EDITOR && UNITY_WSA
        var http = new HttpClient();

        http.DefaultRequestHeaders.Authorization =
        new AuthenticationHeaderValue("Bearer", accessToken);
        var response = await http.GetAsync(BuildTodayCalendarEndpoint());

        var jsonResponse = await response.Content.ReadAsStringAsync();

        Rootobject rootObject = new Rootobject();
        try
        {
            // Parse the JSON response.
            rootObject = JsonUtility.FromJson<Rootobject>(jsonResponse);

            // Sort the meeting list by starting time.
            rootObject.value.Sort((x, y) => DateTime.Compare(x.start.StartDateTime, y.start.StartDateTime));

            // Populate the UI with the meetings.
            for (int i = 0; i < rootObject.value.Count; i++)
            {
                MeetingsUI.Instance.AddMeeting(rootObject.value[i].subject,
                                            rootObject.value[i].start.StartDateTime.ToLocalTime(),
                                            rootObject.value[i].location.displayName);
            }
        }
        catch (Exception ex)
        {
            Debug.Log($"Error = {ex.Message}");
            return;
        }
#endif
    }
现在,你已经完成了 “Graph” 脚本。 返回到 Unity 之前,请在 Visual Studio 中“保存所做的更改”。
第 7 章 - 创建 GazeInput 脚本
现在,你将创建 “GazeInput”。 此类使用来自“主相机”的“光线投射”处理并跟踪用户的凝视,并向前投影。
若要创建脚本:
双击“脚本”文件夹,将其打开。
右键单击“脚本”文件夹,然后单击“创建”>“C# 脚本”。 将脚本命名为“GazeInput”。
双击该脚本以通过 Visual Studio 打开它。
更改命名空间代码以匹配以下代码,同时在 “GazeInput” 类上方添加“[System.Serializable]”标记,以便对其进行序列化:
using UnityEngine;

/// <summary>
/// Class responsible for the User's Gaze interactions
/// </summary>
[System.Serializable]
public class GazeInput : MonoBehaviour
{
在 “GazeInput” 类中,添加以下变量:
    [Tooltip("Used to compare whether an object is to be interacted with.")]
    internal string InteractibleTag = "SignInButton";

    /// <summary>
    /// Length of the gaze
    /// </summary>
    internal float GazeMaxDistance = 300;

    /// <summary>
    /// Object currently gazed
    /// </summary>
    internal GameObject FocusedObject { get; private set; }

    internal GameObject oldFocusedObject { get; private set; }

    internal RaycastHit HitInfo { get; private set; }

    /// <summary>
    /// Cursor object visible in the scene
    /// </summary>
    internal GameObject Cursor { get; private set; }

    internal bool Hit { get; private set; }

    internal Vector3 Position { get; private set; }

    internal Vector3 Normal { get; private set; }

    private Vector3 _gazeOrigin;

    private Vector3 _gazeDirection;
添加 “CreateCursor()” 方法以在场景中创建 HoloLens 光标,并从 “Start()” 方法调用该方法:
    /// <summary>
    /// Start method used upon initialisation.
    /// </summary>
    internal virtual void Start()
    {
        FocusedObject = null;
        Cursor = CreateCursor();
    }

    /// <summary>
    /// Method to create a cursor object.
    /// </summary>
    internal GameObject CreateCursor()
    {
        GameObject newCursor = GameObject.CreatePrimitive(PrimitiveType.Sphere);
        newCursor.SetActive(false);
        // Remove the collider, so it doesn't block raycast.
        Destroy(newCursor.GetComponent<SphereCollider>());
        newCursor.transform.localScale = new Vector3(0.05f, 0.05f, 0.05f);
        Material mat = new Material(Shader.Find("Diffuse"));
        newCursor.GetComponent<MeshRenderer>().material = mat;
        mat.color = Color.HSVToRGB(0.0223f, 0.7922f, 1.000f);
        newCursor.SetActive(true);

        return newCursor;
    }
以下方法可启用凝视光线投射并跟踪聚焦对象。
/// <summary>
/// Called every frame
/// </summary>
internal virtual void Update()
{
    _gazeOrigin = Camera.main.transform.position;

    _gazeDirection = Camera.main.transform.forward;

    UpdateRaycast();
}
/// <summary>
/// Reset the old focused object, stop the gaze timer, and send data if it
/// is greater than one.
/// </summary>
private void ResetFocusedObject()
{
    // Ensure the old focused object is not null.
    if (oldFocusedObject != null)
    {
        if (oldFocusedObject.CompareTag(InteractibleTag))
        {
            // Provide the 'Gaze Exited' event.
            oldFocusedObject.SendMessage("OnGazeExited", SendMessageOptions.DontRequireReceiver);
        }
    }
}
private void UpdateRaycast() { // Set the old focused gameobject. oldFocusedObject = FocusedObject; RaycastHit hitInfo; // Initialise Raycasting. Hit = Physics.Raycast(_gazeOrigin, _gazeDirection, out hitInfo, GazeMaxDistance); HitInfo = hitInfo; // Check whether raycast has hit. if (Hit == true) { Position = hitInfo.point; Normal = hitInfo.normal; // Check whether the hit has a collider. if (hitInfo.collider != null) { // Set the focused object with what the user just looked at. FocusedObject = hitInfo.collider.gameObject; } else { // Object looked on is not valid, set focused gameobject to null. FocusedObject = null; } } else { // No object looked upon, set focused gameobject to null. FocusedObject = null; // Provide default position for cursor. Position = _gazeOrigin + (_gazeDirection * GazeMaxDistance); // Provide a default normal. Normal = _gazeDirection; } // Lerp the cursor to the given position, which helps to stabilize the gaze. Cursor.transform.position = Vector3.Lerp(Cursor.transform.position, Position, 0.6f); // Check whether the previous focused object is this same. If so, reset the focused object. if (FocusedObject != oldFocusedObject) { ResetFocusedObject(); if (FocusedObject != null) { if (FocusedObject.CompareTag(InteractibleTag)) { // Provide the 'Gaze Entered' event. FocusedObject.SendMessage("OnGazeEntered", SendMessageOptions.DontRequireReceiver); } } } }返回到 Unity 之前,请在 Visual Studio 中“保存所做的更改”。
第 8 章 - 创建 Interactions 类
现在,你需要创建 “Interactions” 脚本,它负责:
处理“点击”交互和“相机凝视”,使用户能够与场景中的登录“按钮”进行交互。
在场景中创建登录“按钮”对象以供用户交互。
若要创建脚本:
双击“脚本”文件夹,将其打开。
右键单击“脚本”文件夹,然后单击“创建”>“C# 脚本”。 将脚本命名为“Interactions”。
双击该脚本以通过 Visual Studio 打开它。
插入以下命名空间:
using UnityEngine;
using UnityEngine.XR.WSA.Input;
将 “Interaction” 类的继承从 MonoBehaviour 更改为 “GazeInput”。
公共类 Interactions:MonoBehaviourpublic class Interactions : GazeInput在 “Interaction” 类中插入以下变量:
    /// <summary>
    /// Allows input recognition with the HoloLens
    /// </summary>
    private GestureRecognizer _gestureRecognizer;
替换 “Start” 方法;请注意,它是一个重写方法,它调用“基本”Gaze 类方法。 当类初始化时,将调用 “Start()”,以便注册初始识别并在场景中创建登录按钮:
    /// <summary>
    /// Called on initialization, after Awake
    /// </summary>
    internal override void Start()
    {
        base.Start();

        // Register the application to recognize HoloLens user inputs
        _gestureRecognizer = new GestureRecognizer();
        _gestureRecognizer.SetRecognizableGestures(GestureSettings.Tap);
        _gestureRecognizer.Tapped += GestureRecognizer_Tapped;
        _gestureRecognizer.StartCapturingGestures();

        // Add the Graph script to this object
        gameObject.AddComponent<MeetingsUI>();
        CreateSignInButton();
    }
添加 “CreateSignInButton()” 方法,该方法将实例化场景中的登录按钮并设置其属性:
    /// <summary>
    /// Create the sign in button object in the scene
    /// and sets its properties
    /// </summary>
    void CreateSignInButton()
    {
        GameObject signInButton = GameObject.CreatePrimitive(PrimitiveType.Sphere);

        Material mat = new Material(Shader.Find("Diffuse"));
        signInButton.GetComponent<Renderer>().material = mat;
        mat.color = Color.blue;

        signInButton.transform.position = new Vector3(3.5f, 2f, 9f);
        signInButton.tag = "SignInButton";
        signInButton.AddComponent<Graph>();
    }
添加 “GestureRecognizer_Tapped()” 方法,该方法响应“点击”用户事件。
    /// <summary>
    /// Detects the User Tap Input
    /// </summary>
    private void GestureRecognizer_Tapped(TappedEventArgs obj)
    {
        if(base.FocusedObject != null)
        {
            Debug.Log($"TAP on {base.FocusedObject.name}");
            base.FocusedObject.SendMessage("SignInAsync", SendMessageOptions.RequireReceiver);
        }
    }
“删除” “Update()” 方法,然后在返回 Unity 之前在 Visual Studio 中“保存所做的更改”。
第 9 章 - 设置脚本引用
在本章中,需要将 “Interactions” 脚本放置在“主相机”上。 然后,该脚本会负责将其他脚本放置在需要的位置。
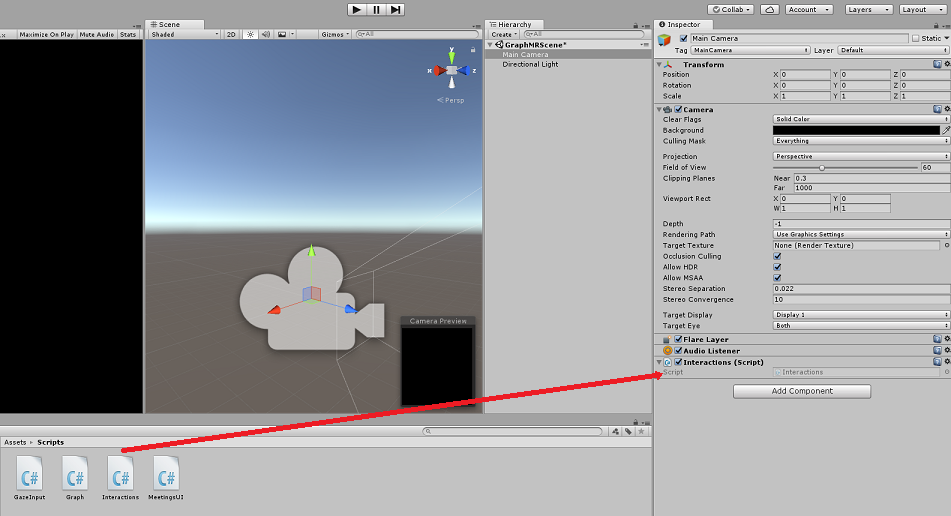
从项目面板的“脚本”文件夹中,将 “Interactions” 脚本拖到“主相机”对象,如下图所示。
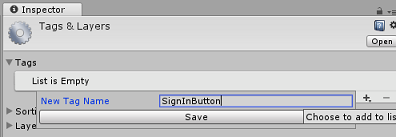
第 10 章 - 设置标记
处理凝视的代码将使用 “SignInButton” 标记来识别用户将与哪个对象交互以登录 Microsoft Graph。
创建标记:
在 Unity 编辑器中,单击“层次结构面板”中的“主相机”。
在“检查器面板”中,单击“MainCamera”标记以打开下拉列表。 单击“添加标记...”。
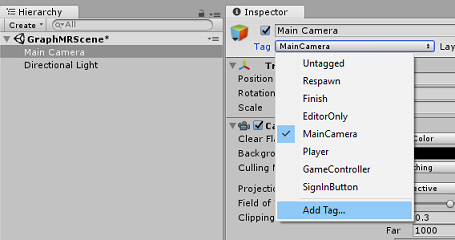
单击“”+按钮。

将标记名称写为 “SignInButton”,然后单击“保存”。
第 11 章 - 将 Unity 项目生成到 UWP
此项目的 Unity 部分所需的一切现已完成,接下来要从 Unity 生成它。
导航到“生成设置”(“文件”>“生成设置”)。
如果尚未勾选“Unity C# 项目”,请勾选。
单击“生成”。 Unity 将启动“文件资源管理器”窗口,你需要在其中创建并选择一个文件夹来生成应用。 现在创建该文件夹,并将其命名为“应用”。 选择“应用”文件夹,然后,单击“选择文件夹”。
Unity 将开始将项目生成到“应用”文件夹。
Unity 完成生成(可能需要一些时间)后,会在生成位置打开“文件资源管理器”窗口(检查任务栏,因为它可能不会始终显示在窗口上方,但会通知你增加了一个新窗口)。
第 12 章 - 部署到 HoloLens
在 HoloLens 上部署:
将需要 HoloLens 的 IP 地址(用于远程部署),并确保 HoloLens 处于开发人员模式。为此,请执行以下操作:
佩戴 HoloLens 时,打开“设置”。
转到“网络和 Internet”>“Wi-Fi”>“高级选项”
记下 “IPv4” 地址。
接下来,导航回“设置”,然后转到“更新和安全”>“对于开发人员”
设置“开发人员模式”。
导航到新的 Unity 生成(“应用”文件夹)并使用 Visual Studio 打开解决方案文件。
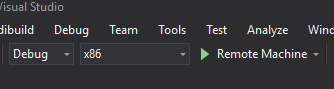
在“解决方案配置”中,选择“调试”。
在“解决方案平台”中,选择“x86,远程计算机”。 系统将提示你插入远程设备的 IP 地址(在本例中为 HoloLens,你之前记下了该地址)。
转到“生成”菜单,并单击“部署解决方案”,将应用程序旁加载到 HoloLens。
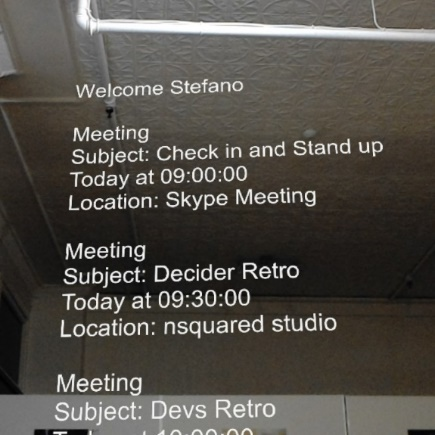
你的应用现在应显示在 HoloLens 上的已安装应用列表中,随时可以启动!
Microsoft Graph HoloLens 应用程序
恭喜,你构建了一个利用 Microsoft Graph 来读取和显示用户日历数据的混合现实应用。
额外练习
练习 1
使用 Microsoft Graph 显示有关用户的其他信息
- 用户电子邮件/电话号码/个人资料图片
练习 1
实现语音控制以导航 Microsoft Graph UI。