MR 输入 213:运动控制器
注意
混合现实学院教程在制作时考虑到了 HoloLens(第一代)和混合现实沉浸式头戴显示设备。 因此,对于仍在寻求这些设备的开发指导的开发人员而言,我们觉得很有必要保留这些教程。 我们不会在这些教程中更新 HoloLens 2 所用的最新工具集或集成相关的内容。 我们将维护这些教程,使之持续适用于支持的设备。 已经为 HoloLens 2 发布了一系列新教程。
混合现实世界中的运动控制器增加了另一个交互层。 使用运动控制器,我们能够以更自然的方式直接与对象交互,类似于我们在现实生活中的物理交互,从而提高应用体验的沉浸感和愉悦感。
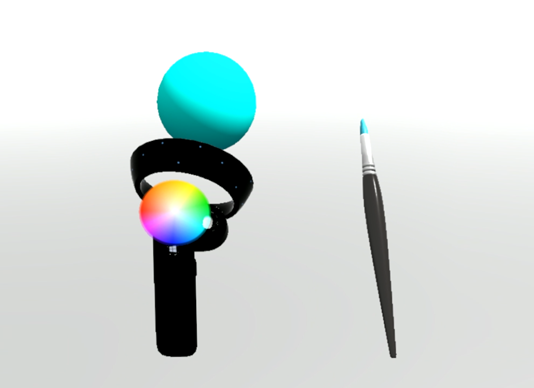
在 MR 输入 213 中,我们将通过创建简单的空间绘画体验来探索运动控制器的输入事件。 在此应用中,用户可以用各种类型的画笔和颜色在三维空间中绘画。
本教程中涵盖的主题
 |
 |
 |
|---|---|---|
| 控制器可视化 | 控制器输入事件 | 自定义控制器和 UI |
| 了解如何在 Unity 的游戏模式下和运行时中渲染运动控制器模型。 | 了解不同类型的按钮事件及其应用方案。 | 了解如何在控制器顶部叠加 UI 元素或全面自定义控制器。 |
设备支持
| 课程 | HoloLens | 沉浸式头戴显示设备 |
|---|---|---|
| MR 输入 213:运动控制器 | ✔ |
开始之前
先决条件
请参阅此页上的沉浸式头戴显示设备安装清单。
- 本教程需要 Unity 2017.2.1p2
项目文件
- 下载项目所需的文件并将这些文件解压缩到桌面。
注意
如果要在下载源代码之前查看它,可以在 GitHub 上查看。
Unity 设置
目标
- 为 Windows Mixed Reality 开发优化 Unity
- 设置混合现实相机
- 设置环境
说明
启动 “Unity”。
选择打开。
导航到桌面,找到前面解压缩的 MixedReality213-master 文件夹。
单击选择文件夹。
Unity 加载完项目文件后,你可以看到 Unity 编辑器。
在 Unity 中,选择“文件”>“生成设置”。
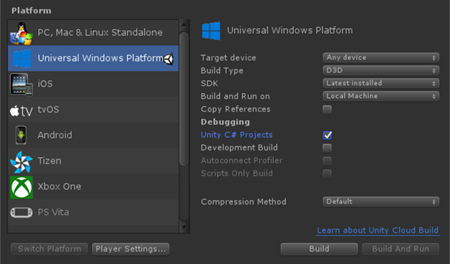
在“平台”列表中选择“通用 Windows 平台”,然后单击“切换平台”按钮。
将“目标设备”设置为“任何设备”
将“生成类型”设置为“D3D”
将“SDK”设置为“最新安装版本”
选中“Unity C# 项目”
- 这样,无需重新生成 Unity 项目就能修改 Visual Studio 项目中的脚本文件。
单击“播放器设置”。
在“检查器”面板中,向下滚动到底部
在“XR 设置”中,选中“支持虚拟现实”
在“虚拟现实 SDK”下,选择“Windows Mixed Reality”
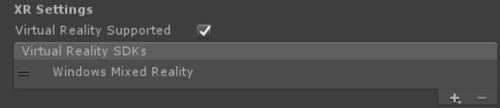
关闭“生成设置”窗口。
项目结构
本教程使用混合现实工具包 - Unity。 可以在此页上找到所需版本。
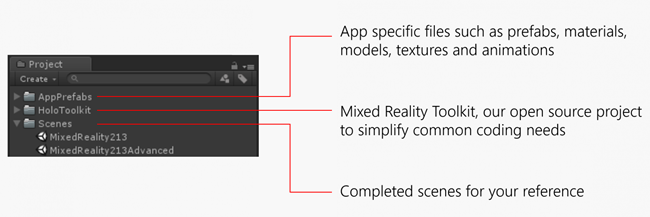
供参考的已完成场景
- 可以在 Scenes 文件夹下找到两个已完成的 Unity 场景。
- MixedReality213:使用一支画笔完成的场景
- MixedReality213Advanced:使用多支画笔完成的高级设计场景
用于教程的新场景设置
在 Unity 中,单击“文件”>“新建场景”
删除“主相机”和“定向光”
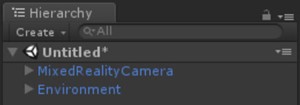
在“项目”面板中,搜索以下预制件并将其拖放到“层次结构”面板中:
- Assets/HoloToolkit/Input/Prefabs/MixedRealityCamera
- Assets/AppPrefabs/Environment
混合现实工具包中有两个相机预制件:
- MixedRealityCamera.prefab:仅相机
- MixedRealityCameraParent.prefab:相机 + 传送 + 边界
- 在本教程中,我们将使用没有传送功能的 MixedRealityCamera。 因此,我们添加了简单的“Environment”预制件,其中包含一个基本地面,使用户感觉像是站在地上。
- 若要详细了解如何使用 MixedRealityCameraParent 进行传送,请参阅高级设计 - 传送和位移
天空盒设置
单击“窗口”>“照明”>“设置”
单击“天空盒材料”字段右侧的圆圈
键入“灰色”并选择“SkyboxGray”(Assets/AppPrefabs/Support/Materials/SkyboxGray.mat)
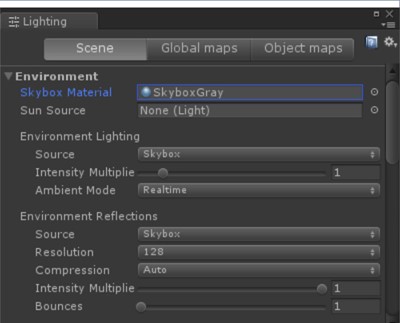
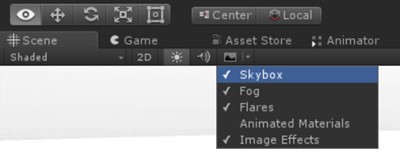
选中“天空盒”选项,以便能够查看分配的灰色渐变天空盒
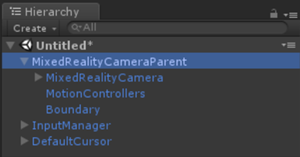
包含 MixedRealityCamera、Environment 和灰色天空盒的场景如下所示。
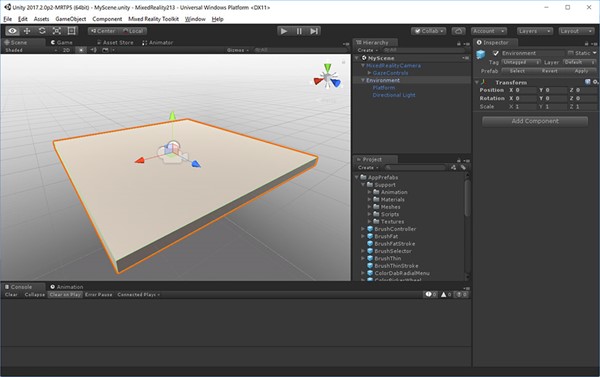
单击“文件”>“场景另存为”
在 Scenes 文件夹下以任意名称保存场景
第 1 章 - 控制器可视化
目标
- 了解如何在 Unity 的游戏模式下和运行时中渲染运动控制器模型。
Windows Mixed Reality 提供动画控制器模型用于实现控制器可视化。 可通过多种方法在应用中实现控制器可视化:
- 默认 - 在不进行修改的情况下使用默认控制器
- 混合 - 使用默认控制器,但自定义其某些元素或叠加 UI 组件
- 更换 - 将你自己的自定义 3D 模型用于控制器
本章将介绍这些控制器自定义设置的示例。
说明
- 在“项目”面板上的搜索框中,键入“MotionControllers”。 也可以在 Assets/HoloToolkit/Input/Prefabs/ 下找到它。
- 将“MotionControllers”预制件拖放到“层次结构”面板中。
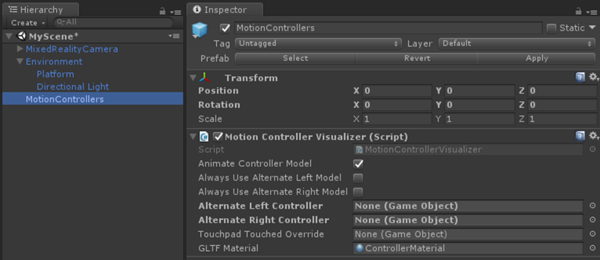
- 单击“层次结构”面板中的“MotionControllers”预制件。
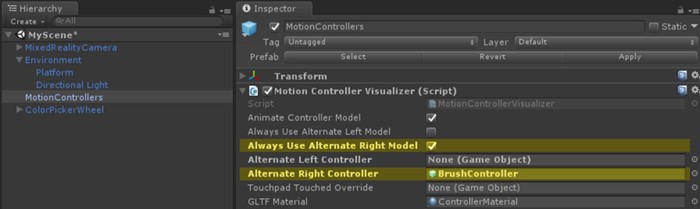
MotionControllers 预制件
MotionControllers 预制件包含一个 MotionControllerVisualizer 脚本,该脚本可为备用控制器模型提供槽。 如果你分配自己的自定义 3D 模型(例如手或剑)并选中“始终使用备用左/右模型”,则会看到这些模型而不是默认模型。 在第 4 章中,我们会使用此槽将控制器模型替换为画笔。
说明
- 在“检查器”面板中,双击“MotionControllerVisualizer”脚本查看 Visual Studio 中的代码
MotionControllerVisualizer 脚本
MotionControllerVisualizer 和 MotionControllerInfo 类提供访问和修改默认控制器模型的方法。 MotionControllerVisualizer 订阅 Unity 的 InteractionSourceDetected 事件,并在找到控制器模型时自动实例化这些模型。
protected override void Awake()
{
    ...
    InteractionManager.InteractionSourceDetected += InteractionManager_InteractionSourceDetected;
    InteractionManager.InteractionSourceLost += InteractionManager_InteractionSourceLost;
    ...
}
控制器模型是根据 glTF 规范交付的。 创建此格式是为了提供通用格式,同时改进传输和解包 3D 资产所涉及的过程。 在本例中,我们需要在运行时检索并加载控制器模型,因为我们希望用户体验尽可能顺畅,但又无法保证用户使用哪个具体的运动控制器版本。 本课程通过混合现实工具包使用 Khronos Group 的 UnityGLTF 项目的某个版本。
交付控制器后,脚本可以使用 MotionControllerInfo 查找特定控制器元素的变换,使它们能够正确定位自身。
后一章会介绍如何使用这些脚本将 UI 元素附加到控制器。
在某些脚本中,可以看到包含 #if !UNITY_EDITOR 或 UNITY_WSA 的代码块。 在部署到 Windows 时,这些代码块仅在 UWP 运行时上运行。 这是因为 Unity 编辑器和 UWP 应用运行时使用的 API 集不同。
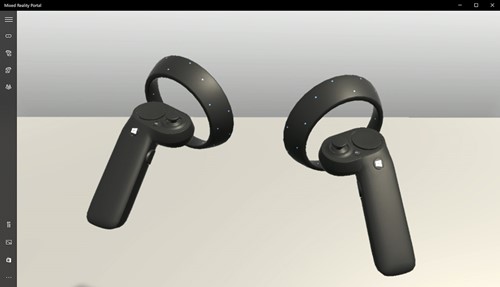
- 保存场景并单击“播放”按钮。
可以在头戴显示设备中看到包含运动控制器的场景。 可以看到按钮单击、控制杆运动和触摸板触摸突出显示的详细动画。
第 2 章 - 将 UI 元素附加到控制器
目标
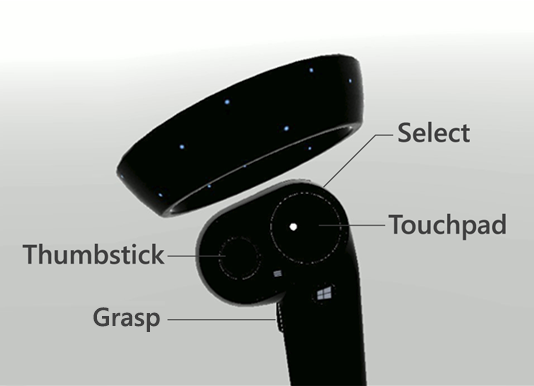
- 了解运动控制器的元素
- 了解如何将对象附加到控制器的特定部分
本章介绍如何将用户界面元素添加到用户可以随时轻松访问和操控的控制器中。 此外,介绍如何使用触摸板输入来添加简单的颜色选择器 UI。
说明
- 在“项目”面板中搜索“MotionControllerInfo”脚本。
- 在搜索结果中,双击“MotionControllerInfo”脚本以在 Visual Studio 中查看代码。
MotionControllerInfo 脚本
第一步是选择要将 UI 附加到控制器元素。 这些元素是在 MotionControllerInfo.cs 的 ControllerElementEnum 中定义的。
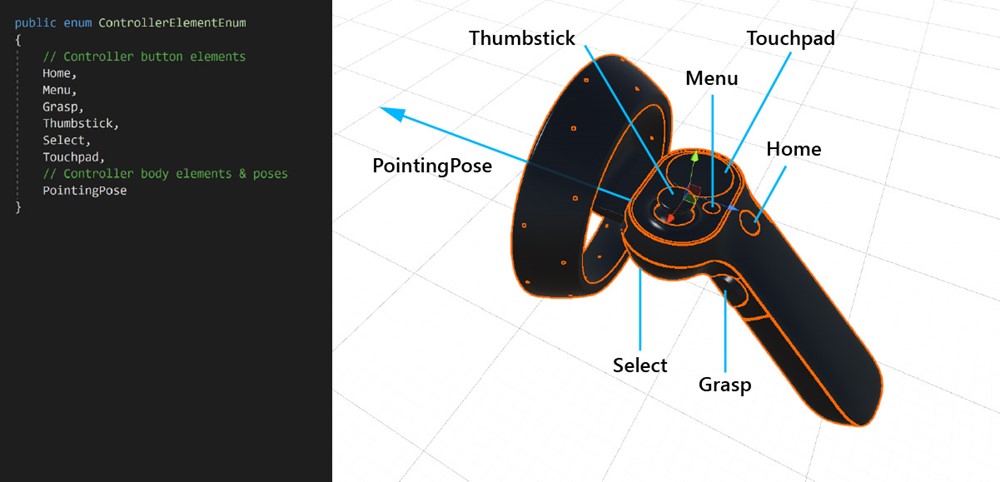
- 主页
- 菜单
- 抓取
- 控制杆
- Select
- 触摸板
- 指向姿势 – 此元素表示控制器指向前方的尖端。
说明
- 在“项目”面板中搜索“AttachToController”脚本。
- 在搜索结果中,双击“AttachToController”脚本以在 Visual Studio 中查看代码。
AttachToController 脚本
AttachToController 脚本提供一种将任何对象附加到指定控制器惯用手和元素的简单方式。
在 AttachElementToController() 中,
- 使用 MotionControllerInfo.Handedness 检查惯用手
- 使用 MotionControllerInfo.TryGetElement() 获取控制器的特定元素
- 从控制器模型中检索元素的变换后,将其下的对象设为父对象,并将对象的局部位置和旋转设置为零。
public MotionControllerInfo.ControllerElementEnum Element { get { return element; } }

private void AttachElementToController(MotionControllerInfo newController)
{
     if (!IsAttached && newController.Handedness == handedness)
     {
          if (!newController.TryGetElement(element, out elementTransform))
          {
               Debug.LogError("Unable to find element of type " + element + " under controller " + newController.ControllerParent.name + "; not attaching.");
               return;
          }

          controller = newController;

          SetChildrenActive(true);

          // Parent ourselves under the element and set our offsets
          transform.parent = elementTransform;
          transform.localPosition = positionOffset;
          transform.localEulerAngles = rotationOffset;
          if (setScaleOnAttach)
          {
               transform.localScale = scale;
          }

          // Announce that we're attached
          OnAttachToController();
          IsAttached = true;
     }
}
AttachToController 脚本的最简单用法是从它继承,就像我们在 ColorPickerWheel 中所做的那样。只需重写 OnAttachToController 和 OnDetachFromController 函数即可在检测到/断开控制器时执行设置/分解。
说明
- 在“项目”面板上的搜索框中键入“ColorPickerWheel”。 也可以在 Assets/AppPrefabs/ 下找到它。
- 将“ColorPickerWheel”预制件拖放到“层次结构”面板中。
- 单击“层次结构”面板中的“ColorPickerWheel”预制件。
- 在“检查器”面板中,双击“ColorPickerWheel”脚本以在 Visual Studio 中查看代码。
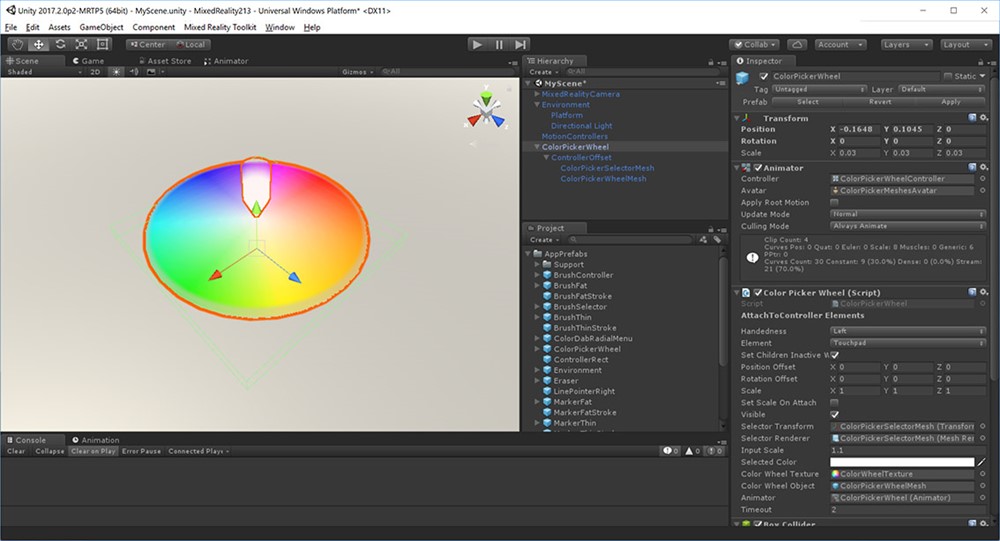
ColorPickerWheel 脚本
由于 ColorPickerWheel 继承 AttachToController,因此它会在“检查器”面板中显示 Handedness 和 Element。 我们将 UI 附加到左侧控制器上的 Touchpad 元素。
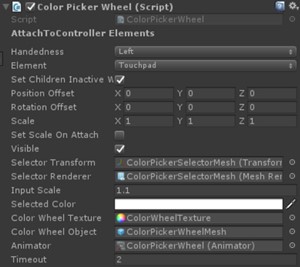
ColorPickerWheel 重写 OnAttachToController 和 OnDetachFromController 以订阅输入事件,下一章将使用该事件通过触摸板输入来选择颜色。
public class ColorPickerWheel : AttachToController, IPointerTarget
{
    protected override void OnAttachToController()
    {
        // Subscribe to input now that we're parented under the controller
        InteractionManager.InteractionSourceUpdated += InteractionSourceUpdated;
    }

    protected override void OnDetachFromController()
    {
        Visible = false;

        // Unsubscribe from input now that we've detached from the controller
        InteractionManager.InteractionSourceUpdated -= InteractionSourceUpdated;
    }
    ...
}
- 保存场景并单击“播放”按钮。
将对象附加到控制器的替代方法
建议让脚本从 AttachToController 继承并重写 OnAttachToController。 但是,这种做法并非始终可行。 替代做法是将其用作独立组件。 如果你想要在不重构脚本的情况下将现有预制件附加到控制器,则这种做法可能有用。 只需让类等待 IsAttached 设置为 true,然后再执行任何设置。 最简单的方式是使用“Start”的协同例程。
private IEnumerator Start() {
    AttachToController attach = gameObject.GetComponent<AttachToController>();

    while (!attach.IsAttached) {
        yield return null;
    }

    // Perform setup here
}
第 3 章 - 使用触摸板输入
目标
- 了解如何获取触摸板输入数据事件
- 了解如何将触摸板轴位置信息用于应用体验
说明
- 在“层次结构”面板中,单击“ColorPickerWheel”
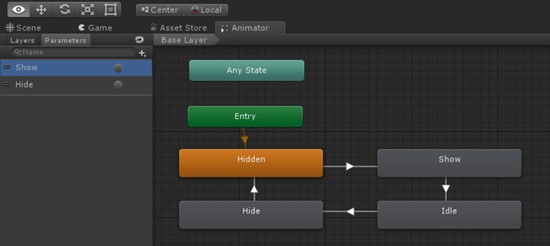
- 在“检查器”面板中的“动画程序”下,双击“ColorPickerWheelController”
- 可以看到“动画程序”选项卡已打开
使用 Unity 的动画控制器显示/隐藏 UI
为了使用动画显示和隐藏 ColorPickerWheel UI,我们使用了 Unity 的动画系统。 将 ColorPickerWheel 的 Visible 属性设置为 true 或 false 会触发 Show 和 Hide 动画触发器。 Show 和 Hide 参数是在 ColorPickerWheelController 动画控制器中定义的。
说明
- 在“层次结构”面板中,选择“ColorPickerWheel”预制件
- 在“检查器”面板中,双击“ColorPickerWheel”脚本以在 Visual Studio 中查看代码
ColorPickerWheel 脚本
ColorPickerWheel 订阅 Unity 的 InteractionSourceUpdated 事件以侦听触摸板事件。
在 InteractionSourceUpdated() 中,该脚本首先会检查并确保该事件:
- 确实是触摸板事件 (obj.state.touchpadTouched)
- 源自左侧控制器 (obj.state.source.handedness)
如果这两项检查结果均为 true,则将触摸板位置 (obj.state.touchpadPosition) 分配到 selectorPosition。
private void InteractionSourceUpdated(InteractionSourceUpdatedEventArgs obj)
{
    if (obj.state.source.handedness == handedness && obj.state.touchpadTouched)
    {
        Visible = true;
        selectorPosition = obj.state.touchpadPosition;
    }
}
在 Update() 中,该脚本基于 visible 属性在颜色选择器的动画程序组件中触发 Show 和 Hide 动画触发器
if (visible != visibleLastFrame)
{
    if (visible)
    {
        animator.SetTrigger("Show");
    }
    else
    {
        animator.SetTrigger("Hide");
    }
}
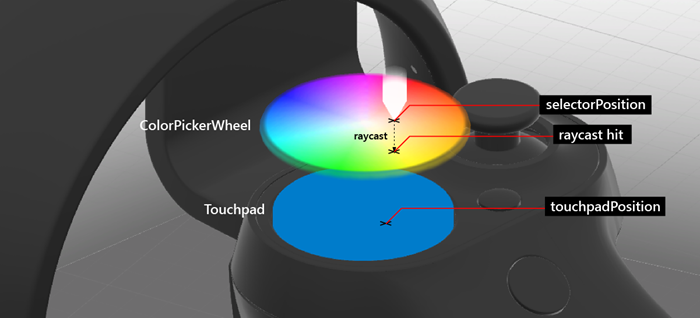
在 Update() 中,selectorPosition 用于向色轮的网格碰撞体投射光线,从而返回 UV 位置。 然后,可以使用此位置来查找色轮纹理的像素坐标和颜色值。 其他脚本可以通过 SelectedColor 属性访问此值。
...
    // Clamp selector position to a radius of 1
    Vector3 localPosition = new Vector3(selectorPosition.x * inputScale, 0.15f, selectorPosition.y * inputScale);
    if (localPosition.magnitude > 1)
    {
        localPosition = localPosition.normalized;
    }
    selectorTransform.localPosition = localPosition;

    // Raycast the wheel mesh and get its UV coordinates
    Vector3 raycastStart = selectorTransform.position + selectorTransform.up * 0.15f;
    RaycastHit hit;
    Debug.DrawLine(raycastStart, raycastStart - (selectorTransform.up * 0.25f));

    if (Physics.Raycast(raycastStart, -selectorTransform.up, out hit, 0.25f, 1 << colorWheelObject.layer, QueryTriggerInteraction.Ignore))
    {
        // Get pixel from the color wheel texture using UV coordinates
        Vector2 uv = hit.textureCoord;
        int pixelX = Mathf.FloorToInt(colorWheelTexture.width * uv.x);
        int pixelY = Mathf.FloorToInt(colorWheelTexture.height * uv.y);
        selectedColor = colorWheelTexture.GetPixel(pixelX, pixelY);
        selectedColor.a = 1f;
    }
    // Set the selector's color and blend it with white to make it visible on top of the wheel
    selectorRenderer.material.color = Color.Lerp (selectedColor, Color.white, 0.5f);
}
第 4 章 - 重写控制器模型
目标
- 了解如何使用自定义 3D 模型重写控制器模型。
说明
- 在“层次结构”面板中单击“MotionControllers”。
- 单击“备用的右侧控制器”字段右侧的圆圈。
- 键入“BrushController”并从结果中选择该预制件。 可以在 Assets/AppPrefabs/BrushController 下找到它。
- 选中“始终使用备用的右侧模型”
不一定要在“层次结构”面板中包含“BrushController”预制件。 但是,若要查看其子组件,请执行以下操作:
- 在“项目”面板中键入“BrushController”,并将“BrushController”预制件拖放到“层次结构”面板中。
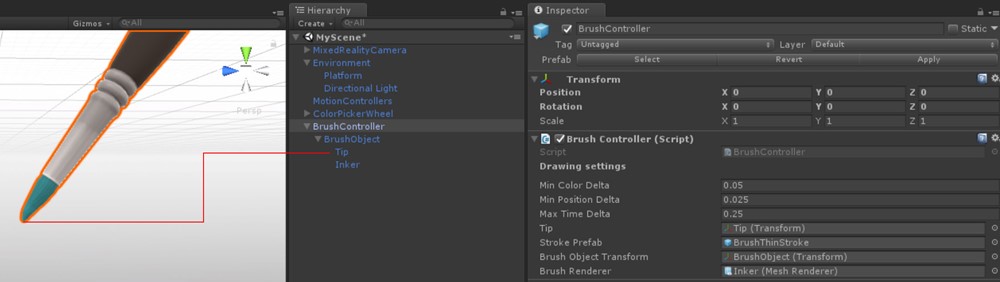
可以在“BrushController”中找到“Tip”组件。 我们将使用该组件的变换来开始/停止绘制线条。
- 从“层次结构”面板中删除“BrushController”。
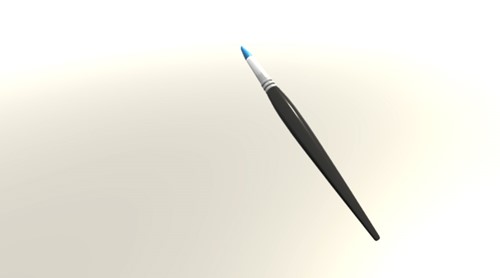
- 保存场景并单击“播放”按钮。 可以看到,画笔模型已替换了右侧的运动控制器。
第 5 章 - 使用 Select 输入来绘画
目标
- 了解如何使用 Select 按钮事件来开始和停止绘制线条
说明
- 在“项目”面板中搜索“BrushController”预制件。
- 在“检查器”面板中,双击“BrushController”脚本以在 Visual Studio 中查看代码
BrushController 脚本
BrushController 订阅 InteractionManager 的 InteractionSourcePressed 和 InteractionSourceReleased 事件。 触发 InteractionSourcePressed 事件时,画笔的 Draw 属性将设置为 true;触发 InteractionSourceReleased 事件时,画笔的 Draw 属性将设置为 false。
private void InteractionSourcePressed(InteractionSourcePressedEventArgs obj)
{
    if (obj.state.source.handedness == InteractionSourceHandedness.Right && obj.pressType == InteractionSourcePressType.Select)
    {
        Draw = true;
    }
}

private void InteractionSourceReleased(InteractionSourceReleasedEventArgs obj)
{
    if (obj.state.source.handedness == InteractionSourceHandedness.Right && obj.pressType == InteractionSourcePressType.Select)
    {
        Draw = false;
    }
}
当 Draw 设置为 true 时,画笔将在实例化的 Unity LineRenderer 中生成点。 对此预制件的引用保存在画笔的“Stroke Prefab”字段中。
private IEnumerator DrawOverTime()
{
    // Get the position of the tip
    Vector3 lastPointPosition = tip.position;

    ...

    // Create a new brush stroke
    GameObject newStroke = Instantiate(strokePrefab);
    LineRenderer line = newStroke.GetComponent<LineRenderer>();
    newStroke.transform.position = startPosition;
    line.SetPosition(0, tip.position);
    float initialWidth = line.widthMultiplier;

    // Generate points in an instantiated Unity LineRenderer
    while (draw)
    {
        // Move the last point to the draw point position
        line.SetPosition(line.positionCount - 1, tip.position);
        line.material.color = colorPicker.SelectedColor;
        brushRenderer.material.color = colorPicker.SelectedColor;
        lastPointAddedTime = Time.unscaledTime;
        // Adjust the width between 1x and 2x width based on strength of trigger pull
        line.widthMultiplier = Mathf.Lerp(initialWidth, initialWidth * 2, width);

        if (Vector3.Distance(lastPointPosition, tip.position) > minPositionDelta || Time.unscaledTime > lastPointAddedTime + maxTimeDelta)
        {
            // Spawn a new point
            lastPointAddedTime = Time.unscaledTime;
            lastPointPosition = tip.position;
            line.positionCount += 1;
            line.SetPosition(line.positionCount - 1, lastPointPosition);
        }
        yield return null;
    }
}
若要使用颜色选择器色轮 UI 中当前选择的颜色,BrushController 需要引用 ColorPickerWheel 对象。 由于 BrushController 预制件在运行时实例化为替换控制器,因此在运行时必须设置对场景中对象的任何引用。 在本例中,我们使用 GameObject.FindObjectOfType 来定位 ColorPickerWheel:
private void OnEnable()
{
    // Locate the ColorPickerWheel
    colorPicker = FindObjectOfType<ColorPickerWheel>();

    // Assign currently selected color to the brush’s material color
    brushRenderer.material.color = colorPicker.SelectedColor;
    ...
}
- 保存场景并单击“播放”按钮。 可以使用右侧控制器上的选择按钮来绘制线条和绘画。
第 6 章 - 使用 Select 输入生成对象
目标
- 了解如何使用 Select 和 Grasp 按钮输入事件
- 了解如何实例化对象
说明
在“项目”面板上的搜索框中键入“ObjectSpawner”。 也可以在 Assets/AppPrefabs/ 下找到它
将“ObjectSpawner”预制件拖放到“层次结构”面板中。
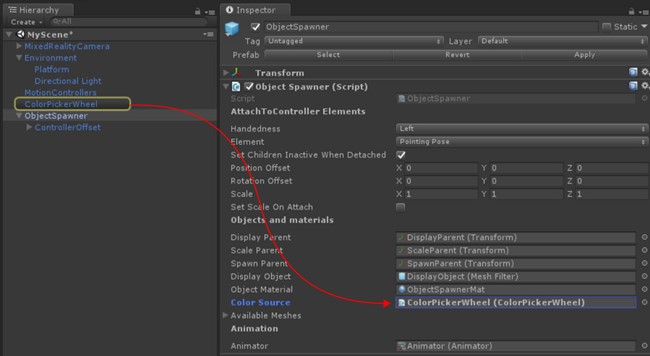
在“层次结构面板”中单击“ObjectSpawner”。
ObjectSpawner 包含一个名为“Color Source”的字段。
从“层次结构”面板中,将“ColorPickerWheel”引用拖放到此字段中。
在“层次结构”面板中单击“ObjectSpawner”预制件。
在“检查器”面板中,双击“ObjectSpawner”脚本以在 Visual Studio 中查看代码。
ObjectSpawner 脚本
ObjectSpawner 将基元网格(立方体、球体、圆柱体)的副本实例化为空间。 检测到 InteractionSourcePressed 时,该脚本会检查惯用手以及该事件是 InteractionSourcePressType.Grasp 还是 InteractionSourcePressType.Select 事件。
对于 Grasp 事件,该脚本会递增当前网格类型(球体、立方体、圆柱体)的索引
private void InteractionSourcePressed(InteractionSourcePressedEventArgs obj)
{
    // Check handedness, see if it is left controller
    if (obj.state.source.handedness == handedness)
    {
        switch (obj.pressType)
        {
            // If it is Select button event, spawn object
            case InteractionSourcePressType.Select:
                if (state == StateEnum.Idle)
                {
                    // We've pressed the grasp - enter spawning state
                    state = StateEnum.Spawning;
                    SpawnObject();
                }
                break;

            // If it is Grasp button event
            case InteractionSourcePressType.Grasp:

                // Increment the index of current mesh type (sphere, cube, cylinder)
                meshIndex++;
                if (meshIndex >= NumAvailableMeshes)
                {
                    meshIndex = 0;
                }
                break;

            default:
                break;
        }
    }
}
对于 Select 事件,会在 SpawnObject() 中实例化一个新对象、取消其父级设置并将其释放到世界中。
private void SpawnObject()
{
    // Instantiate the spawned object
    GameObject newObject = Instantiate(displayObject.gameObject, spawnParent);
    // Detach the newly spawned object
    newObject.transform.parent = null;
    // Reset the scale transform to 1
    scaleParent.localScale = Vector3.one;
    // Set its material color so its material gets instantiated
    newObject.GetComponent<Renderer>().material.color = colorSource.SelectedColor;
}
ObjectSpawner 使用 ColorPickerWheel 来设置用于显示对象材料的颜色。 将为生成的对象分配此材料的一个实例,使其保留其颜色。
- 保存场景并单击“播放”按钮。
可以使用“抓取”按钮更改对象,使用“选择”按钮生成对象。
生成应用并将其部署到混合现实门户
- 在 Unity 中,选择“文件”>“生成设置”。
- 单击“添加开放场景”,将当前场景添加到“生成中的场景”。
- 单击“生成”。
- 创建名为“App”的新文件夹。
- 单击“App”文件夹。
- 单击选择文件夹。
- 完成 Unity 设置后,将出现一个文件资源管理器窗口。
- 打开“App”文件夹。
- 双击“YourSceneName.sln”Visual Studio 解决方案文件。
- 使用 Visual Studio 中的顶部工具栏,将目标从“调试”更改为“发布”,并从“ARM”更改为“X64”。
- 单击“设备”按钮旁边的下拉箭头,然后选择“本地计算机”。
- 在菜单中单击“调试”->“开始执行(不调试)”或按 Ctrl + F5。
该应用随即会生成并安装到混合现实门户中。 可以通过混合现实门户中的“开始”菜单再次启动它。
高级设计 - 采用径向布局的画笔工具
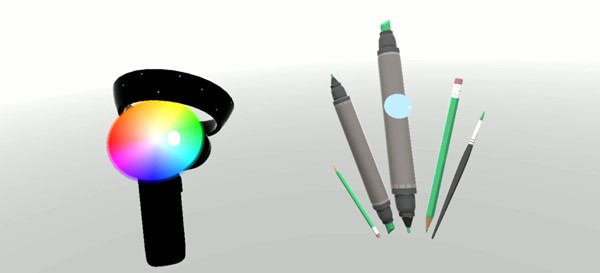
本章介绍如何使用自定义画笔工具集合来替换默认的运动控制器模型。 可以在 Scenes 文件夹下找到已完成的参考场景 MixedReality213Advanced。
说明
在“项目”面板上的搜索框中键入“BrushSelector”。 也可以在 Assets/AppPrefabs/ 下找到它
将“BrushSelector”预制件拖放到“层次结构”面板中。
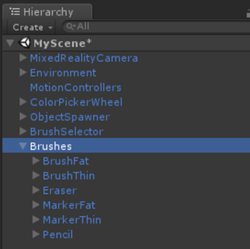
对于组织,请创建名为“Brushes”的空 GameObject
将以下预制件从“项目”面板拖放到“Brushes”中
- Assets/AppPrefabs/BrushFat
- Assets/AppPrefabs/BrushThin
- Assets/AppPrefabs/Eraser
- Assets/AppPrefabs/MarkerFat
- Assets/AppPrefabs/MarkerThin
- Assets/AppPrefabs/Pencil
在“层次结构”面板中单击“MotionControllers”预制件。
在“检查器”面板中,取消选中“运动控制器可视化工具”上的“始终使用备用的右侧模型”
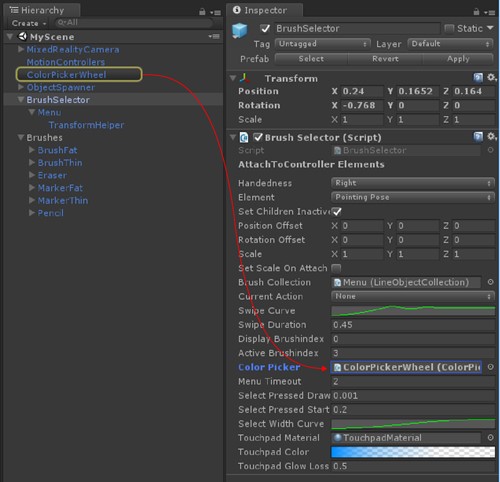
在“层次结构”面板中单击“BrushSelector”
“BrushSelector”包含名为“ColorPicker”的字段
从“层次结构”面板中,将“ColorPickerWheel”拖放到“检查器”面板上的“ColorPicker”字段中。
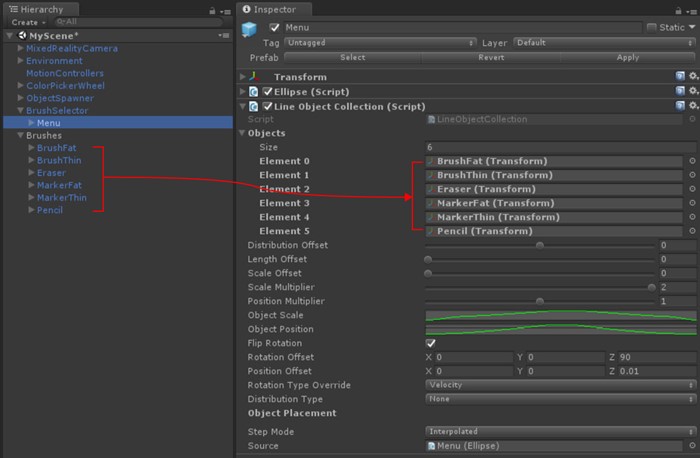
在“层次结构”面板中的“BrushSelector”预制件下,选择“Menu”对象。
在“检查器”面板中的“LineObjectCollection”组件下,打开“Objects”数组下拉列表。 你将看到 6 个空槽。
从“层次结构”面板中,将“Brushes”GameObject 下的每个预制件以任意顺序拖放到这些槽中。 (确保拖放场景中的预制件,而不是项目文件夹中的预制件。)
BrushSelector 预制件
由于 BrushSelector 继承 AttachToController,因此它会在“检查器”面板中显示“Handedness”和“Element”选项。 我们选择了“右侧”和“指向姿势”,以将画笔工具附加到右侧控制器并使其朝向前方。
BrushSelector 利用两个实用工具:
- Ellipse:用于沿椭圆形状在空间中生成点。
- LineObjectCollection:使用由任一 Line 类(例如 Ellipse)生成的点来分布对象。 这就是我们用来沿着椭圆形状放置画笔的实用工具。
将这些实用工具相结合可以创建径向菜单。
LineObjectCollection 脚本
LineObjectCollection 可以控制沿线条分布的对象的大小、位置和旋转。 这对于创建画笔选择器之类的径向菜单很有用。 为了在画笔接近中心选定位置时创建从无形到不断扩大的画笔外观,ObjectScale 曲线将在中心位置达到峰值,并在边缘位置逐渐变细。
BrushSelector 脚本
对于 BrushSelector,我们已选择使用过程动画。 首先,画笔模型通过 LineObjectCollection 脚本分布在椭圆中。 然后,每个画笔负责根据其 DisplayMode 值(该值会随着所选内容而变化)来保持其在用户手中的位置。 我们之所以选择了一种过程方法,是因为用户在选择画笔时中断画笔位置转换的概率很高。 Mecanim 动画可以正常处理中断,但它往往比简单的 Lerp 操作更复杂。
BrushSelector 结合使用这两种方法。 当检测到触摸板输入时,画笔选项将会可见并沿径向菜单放大。 在超时后(表示用户已做出选择),画笔选项将再次缩小,只留下选定的画笔。
可视化触摸板输入
即使完全替换了控制器模型,显示原始模型输入上的输入也可能有帮助。 这有助于将用户操作置于现实中。 对于 BrushSelector,我们已选择在收到输入时使触摸板短暂可见。 为此,我们将从控制器检索 Touchpad 元素,将其材料替换为自定义材料,然后根据上次接收触摸板输入的时间对该材料的颜色应用渐变。
protected override void OnAttachToController()
{
    // Turn off the default controller's renderers
    controller.SetRenderersVisible(false);

    // Get the touchpad and assign our custom material to it
    Transform touchpad;
    if (controller.TryGetElement(MotionControllerInfo.ControllerElementEnum.Touchpad, out touchpad))
    {
        touchpadRenderer = touchpad.GetComponentInChildren<MeshRenderer>();
        originalTouchpadMaterial = touchpadRenderer.material;
        touchpadRenderer.material = touchpadMaterial;
        touchpadRenderer.enabled = true;
    }

    // Subscribe to input now that we're parented under the controller
    InteractionManager.InteractionSourceUpdated += InteractionSourceUpdated;
}

private void Update()
{
    ...
    // Update our touchpad material
    Color glowColor = touchpadColor.Evaluate((Time.unscaledTime - touchpadTouchTime) / touchpadGlowLossTime);
    touchpadMaterial.SetColor("_EmissionColor", glowColor);
    touchpadMaterial.SetColor("_Color", glowColor);
    ...
}
使用触摸板输入选择画笔工具
当画笔选择器检测到触摸板的下按输入时,它会检查输入的位置以确定输入是来自左侧还是右侧。
使用 selectPressedAmount 获取笔画粗细
如果不使用 InteractionSourcePressed() 中的 InteractionSourcePressType.Select 事件,可以通过 selectPressedAmount 获取按下量的模拟值。 可以在 InteractionSourceUpdated() 中检索此值。
private void InteractionSourceUpdated(InteractionSourceUpdatedEventArgs obj)
{
    if (obj.state.source.handedness == handedness)
    {
        if (obj.state.touchpadPressed)
        {
            // Check which side we clicked
            if (obj.state.touchpadPosition.x < 0)
            {
                currentAction = SwipeEnum.Left;
            }
            else
            {
                currentAction = SwipeEnum.Right;
            }

            // Ping the touchpad material so it gets bright
            touchpadTouchTime = Time.unscaledTime;
        }

        if (activeBrush != null)
        {
            // If the pressed amount is greater than our threshold, draw
            if (obj.state.selectPressedAmount >= selectPressedDrawThreshold)
            {
                activeBrush.Draw = true;
                activeBrush.Width = ProcessSelectPressedAmount(obj.state.selectPressedAmount);
            }
            else
            {
                // Otherwise, stop drawing
                activeBrush.Draw = false;
                selectPressedSmooth = 0f;
            }
        }
    }
}
Eraser 脚本
橡皮擦是一种特殊类型的画笔,可以重写基础画笔的 DrawOverTime() 函数。 当 Draw 为 true 时,橡皮擦会检查其尖端是否与任何现有画笔笔划相交。 如果是,则将这些笔划添加到队列以进行缩小和删除。
高级设计 - 传送和位移
如果想要允许用户使用控制杆通过传送在场景中移动,请使用 MixedRealityCameraParent 而不是 MixedRealityCamera。 还需要添加 InputManager 和 DefaultCursor。 由于 MixedRealityCameraParent 已包含 MotionControllers 和 Boundary 作为子组件,因此你应该删除现有的 MotionControllers 和 Environment 预制件。
说明
在“层次结构”面板中,删除“MixedRealityCamera”、“Environment”和“MotionControllers”
在“项目”面板中,搜索以下预制件并将其拖放到“层次结构”面板中:
- Assets/AppPrefabs/Input/Prefabs/MixedRealityCameraParent
- Assets/AppPrefabs/Input/Prefabs/InputManager
- Assets/AppPrefabs/Input/Prefabs/Cursor/DefaultCursor
在“层次结构”面板中单击“输入管理器”
在“检查器”面板中,向下滚动到“简单单指针选择器”部分
从“层次结构”面板中,将“DefaultCursor”拖放到“Cursor”字段中
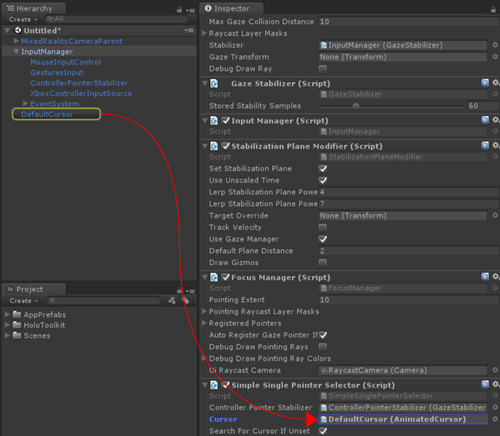
保存场景并单击“播放”按钮。 可以使用控制杆向左/向右旋转或传送。
结束
本教程到此结束! 你已了解:
- 如何在 Unity 的游戏模式下和运行时使用运动控制器模型。
- 如何使用不同类型的按钮事件及其应用方案。
- 如何在控制器顶部叠加 UI 元素或全面自定义控制器。
现在你可以开始使用运动控制器创建自己的沉浸式体验了!
已完成的场景
- 在 Unity 的“项目”面板中单击“Scenes”文件夹。
- 你将看到两个 Unity 场景:MixedReality213 和 MixedReality213Advanced。
- MixedReality213:使用一支画笔完成的场景
- MixedReality213Advanced:使用多支画笔完成的场景以及“选择”按钮的按下量示例