浮出控件
浮出控件是可显示任意 UI 作为其内容的轻型消除容器。 浮出控件可能包含其他浮出控件或上下文菜单,用于创建嵌套体验。
这是正确的控件吗?
有关何时使用浮出控件以及何时使用对话框(类似控件)的建议,请参阅对话框和浮出控件。
UWP 和 WinUI 2
重要
本文中的信息和示例是针对使用 Windows App SDK 和 WinUI 3 的应用优化的,但通常适用于使用 WinUI 2 的 UWP 应用。 有关特定于平台的信息和示例,请查看 UWP API 参考。
本部分包含在 UWP 或 WinUI 2 应用中使用该控件所需的信息。
此控件的 API 存在于 Windows.UI.Xaml.Controls 命名空间中。
- UWP API:浮出控件类、Button.Flyout 属性
- 打开 WinUI 2 库应用并查看浮出控件。 WinUI 2 库应用包括大多数 WinUI 2 控件、特性和功能的交互式示例。 通过 Microsoft Store 获取应用,或在 GitHub 上获取源代码。
建议使用最新的 WinUI 2 来获取所有控件的最新样式和模板。 WinUI 2.2 或更高版本包含此控件的使用圆角的新模板。 有关详细信息,请参阅圆角半径。
创建浮出控件
- 重要 API: 浮出控件类、 Button.Flyout 属性
WinUI 3 库应用包括大多数 WinUI 3 控件、特性和功能的交互式示例。 通过 Microsoft Store 获取应用,或在 GitHub 上获取源代码
浮出控件附加到特定控件。 可以使用 Placement 属性指定浮出控件的显示位置:Top、Left、Bottom、Right 或 Full。 如果选择“ 完全放置”模式,应用将拉伸浮出控件并将其居中,并将其居中。 某些控件(如 Button)提供可用于关联浮出控件或上下文菜单 的 Flyout 属性。
本示例创建一个简单的浮出控件,该浮出控件在按下按钮时显示一些文本。
<Button Content="Click me">
  <Button.Flyout>
     <Flyout>
        <TextBlock Text="This is a flyout!"/>
     </Flyout>
  </Button.Flyout>
</Button>
如果控件没有浮出控件属性,则可以改用 FlyoutBase.AttachedFlyout 附加属性。 执行此操作时,还需要调用 FlyoutBase.ShowAttachedFlyout 方法以显示浮出控件。
本示例向图像添加一个简单的浮出控件。 当用户点击图像时,应用会显示浮出控件。
<Image Source="Assets/cliff.jpg" Width="50" Height="50"
  Margin="10" Tapped="Image_Tapped">
  <FlyoutBase.AttachedFlyout>
    <Flyout>
      <TextBlock Text="This is some text in a flyout."  />
    </Flyout>
  </FlyoutBase.AttachedFlyout>
</Image>
private void Image_Tapped(object sender, TappedRoutedEventArgs e)
{
    FlyoutBase.ShowAttachedFlyout((FrameworkElement)sender);
}
前面的示例定义了其内联浮出控件。 还可以将浮出控件定义为静态资源,然后将其与多个元素一起使用。 此示例创建一个更复杂的浮出控件,该浮出控件在点击图像缩略图时显示更大的图像版本。
<!-- Declare the shared flyout as a resource. -->
<Page.Resources>
    <Flyout x:Key="ImagePreviewFlyout" Placement="Right">
        <!-- The flyout's DataContext must be the Image Source
             of the image the flyout is attached to. -->
        <Image Source="{Binding Path=Source}"
            MaxHeight="400" MaxWidth="400" Stretch="Uniform"/>
    </Flyout>
</Page.Resources>
<!-- Assign the flyout to each element that shares it. -->
<StackPanel>
    <Image Source="Assets/cliff.jpg" Width="50" Height="50"
           Margin="10" Tapped="Image_Tapped"
           FlyoutBase.AttachedFlyout="{StaticResource ImagePreviewFlyout}"
           DataContext="{Binding RelativeSource={RelativeSource Mode=Self}}"/>
    <Image Source="Assets/grapes.jpg" Width="50" Height="50"
           Margin="10" Tapped="Image_Tapped"
           FlyoutBase.AttachedFlyout="{StaticResource ImagePreviewFlyout}"
           DataContext="{Binding RelativeSource={RelativeSource Mode=Self}}"/>
    <Image Source="Assets/rainier.jpg" Width="50" Height="50"
           Margin="10" Tapped="Image_Tapped"
           FlyoutBase.AttachedFlyout="{StaticResource ImagePreviewFlyout}"
           DataContext="{Binding RelativeSource={RelativeSource Mode=Self}}"/>
</StackPanel>
private void Image_Tapped(object sender, TappedRoutedEventArgs e)
{
    FlyoutBase.ShowAttachedFlyout((FrameworkElement)sender);
}
设置浮出控件的样式
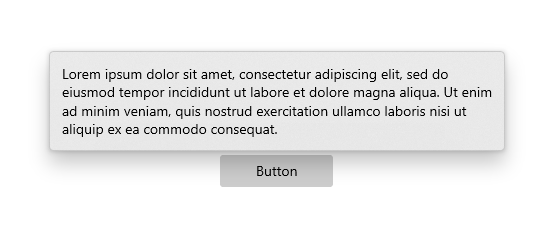
若要设置浮出控件的样式,请修改其 FlyoutPresenterStyle。 此示例显示一段环绕文本,并使屏幕阅读器可以访问文本块。

<Flyout>
  <Flyout.FlyoutPresenterStyle>
    <Style TargetType="FlyoutPresenter">
      <Setter Property="ScrollViewer.HorizontalScrollMode"
          Value="Disabled"/>
      <Setter Property="ScrollViewer.HorizontalScrollBarVisibility" Value="Disabled"/>
      <Setter Property="IsTabStop" Value="True"/>
      <Setter Property="TabNavigation" Value="Cycle"/>
    </Style>
  </Flyout.FlyoutPresenterStyle>
  <TextBlock Style="{StaticResource BodyTextBlockStyle}" Text="Lorem ipsum dolor sit amet, consectetur adipiscing elit, sed do eiusmod tempor incididunt ut labore et dolore magna aliqua. Ut enim ad minim veniam, quis nostrud exercitation ullamco laboris nisi ut aliquip ex ea commodo consequat."/>
</Flyout>
设置浮出控件样式,以实现 10 英尺体验
轻型消除控件(如浮出控件)会捕获瞬态 UI 内的键盘焦点和游戏板焦点,直到消除为止。 若要为此行为提供视觉提示,Xbox 上的轻型消除控件将绘制覆盖,以便使 UI 范围之外的对比度和可见性变暗。 可以使用 LightDismissOverlayMode 属性修改此行为。 默认情况下,浮出控件将在 Xbox(而非其他设备系列)上绘制轻型消除覆盖,不过应用可以选择强制使覆盖始终“打开”或始终“关闭”。

<MenuFlyout LightDismissOverlayMode="On">
轻型消除行为
可通过快速的轻型消除操作来关闭浮出控件,这些操作包括
- 在浮出控件之外点击
- 按 Esc 键盘键
- 按硬件或软件系统后退按钮
- 按游戏板 B 按钮
通过点击消除时,此手势通常会被吸收,不会传递到下面的 UI。 例如,如果在开放式浮出控件后有一个按钮可见,则用户的第一次点击会消除浮出控件,但不会激活此按钮。 按下该按钮需要第二次点击。
可通过将该按钮指定为浮出控件的输入直通元素来更改此行为。 浮出控件将因上述轻型消除操作而关闭,还会将点击事件传递给它的指定 OverlayInputPassThroughElement。 请考虑采用此行为,以加快功能类似项目上的用户交互。 如果你的应用有收藏夹集合并且该集合中的每个项目都包括一个附加的浮出控件,用户可能希望快速连续地与多个浮出控件进行交互。
注意
请注意不要指定会导致破坏性操作的覆盖输入直通元素。 用户已习惯谨慎执行不激活主要 UI 的轻型消除操作。 关闭、删除或类似破坏性的按钮不应在轻消除时激活,以避免意外和破坏性行为。
在下面的示例中,将在第一次点击时激活 FavoritesBar 内的所有三个按钮。
<Page>
    <Page.Resources>
        <Flyout x:Name="TravelFlyout" x:Key="TravelFlyout"
                OverlayInputPassThroughElement="{x:Bind FavoritesBar}">
            <StackPanel>
                <HyperlinkButton Content="Washington Trails Association"/>
                <HyperlinkButton Content="Washington Cascades - Go Northwest! A Travel Guide"/>
            </StackPanel>
        </Flyout>
    </Page.Resources>

    <Grid>
        <Grid.RowDefinitions>
            <RowDefinition Height="Auto"/>
            <RowDefinition Height="*"/>
        </Grid.RowDefinitions>
        <StackPanel x:Name="FavoritesBar" Orientation="Horizontal">
            <HyperlinkButton x:Name="PageLinkBtn">Bing</HyperlinkButton>
            <Button x:Name="Folder1" Content="Travel" Flyout="{StaticResource TravelFlyout}"/>
            <Button x:Name="Folder2" Content="Entertainment" Click="Folder2_Click"/>
        </StackPanel>
        <ScrollViewer Grid.Row="1">
            <WebView x:Name="WebContent"/>
        </ScrollViewer>
    </Grid>
</Page>
private void Folder2_Click(object sender, RoutedEventArgs e)
{
     Flyout flyout = new Flyout();
     flyout.OverlayInputPassThroughElement = FavoritesBar;
     ...
     flyout.ShowAt(sender as FrameworkElement);
{
获取示例代码
- WinUI 库示例 - 以交互式格式查看所有 XAML 控件。
