通过输入式注入模拟用户输入
在 Windows 应用中从键盘、鼠标、触控、触控笔和游戏板等设备模拟和自动完成用户输入。
概述
输入式注入使 Windows 应用程序可以模拟从各类输入设备的输入并将输入指向任何位置,包括应用客户端区域的外部(甚至是使用管理员权限运行的应用,如注册表编辑器)。
对于需要提供包括辅助功能、测试(临时、自动)、远程访问和支持功能等功能的 Windows 应用和工具,输入式注入非常有用。
安装
若要在你的 Windows 应用中使用输入式注入 API,你需要向应用清单添加以下项目:
- 右键单击 Package.appxmanifest 文件,然后选择“ 查看代码”。
- 将以下内容插入节点
Package:xmlns:rescap="http://schemas.microsoft.com/appx/manifest/foundation/windows10/restrictedcapabilities"IgnorableNamespaces="rescap"
- 将以下内容插入节点
Capabilities:<rescap:Capability Name="inputInjectionBrokered" />
重复用户输入
 |
|---|
| 触摸输入注入示例 |
在此示例中,我们演示如何使用输入注入 API(Windows.UI.Input.Preview.Injection)侦听应用一个区域中的鼠标输入事件,并模拟另一个区域中的相应触摸输入事件。
从输入式注入示例(鼠标到触控)下载此示例
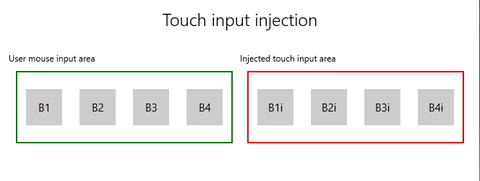
首先,我们设置 UI (MainPage.xaml)。
我们有两个网格区域(一个用于鼠标输入,一个用于注入触摸输入),每个区域有四个按钮。
注意
必须为网格背景分配值(在这种情况下为
Transparent),否则不会检测到指针事件。当在输入区域中检测到任何鼠标单击时,相应的触摸事件将注入输入注入区域。 游戏区域中会报告来自注入输入的按钮单击。
<Grid Background="{ThemeResource ApplicationPageBackgroundThemeBrush}">
    <Grid.RowDefinitions>
        <RowDefinition Height="Auto"/>
        <RowDefinition Height="Auto"/>
        <RowDefinition Height="*"/>
    </Grid.RowDefinitions>
    <StackPanel Grid.Row="0"
                Margin="10">
        <TextBlock Style="{ThemeResource TitleTextBlockStyle}"
                   Name="titleText"
                   Text="Touch input injection"
                   HorizontalTextAlignment="Center" />
        <TextBlock Style="{ThemeResource BodyTextBlockStyle}"
                   Name="statusText"
                   HorizontalTextAlignment="Center" />
    </StackPanel>
    <Grid HorizontalAlignment="Center"
                    Grid.Row="1">
        <Grid.RowDefinitions>
            <RowDefinition Height="Auto"/>
            <RowDefinition Height="*"/>
        </Grid.RowDefinitions>
        <Grid.ColumnDefinitions>
            <ColumnDefinition/>
            <ColumnDefinition/>
        </Grid.ColumnDefinitions>
        <TextBlock Grid.Column="0"
                   Grid.Row="0"
                   Style="{ThemeResource CaptionTextBlockStyle}"
                   Text="User mouse input area"/>
        <!-- Background must be set to something, otherwise pointer events are not detected. -->
        <Grid Name="ContainerInput"
              Grid.Column="0"
              Grid.Row="1"
              HorizontalAlignment="Stretch"
              Background="Transparent"
              BorderBrush="Green"
              BorderThickness="2"
              MinHeight="100" MinWidth="300"
              Margin="10">
            <Grid.ColumnDefinitions>
                <ColumnDefinition/>
                <ColumnDefinition/>
                <ColumnDefinition/>
                <ColumnDefinition/>
            </Grid.ColumnDefinitions>
            <Button Name="B1"
                    Grid.Column="0"
                    HorizontalAlignment="Center"
                    Width="50" Height="50"
                    Content="B1" />
            <Button Name="B2"
                    Grid.Column="1"
                    HorizontalAlignment="Center"
                    Width="50" Height="50"
                    Content="B2" />
            <Button Name="B3"
                    Grid.Column="2"
                    HorizontalAlignment="Center"
                    Width="50" Height="50"
                    Content="B3" />
            <Button Name="B4"
                    Grid.Column="3"
                    HorizontalAlignment="Center"
                    Width="50" Height="50"
                    Content="B4" />
        </Grid>
        <TextBlock Grid.Column="1"
                   Grid.Row="0"
                   Style="{ThemeResource CaptionTextBlockStyle}"
                   Text="Injected touch input area"/>
        <Grid Name="ContainerInject"
              Grid.Column="1"
              Grid.Row="1"
              HorizontalAlignment="Stretch"
              BorderBrush="Red"
              BorderThickness="2"
              MinHeight="100" MinWidth="300"
              Margin="10">
            <Grid.ColumnDefinitions>
                <ColumnDefinition/>
                <ColumnDefinition/>
                <ColumnDefinition/>
                <ColumnDefinition/>
            </Grid.ColumnDefinitions>
            <Button Name="B1i" Click="Button_Click_Injected"
                    Content="B1i"
                    Grid.Column="0"
                    HorizontalAlignment="Center"
                    Width="50" Height="50" />
            <Button Name="B2i" Click="Button_Click_Injected"
                    Content="B2i"
                    Grid.Column="1"
                    HorizontalAlignment="Center"
                    Width="50" Height="50" />
            <Button Name="B3i" Click="Button_Click_Injected"
                    Content="B3i"
                    Grid.Column="2"
                    HorizontalAlignment="Center"
                    Width="50" Height="50" />
            <Button Name="B4i" Click="Button_Click_Injected"
                    Content="B4i"
                    Grid.Column="3"
                    HorizontalAlignment="Center"
                    Width="50" Height="50" />
        </Grid>
    </Grid>
</Grid>
接下来,初始化应用。
在此代码片段中,我们声明全局对象,并在鼠标输入区域中声明指针事件(AddHandler)的侦听器,这些侦听器可能在按钮单击事件中标记为已处理。
InputInjector 对象表示用于发送输入数据的虚拟输入设备。
在处理程序中
ContainerInput_PointerPressed,我们调用触摸注入函数。在处理程序中
ContainerInput_PointerReleased,调用 UninitializeTouchInjection 以关闭 InputInjector 对象。public sealed partial class MainPage : Page { /// <summary> /// The virtual input device. /// </summary> InputInjector _inputInjector; /// <summary> /// Initialize the app, set the window size, /// and add pointer input handlers for the container. /// </summary> public MainPage() { this.InitializeComponent(); ApplicationView.PreferredLaunchViewSize = new Size(600, 200); ApplicationView.PreferredLaunchWindowingMode = ApplicationViewWindowingMode.PreferredLaunchViewSize; // Button handles PointerPressed/PointerReleased in // the Tapped routed event, but we need the container Grid // to handle them also. Add a handler for both // PointerPressedEvent and PointerReleasedEvent on the input Grid // and set handledEventsToo to true. ContainerInput.AddHandler(PointerPressedEvent, new PointerEventHandler(ContainerInput_PointerPressed), true); ContainerInput.AddHandler(PointerReleasedEvent, new PointerEventHandler(ContainerInput_PointerReleased), true); } /// <summary> /// PointerReleased handler for all pointer conclusion events. /// PointerPressed and PointerReleased events do not always occur /// in pairs, so your app should listen for and handle any event that /// might conclude a pointer down (such as PointerExited, PointerCanceled, /// and PointerCaptureLost). /// </summary> /// <param name="sender">Source of the click event</param> /// <param name="e">Event args for the button click routed event</param> private void ContainerInput_PointerReleased( object sender, PointerRoutedEventArgs e) { // Prevent most handlers along the event route from handling event again. e.Handled = true; // Shut down the virtual input device. _inputInjector.UninitializeTouchInjection(); } /// <summary> /// PointerPressed handler. /// PointerPressed and PointerReleased events do not always occur /// in pairs. Your app should listen for and handle any event that /// might conclude a pointer down (such as PointerExited, /// PointerCanceled, and PointerCaptureLost). /// </summary> /// <param name="sender">Source of the click event</param> /// <param name="e">Event args for the button click routed event</param> private void ContainerInput_PointerPressed( object sender, PointerRoutedEventArgs e) { // Prevent most handlers along the event route from // handling the same event again. e.Handled = true; InjectTouchForMouse(e.GetCurrentPoint(ContainerInput)); } ... }下面是触摸输入注入函数。
首先,调用 TryCreate 来实例化 InputInjector 对象。
然后,我们使用 InjectedInputVisualizationMode 的 InjectedTouchInjection 调用 InitializeTouchInjection。
Default计算注入点后,调用 InjectedInputTouchInfo 来初始化要注入的触摸点列表(在本示例中,我们将创建一个对应于鼠标输入指针的触摸点)。
最后,我们调用 InjectTouchInput 两次,第一个用于向下指针,第二个用于向上指针。
/// <summary>
/// Inject touch input on injection target corresponding
/// to mouse click on input target.
/// </summary>
/// <param name="pointerPoint">The mouse click pointer.</param>
private void InjectTouchForMouse(PointerPoint pointerPoint)
{
    // Create the touch injection object.
    _inputInjector = InputInjector.TryCreate();

    if (_inputInjector != null)
    {
        _inputInjector.InitializeTouchInjection(
            InjectedInputVisualizationMode.Default);

        // Create a unique pointer ID for the injected touch pointer.
        // Multiple input pointers would require more robust handling.
        uint pointerId = pointerPoint.PointerId + 1;

        // Get the bounding rectangle of the app window.
        Rect appBounds =
            Windows.UI.ViewManagement.ApplicationView.GetForCurrentView().VisibleBounds;

        // Get the top left screen coordinates of the app window rect.
        Point appBoundsTopLeft = new Point(appBounds.Left, appBounds.Top);

        // Get a reference to the input injection area.
        GeneralTransform injectArea =
            ContainerInject.TransformToVisual(Window.Current.Content);

        // Get the top left screen coordinates of the input injection area.
        Point injectAreaTopLeft = injectArea.TransformPoint(new Point(0, 0));

        // Get the screen coordinates (relative to the input area)
        // of the input pointer.
        int pointerPointX = (int)pointerPoint.Position.X;
        int pointerPointY = (int)pointerPoint.Position.Y;

        // Create the point for input injection and calculate its screen location.
        Point injectionPoint =
            new Point(
                appBoundsTopLeft.X + injectAreaTopLeft.X + pointerPointX,
                appBoundsTopLeft.Y + injectAreaTopLeft.Y + pointerPointY);

        // Create a touch data point for pointer down.
        // Each element in the touch data list represents a single touch contact.
        // For this example, we're mirroring a single mouse pointer.
        List<InjectedInputTouchInfo> touchData =
            new List<InjectedInputTouchInfo>
            {
                new InjectedInputTouchInfo
                {
                    Contact = new InjectedInputRectangle
                    {
                        Left = 30, Top = 30, Bottom = 30, Right = 30
                    },
                    PointerInfo = new InjectedInputPointerInfo
                    {
                        PointerId = pointerId,
                        PointerOptions =
                        InjectedInputPointerOptions.PointerDown |
                        InjectedInputPointerOptions.InContact |
                        InjectedInputPointerOptions.New,
                        TimeOffsetInMilliseconds = 0,
                        PixelLocation = new InjectedInputPoint
                        {
                            PositionX = (int)injectionPoint.X ,
                            PositionY = (int)injectionPoint.Y
                        }
                },
                Pressure = 1.0,
                TouchParameters =
                    InjectedInputTouchParameters.Pressure |
                    InjectedInputTouchParameters.Contact
            }
        };

        // Inject the touch input.
        _inputInjector.InjectTouchInput(touchData);

        // Create a touch data point for pointer up.
        touchData = new List<InjectedInputTouchInfo>
        {
            new InjectedInputTouchInfo
            {
                PointerInfo = new InjectedInputPointerInfo
                {
                    PointerId = pointerId,
                    PointerOptions = InjectedInputPointerOptions.PointerUp
                }
            }
        };

        // Inject the touch input.
        _inputInjector.InjectTouchInput(touchData);
    }
}
最后,处理输入注入区域中的任何按钮 单击 路由事件,并使用单击按钮的名称更新 UI。
