如何使用 Direct2D 设备上下文呈现
本主题介绍如何在 Windows 8 中创建 Direct2D设备上下文。 如果你使用 Direct2D 开发 Windows 应用商店应用或桌面应用,则此信息适用于你。 本主题介绍 Direct2D 设备上下文对象的用途、如何创建该对象,以及有关呈现和显示 Direct2D 基元和图像的分步指南。 你还将了解如何切换呈现目标以及向应用添加效果。
- 什么是 Direct2D 设备?
- 什么是 Direct2D 设备上下文?
- 在 Windows 8 上使用 Direct2D 进行渲染
- 为何使用设备上下文进行呈现?
- 如何创建用于呈现的 Direct2D 设备上下文
- 选择目标
- 如何呈现和显示
什么是 Direct2D 设备?
需要 Direct2D 设备和 Direct3D 设备才能创建 Direct2D 设备上下文。 Direct2D 设备 (公开 ID2D1Device 接口指针,) 表示显示适配器。 Direct3D 设备 (公开与 Direct2D 设备关联的 ID3D11Device 接口指针) 。 每个应用必须有一个 Direct2D 设备,但可以有多个 设备。
什么是 Direct2D 设备上下文?
Direct2D设备上下文 (公开 ID2D1DeviceContext 接口指针) 表示一组状态和命令缓冲区,用于呈现目标。 可以在设备上下文中调用方法,以使用设备拥有的资源来设置管道状态并生成呈现命令。
在 Windows 8 上使用 Direct2D 进行渲染
在 Windows 7 及更早版本中,可以使用 ID2D1HwndRenderTarget 或其他呈现目标接口呈现到窗口或图面。 从Windows 8开始,我们不建议使用依赖于 ID2D1HwndRenderTarget 等接口的方法进行呈现,因为它们不适用于 Windows 应用商店应用。 如果要创建桌面应用,但仍要利用 设备上下文 的其他功能,则可以使用 设备上下文 呈现到 Hwnd。 但是,使用 Direct2D 在 Windows 应用商店应用中呈现内容需要设备上下文。
为何使用设备上下文进行呈现?
- 你可以为 Windows 应用商店应用呈现。
- 可以在呈现之前、期间和呈现后随时更改呈现目标。 设备上下文可确保按顺序执行对绘图方法的调用,并在切换呈现目标时应用它们。
- 可以对设备上下文使用多种类型的窗口。 可以使用 设备上下文 和 DXGI 交换链 直接呈现到 Windows::UI::Core::CoreWindow 或 Windows:::UI::XAML::SwapChainBackgroundPanel。
- 可以使用 Direct2D设备上下文 创建 Direct2D 效果 ,并将图像效果或效果图的输出呈现给呈现器目标。
- 可以有多个 设备上下文,这有助于提高线程应用的性能。 有关详细信息 ,请参阅多线程 Direct2D 应用 。
- 设备上下文与 Direct3D 紧密互操作,使你能够更多地访问 Direct3D 选项。
如何创建用于呈现的 Direct2D 设备上下文
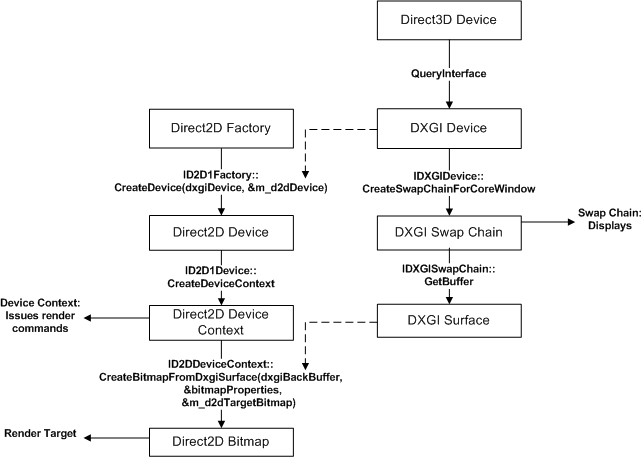
此处的代码演示如何创建 Direct3D11 设备、获取关联的 DXGI 设备、创建 Direct2D 设备,最后创建 Direct2D 设备上下文 进行呈现。
下面是方法调用和此代码使用的接口的关系图。
注意
此代码假定你已有 ID2D1Factory1 对象,有关详细信息,请参阅 ID2D1Factory 参考页。
    // This flag adds support for surfaces with a different color channel ordering than the API default.
    // You need it for compatibility with Direct2D.
    UINT creationFlags = D3D11_CREATE_DEVICE_BGRA_SUPPORT;

    // This array defines the set of DirectX hardware feature levels this app  supports.
    // The ordering is important and you should  preserve it.
    // Don't forget to declare your app's minimum required feature level in its
    // description.  All apps are assumed to support 9.1 unless otherwise stated.
    D3D_FEATURE_LEVEL featureLevels[] =
    {
        D3D_FEATURE_LEVEL_11_1,
        D3D_FEATURE_LEVEL_11_0,
        D3D_FEATURE_LEVEL_10_1,
        D3D_FEATURE_LEVEL_10_0,
        D3D_FEATURE_LEVEL_9_3,
        D3D_FEATURE_LEVEL_9_2,
        D3D_FEATURE_LEVEL_9_1
    };

    // Create the DX11 API device object, and get a corresponding context.
    ComPtr<ID3D11Device> device;
    ComPtr<ID3D11DeviceContext> context;

    DX::ThrowIfFailed(
        D3D11CreateDevice(
            nullptr,                    // specify null to use the default adapter
            D3D_DRIVER_TYPE_HARDWARE,
            0,
            creationFlags,              // optionally set debug and Direct2D compatibility flags
            featureLevels,              // list of feature levels this app can support
            ARRAYSIZE(featureLevels),   // number of possible feature levels
            D3D11_SDK_VERSION,
            &device,                    // returns the Direct3D device created
            &m_featureLevel,            // returns feature level of device created
            &context                    // returns the device immediate context
            )
        );

    ComPtr<IDXGIDevice> dxgiDevice;
    // Obtain the underlying DXGI device of the Direct3D11 device.
    DX::ThrowIfFailed(
        device.As(&dxgiDevice)
        );

    // Obtain the Direct2D device for 2-D rendering.
    DX::ThrowIfFailed(
        m_d2dFactory->CreateDevice(dxgiDevice.Get(), &m_d2dDevice)
        );

    // Get Direct2D device's corresponding device context object.
    DX::ThrowIfFailed(
        m_d2dDevice->CreateDeviceContext(
            D2D1_DEVICE_CONTEXT_OPTIONS_NONE,
            &m_d2dContext
            )
        );
让我们演练前面的代码示例中的步骤。
获取 ID3D11Device 接口指针,创建设备上下文时需要此指针。
声明一个由 D3D_FEATURE_LEVEL 条目构成的数组,表示应用将支持的功能级别集。
注意
Direct3D 搜索列表,直到找到主机系统支持的功能级别。
使用 D3D11CreateDevice 函数创建 ID3D11Device 对象,该函数还将返回 ID3D11DeviceContext 对象,但此示例不需要该对象。
查询 Direct3D 11 设备 以查找其 DXGI 设备 接口。
通过调用 ID2D1Factory::CreateDevice 方法并传入 IDXGIDevice 对象来创建 ID2D1Device 对象。
使用 ID2D1Device::CreateDeviceContext 方法创建 ID2D1DeviceContext 指针。
选择目标
此处的代码演示了如何获取窗口后退缓冲区的 二维 Direct3D 纹理 ,并创建一个位图目标,该目标链接到 Direct2D 设备上下文 所呈现的纹理。
        // Allocate a descriptor.
        DXGI_SWAP_CHAIN_DESC1 swapChainDesc = {0};
        swapChainDesc.Width = 0;                           // use automatic sizing
        swapChainDesc.Height = 0;
        swapChainDesc.Format = DXGI_FORMAT_B8G8R8A8_UNORM; // this is the most common swapchain format
        swapChainDesc.Stereo = false;
        swapChainDesc.SampleDesc.Count = 1;                // don't use multi-sampling
        swapChainDesc.SampleDesc.Quality = 0;
        swapChainDesc.BufferUsage = DXGI_USAGE_RENDER_TARGET_OUTPUT;
        swapChainDesc.BufferCount = 2;                     // use double buffering to enable flip
        swapChainDesc.Scaling = DXGI_SCALING_NONE;
        swapChainDesc.SwapEffect = DXGI_SWAP_EFFECT_FLIP_SEQUENTIAL; // all apps must use this SwapEffect
        swapChainDesc.Flags = 0;

        // Identify the physical adapter (GPU or card) this device is runs on.
        ComPtr<IDXGIAdapter> dxgiAdapter;
        DX::ThrowIfFailed(
            dxgiDevice->GetAdapter(&dxgiAdapter)
            );

        // Get the factory object that created the DXGI device.
        ComPtr<IDXGIFactory2> dxgiFactory;
        DX::ThrowIfFailed(
            dxgiAdapter->GetParent(IID_PPV_ARGS(&dxgiFactory))
            );

        // Get the final swap chain for this window from the DXGI factory.
        DX::ThrowIfFailed(
            dxgiFactory->CreateSwapChainForCoreWindow(
                device.Get(),
                reinterpret_cast<IUnknown*>(m_window),
                &swapChainDesc,
                nullptr,    // allow on all displays
                &m_swapChain
                )
            );

        // Ensure that DXGI doesn't queue more than one frame at a time.
        DX::ThrowIfFailed(
            dxgiDevice->SetMaximumFrameLatency(1)
            );

    // Get the backbuffer for this window which is be the final 3D render target.
    ComPtr<ID3D11Texture2D> backBuffer;
    DX::ThrowIfFailed(
        m_swapChain->GetBuffer(0, IID_PPV_ARGS(&backBuffer))
        );

    // Now we set up the Direct2D render target bitmap linked to the swapchain.
    // Whenever we render to this bitmap, it is directly rendered to the
    // swap chain associated with the window.
    D2D1_BITMAP_PROPERTIES1 bitmapProperties =
        BitmapProperties1(
            D2D1_BITMAP_OPTIONS_TARGET | D2D1_BITMAP_OPTIONS_CANNOT_DRAW,
            PixelFormat(DXGI_FORMAT_B8G8R8A8_UNORM, D2D1_ALPHA_MODE_IGNORE),
            m_dpi,
            m_dpi
            );

    // Direct2D needs the dxgi version of the backbuffer surface pointer.
    ComPtr<IDXGISurface> dxgiBackBuffer;
    DX::ThrowIfFailed(
        m_swapChain->GetBuffer(0, IID_PPV_ARGS(&dxgiBackBuffer))
        );

    // Get a D2D surface from the DXGI back buffer to use as the D2D render target.
    DX::ThrowIfFailed(
        m_d2dContext->CreateBitmapFromDxgiSurface(
            dxgiBackBuffer.Get(),
            &bitmapProperties,
            &m_d2dTargetBitmap
            )
        );

    // Now we can set the Direct2D render target.
    m_d2dContext->SetTarget(m_d2dTargetBitmap.Get());
让我们演练前面的代码示例中的步骤。
分配 DXGI_SWAP_CHAIN_DESC1 结构并定义 交换链的设置。
这些设置演示了如何创建 Windows 应用商店应用可以使用的交换链的示例。
获取 Direct3D 设备和DXGI 设备 正在运行的适配器,并获取与之关联的 IDXGIFactory 对象。 必须使用此 DXGI 工厂 来确保在同一适配器上创建 交换链 。
调用 IDXGIFactory2::CreateSwapChainForCoreWindow 方法来创建交换链。 将 Windows::UI::CoreWindow 类用于 Windows 应用商店应用的main窗口。
确保将最大帧延迟设置为 1 以最大程度地降低功耗。
如果要在 Windows 应用商店应用中呈现 Direct2D 内容,请参阅 CreateSwapChainForComposition 方法。
从 交换链中获取后台缓冲区。 后台缓冲区公开由交换链分配的 ID3D11Texture2D 接口
声明 D2D1_BITMAP_PROPERTIES1 结构并设置属性值。 将像素格式设置为 BGRA,因为这是 Direct3D 设备和DXGI 设备 使用的格式。
获取作为 IDXGISurface 的后台缓冲区,以传递到 Direct2D。 Direct2D 不接受 ID3D11Texture2D 直接。
使用 ID2D1DeviceContext::CreateBitmapFromDxgiSurface 方法从后台缓冲区创建 ID2D1Bitmap 对象。
现在 ,Direct2D 位图 已链接到后台缓冲区。 将 Direct2D 设备上下文 上的目标设置为 位图。
如何呈现和显示
有了目标位图后,可以使用 Direct2D 设备上下文向其绘制基元、图像、图像效果和文本。 此处的代码演示如何绘制矩形。
ComPtr<ID2D1SolidColorBrush> pBlackBrush;
DX::ThrowIfFailed(
m_d2dContext->CreateSolidColorBrush(
D2D1::ColorF(D2D1::ColorF::Black),
&pBlackBrush
)
);
m_d2dContext->BeginDraw();
m_d2dContext->DrawRectangle(
D2D1::RectF(
rc.left + 100.0f,
rc.top + 100.0f,
rc.right - 100.0f,
rc.bottom - 100.0f),
pBlackBrush);
DX::ThrowIfFailed(
m_d2dContext->EndDraw()
);
DX::ThrowIfFailed(
m_swapChain->Present1(1, 0, ¶meters);
);
让我们演练前面的代码示例中的步骤。
- 调用 CreateSolidColorBrush 以创建画笔来绘制矩形。
- 在发出任何绘图命令之前调用 BeginDraw 方法。
- 调用 DrawRectangle 方法要绘制的矩形和画笔。
- 在完成发出绘图命令后调用 EndDraw 方法。
- 通过调用 IDXGISwapChain::P resent 方法显示结果。
现在,可以使用 Direct2D 设备上下文 在屏幕上绘制基元、图像、图像效果和文本。
反馈
即将发布:在整个 2024 年,我们将逐步淘汰作为内容反馈机制的“GitHub 问题”,并将其取代为新的反馈系统。 有关详细信息,请参阅:https://aka.ms/ContentUserFeedback。
提交和查看相关反馈