你好,穿戴设备
创建第一个 Android Wear 应用,并在 Wear 仿真器或设备上运行它。 本演练分步说明如何创建一个小型 Android Wear 项目,用于处理按钮点击,并在 Wear 设备上显示一个点击计数器。 本文介绍如何使用通过蓝牙连接到 Android 手机的 Wear 仿真器或 Wear 设备调试应用。 还提供了一组用于 Android Wear 的调试提示。
你的第一个 Wear 应用
按照以下步骤创建自己的第一个 Xamarin.Android Wear 应用:
1.创建新的 Android 项目
创建新的 Android Wear 应用程序:


此模板自动包含了“Xamarin Android 可穿戴库”NuGet(和依赖项),以便你可以访问特定于 Wear 小组件。 如果未看到“Wear”模板,请查看安装和设置指南,以仔细确认是否已安装支持的 Android SDK。
2.选择正确的目标框架
确保“面向的最低 Android”设置为“Android 5.0 (Lollipop)”或更高版本:


有关设置目标框架的详细信息,请参阅了解 Android API 级别。
3.编辑 Main.axml 布局
配置布局以包含用于示例的 TextView 和 Button:
<?xml version="1.0" encoding="utf-8"?>
<FrameLayout xmlns:android="http://schemas.android.com/apk/res/android"
android:layout_width="match_parent"
android:layout_height="match_parent">
  <ScrollView
    android:id="@+id/scroll"
    android:layout_width="wrap_content"
    android:layout_height="wrap_content"
    android:background="#000000"
    android:fillViewport="true">
    <LinearLayout
      android:layout_width="match_parent"
      android:layout_height="wrap_content"
      android:orientation="vertical">
      <TextView
        android:layout_width="wrap_content"
        android:layout_height="wrap_content"
        android:layout_marginBottom="2dp"
        android:text="Main Activity"
        android:textSize="36sp"
        android:textColor="#006600" />
      <TextView
        android:layout_width="wrap_content"
        android:layout_height="wrap_content"
        android:layout_marginBottom="2dp"
        android:textColor="#cccccc"
        android:id="@+id/result" />
      <Button
        android:layout_width="match_parent"
        android:layout_height="wrap_content"
        android:onClick="showNotification"
        android:text="Click Me!"
        android:id="@+id/click_button" />
    </LinearLayout>
  </ScrollView>
</FrameLayout>
4.编辑 MainActivity.cs 源
添加代码,用于递增计数器并在单击按钮时显示它:
[Activity (Label = "WearTest", MainLauncher = true, Icon = "@drawable/icon")]
public class MainActivity : Activity
{
  int count = 1;

  protected override void OnCreate (Bundle bundle)
  {
    base.OnCreate (bundle);

    SetContentView (Resource.Layout.Main);

    Button button = FindViewById<Button> (Resource.Id.click_button);
    TextView text = FindViewById<TextView> (Resource.Id.result);

    button.Click += delegate {
      text.Text = string.Format ("{0} clicks!", count++);
    };
  }
}
5.设置仿真器或设备
下一步是设置仿真器或设备以部署和运行应用。 如果还不熟悉部署和运行 Xamarin.Android 应用的一般过程,请参阅“Hello,Android”快速入门。
如果没有 Android Wear 设备(如 Android Wear 智能手表),可以在仿真器上运行应用。 有关在仿真器上调试 Wear 应用的信息,请参阅在仿真器上调试 Android Wear。
如果有 Android Wear 设备(如 Android Wear 智能手表),可以在该设备上运行应用,而不是使用仿真器。 有关在 Wear 设备上调试的详细信息,请参阅在 Wear 设备上调试。
6.运行 Android Wear 应用
设备下拉菜单中应显示有 Android Wear 设备。 在开始调试之前,务必选择正确的 Android Wear 设备或 AVD。 选择设备后,单击“播放”按钮将应用部署到仿真器或设备。


刚开始可能会显示“请稍等...”消息(或其他过渡屏幕):
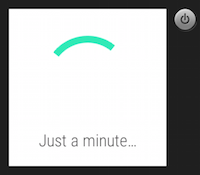
如果使用手表仿真器,启动应用时可能需要等待一段时间。 使用蓝牙时,部署应用所需的时间比通过 USB 部署的时间要长。 (例如,将此应用部署到通过蓝牙连接到 Nexus 5 手机的 LG G 手表大约需要 5 分钟。)
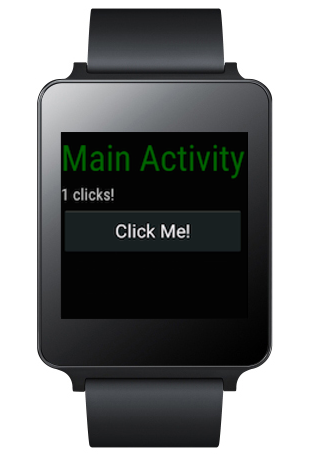
成功部署应用后,Wear 设备应会显示如下所示的屏幕:

点击 Wear 设备表面的“点击我!”按钮,每次点击时都会看到计数增加:

后续步骤
当应用可以进行分发时,请参阅打包处理。