Xamarin.iOS 中的 TextKit
TextKit 是一个新的 API,提供强大的文本布局和呈现功能。 它基于低级别核心文本框架构建,但比核心文本更容易使用。
若要使 TextKit 的功能可用于标准控件,已重新实现多个 iOS 文本控件以使用 TextKit,包括:
- UITextView
- UITextField
- UILabel
体系结构
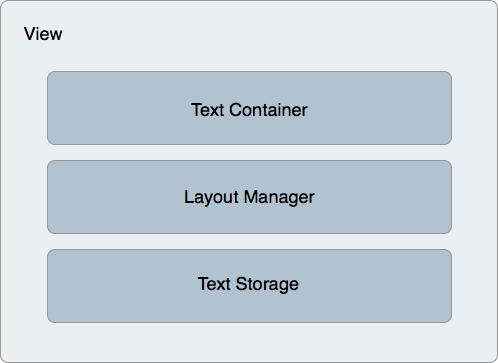
TextKit 提供了一个分层体系结构,该体系结构将文本存储与布局和显示区分开,包括以下类:
NSTextContainer– 提供用于布局文本的坐标系和几何图形。NSLayoutManager– 通过将文本转换为字形来设置文本布局。NSTextStorage– 保存文本数据,以及处理批处理文本属性更新。 任何批处理更新都交给布局管理器,以便对更改进行实际处理,例如重新计算布局并重新绘制文本。
这三个类应用于呈现文本的视图。 内置文本处理视图(如 UITextView、UITextField 和 UILabel 已设置它们),但也可以创建这些视图并将其应用于任何 UIView 实例。
下图说明了此体系结构:
文本存储和属性
NSTextStorage 类保存视图显示的文本。 它还会将文本的任何更改(如对字符的更改或其属性)传达给布局管理器以供显示。 NSTextStorage 继承自 MSMutableAttributed 字符串,允许在 BeginEditing 和 EndEditing 调用之间批量指定文本属性的更改。
例如,以下代码片段分别指定对前台和背景颜色的更改,以及针对特定范围:
textView.TextStorage.BeginEditing ();
textView.TextStorage.AddAttribute(UIStringAttributeKey.ForegroundColor, UIColor.Green, new NSRange(200, 400));
textView.TextStorage.AddAttribute(UIStringAttributeKey.BackgroundColor, UIColor.Black, new NSRange(210, 300));
textView.TextStorage.EndEditing ();
调用 EndEditing 后,更改将发送到布局管理器,后者又会执行任何必要的布局和呈现计算,以便在视图中显示文本。
具有排除路径的布局
TextKit 还支持布局,并允许复杂的方案,例如多列文本和围绕指定路径流动的文本,称为排除路径。 排除路径应用于文本容器,该容器修改文本布局的几何图形,导致文本在指定路径周围流动。
添加排除路径需要设置布局管理器上的 ExclusionPaths 属性。 设置此属性会导致布局管理器使文本布局失效,并在排除路径周围流动文本。
基于 CGPath 的排除
请考虑以下 UITextView 子类实现:
public class ExclusionPathView : UITextView
{
    CGPath exclusionPath;
    CGPoint initialPoint;
    CGPoint latestPoint;
    UIBezierPath bezierPath;

    public ExclusionPathView (string text)
    {
        Text = text;
        ContentInset = new UIEdgeInsets (20, 0, 0, 0);
        BackgroundColor = UIColor.White;
        exclusionPath = new CGPath ();
        bezierPath = UIBezierPath.Create ();

        LayoutManager.AllowsNonContiguousLayout = false;
    }

    public override void TouchesBegan (NSSet touches, UIEvent evt)
    {
        base.TouchesBegan (touches, evt);

        var touch = touches.AnyObject as UITouch;

        if (touch != null) {
            initialPoint = touch.LocationInView (this);
        }
    }

    public override void TouchesMoved (NSSet touches, UIEvent evt)
    {
        base.TouchesMoved (touches, evt);

        UITouch touch = touches.AnyObject as UITouch;

        if (touch != null) {
            latestPoint = touch.LocationInView (this);
            SetNeedsDisplay ();
        }
    }

    public override void TouchesEnded (NSSet touches, UIEvent evt)
    {
        base.TouchesEnded (touches, evt);

        bezierPath.CGPath = exclusionPath;
        TextContainer.ExclusionPaths = new UIBezierPath[] { bezierPath };
    }

    public override void Draw (CGRect rect)
    {
        base.Draw (rect);

        if (!initialPoint.IsEmpty) {

            using (var g = UIGraphics.GetCurrentContext ()) {

                g.SetLineWidth (4);
                UIColor.Blue.SetStroke ();

                if (exclusionPath.IsEmpty) {
                    exclusionPath.AddLines (new CGPoint[] { initialPoint, latestPoint });
                } else {
                    exclusionPath.AddLineToPoint (latestPoint);
                }

                g.AddPath (exclusionPath);
                g.DrawPath (CGPathDrawingMode.Stroke);
            }
        }
    }
}
此代码添加了对使用核心图形在文本视图中绘图的支持。 由于现在生成了 UITextView 类以使用 TextKit 进行文本呈现和布局,因此可以使用 TextKit 的所有功能,例如设置排除路径。
重要
此示例子类 UITextView 添加触摸绘图支持。 获取 TextKit 的功能不需要子类化 UITextView。
用户绘制文本视图后,通过设置 UIBezierPath.CGPath 属性将绘制 CGPath 应用于 UIBezierPath 实例:
bezierPath.CGPath = exclusionPath;
更新以下代码行会使文本布局围绕路径进行更新:
TextContainer.ExclusionPaths = new UIBezierPath[] { bezierPath };
以下屏幕截图说明了文本布局如何更改以在绘制路径周围流动:
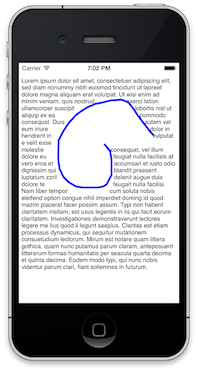
请注意,在这种情况下,布局管理器 AllowsNonContiguousLayout 属性设置为 false。 这会导致重新计算文本更改的所有情况的布局。 如果设置为 true,则避免完全布局刷新(尤其是在大型文档的情况下)可能会使性能受益。 但是,将 AllowsNonContiguousLayout 设置为 true 将阻止排除路径在某些情况下更新布局 - 例如,如果在运行时输入文本而不在设置路径之前返回尾随回车。