Xamarin.Forms ListView 是以垂直列表的形式显示数据集合的视图。 本文演示如何创建自定义呈现器来封装特定于平台的列表控件和本机单元布局,从而进一步控制本机列表控件的性能。
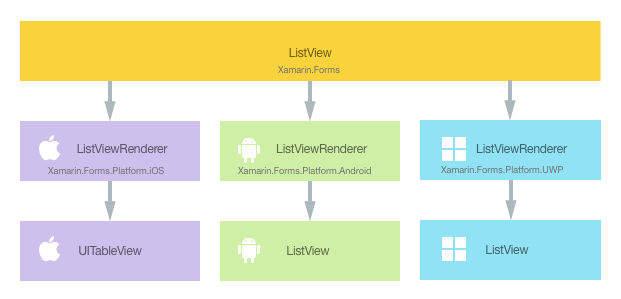
每个 Xamarin.Forms 视图都有一个附带的呈现器,适用于创建本机控件实例的各个平台。 当 Xamarin.Forms 应用程序呈现 ListView 时,将在 iOS 中实例化 ListViewRenderer 类,而该操作又会实例化本机 UITableView 控件。 在 Android 平台上,ListViewRenderer 类实例化本机 ListView 控件。 在通用 Windows 平台 (UWP) 上,ListViewRenderer 类实例化本机 ListView 控件。 有关 Xamarin.Forms 控件映射到的呈现器和本机控件类的详细信息,请参阅呈现器基类和本机控件。
下图说明了 ListView 控件和实现它的相应本机控件之间的关系:
通过在每个平台上为 ListView 创建自定义呈现器,可以利用呈现过程来实现特定于平台的自定义。 执行此操作的过程如下:
现在将依次讨论每个项目,以实现 NativeListView 呈现器,该呈现器利用特定于平台的列表控件和本机单元布局。 移植包含可以重复使用的列表和单元代码的现有本机应用时,此方案很有用。 此外,它还允许对可能影响性能的列表控件功能进行详细自定义,例如数据虚拟化。
创建自定义 ListView 控件
通过子类化 ListView 类,可以创建自定义 ListView 控件,如以下代码示例所示:
public class NativeListView : ListView
{
  public static readonly BindableProperty ItemsProperty =
    BindableProperty.Create ("Items", typeof(IEnumerable<DataSource>), typeof(NativeListView), new List<DataSource> ());

  public IEnumerable<DataSource> Items {
    get { return (IEnumerable<DataSource>)GetValue (ItemsProperty); }
    set { SetValue (ItemsProperty, value); }
  }

  public event EventHandler<SelectedItemChangedEventArgs> ItemSelected;

  public void NotifyItemSelected (object item)
  {
    if (ItemSelected != null) {
      ItemSelected (this, new SelectedItemChangedEventArgs (item));
    }
  }
}
NativeListView 在 .NET Standard 库项目中创建,它定义自定义控件的 API。 此控件公开 Items 属性,该属性用于使用数据填充 ListView,并且可出于显示目的绑定数据。 它还公开了 ItemSelected 事件,只要在特定于平台的本机列表控件中选中了某个项目,就会触发该事件。 若要深入了解数据绑定,请参阅数据绑定基本知识。
使用自定义控件
通过在控件上声明 NativeListView 自定义控件位置的命名空间并使用命名空间前缀,可以在 .NET Standard 库项目的 XAML 中引用该自定义控件。 以下代码示例展示了 XAML 页可以如何使用 NativeListView 自定义控件:
<ContentPage ...
    xmlns:local="clr-namespace:CustomRenderer;assembly=CustomRenderer"
    ...>
    ...
    <ContentPage.Content>
          <Grid>
            <Grid.RowDefinitions>
              <RowDefinition Height="Auto"/>
              <RowDefinition Height="*" />
            </Grid.RowDefinitions>
          <Label Text="{x:Static local:App.Description}" HorizontalTextAlignment="Center" />
            <local:NativeListView Grid.Row="1" x:Name="nativeListView" ItemSelected="OnItemSelected" VerticalOptions="FillAndExpand" />
          </Grid>
      </ContentPage.Content>
</ContentPage>
local 命名空间前缀可以命名为任何内容。 但是,clr-namespace 和 assembly 值必须与自定义控件的详细信息相匹配。 声明命名空间后,前缀用于引用自定义控件。
以下代码示例展示了 C# 页可以如何使用 NativeListView 自定义控件:
public class MainPageCS : ContentPage
{
    NativeListView nativeListView;

    public MainPageCS()
    {
        nativeListView = new NativeListView
        {
            Items = DataSource.GetList(),
            VerticalOptions = LayoutOptions.FillAndExpand
        };

        switch (Device.RuntimePlatform)
        {
            case Device.iOS:
                Padding = new Thickness(0, 20, 0, 0);
                break;
            case Device.Android:
            case Device.UWP:
                Padding = new Thickness(0);
                break;
        }

        Content = new Grid
        {
            RowDefinitions = {
                new RowDefinition { Height = GridLength.Auto },
                new RowDefinition { Height = new GridLength (1, GridUnitType.Star) }
            },
            Children = {
                new Label { Text = App.Description, HorizontalTextAlignment = TextAlignment.Center },
                nativeListView
            }
        };
        nativeListView.ItemSelected += OnItemSelected;
    }
    ...
}
NativeListView 自定义控件使用特定于平台的自定义呈现器来显示数据列表,该列表通过 Items 属性进行填充。 列表中的每一行都包含三项数据:名称、类别和图像文件名。 列表中每行的布局由特定于平台的自定义呈现器定义。
注意
由于 NativeListView 自定义控件将使用包含滚动功能的特定于平台的列表控件进行呈现,自定义控件不应托管在可滚动的布局控件中,例如 ScrollView。
现在可以向每个应用程序项目添加自定义呈现器,以便创建特定于平台的列表控件和本机单元布局。
在每个平台上创建自定义呈现器
创建自定义呈现器类的过程如下所示:
- 创建呈现自定义控件的
ListViewRenderer类的子类。 - 替代呈现自定义控件的
OnElementChanged方法,并编写逻辑以自定义控件。 创建相应的 Xamarin.FormsListView时将调用此方法。 - 向自定义呈现器类添加
ExportRenderer属性,以指定其将用于呈现 Xamarin.Forms 自定义控件。 此属性用于向 Xamarin.Forms 注册自定义呈现器。
注意
可选择在每个平台项目中提供自定义呈现器。 如果未注册自定义呈现器,则之后将使用单元基类的默认呈现器。
下图说明了示例应用程序中每个项目的职责,以及它们之间的关系:
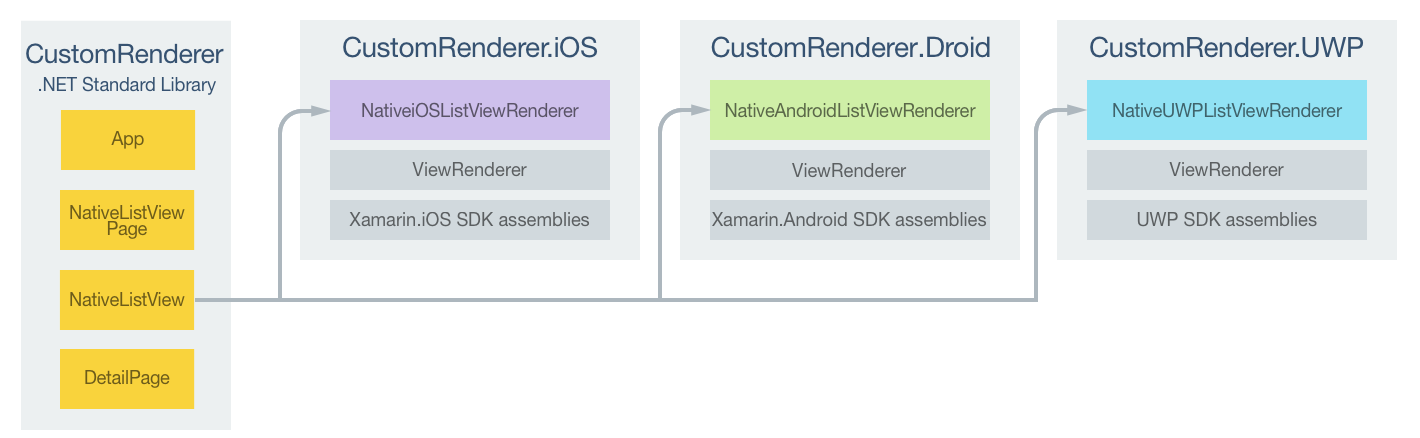
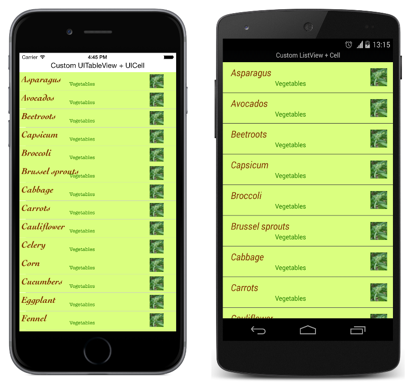
NativeListView 自定义控件由特定于平台的呈现器类呈现,这些类全都派生自各平台的 ListViewRenderer 类。 这导致每个 NativeListView 自定义控件都使用特定于平台的列表控件和本机单元布局呈现,如以下屏幕截图所示:
ListViewRenderer 类公开 OnElementChanged 方法,创建 Xamarin.Forms 自定义控件时调用此方法以呈现对应的本机控件。 此方法采用 ElementChangedEventArgs 参数,其中包含 OldElement 和 NewElement 属性。 这两个属性分别表示呈现器“曾经”附加到的 Xamarin.Forms 元素和呈现器“现在”附加到的 Xamarin.Forms 元素。 在示例应用程序中,OldElement 属性将为 null,且 NewElement 属性将包含对 NativeListView 实例的引用。
在每个特定于平台的呈现器类中,OnElementChanged 方法的替代版本可执行本机控件自定义。 可以通过 Control 属性访问平台上使用的对本机控件的类型化引用。 此外,可以通过 Element 属性获取正在呈现的 Xamarin.Forms 控件的引用。
订阅 OnElementChanged 方法中的事件处理程序时必须小心,如以下代码示例所示:
protected override void OnElementChanged (ElementChangedEventArgs<Xamarin.Forms.ListView> e)
{
  base.OnElementChanged (e);

  if (e.OldElement != null) {
    // Unsubscribe from event handlers and cleanup any resources
  }

  if (e.NewElement != null) {
    // Configure the native control and subscribe to event handlers
  }
}
仅当自定义呈现器附加到新的 Xamarin.Forms 元素时,才应配置本机控件并订阅事件处理程序。 同样,仅当呈现器所附加到的元素更改时,才应取消订阅任何订阅的事件处理程序。 采用此方法将有助于创建不会遭受内存泄漏的自定义呈现器。
在每个特定于平台的呈现器类中,OnElementPropertyChanged 方法的替代版本是响应 Xamarin.Forms 自定义控件上的可绑定属性更改的位置。 应始终检查已更改的属性,因为可多次调用此替代。
每个自定义呈现器类均用 ExportRenderer 属性修饰,该属性向 Xamarin.Forms 注册呈现器。 该属性采用两个参数:要呈现的 Xamarin.Forms 自定义控件的类型名称和自定义呈现器的类型名称。 属性的 assembly 前缀指示属性适用于整个程序集。
以下各部分讨论每个平台特定的 自定义呈现器类的实现。
在 iOS 上创建自定义呈现器
以下代码示例展示了适用于 iOS 平台的自定义呈现器:
[assembly: ExportRenderer (typeof(NativeListView), typeof(NativeiOSListViewRenderer))]
namespace CustomRenderer.iOS
{
    public class NativeiOSListViewRenderer : ListViewRenderer
    {
        protected override void OnElementChanged (ElementChangedEventArgs<Xamarin.Forms.ListView> e)
        {
            base.OnElementChanged (e);

            if (e.OldElement != null) {
                // Unsubscribe
            }

            if (e.NewElement != null) {
                Control.Source = new NativeiOSListViewSource (e.NewElement as NativeListView);
            }
        }
    }
}
如果自定义呈现器附加到新的 Xamarin.Forms 元素,则通过创建 NativeiOSListViewSource 类的实例来配置 UITableView 控件。 此类通过替代 UITableViewSource 类中的 RowsInSection 和 GetCell 方法,以及通过公开包含要显示的数据列表的 Items 属性,向 UITableView 控件提供数据。 该类还提供 RowSelected 方法替代,可调用 NativeListView 自定义控件提供的 ItemSelected 事件。 有关方法替代的详细信息,请参阅子类化 UITableViewSource。 GetCell 方法返回 UITableCellView,其中填充列表中每行的数据,如以下代码示例所示:
public override UITableViewCell GetCell (UITableView tableView, NSIndexPath indexPath)
{
  // request a recycled cell to save memory
  NativeiOSListViewCell cell = tableView.DequeueReusableCell (cellIdentifier) as NativeiOSListViewCell;

  // if there are no cells to reuse, create a new one
  if (cell == null) {
    cell = new NativeiOSListViewCell (cellIdentifier);
  }

  if (String.IsNullOrWhiteSpace (tableItems [indexPath.Row].ImageFilename)) {
    cell.UpdateCell (tableItems [indexPath.Row].Name
      , tableItems [indexPath.Row].Category
      , null);
  } else {
    cell.UpdateCell (tableItems [indexPath.Row].Name
      , tableItems [indexPath.Row].Category
      , UIImage.FromFile ("Images/" + tableItems [indexPath.Row].ImageFilename + ".jpg"));
  }

  return cell;
}
此方法为将在屏幕上显示的每行数据创建 NativeiOSListViewCell 实例。 NativeiOSCell 实例定义每个单元的布局和单元的数据。 当一个单元因滚动而从屏幕上消失时,该单元将可供重复使用。 这样一来,可通过确保屏幕上仅显示数据的 NativeiOSCell 实例(而不是列表中的所有数据)来避免浪费内存。 有关单元重用的详细信息,请参阅单元重用。 GetCell 方法还会读取每行数据的 ImageFilename 属性(如果存在),并在使用该列数据(名称、类别和图像)更新 NativeiOSListViewCell 实例前,读取图像及将其作为 UIImage 实例存储。
NativeiOSListViewCell 类定义每个单元的布局,如以下代码示例所示:
public class NativeiOSListViewCell : UITableViewCell
{
  UILabel headingLabel, subheadingLabel;
  UIImageView imageView;

  public NativeiOSListViewCell (NSString cellId) : base (UITableViewCellStyle.Default, cellId)
  {
    SelectionStyle = UITableViewCellSelectionStyle.Gray;

    ContentView.BackgroundColor = UIColor.FromRGB (218, 255, 127);

    imageView = new UIImageView ();

    headingLabel = new UILabel () {
      Font = UIFont.FromName ("Cochin-BoldItalic", 22f),
      TextColor = UIColor.FromRGB (127, 51, 0),
      BackgroundColor = UIColor.Clear
    };

    subheadingLabel = new UILabel () {
      Font = UIFont.FromName ("AmericanTypewriter", 12f),
      TextColor = UIColor.FromRGB (38, 127, 0),
      TextAlignment = UITextAlignment.Center,
      BackgroundColor = UIColor.Clear
    };

    ContentView.Add (headingLabel);
    ContentView.Add (subheadingLabel);
    ContentView.Add (imageView);
  }

  public void UpdateCell (string caption, string subtitle, UIImage image)
  {
    headingLabel.Text = caption;
    subheadingLabel.Text = subtitle;
    imageView.Image = image;
  }

  public override void LayoutSubviews ()
  {
    base.LayoutSubviews ();

    headingLabel.Frame = new CoreGraphics.CGRect (5, 4, ContentView.Bounds.Width - 63, 25);
    subheadingLabel.Frame = new CoreGraphics.CGRect (100, 18, 100, 20);
    imageView.Frame = new CoreGraphics.CGRect (ContentView.Bounds.Width - 63, 5, 33, 33);
  }
}
此类定义用于呈现该单元内容及其布局的控件。 NativeiOSListViewCell 构造函数创建 UILabel 和 UIImageView 控件的实例,并初始化其外观。 这些控件用于显示每行的数据,包括用于在 UILabel 和 UIImageView 实例上设置此数据的 UpdateCell 方法。 这些实例的位置由替代的 LayoutSubviews 方法设置,方法是在单元内指定其坐标。
响应自定义控件的属性更改
如果 NativeListView.Items 属性更改,由于项目被添加到列表或从列表中删除,自定义呈现器需要通过显示更改来进行响应。 这可以通过替代 OnElementPropertyChanged 方法来完成,如以下代码示例所示:
protected override void OnElementPropertyChanged (object sender, System.ComponentModel.PropertyChangedEventArgs e)
{
  base.OnElementPropertyChanged (sender, e);

  if (e.PropertyName == NativeListView.ItemsProperty.PropertyName) {
    Control.Source = new NativeiOSListViewSource (Element as NativeListView);
  }
}
该方法创建 NativeiOSListViewSource 类的新实例,如果可绑定的 NativeListView.Items 属性已更改,该实例会向 UITableView 控件提供数据。
在 Android 上创建自定义呈现器
以下代码示例展示了适用于 Android 平台的自定义呈现器:
[assembly: ExportRenderer(typeof(NativeListView), typeof(NativeAndroidListViewRenderer))]
namespace CustomRenderer.Droid
{
    public class NativeAndroidListViewRenderer : ListViewRenderer
    {
        Context _context;

        public NativeAndroidListViewRenderer(Context context) : base(context)
        {
            _context = context;
        }

        protected override void OnElementChanged(ElementChangedEventArgs<Xamarin.Forms.ListView> e)
        {
            base.OnElementChanged(e);

            if (e.OldElement != null)
            {
                // unsubscribe
                Control.ItemClick -= OnItemClick;
            }

            if (e.NewElement != null)
            {
                // subscribe
                Control.Adapter = new NativeAndroidListViewAdapter(_context as Android.App.Activity, e.NewElement as NativeListView);
                Control.ItemClick += OnItemClick;
            }
        }
        ...

        void OnItemClick(object sender, Android.Widget.AdapterView.ItemClickEventArgs e)
        {
            ((NativeListView)Element).NotifyItemSelected(((NativeListView)Element).Items.ToList()[e.Position - 1]);
        }
    }
}
如果自定义呈现器附加到新的 Xamarin.Forms 元素,则配置本机 ListView 控件。 此配置涉及创建向本机 ListView 控件提供数据的 NativeAndroidListViewAdapter 类的实例,以及注册事件处理程序用于处理 ItemClick 事件。 此处理程序转而会调用 NativeListView 自定义控件提供的 ItemSelected 事件。 如果呈现器所附加到的 Xamarin.Forms 元素更改,则会取消订阅 ItemClick 事件。
NativeAndroidListViewAdapter 派生自 BaseAdapter 类,并公开包含要显示的数据列表的 Items 属性,同时替代 Count、GetView、GetItemId 和 this[int] 方法。 有关这些方法替代的详细信息,请参阅实现 ListAdapter。 GetView 方法返回每行的视图,其中填充数据,如以下代码示例所示:
public override View GetView (int position, View convertView, ViewGroup parent)
{
  var item = tableItems [position];

  var view = convertView;
  if (view == null) {
    // no view to re-use, create new
    view = context.LayoutInflater.Inflate (Resource.Layout.NativeAndroidListViewCell, null);
  }
  view.FindViewById<TextView> (Resource.Id.Text1).Text = item.Name;
  view.FindViewById<TextView> (Resource.Id.Text2).Text = item.Category;

  // grab the old image and dispose of it
  if (view.FindViewById<ImageView> (Resource.Id.Image).Drawable != null) {
    using (var image = view.FindViewById<ImageView> (Resource.Id.Image).Drawable as BitmapDrawable) {
      if (image != null) {
        if (image.Bitmap != null) {
          //image.Bitmap.Recycle ();
          image.Bitmap.Dispose ();
        }
      }
    }
  }

  // If a new image is required, display it
  if (!String.IsNullOrWhiteSpace (item.ImageFilename)) {
    context.Resources.GetBitmapAsync (item.ImageFilename).ContinueWith ((t) => {
      var bitmap = t.Result;
      if (bitmap != null) {
        view.FindViewById<ImageView> (Resource.Id.Image).SetImageBitmap (bitmap);
        bitmap.Dispose ();
      }
    }, TaskScheduler.FromCurrentSynchronizationContext ());
  } else {
    // clear the image
    view.FindViewById<ImageView> (Resource.Id.Image).SetImageBitmap (null);
  }

  return view;
}
调用 GetView 方法,以 View 的形式返回列表中每行数据要呈现的单元。 它会为将在屏幕上显示的每行数据创建 View 实例,并在布局文件中定义 View 实例的外观。 当一个单元因滚动而从屏幕上消失时,该单元将可供重复使用。 这样一来,可通过确保屏幕上仅显示数据的 View 实例(而不是列表中的所有数据)来避免浪费内存。 有关视图重用的详细信息,请参阅行视图重用。
GetView 方法还使用数据填充 View 实例,包括从 ImageFilename 属性中指定的文件名读取图像数据。
本机 ListView 显示的每个单元的布局在 NativeAndroidListViewCell.axml 布局文件中定义,该文件由 LayoutInflater.Inflate 方法膨胀。 以下代码示例展示了布局定义:
<?xml version="1.0" encoding="utf-8"?>
<RelativeLayout xmlns:android="http://schemas.android.com/apk/res/android"
    android:layout_width="fill_parent"
    android:layout_height="wrap_content"
    android:padding="8dp"
    android:background="@drawable/CustomSelector">
    <LinearLayout
        android:id="@+id/Text"
        android:orientation="vertical"
        android:layout_width="wrap_content"
        android:layout_height="wrap_content"
        android:paddingLeft="10dip">
        <TextView
            android:id="@+id/Text1"
            android:layout_width="wrap_content"
            android:layout_height="wrap_content"
            android:textColor="#FF7F3300"
            android:textSize="20dip"
            android:textStyle="italic" />
        <TextView
            android:id="@+id/Text2"
            android:layout_width="wrap_content"
            android:layout_height="wrap_content"
            android:textSize="14dip"
            android:textColor="#FF267F00"
            android:paddingLeft="100dip" />
    </LinearLayout>
    <ImageView
        android:id="@+id/Image"
        android:layout_width="48dp"
        android:layout_height="48dp"
        android:padding="5dp"
        android:src="@drawable/icon"
        android:layout_alignParentRight="true" />
</RelativeLayout>
此布局指定使用两个 TextView 控件和一个 ImageView 控件来显示单元内容。 两个 TextView 控件在 LinearLayout 控件中为垂直方向,并且要包含的所有控件都在 RelativeLayout 内。
响应自定义控件的属性更改
如果 NativeListView.Items 属性更改,由于项目被添加到列表或从列表中删除,自定义呈现器需要通过显示更改来进行响应。 这可以通过替代 OnElementPropertyChanged 方法来完成,如以下代码示例所示:
protected override void OnElementPropertyChanged (object sender, System.ComponentModel.PropertyChangedEventArgs e)
{
  base.OnElementPropertyChanged (sender, e);

  if (e.PropertyName == NativeListView.ItemsProperty.PropertyName) {
    Control.Adapter = new NativeAndroidListViewAdapter (_context as Android.App.Activity, Element as NativeListView);
  }
}
该方法创建 NativeAndroidListViewAdapter 类的新实例,如果可绑定的 NativeListView.Items 属性已更改,该实例会向本地 ListView 控件提供数据。
在 UWP 上创建自定义呈现器
以下代码示例展示了适用于 UWP 的自定义呈现器:
[assembly: ExportRenderer(typeof(NativeListView), typeof(NativeUWPListViewRenderer))]
namespace CustomRenderer.UWP
{
    public class NativeUWPListViewRenderer : ListViewRenderer
    {
        ListView listView;

        protected override void OnElementChanged(ElementChangedEventArgs<Xamarin.Forms.ListView> e)
        {
            base.OnElementChanged(e);

            listView = Control as ListView;

            if (e.OldElement != null)
            {
                // Unsubscribe
                listView.SelectionChanged -= OnSelectedItemChanged;
            }

            if (e.NewElement != null)
            {
                listView.SelectionMode = ListViewSelectionMode.Single;
                listView.IsItemClickEnabled = false;
                listView.ItemsSource = ((NativeListView)e.NewElement).Items;
                listView.ItemTemplate = App.Current.Resources["ListViewItemTemplate"] as Windows.UI.Xaml.DataTemplate;
                // Subscribe
                listView.SelectionChanged += OnSelectedItemChanged;
            }
        }

        void OnSelectedItemChanged(object sender, SelectionChangedEventArgs e)
        {
            ((NativeListView)Element).NotifyItemSelected(listView.SelectedItem);
        }
    }
}
如果自定义呈现器附加到新的 Xamarin.Forms 元素,则配置本机 ListView 控件。 此配置涉及设置本机 ListView 控件将如何响应所选项、填充控件显示的数据、定义每个单元的外观和内容,以及注册事件处理程序用于处理 SelectionChanged 事件。 此处理程序转而会调用 NativeListView 自定义控件提供的 ItemSelected 事件。 如果呈现器所附加到的 Xamarin.Forms 元素更改,则会取消订阅 SelectionChanged 事件。
每个本机 ListView 单元的外观和内容均由名为 ListViewItemTemplate 的 DataTemplate 定义。 此 DataTemplate 存储在应用程序级资源字典中,如以下代码示例所示:
<DataTemplate x:Key="ListViewItemTemplate">
    <Grid Background="#DAFF7F">
        <Grid.Resources>
            <local:ConcatImageExtensionConverter x:Name="ConcatImageExtensionConverter" />
        </Grid.Resources>
        <Grid.RowDefinitions>
            <RowDefinition Height="Auto" />
            <RowDefinition Height="Auto" />
        </Grid.RowDefinitions>
        <Grid.ColumnDefinitions>
            <ColumnDefinition Width="0.40*" />
            <ColumnDefinition Width="0.40*"/>
            <ColumnDefinition Width="0.20*" />
        </Grid.ColumnDefinitions>
        <TextBlock Grid.ColumnSpan="2" Foreground="#7F3300" FontStyle="Italic" FontSize="22" VerticalAlignment="Top" Text="{Binding Name}" />
        <TextBlock Grid.RowSpan="2" Grid.Column="1" Foreground="#267F00" FontWeight="Bold" FontSize="12" VerticalAlignment="Bottom" Text="{Binding Category}" />
        <Image Grid.RowSpan="2" Grid.Column="2" HorizontalAlignment="Left" VerticalAlignment="Center" Source="{Binding ImageFilename, Converter={StaticResource ConcatImageExtensionConverter}}" Width="50" Height="50" />
        <Line Grid.Row="1" Grid.ColumnSpan="3" X1="0" X2="1" Margin="30,20,0,0" StrokeThickness="1" Stroke="LightGray" Stretch="Fill" VerticalAlignment="Bottom" />
    </Grid>
</DataTemplate>
DataTemplate 指定用于显示单元内容及其布局和外观的控件。 两个 TextBlock 控件和一个 Image 控件用于通过数据绑定显示单元内容。 此外,ConcatImageExtensionConverter 实例用于将 .jpg 文件扩展连接到每个图像文件名。 这可确保 Source 控件在其 Image 属性设置后可以加载和呈现图像。
响应自定义控件的属性更改
如果 NativeListView.Items 属性更改,由于项目被添加到列表或从列表中删除,自定义呈现器需要通过显示更改来进行响应。 这可以通过替代 OnElementPropertyChanged 方法来完成,如以下代码示例所示:
protected override void OnElementPropertyChanged(object sender, System.ComponentModel.PropertyChangedEventArgs e)
{
    base.OnElementPropertyChanged(sender, e);

    if (e.PropertyName == NativeListView.ItemsProperty.PropertyName)
    {
        listView.ItemsSource = ((NativeListView)Element).Items;
    }
}
如果可绑定的 NativeListView.Items 属性已更改,则该方法会使用已更改的数据重新填充本机 ListView 控件。
总结
本文演示了如何创建自定义呈现器来封装特定于平台的列表控件和本机单元布局,从而进一步控制本机列表控件的性能。