Mac 平台设置

在开始之前,请创建(或使用现有的)Xamarin.Forms 项目。 只能使用 Visual Studio for Mac 添加 Mac 应用。
将 macOS 项目添加到 Xamarin.Forms 视频
添加 Mac 应用
按照以下说明添加将在 macOS Sierra 和 macOS El Capitan 上运行的 Mac 应用:
在 Visual Studio for Mac 中,右键单击现有的 Xamarin.Forms 解决方案,然后选择“添加”>“添加新项目...”
在“新建项目”窗口中,选择“Mac”>“应用”“Cocoa 应用”,然后按“下一步”。>
键入应用名称(也可以为停靠项选择其他名称),然后按“下一步”。
查看配置,然后按“创建”。 这些步骤如下所示:
在 Mac 项目中,右键单击“包”>“添加包...”,以添加 Xamarin.Forms NuGet。 还应更新其他项目以使用同一版本的 Xamarin.Forms NuGet 包。
在 Mac 项目中,右键单击“引用”并添加对 Xamarin.Forms 项目的引用(共享项目或 .NET Standard 库项目)。

更新 Main.cs 以初始化
AppDelegate:static class MainClass { static void Main(string[] args) { NSApplication.Init(); NSApplication.SharedApplication.Delegate = new AppDelegate(); // add this line NSApplication.Main(args); } }更新
AppDelegate以初始化 Xamarin.Forms,创建窗口并加载 Xamarin.Forms 应用程序(记得设置适当的Title)。 如有其他需要初始化的依赖项,也可以在此处执行此操作。using Xamarin.Forms; using Xamarin.Forms.Platform.MacOS; // also add a using for the Xamarin.Forms project, if the namespace is different to this file ... [Register("AppDelegate")] public class AppDelegate : FormsApplicationDelegate { NSWindow window; public AppDelegate() { var style = NSWindowStyle.Closable | NSWindowStyle.Resizable | NSWindowStyle.Titled; var rect = new CoreGraphics.CGRect(200, 1000, 1024, 768); window = new NSWindow(rect, style, NSBackingStore.Buffered, false); window.Title = "Xamarin.Forms on Mac!"; // choose your own Title here window.TitleVisibility = NSWindowTitleVisibility.Hidden; } public override NSWindow MainWindow { get { return window; } } public override void DidFinishLaunching(NSNotification notification) { Forms.Init(); LoadApplication(new App()); base.DidFinishLaunching(notification); } }双击“Main.storyboard”以在 Xcode 中编辑。 选择“窗口”并取消选中“是初始控制器”复选框(这是因为上面的代码创建了窗口):
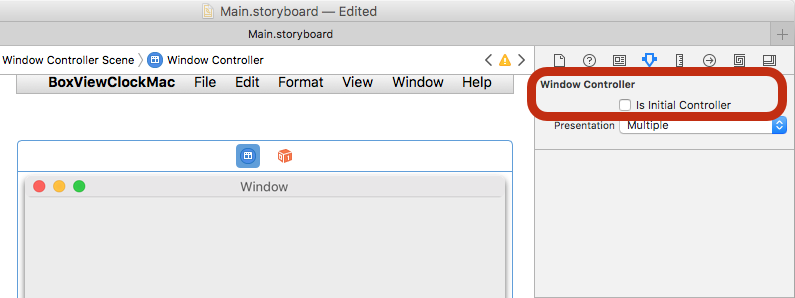
可以编辑情节提要中的菜单系统以移除不需要的项目。
最后,从所需的现有平台项目添加任何本地资源(例如图像文件)。
现在,Mac 项目应在 macOS 上运行 Xamarin.Forms 代码!

后续步骤
“样式”
通过最近对 OnPlatform 平台所做的更改,现在可以针对任意数量的平台执行操作。 这包括 macOS。
<Button.TextColor>
    <OnPlatform x:TypeArguments="Color">
        <On Platform="iOS" Value="White"/>
        <On Platform="macOS" Value="White"/>
        <On Platform="Android" Value="Black"/>
    </OnPlatform>
</Button.TextColor>
请注意,还可以对如下所示的平台加倍:<On Platform="iOS, macOS" ...>。
窗口大小和位置
可以在 AppDelegate 中调整窗口的初始大小和位置:
var rect = new CoreGraphics.CGRect(200, 1000, 1024, 768); // x, y, width, height
已知问题
这是预览版,因此你应该预料到并非所有内容都已处于生产就绪状态。 下面是向项目添加 macOS 时可能会遇到的一些情况:
并非所有 NuGet 都已准备好用于 macOS
你可能会发现,你使用的一些库尚不支持 macOS。 在这种情况下,需要向项目的维护者发送请求以添加支持。 在获得支持之前,你可能需要寻找替代方案。
缺少 Xamarin.Forms 功能
并非所有 Xamarin.Forms 功能都在此预览版中完成。 有关详细信息,请参阅 Xamarin.Forms GitHub 存储库中的平台支持 macOS 状态。