在 Azure Active Directory B2C 中使用自訂原則設定密碼變更
開始之前,請使用此頁面頂端的 [選擇原則類型] 選取器,選擇您要設定的原則類型。 Azure Active Directory B2C 提供兩種方法來定義使用者如何與您的應用程式互動:透過預先定義的使用者流程,或透過完全可設定的自訂原則。 本文中所需的步驟隨各方法而異。
您可以設定 Azure Active Directory B2C (Azure AD B2C) 讓使用本機帳戶登入的使用者可以變更密碼,不必使用電子郵件驗證來證明其身分識別。
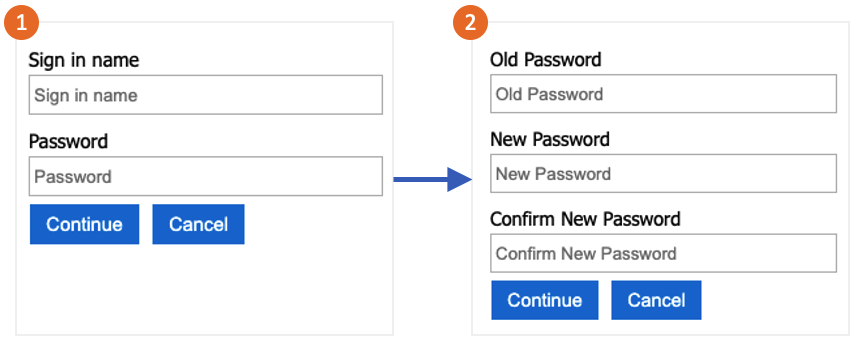
密碼變更流程包含下列步驟:
使用者登入其本機帳戶。 如果工作階段仍在使用中,Azure AD B2C 會授權使用者並跳至下一個步驟。
使用者在 [舊密碼] 中驗證舊密碼。 然後在 [新密碼] 中建立並確認新密碼。

提示
只有當使用者知道自己的密碼,而且想要變更密碼時,才可以使用本文中所描述的密碼變更流程。 建議亦啟用自助式密碼重設,以支援使用者忘記密碼的狀況。
此功能僅適用於自訂原則。 如需設定步驟,請在前述選取器中選取 [自訂原則]。
必要條件
新增元素
開啟 TrustFrameworkExtensions.xml 檔案。 將下列識別碼為
oldPassword的 ClaimType 元素新增至 ClaimsSchema 元素:<BuildingBlocks> <ClaimsSchema> <ClaimType Id="oldPassword"> <DisplayName>Old Password</DisplayName> <DataType>string</DataType> <UserHelpText>Enter your old password</UserHelpText> <UserInputType>Password</UserInputType> </ClaimType> </ClaimsSchema> </BuildingBlocks>ClaimsProvider 元素包含會驗證使用者的技術設定檔。 請將下列宣告提供者新增至 ClaimsProvider 元素:
<ClaimsProviders>
  <ClaimsProvider>
    <DisplayName>Local Account SignIn</DisplayName>
    <TechnicalProfiles>
      <TechnicalProfile Id="login-NonInteractive-PasswordChange">
        <DisplayName>Local Account SignIn</DisplayName>
        <InputClaims>
          <InputClaim ClaimTypeReferenceId="oldPassword" PartnerClaimType="password" Required="true" />
          </InputClaims>
        <IncludeTechnicalProfile ReferenceId="login-NonInteractive" />
      </TechnicalProfile>
    </TechnicalProfiles>
  </ClaimsProvider>
  <ClaimsProvider>
    <DisplayName>Local Account Password Change</DisplayName>
    <TechnicalProfiles>
      <TechnicalProfile Id="LocalAccountWritePasswordChangeUsingObjectId">
        <DisplayName>Change password (username)</DisplayName>
        <Protocol Name="Proprietary" Handler="Web.TPEngine.Providers.SelfAssertedAttributeProvider, Web.TPEngine, Version=1.0.0.0, Culture=neutral, PublicKeyToken=null" />
        <Metadata>
          <Item Key="ContentDefinitionReferenceId">api.selfasserted</Item>
        </Metadata>
        <InputClaims>
          <InputClaim ClaimTypeReferenceId="objectId" />
        </InputClaims>
        <OutputClaims>
          <OutputClaim ClaimTypeReferenceId="oldPassword" Required="true" />
          <OutputClaim ClaimTypeReferenceId="newPassword" Required="true" />
          <OutputClaim ClaimTypeReferenceId="reenterPassword" Required="true" />
        </OutputClaims>
        <ValidationTechnicalProfiles>
          <ValidationTechnicalProfile ReferenceId="login-NonInteractive-PasswordChange" />
          <ValidationTechnicalProfile ReferenceId="AAD-UserWritePasswordUsingObjectId" />
        </ValidationTechnicalProfiles>
      </TechnicalProfile>
    </TechnicalProfiles>
  </ClaimsProvider>
</ClaimsProviders>
UserJourneys 元素會定義使用者與應用程式互動時所採用的路徑。 新增 UserJourney 識別碼為
PasswordChange的 UserJourneys 元素 (如果此元素不存在):<UserJourneys> <UserJourney Id="PasswordChange"> <OrchestrationSteps> <OrchestrationStep Order="1" Type="ClaimsProviderSelection" ContentDefinitionReferenceId="api.signuporsignin"> <ClaimsProviderSelections> <ClaimsProviderSelection TargetClaimsExchangeId="LocalAccountSigninEmailExchange" /> </ClaimsProviderSelections> </OrchestrationStep> <OrchestrationStep Order="2" Type="ClaimsExchange"> <ClaimsExchanges> <ClaimsExchange Id="LocalAccountSigninEmailExchange" TechnicalProfileReferenceId="SelfAsserted-LocalAccountSignin-Email" /> </ClaimsExchanges> </OrchestrationStep> <OrchestrationStep Order="3" Type="ClaimsExchange"> <ClaimsExchanges> <ClaimsExchange Id="NewCredentials" TechnicalProfileReferenceId="LocalAccountWritePasswordChangeUsingObjectId" /> </ClaimsExchanges> </OrchestrationStep> <OrchestrationStep Order="4" Type="ClaimsExchange"> <ClaimsExchanges> <ClaimsExchange Id="AADUserReadWithObjectId" TechnicalProfileReferenceId="AAD-UserReadUsingObjectId" /> </ClaimsExchanges> </OrchestrationStep> <OrchestrationStep Order="5" Type="SendClaims" CpimIssuerTechnicalProfileReferenceId="JwtIssuer" /> </OrchestrationSteps> <ClientDefinition ReferenceId="DefaultWeb" /> </UserJourney> </UserJourneys>儲存 TrustFrameworkExtensions.xml 原則檔案。
複製與入門套件一起下載的 ProfileEdit.xml 檔案,並將其命名為 ProfileEditPasswordChange.xml。
開啟新檔案,然後將 PolicyId 屬性更新成唯一值。 此值是您原則的名稱。 例如 B2C_1A_profile_edit_password_change。
修改 DefaultUserJourney 中的 ReferenceId 屬性,使其符合您建立的新使用者旅程圖識別碼。 例如 PasswordChange。
儲存您的變更。
上傳並測試原則
- 登入 Azure 入口網站。
- 如果您有多個租用戶的存取權,請使用頂端功能表中的 [設定] 圖示,從 [目錄 + 訂用帳戶] 功能表切換至您的 Azure AD B2C 租用戶。
- 選擇 Azure 入口網站左上角的 [所有服務],然後搜尋並選取 [Azure AD B2C]。
- 選取 [識別體驗架構]。
- 在 [自訂原則] 中,選取 [上傳原則]。
- 選取 [覆寫現有的原則],然後搜尋並選取 TrustFrameworkExtensions.xml 檔案。
- 選取上傳。
- 針對信賴憑證者檔案 (例如 ProfileEditPasswordChange.xml) 重複步驟 5 到 7。
執行原則
- 開啟您所變更的原則。 例如 B2C_1A_profile_edit_password_change。
- 在 [應用程式] 選取您稍早註冊過的應用程式。 若要查看權杖,[回覆 URL] 應該顯示
https://jwt.ms。 - 選取 [立即執行]。 在開啟的新索引標籤中,從 URL 移除 "&prompt=login",然後重新整理索引標籤。接著,使用您稍早建立的帳戶登入。 密碼變更對話方塊可供選擇變更密碼。