教學課程:從 通用 Windows 平台 (UWP) 應用程式呼叫 Microsoft Graph API
在本教學課程中,您會建置原生 通用 Windows 平台 (UWP) 應用程式來登入使用者,並取得存取令牌來呼叫 Microsoft Graph API。
在本指南結尾,您的應用程式會使用個人帳戶呼叫受保護的 API。 範例包括 outlook.com、live.com 及其他。 您的應用程式也會從具有 Microsoft Entra ID 的任何公司或組織呼叫公司與學校帳戶。
在本教學課程中:
- 在 Visual Studio 中建立 通用 Windows 平台 (UWP) 專案
- 在 Azure 入口網站 註冊應用程式
- 新增程式代碼以支援使用者登入和註銷
- 新增程式代碼以呼叫 Microsoft Graph API
- 測試應用程式
必要條件
- 已安裝 通用 Windows 平台 開發工作負載的Visual Studio 2019
本指南的運作方式

本指南會建立查詢 Microsoft Graph API 的範例 UWP 應用程式。 在此案例中,令牌會使用 Authorization 標頭新增至 HTTP 要求。 Microsoft 驗證連結庫會處理令牌取得和更新。
NuGet 套件
本指南使用下列 NuGet 套件:
| 程式庫 | 描述 |
|---|---|
| Microsoft.Identity.Client | Microsoft 驗證資源庫 |
| Microsoft.Graph | Microsoft Graph 用戶端連結庫 |
設定您的專案
本節提供將 Windows Desktop .NET 應用程式 (XAML) 與 Microsoft 登入的逐步指示。 然後應用程式可以查詢需要令牌的 Web API,例如 Microsoft Graph API。
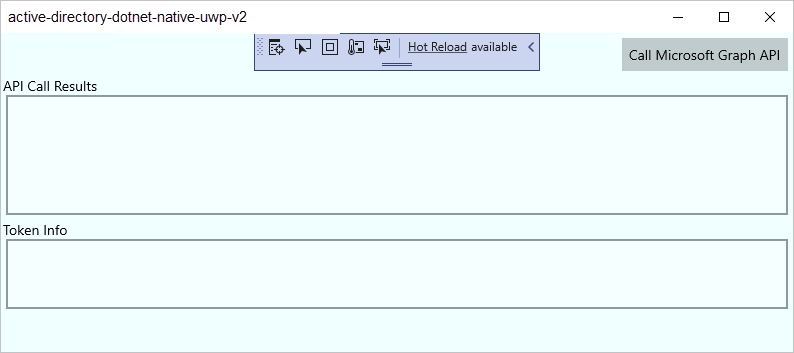
本指南會建立一個應用程式,其會顯示查詢 Microsoft Graph API 的按鈕,以及要註銷的按鈕。它也會顯示包含呼叫結果的文字框。
提示
若要查看您在本教學課程中建置的專案已完成版本,您可以從 GitHub 下載它。
建立您的應用程式
開啟 Visual Studio,然後選取 [ 建立新專案]。
在 [建立新專案] 中,針對 C# 選擇 [ 空白應用程式][通用 Windows] ,然後選取 [ 下一步]。
在 [ 設定新專案] 中,為應用程式命名,然後選取 [ 建立]。
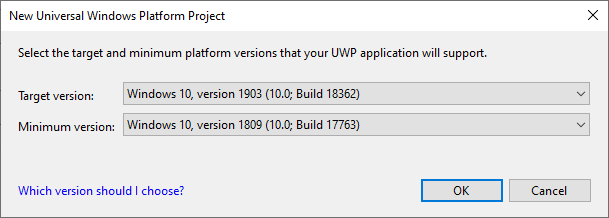
如果出現提示,請在 [新增 通用 Windows 平台 專案] 中,選取 [目標] 和 [最低版本] 的任何版本,然後選取 [確定]。
將 Microsoft 驗證連結庫新增至您的專案
在 Visual Studio 中,選取工具>NuGet 套件管理員>套件管理器主控台。
在 封裝管理員 [主控台] 視窗中複製並貼上下列命令:
Install-Package Microsoft.Identity.Client
Install-Package Microsoft.Graph
注意
第一個命令會安裝 Microsoft 驗證連結庫 (MSAL.NET)。 MSAL.NET 取得、快取及重新整理使用者令牌,以存取受 Microsoft 身分識別平台 保護的 API。 第二個命令會 安裝 Microsoft Graph .NET 用戶端連結庫 ,以驗證對 Microsoft Graph 的要求,並呼叫服務。
建立應用程式的UI
Visual Studio 會將 MainPage.xaml 建立為專案範本的一部分。 開啟此檔案,然後使用下列程式代碼取代應用程式的 Grid 節點:
<Grid>
    <StackPanel Background="Azure">
        <StackPanel Orientation="Horizontal" HorizontalAlignment="Right">
            <Button x:Name="CallGraphButton" Content="Call Microsoft Graph API" HorizontalAlignment="Right" Padding="5" Click="CallGraphButton_Click" Margin="5" FontFamily="Segoe Ui"/>
            <Button x:Name="SignOutButton" Content="Sign-Out" HorizontalAlignment="Right" Padding="5" Click="SignOutButton_Click" Margin="5" Visibility="Collapsed" FontFamily="Segoe Ui"/>
        </StackPanel>
        <TextBlock Text="API Call Results" Margin="2,0,0,-5" FontFamily="Segoe Ui" />
        <TextBox x:Name="ResultText" TextWrapping="Wrap" MinHeight="120" Margin="5" FontFamily="Segoe Ui"/>
        <TextBlock Text="Token Info" Margin="2,0,0,-5" FontFamily="Segoe Ui" />
        <TextBox x:Name="TokenInfoText" TextWrapping="Wrap" MinHeight="70" Margin="5" FontFamily="Segoe Ui"/>
    </StackPanel>
</Grid>
使用 Microsoft 驗證連結庫取得 Microsoft Graph API 的令牌
本節說明如何使用 Microsoft 驗證連結庫來取得 Microsoft Graph API 的令牌。 對 MainPage.xaml.cs 檔案進行變更。
在 MainPage.xaml.cs 中,新增下列參考:
using Microsoft.Identity.Client;
using Microsoft.Graph;
using Microsoft.Graph.Models;
using System.Diagnostics;
using System.Threading.Tasks;
using System.Net.Http.Headers;
以下欄程序代碼取代類別
MainPage:public sealed partial class MainPage : Page { //Set the scope for API call to user.read private string[] scopes = new string[] { "user.read" }; // Below are the clientId (Application Id) of your app registration and the tenant information. // You have to replace: // - the content of ClientID with the Application Id for your app registration private const string ClientId = "[Application Id pasted from the application registration portal]"; private const string Tenant = "common"; // Alternatively "[Enter your tenant, as obtained from the Azure portal, e.g. kko365.onmicrosoft.com]" private const string Authority = "https://login.microsoftonline.com/" + Tenant; // The MSAL Public client app private static IPublicClientApplication PublicClientApp; private static string MSGraphURL = "https://graph.microsoft.com/v1.0/"; private static AuthenticationResult authResult; public MainPage() { this.InitializeComponent(); } /// <summary> /// Call AcquireTokenAsync - to acquire a token requiring user to sign in /// </summary> private async void CallGraphButton_Click(object sender, RoutedEventArgs e) { try { // Sign in user using MSAL and obtain an access token for Microsoft Graph GraphServiceClient graphClient = await SignInAndInitializeGraphServiceClient(scopes); // Call the /me endpoint of Graph User graphUser = await graphClient.Me.GetAsync(); // Go back to the UI thread to make changes to the UI await Dispatcher.RunAsync(Windows.UI.Core.CoreDispatcherPriority.Normal, () => { ResultText.Text = "Display Name: " + graphUser.DisplayName + "\nBusiness Phone: " + graphUser.BusinessPhones.FirstOrDefault() + "\nGiven Name: " + graphUser.GivenName + "\nid: " + graphUser.Id + "\nUser Principal Name: " + graphUser.UserPrincipalName; DisplayBasicTokenInfo(authResult); this.SignOutButton.Visibility = Visibility.Visible; }); } catch (MsalException msalEx) { await DisplayMessageAsync($"Error Acquiring Token:{System.Environment.NewLine}{msalEx}"); } catch (Exception ex) { await DisplayMessageAsync($"Error Acquiring Token Silently:{System.Environment.NewLine}{ex}"); return; } } /// <summary> /// Signs in the user and obtains an access token for Microsoft Graph /// </summary> /// <param name="scopes"></param> /// <returns> Access Token</returns> private static async Task<string> SignInUserAndGetTokenUsingMSAL(string[] scopes) { // Initialize the MSAL library by building a public client application PublicClientApp = PublicClientApplicationBuilder.Create(ClientId) .WithAuthority(Authority) .WithUseCorporateNetwork(false) .WithRedirectUri("https://login.microsoftonline.com/common/oauth2/nativeclient") .WithLogging((level, message, containsPii) => { Debug.WriteLine($"MSAL: {level} {message} "); }, LogLevel.Warning, enablePiiLogging: false, enableDefaultPlatformLogging: true) .Build(); // It's good practice to not do work on the UI thread, so use ConfigureAwait(false) whenever possible. IEnumerable<IAccount> accounts = await PublicClientApp.GetAccountsAsync().ConfigureAwait(false); IAccount firstAccount = accounts.FirstOrDefault(); try { authResult = await PublicClientApp.AcquireTokenSilent(scopes, firstAccount) .ExecuteAsync(); } catch (MsalUiRequiredException ex) { // A MsalUiRequiredException happened on AcquireTokenSilentAsync. This indicates you need to call AcquireTokenAsync to acquire a token Debug.WriteLine($"MsalUiRequiredException: {ex.Message}"); authResult = await PublicClientApp.AcquireTokenInteractive(scopes) .ExecuteAsync() .ConfigureAwait(false); } return authResult.AccessToken; } }
以互動方式取得使用者令牌
方法 AcquireTokenInteractive 會導致視窗提示使用者登入。 應用程式通常需要使用者第一次以互動方式登入,才能存取受保護的資源。 當取得令牌的無訊息作業失敗時,它們可能也需要登入。 例如,當用戶的密碼已過期時。
以無訊息方式取得使用者令牌
AcquireTokenSilent方法會處理令牌擷取和更新,而不需要任何用戶互動。 第一次執行並提示使用者輸入認證之後 AcquireTokenInteractive ,請使用 AcquireTokenSilent 方法來要求令牌以供稍後呼叫。 該方法會以無訊息方式取得令牌。 Microsoft 驗證連結庫會處理令牌快取和更新。
最後, AcquireTokenSilent 方法會失敗。 失敗的原因包括在另一部裝置上註銷或變更其密碼的使用者。 當 Microsoft 驗證連結庫偵測到問題需要互動式動作時,就會擲回 MsalUiRequiredException 例外狀況。 您的應用程式可以透過兩種方式來處理此例外狀況:
您的應用程式會立即呼叫
AcquireTokenInteractive。 此呼叫會導致提示使用者登入。 一般而言,針對使用者沒有可用的離線內容的在線應用程式,請使用此方法。 這個引導式設定所產生的範例會遵循模式。 第一次執行範例時,您會看到它運作情形。因為沒有任何使用者使用應用程式,
accounts.FirstOrDefault()因此會包含 Null 值,並擲回MsalUiRequiredException例外狀況。然後,範例中的程式代碼會藉由呼叫
AcquireTokenInteractive來處理例外狀況。 此呼叫會導致提示使用者登入。您的應用程式向用戶顯示他們需要登入的視覺指示。 然後,他們可以選取正確的登入時間。 應用程式稍後可以重試
AcquireTokenSilent。 當使用者可以在不中斷的情況下使用其他應用程式功能時,請使用此方法。 例如,當應用程式中有離線內容可用時。 在此情況下,用戶可以決定何時想要登入。 應用程式可以在網路暫時無法使用之後重試AcquireTokenSilent。
從 SignInUserAndGetTokenUsingMSAL 方法取得令牌,以具現化 Microsoft Graph 服務用戶端
在專案中,建立名為 TokenProvider.cs 的新檔案:以滑鼠右鍵按兩下項目,選取 [新增>專案>空白頁面]。
將 新增至新建立的檔案,下列程序代碼:
using Microsoft.Kiota.Abstractions.Authentication;
using System;
using System.Collections.Generic;
using System.Threading;
using System.Threading.Tasks;

namespace UWP_app_MSGraph {
    public class TokenProvider : IAccessTokenProvider {
        private Func<string[], Task<string>> getTokenDelegate;
        private string[] scopes;

        public TokenProvider(Func<string[], Task<string>> getTokenDelegate, string[] scopes) {
            this.getTokenDelegate = getTokenDelegate;
            this.scopes = scopes;
        }

        public Task<string> GetAuthorizationTokenAsync(Uri uri, Dictionary<string, object> additionalAuthenticationContext = default,
            CancellationToken cancellationToken = default) {
            return getTokenDelegate(scopes);
        }

        public AllowedHostsValidator AllowedHostsValidator { get; }
    }
}
提示
貼上程式代碼之後,請確定 TokenProvider.cs 檔案中的命名空間符合專案的命名空間。 這可讓您更輕鬆地參考專案中的 TokenProvider 類別。
類別 TokenProvider 會定義自定義存取令牌提供者,該提供者會執行指定的委派方法來取得及傳回存取令牌。
將下列新方法新增至 MainPage.xaml.cs:
      /// <summary>
     /// Sign in user using MSAL and obtain a token for Microsoft Graph
     /// </summary>
     /// <returns>GraphServiceClient</returns>
     private async static Task<GraphServiceClient> SignInAndInitializeGraphServiceClient(string[] scopes)
     {
         var tokenProvider = new TokenProvider(SignInUserAndGetTokenUsingMSAL, scopes);
         var authProvider = new BaseBearerTokenAuthenticationProvider(tokenProvider);
         var graphClient = new GraphServiceClient(authProvider, MSGraphURL);

         return await Task.FromResult(graphClient);
     }
在此方法中,您會使用自定義存取令牌提供者 TokenProvider ,將方法連線 SignInUserAndGetTokenUsingMSAL 到 Microsoft Graph .NET SDK,並建立已驗證的用戶端。
若要在BaseBearerTokenAuthenticationProviderMainPage.xaml.cs 檔案中使用 ,請新增下列參考:
using Microsoft.Kiota.Abstractions.Authentication;
針對受保護的 API 進行 REST 呼叫的詳細資訊
在此範例應用程式中, GetGraphServiceClient 方法會使用存取令牌具現化 GraphServiceClient 。 然後, GraphServiceClient 用來從 我 端點取得使用者的配置文件資訊。
新增方法以註銷使用者
若要註銷使用者,請將下列方法新增至 MainPage.xaml.cs:
/// <summary>
/// Sign out the current user
/// </summary>
private async void SignOutButton_Click(object sender, RoutedEventArgs e)
{
    IEnumerable<IAccount> accounts = await PublicClientApp.GetAccountsAsync().ConfigureAwait(false);
    IAccount firstAccount = accounts.FirstOrDefault();

    try
    {
        await PublicClientApp.RemoveAsync(firstAccount).ConfigureAwait(false);
        await Dispatcher.RunAsync(Windows.UI.Core.CoreDispatcherPriority.Normal, () =>
        {
            ResultText.Text = "User has signed out";
            this.CallGraphButton.Visibility = Visibility.Visible;
                this.SignOutButton.Visibility = Visibility.Collapsed;
            });
        }
        catch (MsalException ex)
        {
            ResultText.Text = $"Error signing out user: {ex.Message}";
        }
    }
MSAL.NET 使用異步方法來取得令牌或操作帳戶。 因此,支援UI線程中的UI動作。 這是 Dispatcher.RunAsync 呼叫 的原因,以及呼叫 ConfigureAwait(false)的預防措施。
註銷的詳細資訊
方法 SignOutButton_Click 會從 Microsoft 驗證連結庫使用者快取中移除使用者。 這個方法會有效地告訴 Microsoft 驗證連結庫忘記目前的使用者。 只有在令牌是互動式時,才能成功取得令牌的未來要求。
此範例中的應用程式支援單一使用者。 Microsoft 驗證連結庫支援使用者可以登入多個帳戶的案例。 例如,用戶有數個帳戶的電子郵件應用程式。
顯示基本令牌資訊
將下列方法新增至 MainPage.xaml.cs ,以顯示權杖的基本資訊:
/// <summary>
/// Display basic information contained in the token. Needs to be called from the UI thread.
/// </summary>
private void DisplayBasicTokenInfo(AuthenticationResult authResult)
{
    TokenInfoText.Text = "";
    if (authResult != null)
    {
        TokenInfoText.Text += $"User Name: {authResult.Account.Username}" + Environment.NewLine;
        TokenInfoText.Text += $"Token Expires: {authResult.ExpiresOn.ToLocalTime()}" + Environment.NewLine;
    }
}
詳細資訊
使用 OpenID 連線 取得的標識碼令牌也包含與使用者相關的一小部分資訊。 DisplayBasicTokenInfo 會顯示令牌中包含的基本資訊。 此資訊包括用戶的顯示名稱和識別碼。 它也包含令牌的到期日,以及表示存取令牌本身的字串。 如果您選取 [ 呼叫 Microsoft Graph API] 按鈕數次,您會看到相同的令牌已針對稍後的要求重複使用。 當 Microsoft 驗證連結庫決定要更新令牌的時間時,您也可以看到到期日。
顯示訊息
將下列新方法新增至 MainPage.xaml.cs:
/// <summary>
/// Displays a message in the ResultText. Can be called from any thread.
/// </summary>
private async Task DisplayMessageAsync(string message)
{
     await Dispatcher.RunAsync(Windows.UI.Core.CoreDispatcherPriority.Normal,
         () =>
         {
             ResultText.Text = message;
         });
     }
註冊您的應用程式
提示
本文中的步驟可能會根據您從開始的入口網站稍有不同。
現在,註冊您的應用程式:
- 以至少應用程式開發人員身分登入 Microsoft Entra 系統管理中心。
- 如果您有多個租使用者的存取權,請使用頂端功能表中的 [設定] 圖示
 ,切換至您要從 [目錄 + 訂用帳戶] 功能表註冊應用程式的租使用者。
 - 流覽至 [身分>識別應用程式> 應用程式註冊。
- 選取新增註冊。
- 輸入應用程式的 [名稱],例如
UWP-App-calling-MSGraph。 您的應用程式使用者可能會看到此名稱,而且您稍後可以加以變更。 - 在 [支援的帳戶類型] 底下,選取 [任何組織目錄中的帳戶](任何 Microsoft Entra 目錄 - 多租使用者)和個人 Microsoft 帳戶(例如 Skype、Xbox)。
- 選取註冊。
- 在 [概觀] 頁面上,尋找 應用程式 (用戶端) 識別碼 值並加以複製。 返回 Visual Studio,開啟 MainPage.xaml.cs,並以此值取代 的值
ClientId。
設定應用程式的驗證:
- 在 Microsoft Entra 系統管理中心中,選取 [驗證>] [新增平臺],然後選取 [行動和桌面應用程式]。
- 在 [ 重新導向 URI] 區段中,輸入
https://login.microsoftonline.com/common/oauth2/nativeclient。 - 選取設定。
設定應用程式的 API 權限:
- 選取 API 權限>新增權限。
- 選取 [Microsoft Graph]。
- 選取 [委派的許可權]、搜尋 User.Read,並確認 已選取 [User.Read ]。
- 如果您進行任何變更,請選取 [ 新增許可權] 以儲存這些變更 。
在同盟網域上啟用整合式驗證(選擇性)
若要在與同盟 Microsoft Entra 網域搭配使用時啟用整合式 Windows 驗證,應用程式指令清單必須啟用其他功能。 返回 Visual Studio 中的應用程式。
開啟 Package.appxmanifest。
選取[ 功能],然後啟用下列設定:
- 企業驗證
- 專用網 (客戶端與伺服器)
- 共用用戶憑證
重要
此範例預設不會設定整合式 Windows 驗證。 要求 Enterprise Authentication 或 Shared User Certificates 功能的應用程式需要 Windows 市集更高的驗證層級。 此外,並非所有開發人員都想要執行較高層級的驗證。 只有在您需要與同盟 Microsoft Entra 網域整合 Windows 驗證 時,才啟用此設定。
使用WithDefaultRedirectURI的替代方法()
在目前的範例中, WithRedirectUri("https://login.microsoftonline.com/common/oauth2/nativeclient") 會使用 方法。 若要使用 WithDefaultRedirectURI(),請完成下列步驟:
在 MainPage.XAML.cs 中,將 取代
WithRedirectUri為WithDefaultRedirectUri:目前的程序代碼
PublicClientApp = PublicClientApplicationBuilder.Create(ClientId)
    .WithAuthority(Authority)
    .WithUseCorporateNetwork(false)
    .WithRedirectUri("https://login.microsoftonline.com/common/oauth2/nativeclient")
    .WithLogging((level, message, containsPii) =>
     {
         Debug.WriteLine($"MSAL: {level} {message} ");
     }, LogLevel.Warning, enablePiiLogging: false, enableDefaultPlatformLogging: true)
    .Build();
更新的程式碼
PublicClientApp = PublicClientApplicationBuilder.Create(ClientId)
    .WithAuthority("https://login.microsoftonline.com/common")
    .WithUseCorporateNetwork(false)
    .WithDefaultRedirectUri()
    .WithLogging((level, message, containsPii) =>
     {
         Debug.WriteLine($"MSAL: {level} {message} ");
     }, LogLevel.Warning, enablePiiLogging: false, enableDefaultPlatformLogging: true)
    .Build();
在MainPage.xaml.cs 中新增
redirectURI欄位,並在其中設定斷點,以尋找應用程式的回呼 URI:public sealed partial class MainPage : Page { ... string redirectURI = Windows.Security.Authentication.Web.WebAuthenticationBroker .GetCurrentApplicationCallbackUri().ToString(); public MainPage() { ... } ... }執行應用程式,然後在叫用斷點時複製的值
redirectUri。 此值看起來應該類似下列值:ms-app://s-1-15-2-1352796503-54529114-405753024-3540103335-3203256200-511895534-1429095407/然後,您可以移除程式代碼行,因為它只需要一次,才能擷取值。
在 Microsoft Entra 系統管理中心中,於 [驗證] 窗格中的 RedirectUri中新增傳回的值。
測試您的程式碼
若要測試您的應用程式,請選取 F5 鍵以在 Visual Studio 中執行專案。 您的主視窗隨即出現:
當您準備好進行測試時,請選取 [呼叫 Microsoft Graph API]。 然後使用 Microsoft Entra 組織帳戶或 Microsoft 帳戶,例如 live.com 或 outlook.com 登入。 使用者第一次執行此測試時,應用程式會顯示視窗,要求使用者登入。
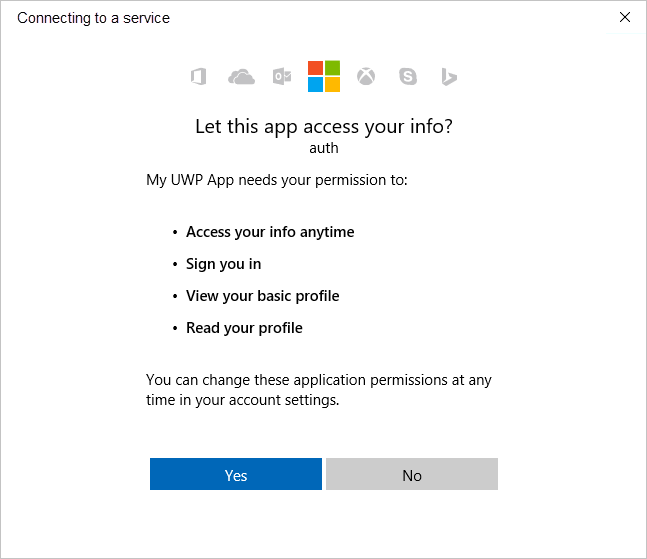
同意
第一次登入應用程式時,同意畫面看起來會類似下圖。 選取 [ 是 ] 明確同意存取:
預期的結果
您會在 [API 呼叫結果] 畫面上看到 Microsoft Graph API 呼叫所傳回的使用者配置檔資訊:
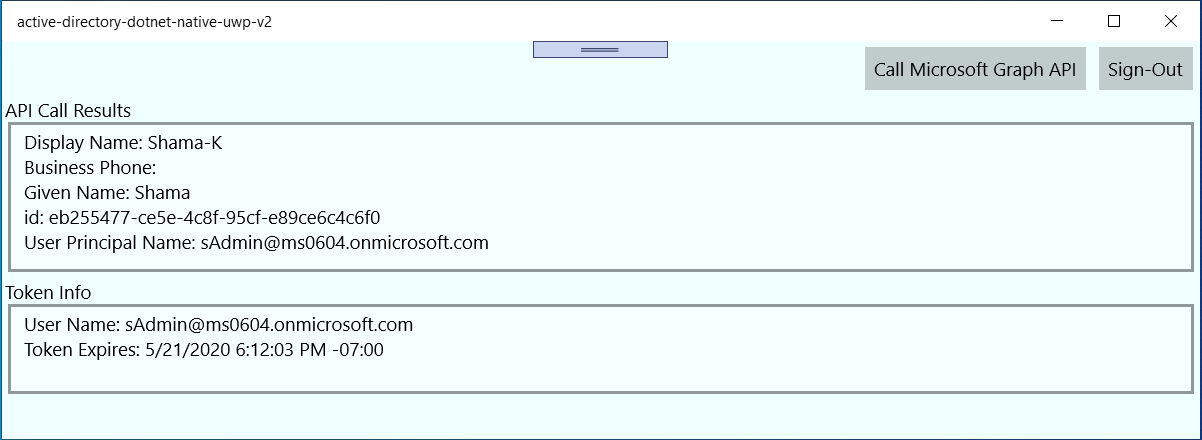
您也可以在 [令牌資訊] 方塊中看到透過 AcquireTokenInteractive 或 AcquireTokenSilent 取得之令牌的基本資訊:
| 屬性 | 格式 | 描述 |
|---|---|---|
Username |
user@domain.com |
識別使用者的用戶名稱。 |
Token Expires |
DateTime |
令牌到期的時間。 Microsoft 驗證連結庫會視需要更新令牌,以延長到期日。 |
範圍和委派許可權的詳細資訊
Microsoft Graph API 需要 user.read 範圍才能讀取使用者配置檔。 這個範圍預設會在應用程式註冊入口網站中註冊的每個應用程式中新增。 適用於 Microsoft Graph 的其他 API 和後端伺服器的自定義 API 可能需要其他範圍。 例如,Microsoft Graph API 需要 Calendars.Read 範圍來列出使用者的行事曆。
若要在應用程式內容中存取使用者的行事曆,請將委派的許可權新增 Calendars.Read 至應用程式註冊資訊。 然後將範圍新增 Calendars.Read 至 acquireTokenSilent 呼叫。
當您增加範圍數目時,可能會提示使用者取得其他同意。
已知問題
問題 1
當您在同盟 Microsoft Entra 網域上登入應用程式時,會收到下列其中一個錯誤訊息:
- 「要求中找不到有效的客戶端憑證」。
- 「在使用者的證書存儲中找不到有效的憑證」。
- 「再試一次選擇不同的驗證方法」。
原因: 未啟用企業和憑證功能。
解決方案:請遵循在同盟網域上啟用整合式驗證中的步驟(選擇性)。
問題 2
您可以在同盟網域上啟用整合式驗證,並嘗試在 Windows 10 計算機上使用 Windows Hello 來登入已設定多重要素驗證的環境。 憑證清單隨即出現。 如果您選擇使用 PIN,則 PIN 視窗永遠不會出現。
原因: 此問題是 UWP 應用程式中在 Windows 10 桌面電腦上執行的 Web 驗證代理程式已知限制。 它適用於 Windows 10 行動裝置版。
因應措施: 選取 [使用其他選項登入]。 然後選取 [以使用者名稱和密碼登入]。 選取 [ 提供密碼]。 然後完成電話驗證程式。
說明與支援
如果您需要協助、想要回報問題,或想要了解支援選項,請參閱 開發人員的說明和支援。
下一步
深入瞭解如何在 .NET 應用程式中使用 Microsoft 驗證連結庫 (MSAL) 進行授權和驗證: