開始使用:文件翻譯用戶端程式庫
文件翻譯是 Azure AI 翻譯工具服務的雲端式功能,以非同步方式使用支援的語言和各種檔案格式來翻譯整份文件。 在本快速入門中,了解如何使用文件翻譯搭配您選擇的程式設計語言,將來源文件翻譯為目標語言,同時保留結構和文字格式。
重要
- 文件翻譯目前僅受翻譯工具 (單一服務) 資源支援,但不包含在 Azure AI 服務 (多服務) 資源中。
- 付費層支援文件翻譯。 Language Studio 支援 S1 或 D3 執行個體層。 我們建議您選取 [標準 S1] 以嘗試文件翻譯。 請參閱Azure AI 服務定價—翻譯工具。
- 文件翻譯公開預覽版本提供了對積極開發中之功能的早期存取權。 根據使用者意見反應,功能、方法和流程在正式發行 (GA) 前可能有所變更。
- 文件翻譯用戶端程式庫的公開預覽版本預設為 REST API 版本 2024-05-01。
必要條件
若要開始,您需要:
單一服務翻譯工具資源 (不是多服務 Azure AI 服務資源)。 如果您計劃搭配受控識別驗證使用文件翻譯功能,請選擇一個地理區域,例如 [美國東部]。 選取標準 S1 標準服務方案 (隨用隨付) 或 C2、C3、C4 或 D3 大量折扣方案。
Azure Blob 儲存體帳戶。 您將在 Azure Blob 儲存體帳戶中為您的來源和目標檔案建立容器:
- 來源容器。 可會在此容器中上傳要翻譯的檔案 (必要)。
- 目標容器。 此容器是翻譯的檔案所將儲存之處 (必要)。
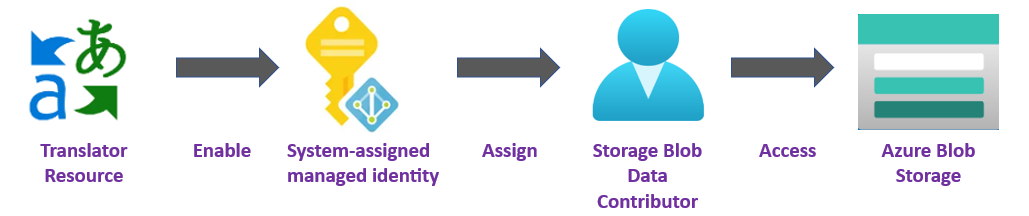
儲存體容器授權
您可以選擇下列其中一個選項來授權翻譯工具資源的存取權。
✔️ 受控識別。 受控識別是一種服務主體,其會建立 Microsoft Entra 身分識別和 Azure 受控資源的特定權限。 受控識別可讓您執行翻譯工具應用程式,而不需要在程式碼中內嵌認證。 受控識別提供更安全的方式來授與儲存體資料的存取權,並取代您包含共用存取簽章權杖(SAS) 與您的來源和目標 URL 的需求。
若要深入了解,請參閱文件翻譯的受控識別。
✔️ 共用存取簽章 (SAS)。 共用存取簽章是一個 URL,可將受限制的存取權授與翻譯工具服務一段時間。 若要使用此方法,您必須為來源和目標容器建立共用存取簽章 (SAS) 權杖。 sourceUrl 和 targetUrl 必須包含共用存取簽章 (SAS) 權杖,並附加為查詢字串。 權杖可以指派給您的容器或特定 Blob。
- 您的來源容器或 Blob 必須具有指定的讀取和列出存取權。
- 您的目標容器或 Blob 必須具有指定的寫入和列出存取權。
若要深入了解,請參閱建立 SAS 權杖。

建置您的 應用程式
有數個工具可用來建立、建置和執行翻譯工具 C#/.NET 應用程式。 在這裡,我們會引導您使用命令列介面 (CLI) 或 Visual Studio。 選取下列其中一個索引標籤以開始使用:
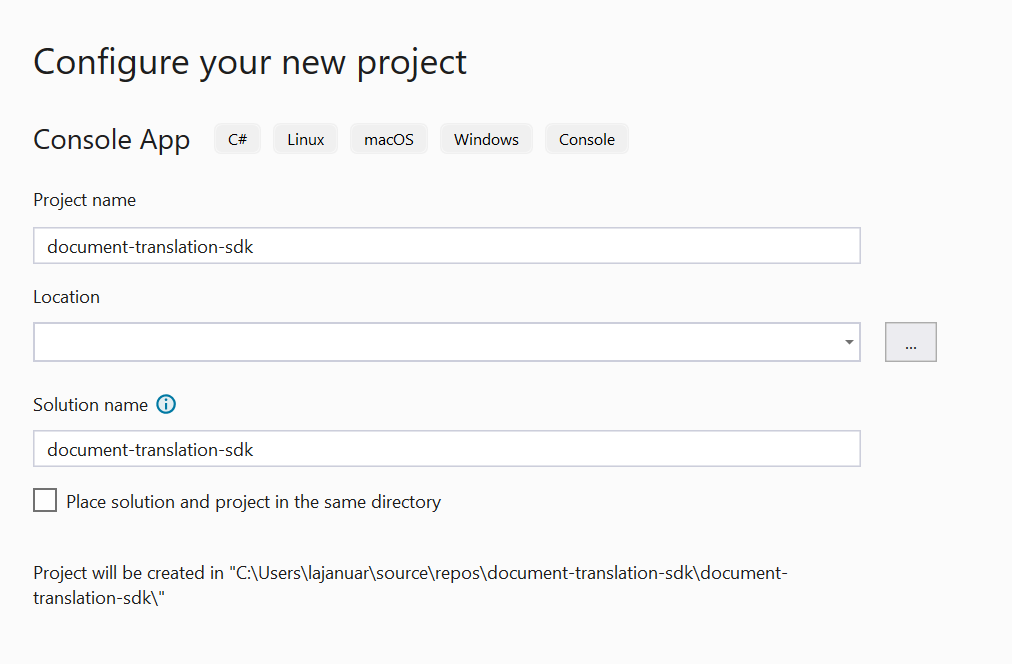
設定您的專案
在主控台視窗中 (例如 cmd、PowerShell 或 Bash),使用 dotnet new 命令建立名為 batch-document-translation 的新主控台應用程式。 此命令會建立簡單的 "Hello World" C# 專案,內含單一原始程式檔:Program.cs。
dotnet new console -n batch-document-translation
將目錄變更為新建立的應用程式資料夾。 使用下列命令建置您的應用程式:
dotnet build
建置輸出應該不會有警告或錯誤。
...
Build succeeded.
 0 Warning(s)
 0 Error(s)
...
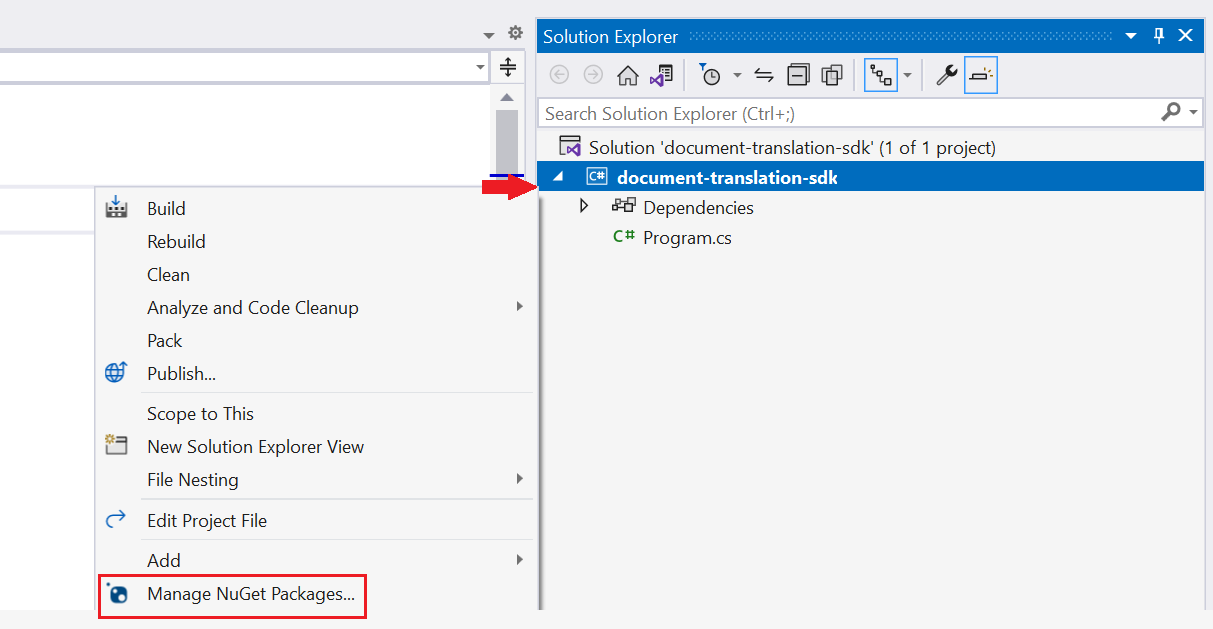
安裝用戶端程式庫
在應用程式目錄中,安裝適用於 .NET 的文件翻譯用戶端程式庫:
dotnet add package Azure.AI.Translation.Document --version 2.0.0-beta
以非同步方式翻譯文件
針對此專案,您需要上傳至來源容器的來源文件。 您可以針對此快速入門下載我們的文件翻譯範例文件。 來源語言為英文。
從專案目錄,在慣用的編輯器或 IDE 中開啟 Program.cs 檔案。 刪除預先存在的程式碼,包含此行
Console.WriteLine("Hello World!")。在應用程式的 Program.cs 中,為您的金鑰和自訂端點建立變數。 如需詳細資訊,請參閱擷取金鑰和自訂網域端點。
private static readonly string endpoint = "<your-document-translation-endpoint>";
private static readonly string key = "<your-key>";
呼叫
StartTranslationAsync方法,為單一 Blob 容器中的一或多份文件啟動翻譯作業。若要呼叫
StartTranslationAsync,您必須初始化包含sourceUri、targetUri和targetLanguageCode參數的DocumentTranslationInput物件:針對受控識別授權,請建立下列變數:
sourceUri。 包含要翻譯文件的來源容器 URL。
targetUri 翻譯文件將寫入的目標容器 URL。
targetLanguageCode。 翻譯文件的語言代碼。 您可以在我們的語言支援頁面上找到語言代碼。
若要尋找您的來源和目標 URL,請瀏覽至 Azure 入口網站中的儲存體帳戶。 在左側提要欄位的 [資料儲存體] 底下,選取 [容器],然後遵循下列步驟來擷取來源文件和目標容器
URLS。來源 Target 1.選取來源容器旁的核取方塊 1.選取目標容器旁的核取方塊。 2.從主視窗區域,選取要翻譯的檔案或文件。 2.選取右側的省略符號,然後選擇 [屬性]。 3.來源 URL 位於 [屬性] 清單的頂端。 3.目標 URL 位於 [屬性] 清單頂端。
針對共用存取簽章 (SAS) 授權建立這些變數
- sourceUri。 針對包含要翻譯文件的來源容器,其 SAS 權杖附加為查詢字串的 SAS URI。
- targetUri 針對用於寫入翻譯文件的目標容器,其 SAS 權杖附加為查詢字串的 SAS URI。
- targetLanguageCode。 翻譯文件的語言代碼。 您可以在我們的語言支援頁面上找到語言代碼。
重要
完成時,請記得從程式碼中移除金鑰,且不要公開張貼金鑰。 在生產環境中,請使用安全的方式來儲存和存取您的認證,例如 Azure Key Vault。 如需詳細資訊,請參閱 Azure AI 服務安全性。
非同步翻譯程式碼範例
將下列程式碼範例輸入至您的應用程式 Program.cs 檔案:
using Azure;
using Azure.AI.Translation.Document;
using System;
using System.Threading;
using System.Text;
class Program {
// create variables for your custom endpoint and resource key
private static readonly string endpoint = "<your-document-translation-endpoint>";
private static readonly string key = "<your-key>";
static async Task Main(string[] args) {
// create variables for your sourceUrl, targetUrl, and targetLanguageCode
Uri sourceUri = new Uri("<sourceUrl>");
Uri targetUri = new Uri("<targetUrl>");
string targetLanguage = "<targetLanguageCode>"
// initialize a new instance of the DocumentTranslationClient object to interact with the Document Translation feature
DocumentTranslationClient client = new DocumentTranslationClient(new Uri(endpoint), new AzureKeyCredential(key));
// initialize a new instance of the `DocumentTranslationInput` object to provide the location of input for the translation operation
DocumentTranslationInput input = new DocumentTranslationInput(sourceUri, targetUri, targetLanguage);
// initialize a new instance of the DocumentTranslationOperation class to track the status of the translation operation
DocumentTranslationOperation operation = await client.StartTranslationAsync(input);
await operation.WaitForCompletionAsync();
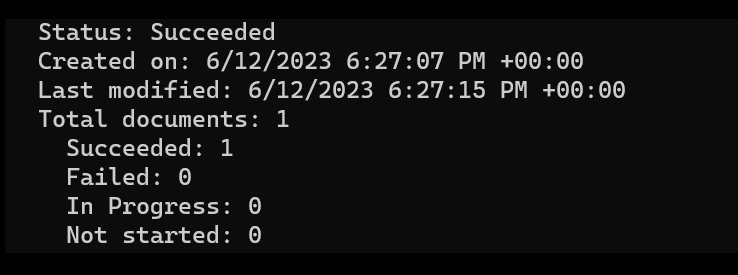
Console.WriteLine($" Status: {operation.Status}");
Console.WriteLine($" Created on: {operation.CreatedOn}");
Console.WriteLine($" Last modified: {operation.LastModified}");
Console.WriteLine($" Total documents: {operation.DocumentsTotal}");
Console.WriteLine($" Succeeded: {operation.DocumentsSucceeded}");
Console.WriteLine($" Failed: {operation.DocumentsFailed}");
Console.WriteLine($" In Progress: {operation.DocumentsInProgress}");
Console.WriteLine($" Not started: {operation.DocumentsNotStarted}");
await foreach(DocumentStatusResult document in operation.Value) {
Console.WriteLine($"Document with Id: {document.Id}");
Console.WriteLine($" Status:{document.Status}");
if (document.Status == DocumentTranslationStatus.Succeeded) {
Console.WriteLine($" Translated Document Uri: {document.TranslatedDocumentUri}");
Console.WriteLine($" Translated to language: {document.TranslatedToLanguageCode}.");
Console.WriteLine($" Document source Uri: {document.SourceDocumentUri}");
} else {
Console.WriteLine($" Error Code: {document.Error.Code}");
Console.WriteLine($" Message: {document.Error.Message}");
}
}
}
}
執行您的應用程式
將程式碼範例新增至應用程式之後,請在終端中輸入下列命令,以從專案目錄執行您的應用程式:
dotnet run
以下是預期輸出的程式碼片段:
同步翻譯程式碼範例
您可以針對此快速入門下載我們的文件翻譯範例文件。 來源語言為英文。
using Azure;
using Azure.AI.Translation.Document;
using System;
using System.Threading;
using System.Text;

class Program {

  string endpoint = "{your-document-translation-endpoint}";
  string apiKey = "{your-api-key}";
  SingleDocumentTranslationClient client = new SingleDocumentTranslationClient(new Uri(endpoint), new AzureKeyCredential(apiKey));

  try
  {
    string filePath = @"C:\{folder}\document.txt"
    using Stream fileStream = File.OpenRead(filePath);

    // MultipartFormFileData (string name, System.IO.Stream content, string contentType);
    var sourceDocument = new MultipartFormFileData(Path.GetFileName(filePath), fileStream, "application/vnd.openxmlformats-officedocument.wordprocessingml.document");

    DocumentTranslateContent content = new DocumentTranslateContent(sourceDocument);

    // DocumentTranslate (string targetLanguage, Azure.AI.Translation.Document.DocumentTranslateContent documentTranslateContent, string sourceLanguage = default, string category = default, bool? allowFallback = default, System.Threading.CancellationToken cancellationToken = default);
    var response = client.DocumentTranslate("de", content);

    Console.WriteLine($"Request string for translation: {requestString}");
    Console.WriteLine($"Response string after translation: {responseString}");
  }
    catch (RequestFailedException exception) {
    Console.WriteLine($"Error Code: {exception.ErrorCode}");
    Console.WriteLine($"Message: {exception.Message}");
  }
}


介紹完畢 您剛剛建立一個程式,可使用 .NET 用戶端程式庫來翻譯儲存體容器中的文件。
設定您的專案
確定已安裝最新版本的 Python。
安裝用戶端程式庫
安裝最新版本的文件翻譯用戶端程式庫:
pip install azure-ai-translation-document==1.1.0b1
翻譯批次檔案
針對此專案,您需要上傳至來源容器的來源文件。 您可以針對此快速入門下載我們的文件翻譯範例文件。 來源語言為英文。
在 Python 應用程式檔案中,為您的資源索引鍵和自訂端點建立變數。 如需詳細資訊,請參閱擷取金鑰和自訂網域端點。
key = "{your-api-key}"
endpoint = "{your-document-translation-endpoint}"
初始化包含
endpoint和key參數的DocumentTranslationClient物件。呼叫
begin_translation方法並傳入sourceUri、targetUri和targetLanguageCode參數。針對受控識別授權,請建立下列變數:
sourceUri。 包含要翻譯文件的來源容器 URL。
targetUri 翻譯文件將寫入的目標容器 URL。
targetLanguageCode。 翻譯文件的語言代碼。 您可以在我們的語言支援頁面上找到語言代碼。
若要尋找您的來源和目標 URL,請瀏覽至 Azure 入口網站中的儲存體帳戶。 在左側提要欄位的 [資料儲存體] 底下,選取 [容器],然後遵循下列步驟來擷取來源文件和目標容器
URLS。來源 Target 1.選取來源容器旁的核取方塊 1.選取目標容器旁的核取方塊。 2.從主視窗區域,選取要翻譯的檔案或文件。 2.選取右側的省略符號,然後選擇 [屬性]。 3.來源 URL 位於 [屬性] 清單的頂端。 3.目標 URL 位於 [屬性] 清單頂端。
針對共用存取簽章 (SAS) 授權建立這些變數
- sourceUri。 針對包含要翻譯文件的來源容器,其 SAS 權杖附加為查詢字串的 SAS URI。
- targetUri 針對用於寫入翻譯文件的目標容器,其 SAS 權杖附加為查詢字串的 SAS URI。
- targetLanguageCode。 翻譯文件的語言代碼。 您可以在我們的語言支援頁面上找到語言代碼。
非同步翻譯程式碼範例
重要
完成時,請記得從程式碼中移除金鑰,且不要公開張貼金鑰。 在生產環境中,請使用安全的方式來儲存和存取您的認證,例如 Azure Key Vault。 如需詳細資訊,請參閱 Azure AI 服務安全性。
在 Python 應用程式中輸入下列程式碼範例:
#  import libraries
from azure.core.credentials import AzureKeyCredential
from azure.ai.translation.document import DocumentTranslationClient

# create variables for your resource key, custom endpoint, sourceUrl, targetUrl, and targetLanguage
key = '{your-api-key}'
endpoint = '{your-document-translation-endpoint}'
sourceUri = '<your-container-sourceUrl>'
targetUri = '<your-container-targetUrl>'
targetLanguage = '<target-language-code>'


# initialize a new instance of the DocumentTranslationClient object to interact with the asynchronous Document Translation feature
client = DocumentTranslationClient(endpoint, AzureKeyCredential(key))

# include source and target locations and target language code for the begin translation operation
poller = client.begin_translation(sourceUri, targetUri, targetLanguage)
result = poller.result()

print('Status: {}'.format(poller.status()))
print('Created on: {}'.format(poller.details.created_on))
print('Last updated on: {}'.format(poller.details.last_updated_on))
print(
    'Total number of translations on documents: {}'.format(
        poller.details.documents_total_count
    )
)

print('\nOf total documents...')
print('{} failed'.format(poller.details.documents_failed_count))
print('{} succeeded'.format(poller.details.documents_succeeded_count))

for document in result:
    print('Document ID: {}'.format(document.id))
    print('Document status: {}'.format(document.status))
    if document.status == 'Succeeded':
        print('Source document location: {}'.format(document.source_document_url))
        print(
            'Translated document location: {}'.format(document.translated_document_url)
        )
        print('Translated to language: {}\n'.format(document.translated_to))
    else:
        print(
            'Error Code: {}, Message: {}\n'.format(
                document.error.code, document.error.message
            )
        )
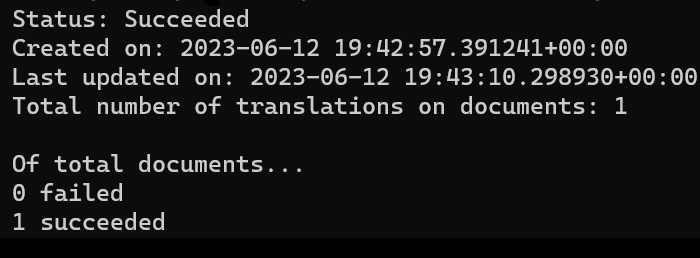
執行您的應用程式
將程式碼範例新增至應用程式之後,請在終端中輸入下列命令:
python asynchronous-sdk.py
以下是預期輸出的程式碼片段:
同步翻譯程式碼範例
您可以針對此快速入門下載我們的文件翻譯範例文件。 來源語言為英文。
import os
from azure.core.credentials import AzureKeyCredential
from azure.ai.translation.document import SingleDocumentTranslationClient
from azure.ai.translation.document.models import DocumentTranslateContent


def sample_single_document_translation():

    # create variables for your resource api key, document translation endpoint, and target language
    key = "<your-api-key>"
    endpoint = "<your-document-translation-endpoint>"
    target_language = "{target-language-code}"

    # initialize a new instance of the SingleDocumentTranslationClient object to interact with the synchronous Document Translation feature
    client = SingleDocumentTranslationClient(endpoint, AzureKeyCredential(key))

    # absolute path to your document
    file_path = "C:/{your-file-path}/document-translation-sample.docx"
    file_name = os.path.path.basename(file_path)
    file_type = (
        "application/vnd.openxmlformats-officedocument.wordprocessingml.document"
    )
    print(f"File for translation: {file_name}")

    with open(file_name, "r") as file:
        file_contents = file.read()

    document_content = (file_name, file_contents, file_type)
    document_translate_content = DocumentTranslateContent(document=document_content)

    response_stream = client.document_translate(
        body=document_translate_content, target_language=target_language
    )
    translated_response = response_stream.decode("utf-8-sig")  # type: ignore[attr-defined]
    print(f"Translated response: {translated_response}")


if __name__ == "__main__":
    sample_single_document_translation()
介紹完畢 您剛建立了一個使用 Python 用戶端程式庫非同步和同步翻譯文件的程式。
後續步驟
意見反映
即將推出:我們會在 2024 年淘汰 GitHub 問題,並以全新的意見反應系統取代並作為內容意見反應的渠道。 如需更多資訊,請參閱:https://aka.ms/ContentUserFeedback。
提交及檢視以下的意見反映: