針對在 Linux 中裝載的 ASP.NET Core Web 應用程式啟用 Profiler
藉由使用適用於 .NET 的 Application Insights Profiler,您可以追蹤在 Linux Azure App 服務 上裝載於 Linux 上之即時 ASP.NET Core Web 應用程式的每個方法所花費的時間。 本文著重於 Linux 中裝載的 Web 應用程式。 您也可以使用 Linux、Windows 和 Mac 開發環境進行實驗。
在本文章中,您將:
- 設定及部署裝載在 Linux 上的 ASP.NET Core Web 應用程式。
- 將 Application Insights Profiler 新增至 ASP.NET Core Web 應用程式。
必要條件
- 安裝最新的 .NET Core SDK。
- 遵循使用者入門 - 安裝 Git 的指示來安裝 Git。
- 檢閱下列內容範例:
在本機設定專案
在您的機器上開啟命令提示字元視窗。
建立 ASP.NET Core MVC Web 應用程式:
dotnet new mvc -n LinuxProfilerTest將工作目錄變更為專案的根資料夾。
新增 NuGet 套件來收集分析工具追蹤:
dotnet add package Microsoft.ApplicationInsights.Profiler.AspNetCore在慣用的程式代碼編輯器中,在 中
Program.cs啟用Application Insights和 .NET Profiler。 新增自訂 Profiler 設定 (如果適用的話)。針對
WebAPI:// Add services to the container. builder.Services.AddApplicationInsightsTelemetry(); builder.Services.AddServiceProfiler();針對
Worker:IHost host = Host.CreateDefaultBuilder(args) .ConfigureServices(services => { services.AddApplicationInsightsTelemetryWorkerService(); services.AddServiceProfiler(); // Assuming Worker is your background service class. services.AddHostedService<Worker>(); }) .Build(); await host.RunAsync();儲存並認可您對本機存放庫的變更:
git init
git add .
git commit -m "first commit"
建立 Linux Web 應用程式來裝載專案
在 Azure 入口網站中,使用 Linux 上的 App Service 建立 Web 應用程式環境。

移至新的 Web 應用程式資源,然後選取 [部署中心]>[FTPS 認證] 以建立部署認證。 記下您的認證以在稍後使用。

選取 [儲存]。
選取 [設定] 索引標籤。
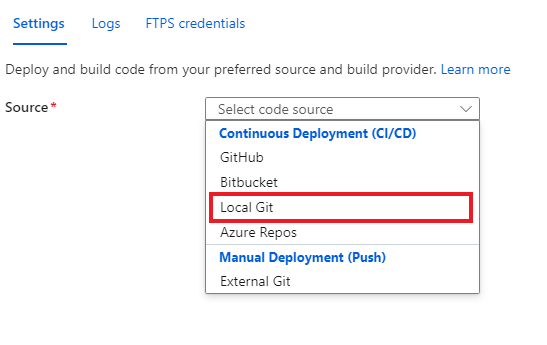
在下拉式清單中,選取 [本機 Git] 以在 Web 應用程式中設定本機 Git 存放庫。

選取 [儲存] 以使用 Git Clone URI 建立 Git 存放庫。

如需進一步了解其他部署選項,請參閱 App Service 文件。
部署您的專案
在命令提示字元視窗中,瀏覽至專案的根資料夾。 新增 Git 遠端存放庫以指向 App Service 上的存放庫:
git remote add azure https://<username>@<app_name>.scm.azurewebsites.net:443/<app_name>.git- 使用您之前建立部署認證時所使用的使用者名稱。
- 使用您之前在 Linux 上使用 App Service 建立 Web 應用程式時所使用的應用程式名稱。
將變更推送至 Azure 來部署專案:
git push azure main您應該會看到類似下列範例的結果:
Counting objects: 9, done.
Delta compression using up to 8 threads.
Compressing objects: 100% (8/8), done.
Writing objects: 100% (9/9), 1.78 KiB | 911.00 KiB/s, done.
Total 9 (delta 3), reused 0 (delta 0)
remote: Updating branch 'main'.
remote: Updating submodules.
remote: Preparing deployment for commit id 'd7369a99d7'.
remote: Generating deployment script.
remote: Running deployment command...
remote: Handling ASP.NET Core Web Application deployment.
remote: ......
remote:   Restoring packages for /home/site/repository/EventPipeExampleLinux.csproj...
remote: .
remote:   Installing Newtonsoft.Json 10.0.3.
remote:   Installing Microsoft.ApplicationInsights.Profiler.Core 1.1.0-LKG
...
新增 Application Insights 以監視您的 Web 應用程式
您有三個選項可將 Application Insights 新增至 Web 應用程式:
- 在 Azure 入口網站中使用 [Application Insights] 窗格。
- 在 Azure 入口網站中使用 [設定] 窗格。
- 手動新增至 Web 應用程式設定。
在 Azure 入口網站的 Web 應用程式中,選取左側窗格上的 [Application Insights]。
選取 [開啟 Application Insights]。

在 [Application Insights] 下,選取 [啟用]。

在 [連結至 Application Insights 資源] 底下,建立新的資源或選取現有的資源。 在此範例中,我們會建立新的資源。

選取 [套用]>[是] 以套用並確認。
![顯示在 [設定] 窗格中新增應用程式設定的螢幕擷取畫面。](media/profiler-aspnetcore-linux/new-setting-configuration.png)
![顯示將 iKey 新增至 [設定] 窗格的螢幕擷取畫面。](media/profiler-aspnetcore-linux/add-ikey-settings.png)
