快速入門:使用 Visual Studio 建立 Bicep 檔案
此快速入門引導您逐步完成使用 Visual Studio Code 建立 Bicep 檔案的步驟。 您將建立儲存體帳戶和虛擬網路。 您也將了解 Bicep 延伸模組如何透過提供型別安全、語法驗證與自動完成來簡化開發。
Visual Studio Code 也支援類似的撰寫體驗。 請參閱快速入門:使用 Visual Studio Code 建立 Bicep 檔案。
必要條件
- Azure 訂用帳戶。 如尚未擁有 Azure 訂用帳戶,請在開始之前先建立免費帳戶。
- Visual Studio 17.3.0 版 Preview 3 或更新版本。 請參閱 Visual Studio Preview。
- Visual Studio Bicep 延伸模組。 請參閱 Visual Studio Marketplace。
- Bicep 檔案部署需要最新版的 Azure CLI 或最新版的 Azure PowerShell 模組。
新增資源程式碼片段
啟動 Visual Studio 並建立名為 main.bicep 的新檔案。
含有 Bicep 延伸模組的 Visual Studio 可透過提供預先定義的程式碼片段來簡化開發。 在此快速入門中,您將新增能建立虛擬網路的程式碼片段。
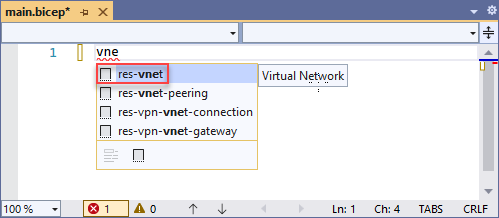
在 main.bicep 中,輸入 vnet。 從清單選取 [res-vnet],然後按下 [TAB] 或 [ENTER]。
提示
如果您在 Visual Studio 中看不到那些 Intellisense 選項,確定您已安裝 Bicep 延伸模組,如必要條件中所指定。 如果您已安裝該延伸模組,則在開啟 Bicep 檔案之後,請給 Bicep 語言服務一些時間來啟動。 其通常會快速啟動,但在其啟動之前,您將不會有 Intellisense 選項。
您的 Bicep 檔案現在包含下列程式碼:
resource virtualNetwork 'Microsoft.Network/virtualNetworks@2019-11-01' = {
  name: 'name'
  location: location
  properties: {
    addressSpace: {
      addressPrefixes: [
        '10.0.0.0/16'
      ]
    }
    subnets: [
      {
        name: 'Subnet-1'
        properties: {
          addressPrefix: '10.0.0.0/24'
        }
      }
      {
        name: 'Subnet-2'
        properties: {
          addressPrefix: '10.0.1.0/24'
        }
      }
    ]
  }
}
此程式碼片段包含定義虛擬網路所需的所有值。 不過,您可以修改此程式碼以符合需求。 例如,name 不是虛擬網路的絕佳名稱。 將 name 屬性變更為 exampleVnet。
name: 'exampleVnet'
請注意,location 有紅色波浪底線。 這表示此處有問題。 將游標停留在 location 上。 錯誤訊息是 - 名稱 "location" 不存在於目前的內容中。我們將在下一節中建立位置參數。
新增參數
我們現在將為儲存體帳戶名稱和位置新增兩個參數。 在檔案頂端,新增:
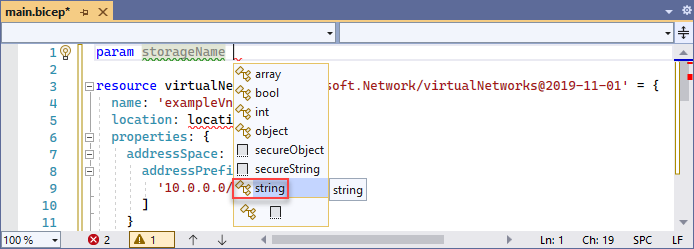
param storageName
當您在 storageName 之後加入一個空格時,請注意 Intellisense 會提供可用於參數的資料類型。 選取 [字串]。
您有下列參數:
param storageName string
此參數運作正常,但儲存體帳戶的名稱長度有限制。 名稱必須至少有 3 個字元,而且不能多於 24 個字元。 您可以透過將裝飾項目新增至參數來指定那些需求。
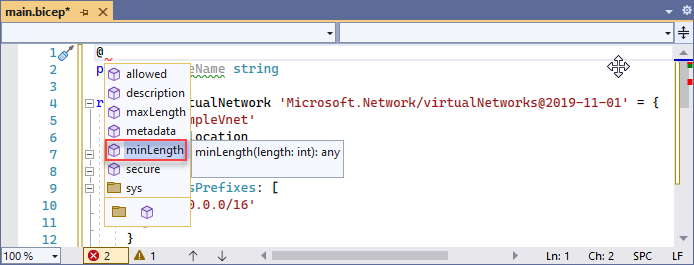
在參數正上方加上一行,然後輸入 @。 您會看到可用的裝飾項目。 請注意,minLength 和 maxLength 都有裝飾項目。
新增這兩個裝飾項目,並指定字元限制,如下所示:
@minLength(3)
@maxLength(24)
param storageName string
您也可以新增參數的描述。 包括的資訊可協助部署 Bicep 檔案的人員了解要提供的值。
@minLength(3)
@maxLength(24)
@description('Provide a name for the storage account. Use only lower case letters and numbers. The name must be unique across Azure.')
param storageName string
儲存體帳戶名稱參數現已可供使用。
新增其他位置參數:
param location string = resourceGroup().location
新增資源
我們將使用 Intellisense 來設定值,而不是使用程式碼片段來定義儲存體帳戶。 相較於必須手動輸入值,Intellisense 讓此步驟容易許多。
若要定義資源,請使用 resource 關鍵字。 在您的虛擬網路下方,輸入 resource exampleStorage:
resource exampleStorage
exampleStorage 是您要部署資源的符號名稱。 您可以使用此名稱來參考 Bicep 檔案其他部分中的資源。
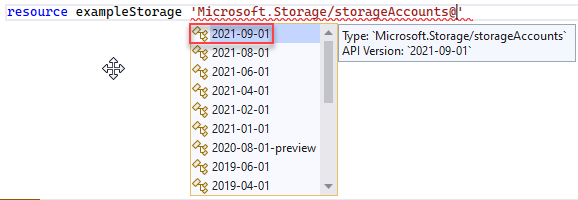
當您在符號名稱後面加上一個空格時,即會顯示資源類型的清單。 繼續輸入 storage,直到您可以從可用選項中加以選取為止。
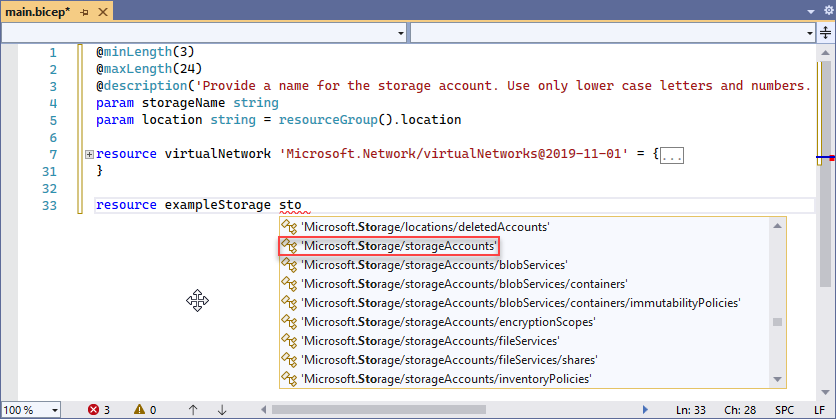
選取 [Microsoft.Storage/storageAccounts] 之後,您就會看到可用的 API 版本。 選取 [2021-09-01] 或最新 API 版本。 建議使用最新 API 版本。
在資源類型的單引號後面,加上 = 和一個空格。 您會看到可將屬性新增至資源的選項。 選取 [required-properties]。

此選項會新增部署所需資源類型的所有屬性。 選取此選項之後,您的儲存體帳戶會有下列屬性:
resource exampleStorage 'Microsoft.Storage/storageAccounts@2021-09-01' = {
	name: 1
	location: 2
	sku: {
		name: 3
	}
	kind: 4
}
程式碼中有四個預留位置。 使用 [TAB] 來瀏覽並輸入值。 再說明一次,Intellisense 可協助您。 將 name 設定為 storageName,這是包含儲存體帳戶名稱的參數。 針對 location,將其設定為 location。 新增 SKU 名稱和種類時,Intellisense 會顯示有效的選項。
完成時,您會有:
@minLength(3)
@maxLength(24)
@description('Provide a name for the storage account. Use only lower case letters and numbers. The name must be unique across Azure.')
param storageName string
param location string = resourceGroup().location

resource virtualNetwork 'Microsoft.Network/virtualNetworks@2019-11-01' = {
  name: storageName
  location: location
  properties: {
    addressSpace: {
      addressPrefixes: [
        '10.0.0.0/16'
      ]
    }
    subnets: [
      {
        name: 'Subnet-1'
        properties: {
          addressPrefix: '10.0.0.0/24'
        }
      }
      {
        name: 'Subnet-2'
        properties: {
          addressPrefix: '10.0.1.0/24'
        }
      }
    ]
  }
}

resource exampleStorage 'Microsoft.Storage/storageAccounts@2021-09-01' = {
  name: storageName
  location: location
  sku: {
    name: 'Standard_LRS'
  }
  kind: 'StorageV2'
}
如需 Bicep 語法的詳細資訊,請參閱 Bicep 結構 (部分機器翻譯)。
部署 Bicep 檔案
Bicep 檔案部署尚無法透過 Visual Studio 完成。 您可以使用 Azure CLI 或 Azure PowerShell 來部署 Bicep 檔案:
az group create --name exampleRG --location eastus

az deployment group create --resource-group exampleRG --template-file main.bicep --parameters storageName=uniquename
當部署完成時,您應該會看到指出部署成功的訊息。
清除資源
如果不再需要 Azure 資源,請使用 Azure CLI 或 Azure PowerShell 模組來刪除快速入門資源群組。
az group delete --name exampleRG
下一步
意見反映
即將推出:我們會在 2024 年淘汰 GitHub 問題,並以全新的意見反應系統取代並作為內容意見反應的渠道。 如需更多資訊,請參閱:https://aka.ms/ContentUserFeedback。
提交及檢視以下的意見反映: