教學課程:建置 Blazor Server 聊天應用程式
本教學課程說明如何建置和修改 Blazor Server 應用程式。 您將了解如何:
- 使用 Blazor Server 應用程式範本建立簡單的聊天室。
- 運用 Razor 元件。
- 使用 Razor 元件中的事件處理和資料繫結。
- 快速部署至 Visual Studio 中的 Azure App Service。
- 從本機 SignalR 遷移至 Azure SignalR Service。
準備開始了嗎?
必要條件
- 安裝 .NET Core 3.0 SDK (版本 >= 3.0.100)
- 安裝 Visual Studio 2019 (版本 >= 16.3)
在 Blazor Server 應用程式中建置本機聊天室
從 Visual Studio 2019 16.2.0 版開始,Azure SignalR Service 會內建於 Web 應用程式發佈流程中,協助您輕鬆管理 Web 應用程式和 SignalR Service 之間的相依性。 您可以在本機開發環境中使用本機 SignalR 執行個體,同時在適用於 Azure App Service 的 Azure SignalR Service 中工作,無需變更任何程式碼。
建立 Blazor 聊天應用程式:
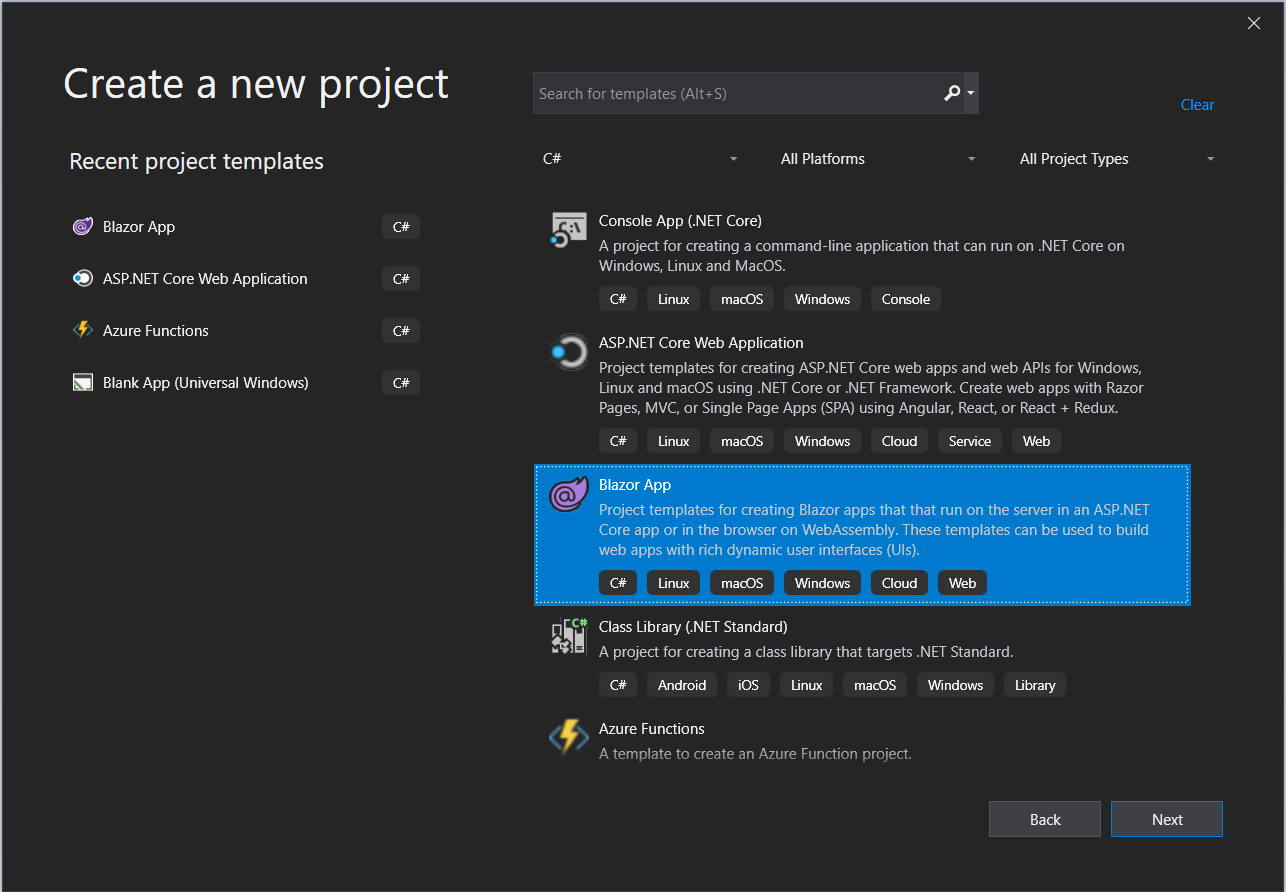
在 Visual Studio 中,選擇 [建立新專案]。
選取 [Blazor 應用程式]。
命名應用程式,然後選擇資料夾。
選取 Blazor Server 應用程式範本。
注意
請確定您已安裝 .NET Core SDK 3.0 +,以便 Visual Studio 能夠正確辨識目標 Framework。
您也可以在 .NET CLI 中執行
dotnet new命令來建立專案:dotnet new blazorserver -o BlazorChat
新增名為
BlazorChatSampleHub.cs的新 C# 檔案,並建立衍生自聊天應用程式Hub類別的新類別BlazorChatSampleHub。 如需建立中樞的詳細資訊,請參閱建立和使用中樞。using System; using System.Threading.Tasks; using Microsoft.AspNetCore.SignalR; namespace BlazorChat { public class BlazorChatSampleHub : Hub { public const string HubUrl = "/chat"; public async Task Broadcast(string username, string message) { await Clients.All.SendAsync("Broadcast", username, message); } public override Task OnConnectedAsync() { Console.WriteLine($"{Context.ConnectionId} connected"); return base.OnConnectedAsync(); } public override async Task OnDisconnectedAsync(Exception e) { Console.WriteLine($"Disconnected {e?.Message} {Context.ConnectionId}"); await base.OnDisconnectedAsync(e); } } }在
Startup.Configure()方法內新增中樞的端點。app.UseEndpoints(endpoints => { endpoints.MapBlazorHub(); endpoints.MapFallbackToPage("/_Host"); endpoints.MapHub<BlazorChatSampleHub>(BlazorChatSampleHub.HubUrl); });安裝
Microsoft.AspNetCore.SignalR.Client套件以使用 SignalR 用戶端。dotnet add package Microsoft.AspNetCore.SignalR.Client --version 3.1.7在
Pages資料夾下建立名為ChatRoom.razor的新 Razor 元件,以實作 SignalR 用戶端。 請遵循下列步驟,或使用 ChatRoom.razor 檔案。新增
@page指示詞和 using 陳述式。 使用@inject指示詞插入NavigationManager服務。@page "/chatroom" @inject NavigationManager navigationManager @using Microsoft.AspNetCore.SignalR.Client;在
@code區段中,將下列成員新增至新的 SignalR 用戶端,以用於傳送和接收訊息。@code { // flag to indicate chat status private bool _isChatting = false; // name of the user who will be chatting private string _username; // on-screen message private string _message; // new message input private string _newMessage; // list of messages in chat private List<Message> _messages = new List<Message>(); private string _hubUrl; private HubConnection _hubConnection; public async Task Chat() { // check username is valid if (string.IsNullOrWhiteSpace(_username)) { _message = "Please enter a name"; return; }; try { // Start chatting and force refresh UI. _isChatting = true; await Task.Delay(1); // remove old messages if any _messages.Clear(); // Create the chat client string baseUrl = navigationManager.BaseUri; _hubUrl = baseUrl.TrimEnd('/') + BlazorChatSampleHub.HubUrl; _hubConnection = new HubConnectionBuilder() .WithUrl(_hubUrl) .Build(); _hubConnection.On<string, string>("Broadcast", BroadcastMessage); await _hubConnection.StartAsync(); await SendAsync($"[Notice] {_username} joined chat room."); } catch (Exception e) { _message = $"ERROR: Failed to start chat client: {e.Message}"; _isChatting = false; } } private void BroadcastMessage(string name, string message) { bool isMine = name.Equals(_username, StringComparison.OrdinalIgnoreCase); _messages.Add(new Message(name, message, isMine)); // Inform blazor the UI needs updating InvokeAsync(StateHasChanged); } private async Task DisconnectAsync() { if (_isChatting) { await SendAsync($"[Notice] {_username} left chat room."); await _hubConnection.StopAsync(); await _hubConnection.DisposeAsync(); _hubConnection = null; _isChatting = false; } } private async Task SendAsync(string message) { if (_isChatting && !string.IsNullOrWhiteSpace(message)) { await _hubConnection.SendAsync("Broadcast", _username, message); _newMessage = string.Empty; } } private class Message { public Message(string username, string body, bool mine) { Username = username; Body = body; Mine = mine; } public string Username { get; set; } public string Body { get; set; } public bool Mine { get; set; } public bool IsNotice => Body.StartsWith("[Notice]"); public string CSS => Mine ? "sent" : "received"; } }在
@code區段之前新增 UI 標記,以與 SignalR 用戶端互動。<h1>Blazor SignalR Chat Sample</h1> <hr /> @if (!_isChatting) { <p> Enter your name to start chatting: </p> <input type="text" maxlength="32" @bind="@_username" /> <button type="button" @onclick="@Chat"><span class="oi oi-chat" aria-hidden="true"></span> Chat!</button> // Error messages @if (_message != null) { <div class="invalid-feedback">@_message</div> <small id="emailHelp" class="form-text text-muted">@_message</small> } } else { // banner to show current user <div class="alert alert-secondary mt-4" role="alert"> <span class="oi oi-person mr-2" aria-hidden="true"></span> <span>You are connected as <b>@_username</b></span> <button class="btn btn-sm btn-warning ml-md-auto" @onclick="@DisconnectAsync">Disconnect</button> </div> // display messages <div id="scrollbox"> @foreach (var item in _messages) { @if (item.IsNotice) { <div class="alert alert-info">@item.Body</div> } else { <div class="@item.CSS"> <div class="user">@item.Username</div> <div class="msg">@item.Body</div> </div> } } <hr /> <textarea class="input-lg" placeholder="enter your comment" @bind="@_newMessage"></textarea> <button class="btn btn-default" @onclick="@(() => SendAsync(_newMessage))">Send</button> </div> }
更新
NavMenu.razor元件以插入新的NavLink元件,以連結至NavMenuCssClass下方的聊天室。<li class="nav-item px-3"> <NavLink class="nav-link" href="chatroom"> <span class="oi oi-chat" aria-hidden="true"></span> Chat room </NavLink> </li>將幾個 CSS 類別新增至
site.css檔案,以在聊天頁面中設定 UI 元素的樣式。/* improved for chat text box */ textarea { border: 1px dashed #888; border-radius: 5px; width: 80%; overflow: auto; background: #f7f7f7 } /* improved for speech bubbles */ .received, .sent { position: relative; font-family: arial; font-size: 1.1em; border-radius: 10px; padding: 20px; margin-bottom: 20px; } .received:after, .sent:after { content: ''; border: 20px solid transparent; position: absolute; margin-top: -30px; } .sent { background: #03a9f4; color: #fff; margin-left: 10%; top: 50%; text-align: right; } .received { background: #4CAF50; color: #fff; margin-left: 10px; margin-right: 10%; } .sent:after { border-left-color: #03a9f4; border-right: 0; right: -20px; } .received:after { border-right-color: #4CAF50; border-left: 0; left: -20px; } /* div within bubble for name */ .user { font-size: 0.8em; font-weight: bold; color: #000; } .msg { /*display: inline;*/ }按下 F5 即可執行應用程式。 現在,您可以開始聊天:


發佈至 Azure
將 Blazor 應用程式部署至 Azure App Service 時,建議您使用 Azure SignalR Service。 Azure SignalR Service 允許將 Blazor Server 應用程式擴增為大量的並行 SignalR 連線。 此外,SignalR Service 的全球性和高效能資料中心可大幅縮短因地理位置而造成的延遲。
重要
在 Blazor Server 應用程式中,UI 狀態會保存於伺服器端,這表示需要黏性伺服器工作階段才能保留狀態。 如果只有單一應用程式伺服器,則依設計可確保黏性工作階段。 不過,如果有多個應用程式伺服器,用戶端交涉和連線可能會移至不同的伺服器,這可能會導致 Blazor 應用程式中的 UI 狀態管理不一致。 因此,建議您啟用黏性伺服器工作階段,如下列 appsettings.json 所示:
"Azure:SignalR:ServerStickyMode": "Required"
以滑鼠右鍵按一下專案,然後移至 [發佈]。 使用下列設定:
- 目標:Azure
- 特定目標:支援所有類型的 Azure App Service。
- App Service:建立或選取 App Service 執行個體。

新增 Azure SignalR Service 相依項目。
建立發行設定檔之後,您會看到在 [服務相依性] 底下新增 Azure SignalR Service 的建議訊息。 選取 [設定] 以建立新的服務,或在面板中選取現有的 Azure SignalR Service。

服務相依性會執行下列活動,讓您的應用程式在 Azure 上執行下列作業時,自動切換至 Azure SignalR Service:
- 更新
HostingStartupAssembly以使用 Azure SignalR Service。 - 新增 Azure SignalR Service NuGet 套件參考。
- 更新設定檔屬性以儲存相依性設定。
- 根據您的選擇設定秘密存放區。
- 在 appsettings.json 中新增組態,讓您的應用程式以 Azure SignalR Service 為目標。
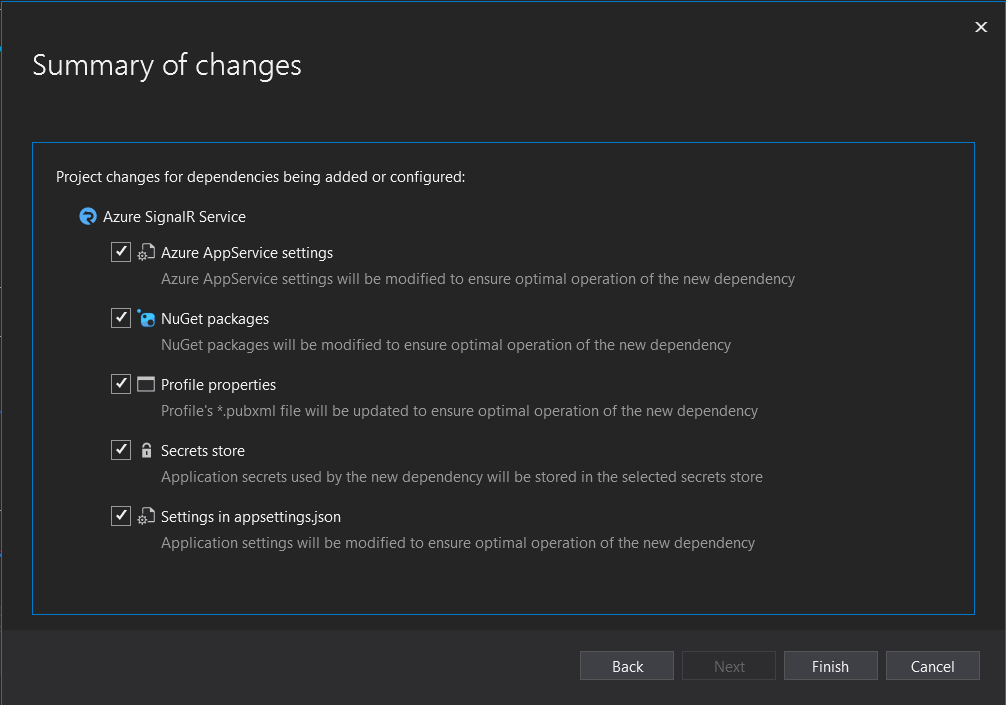
- 更新
發行應用程式。
現在您的應用程式已準備好發佈。 發佈程序完成後,應用程式會自動在瀏覽器中啟動。
注意
由於 Azure App Service 部署啟動延遲,應用程式可能需要一些時間才能啟動。 您可以使用瀏覽器偵錯工具 (通常是按 F12),確認流量已重新導向至 Azure SignalR Service。


針對本機開發啟用 Azure SignalR Service
使用下列命令新增對 Azure SignalR SDK 的參考。
dotnet add package Microsoft.Azure.SignalR在
Startup.ConfigureServices()中新增呼叫AddAzureSignalR(),如下所示。public void ConfigureServices(IServiceCollection services) { ... services.AddSignalR().AddAzureSignalR(); ... }在 appsettings.json 或使用秘密管理員工具設定 Azure SignalR Service 連接字串。
注意
步驟 2 可替換為設定裝載啟動組件以使用 SignalR SDK。
新增組態以在 appsettings.json 中開啟 Azure SignalR Service:
"Azure": {
  "SignalR": {
    "Enabled": true,
    "ConnectionString": <your-connection-string>
  }
}
設定裝載啟動組件以使用 Azure SignalR SDK。 編輯 launchSettings.json,並在
environmentVariables中新增組態,如下列範例所示:"environmentVariables": { ..., "ASPNETCORE_HOSTINGSTARTUPASSEMBLIES": "Microsoft.Azure.SignalR" }
清除資源
若要清除在本教學課程中建立的資源,請使用 Azure 入口網站刪除資源群組。
其他資源
下一步
在本教學課程中,您已了解如何:
- 使用 Blazor Server 應用程式範本建立簡單的聊天室。
- 運用 Razor 元件。
- 使用 Razor 元件中的事件處理和資料繫結。
- 快速部署至 Visual Studio 中的 Azure App Service。
- 從本機 SignalR 遷移至 Azure SignalR Service。
深入了解高可用性:
意見反映
即將推出:我們會在 2024 年淘汰 GitHub 問題,並以全新的意見反應系統取代並作為內容意見反應的渠道。 如需更多資訊,請參閱:https://aka.ms/ContentUserFeedback。
提交及檢視以下的意見反映: