教學課程:使用 Azure Functions 和 Azure Web PubSub 服務建立無伺服器即時聊天應用程式
Azure Web PubSub 服務可協助您使用 WebSockets 和發佈訂閱模式,輕鬆地建置即時傳訊 Web 應用程式。 Azure Functions 是無伺服器平台,可讓您在不需要管理任何基礎結構的情況下執行您的程式碼。 在本教學課程中,您會了解如何使用 Azure Web PubSub 服務和 Azure Functions,建置具有即時傳訊和發佈訂閱模式的無伺服器應用程式。
在本教學課程中,您會了解如何:
- 建置無伺服器即時聊天應用程式
- 使用 Web PubSub 函式觸發程式繫結和輸出繫結
- 將函式部署至 Azure 函式應用程式
- 設定 Azure 驗證
- 設定 Web PubSub 事件處理常式,將事件和訊息路由傳送至應用程式
重要
原始 連接字串 只會針對示範目的出現在本文中。
連接字串包含應用程式存取 Azure Web PubSub 服務所需的授權資訊。 連接字串內的存取金鑰類似於服務的根密碼。 在生產環境中,請一律保護您的存取金鑰。 使用 Azure 金鑰保存庫,安全地管理和輪替密鑰,並使用保護連線WebPubSubServiceClient。
避免將存取金鑰散發給其他使用者、寫入程式碼,或將其以純文字儲存在他人可以存取的位置。 如果您認為金鑰可能已遭盜用,請輪替金鑰。
必要條件
程式碼編輯器,例如 Visual Studio Code
Node.js18.x 版或更新版本。
注意
如需支援的 Node.js 版本詳細資訊,請參閱 Azure Functions 執行階段版本文件。
Azure Functions Core Tools (最好是 v4 或更高版本) 以在本機執行 Azure Function 應用程式,並部署至 Azure。
Azure CLI 以管理 Azure 資源。
如果您沒有 Azure 訂用帳戶,請在開始之前先建立 Azure 免費帳戶。
登入 Azure
請使用您的 Azure 帳戶登入 Azure 入口網站 (https://portal.azure.com/)。
建立 Azure Web PubSub 服務執行個體
您的應用程式將會連線至 Azure 中的 Web PubSub 服務執行個體。
選取 Azure 入口網站左上角的 [新增] 按鈕。 在 [新增] 畫面的搜尋方塊中輸入 Web PubSub 並按 Enter。 (您也可以從
Web類別搜尋 Azure Web PubSub。)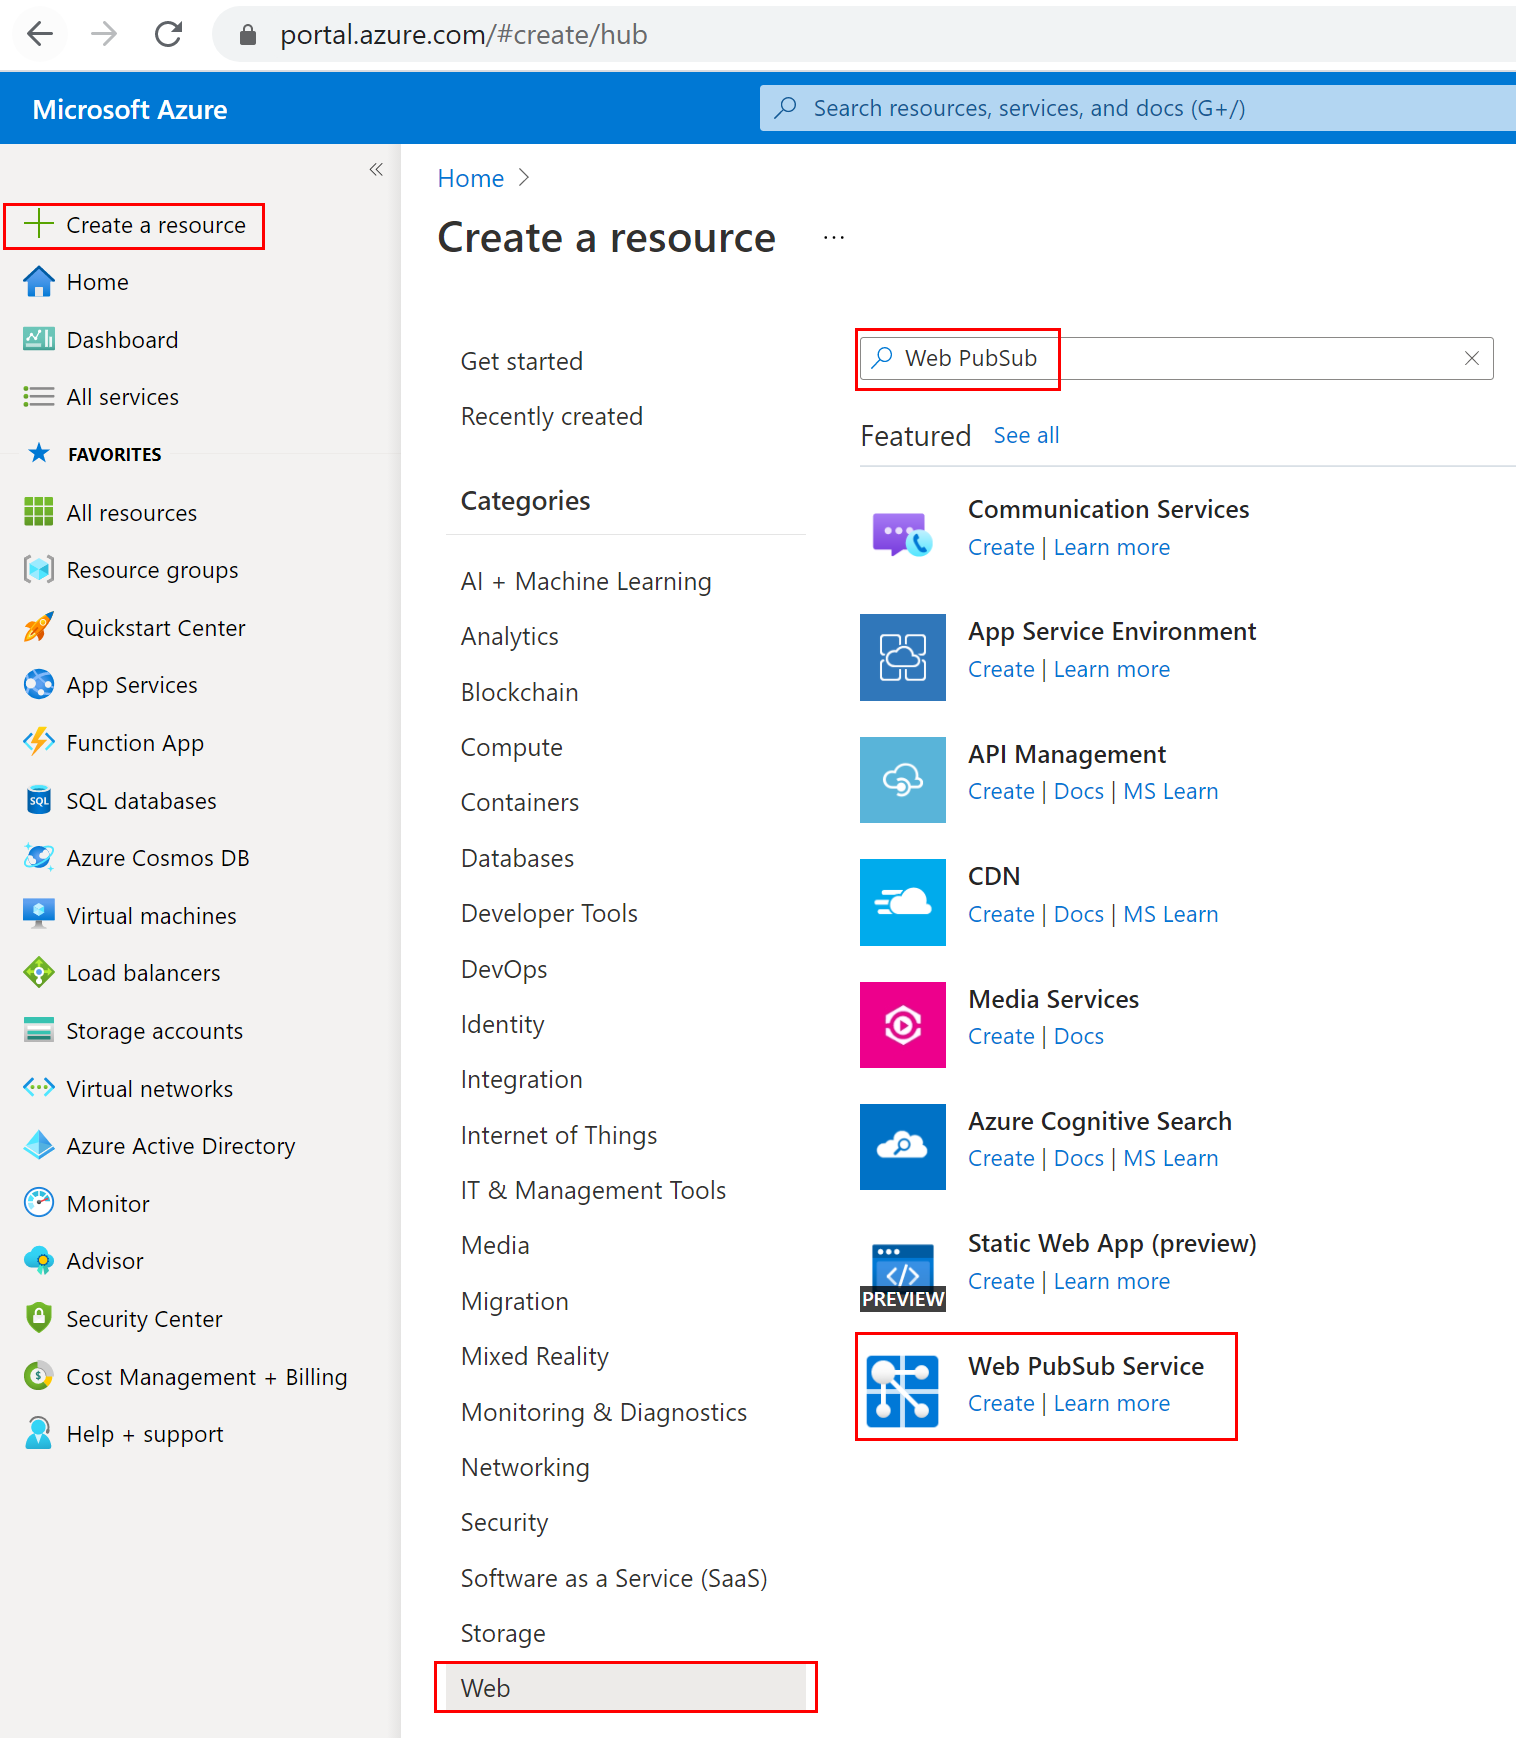
從搜尋結果中選取 [Web PubSub],然後選取 [建立]。
輸入下列設定。
設定 建議的值 描述 資源名稱 全域唯一的名稱 識別新 Web PubSub 服務執行個體的全域唯一名稱。 有效字元: a-z、A-Z、0-9和-。訂用帳戶 您的訂用帳戶 將在其下建立這個新 Web PubSub 服務執行個體的 Azure 訂用帳戶。 資源群組 myResourceGroup 要在其中建立 Web PubSub 服務執行個體之新資源群組的名稱。 地點 美國西部 選擇您附近的區域。 定價層 免費 您可以先免費試用 Azure Web PubSub 服務。 深入了解 Azure Web PubSub 服務定價層 單位計數 - 單位計數會指出您的 Web PubSub 服務執行個體可接受的連線數目。 每個單位支援最多 1,000 個同時連線。 它只能在標準層中設定。 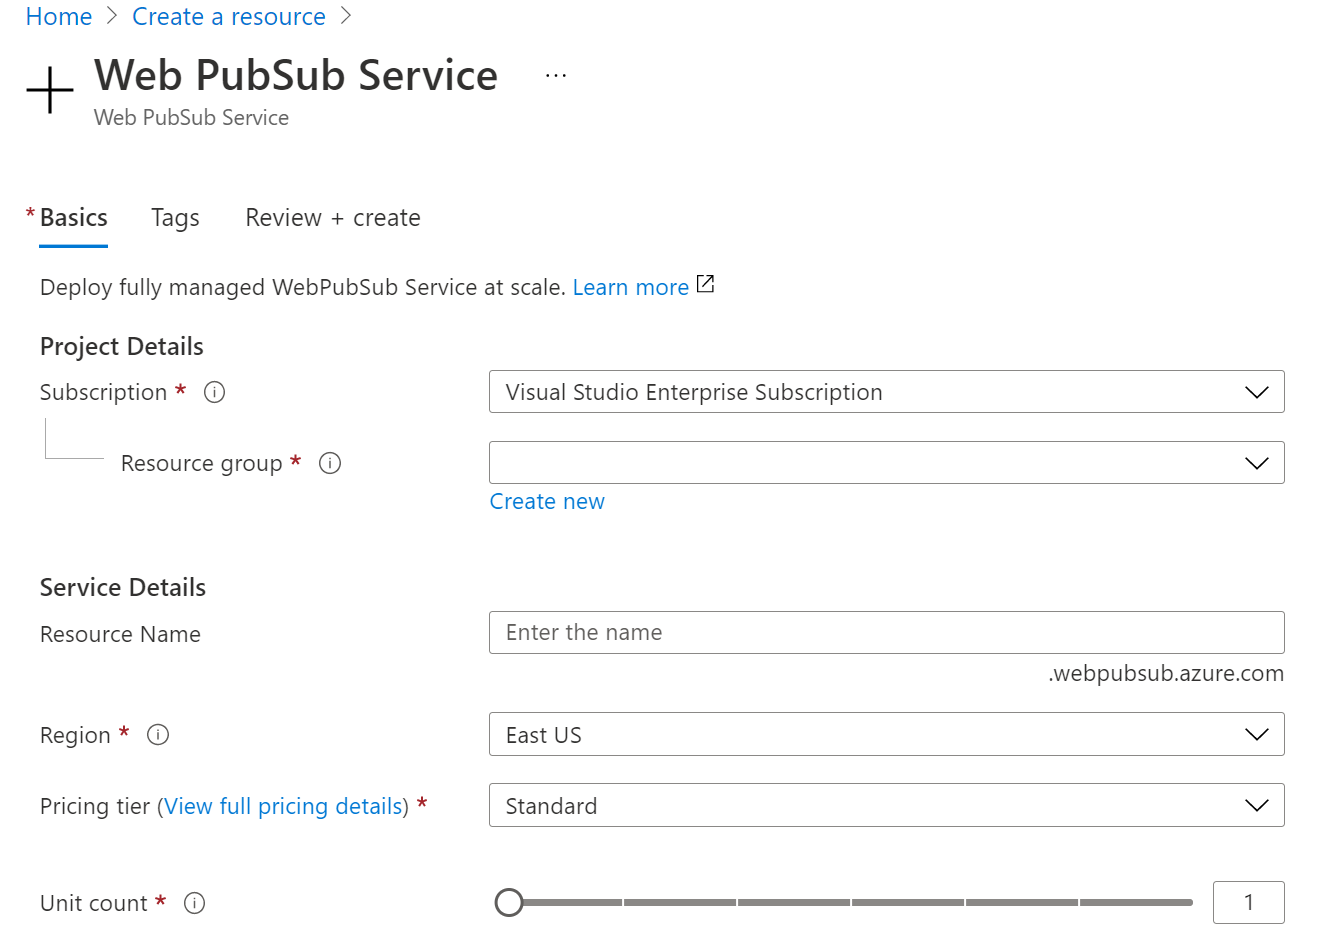
選取 [建立] 以開始部署 Web PubSub 服務執行個體。
建立函式
請確定您已安裝 Azure Functions Core Tools。 然後為專案建立空的目錄。 在此工作目錄下執行命令。
func init --worker-runtime javascript --model V4安裝
Microsoft.Azure.WebJobs.Extensions.WebPubSub。確認並將
host.json的 extensionBundle 更新為 4.* 版或更新版本,以取得 Web PubSub 支援。{ "extensionBundle": { "id": "Microsoft.Azure.Functions.ExtensionBundle", "version": "[4.*, 5.0.0)" } }建立
index函式,以讀取和裝載用戶端的靜態網頁。func new -n index -t HttpTrigger- 更新
src/functions/index.js並複製下列程式碼。const { app } = require('@azure/functions'); const { readFile } = require('fs/promises'); app.http('index', { methods: ['GET', 'POST'], authLevel: 'anonymous', handler: async (context) => { const content = await readFile('index.html', 'utf8', (err, data) => { if (err) { context.err(err) return } }); return { status: 200, headers: { 'Content-Type': 'text/html' }, body: content, }; } });
- 更新
建立
negotiate函式,協助用戶端使用存取權杖取得服務連線 URL。func new -n negotiate -t HttpTrigger注意
在此範例中,我們使用 Microsoft Entra ID 使用者身分識別標頭
x-ms-client-principal-name來擷取userId。 這不適用於本機函式。 您可以在本機播放時將其設定為空白或變更為其他方法,來取得或產生userId。 例如,讓用戶端輸入使用者名稱,並在呼叫negotiate函式以取得服務連線 URL 時將其傳入查詢,例如?user={$username}。 在negotiate函式中,使用值{query.user}來設定userId。- 更新
src/functions/negotiate並複製下列程式碼。const { app, input } = require('@azure/functions'); const connection = input.generic({ type: 'webPubSubConnection', name: 'connection', userId: '{headers.x-ms-client-principal-name}', hub: 'simplechat' }); app.http('negotiate', { methods: ['GET', 'POST'], authLevel: 'anonymous', extraInputs: [connection], handler: async (request, context) => { return { body: JSON.stringify(context.extraInputs.get('connection')) }; }, });
- 更新
建立
message函式,以透過服務廣播用戶端訊息。func new -n message -t HttpTrigger- 更新
src/functions/message.js並複製下列程式碼。const { app, output, trigger } = require('@azure/functions'); const wpsMsg = output.generic({ type: 'webPubSub', name: 'actions', hub: 'simplechat', }); const wpsTrigger = trigger.generic({ type: 'webPubSubTrigger', name: 'request', hub: 'simplechat', eventName: 'message', eventType: 'user' }); app.generic('message', { trigger: wpsTrigger, extraOutputs: [wpsMsg], handler: async (request, context) => { context.extraOutputs.set(wpsMsg, [{ "actionName": "sendToAll", "data": `[${context.triggerMetadata.connectionContext.userId}] ${request.data}`, "dataType": request.dataType }]); return { data: "[SYSTEM] ack.", dataType: "text", }; } });
- 更新
在專案根資料夾中新增用戶端單一頁面
index.html並複製內容。<html> <body> <h1>Azure Web PubSub Serverless Chat App</h1> <div id="login"></div> <p></p> <input id="message" placeholder="Type to chat..." /> <div id="messages"></div> <script> (async function () { let authenticated = window.location.href.includes( "?authenticated=true" ); if (!authenticated) { // auth let login = document.querySelector("#login"); let link = document.createElement("a"); link.href = `${window.location.origin}/.auth/login/aad?post_login_redirect_url=/api/index?authenticated=true`; link.text = "login"; login.appendChild(link); } else { // negotiate let messages = document.querySelector("#messages"); let res = await fetch(`${window.location.origin}/api/negotiate`, { credentials: "include", }); let url = await res.json(); // connect let ws = new WebSocket(url.url); ws.onopen = () => console.log("connected"); ws.onmessage = (event) => { let m = document.createElement("p"); m.innerText = event.data; messages.appendChild(m); }; let message = document.querySelector("#message"); message.addEventListener("keypress", (e) => { if (e.charCode !== 13) return; ws.send(message.value); message.value = ""; }); } })(); </script> </body> </html>
建立並部署 Azure 函式應用程式
若要將函式程式碼部署至 Azure,您必須先建立三個資源:
- 資源群組,其為相關資源的邏輯容器。
- 儲存體帳戶,用來維護函式的狀態和其他資訊。
- 函數應用程式,其提供執行函式程式碼的環境。 函式應用程式可對應至您的本機函式專案,並可讓您將函式分組為邏輯單位,以便管理、部署和共用資源。
請使用下列命令來建立這些項目。
如果您尚未登入 Azure,請於此時登入:
az login建立資源群組,或者您可以重複使用其中一個 Azure Web PubSub 服務來略過:
az group create -n WebPubSubFunction -l <REGION>在您的資源群組和區域中建立一般用途的儲存體帳戶:
az storage account create -n <STORAGE_NAME> -l <REGION> -g WebPubSubFunction在 Azure 中建立函式應用程式:
az functionapp create --resource-group WebPubSubFunction --consumption-plan-location <REGION> --runtime node --runtime-version 18 --functions-version 4 --name <FUNCIONAPP_NAME> --storage-account <STORAGE_NAME>注意
請參閱 Azure Functions 執行階段版本文件,將
--runtime-version參數設定為支援的值。將函式專案部署至 Azure:
在 Azure 中成功建立函式應用程式之後,您就可以開始使用 func azure functionapp publish 命令來部署本機函式專案。
func azure functionapp publish <FUNCIONAPP_NAME>為函式應用程式設定
WebPubSubConnectionString:原始 連接字串 只會針對示範目的出現在本文中。 在生產環境中,請一律保護您的存取金鑰。 使用 Azure 金鑰保存庫,安全地管理和輪替密鑰,並使用保護連線
WebPubSubServiceClient。首先,從 Azure 入口網站尋找您的 Web PubSub 資源,然後複製 [金鑰] 底下的連接字串。 然後,流覽至 Azure 入口網站 ->Settings ->Environment variables 中的函式應用程式設定。 然後在 [應用程式設定] 底下新增專案,名稱等於
WebPubSubConnectionString且值為您的 Web PubSub 資源 連接字串。
設定 Web PubSub 服務 Event Handler
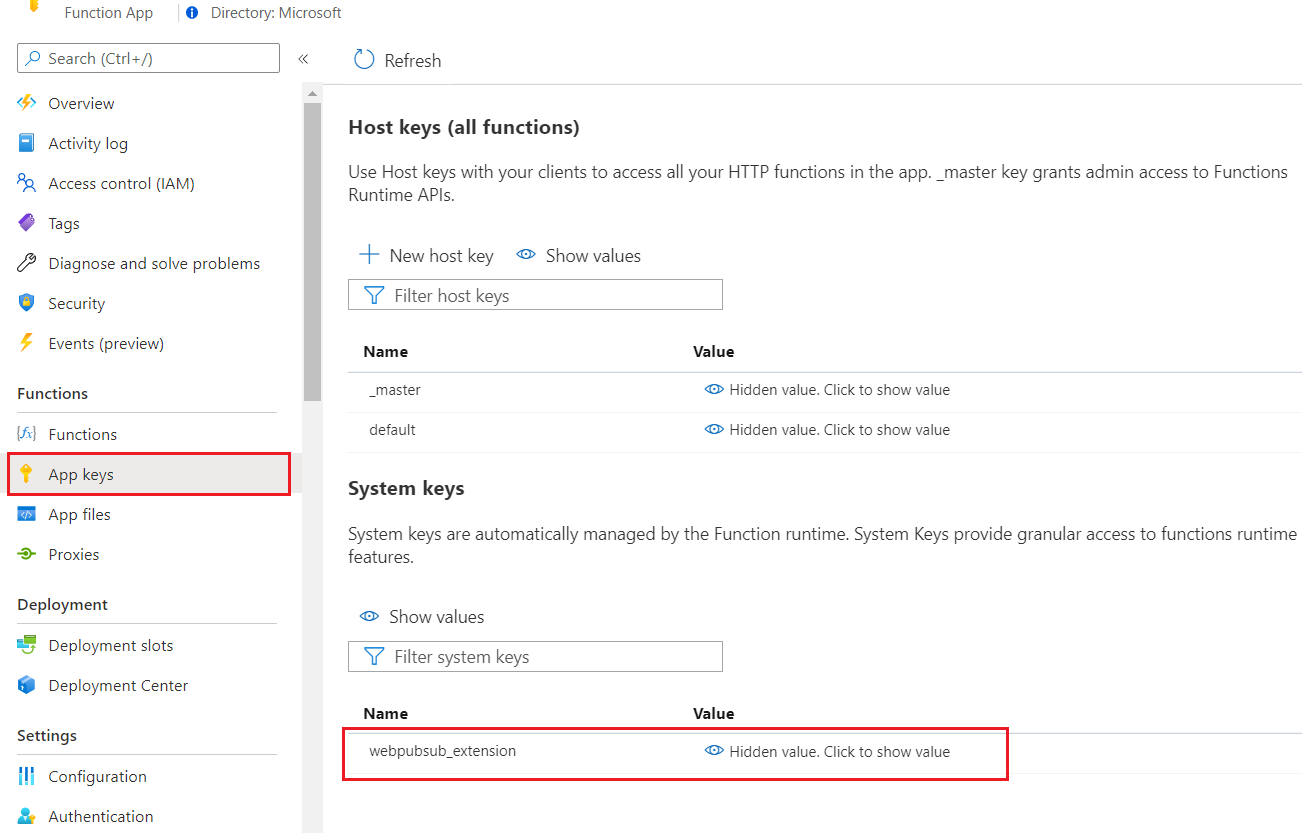
在此範例中,我們使用 WebPubSubTrigger 來接聽服務上游要求。 因此,Web PubSub 必須知道函式的端點資訊,才能傳送目標用戶端要求。 Azure 函式應用程式需要系統金鑰,以獲得延伸模組特定 Webhook 方法的安全性。 在上一個步驟中,我們部署了具有 message 函式的函式應用程式之後,我們就能取得系統金鑰。
移至 Azure 入口網站 -> 尋找您的函式應用程式資源 -> [應用程式金鑰] -> [系統金鑰] ->webpubsub_extension。 將值複製為 <APP_KEY>。
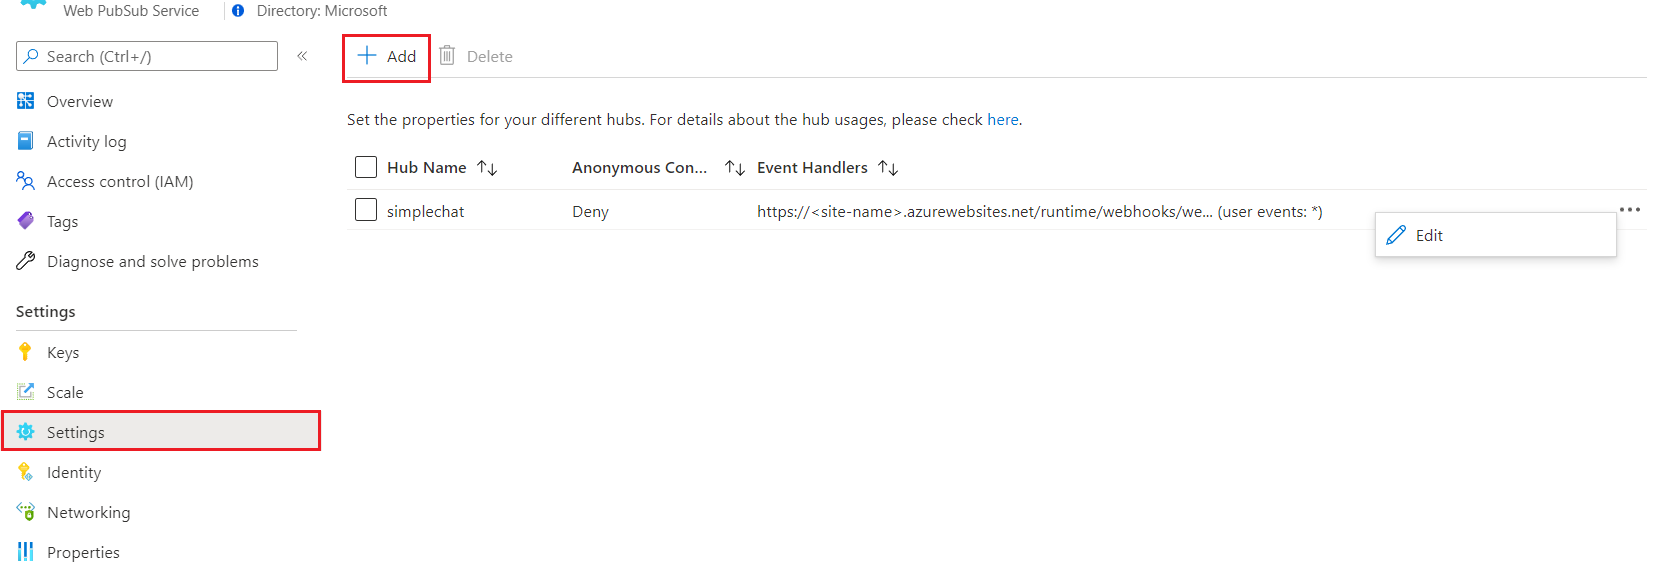
在 Azure Web PubSub 服務中設定 Event Handler。 移至 Azure 入口網站 -> 尋找您的 Web PubSub 資源 -> [設定]。 將新的中樞設定對應新增至一個使用中函式。 將 <FUNCTIONAPP_NAME> 與 <APP_KEY> 取代為您的值。
- 中樞名稱:
simplechat - URL 範本:https://<FUNCTIONAPP_NAME>.azurewebsites.net/runtime/webhooks/webpubsub?code=<APP_KEY>
- 使用者事件模式:*
- 系統事件:-(在此範例中不需要設定)
設定以啟用用戶端驗證
移至 Azure 入口網站 -> 尋找您的函式應用程式資源 -> [驗證]。 按一下 Add identity provider。 將 [App Service 驗證設定] 設定為 [允許未驗證的存取],讓匿名使用者在重新導向進行驗證之前,可以先造訪您的用戶端索引頁。 然後選取存檔。
在這裡,我們選擇 Microsoft 作為識別提供者,其會使用 x-ms-client-principal-name 作為 negotiate 函式中的 userId。 此外,您可以依照連結設定其他識別提供者,並且別忘了據此更新 negotiate 函式中的 userId 值。
嘗試使用應用程式
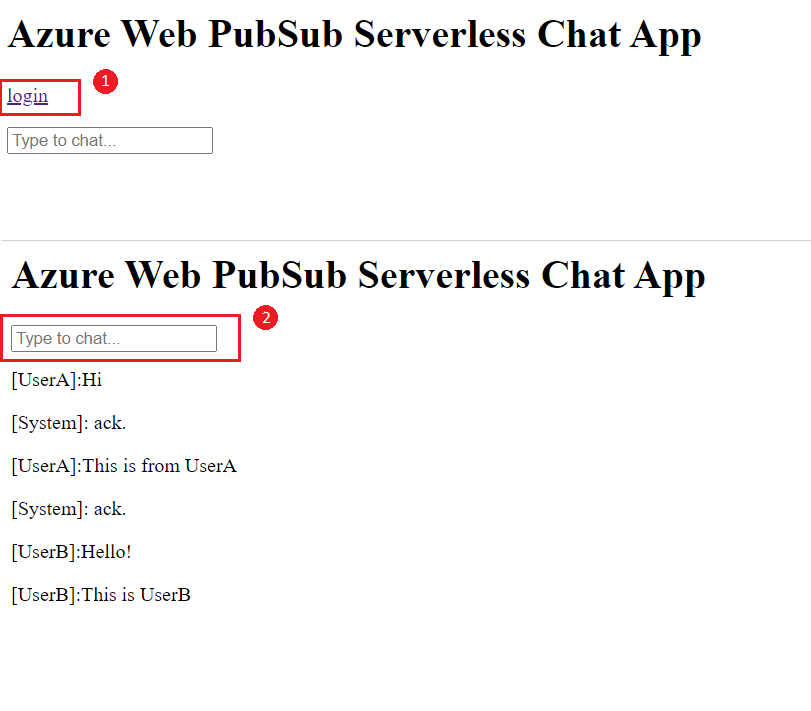
現在,您可以從函式應用程式測試頁面:https://<FUNCTIONAPP_NAME>.azurewebsites.net/api/index。 請參閱快照集。
- 按一下
login以驗證自己。 - 在輸入方塊中輸入訊息以進行聊天。
在訊息函式中,我們會將呼叫者的訊息廣播給所有用戶端,並使用訊息 [SYSTEM] ack 傳回給呼叫者。 因此,我們可以在範例聊天快照集中知道,前四則訊息是來自目前的用戶端,最後兩則訊息是來自另一個用戶端。
清除資源
如果您不會繼續使用此應用程式,請使用下列步驟來刪除本文件所建立的全部資源,這樣才不會產生任何費用:
在 Azure 入口網站中選取最左側的 [資源群組],然後選取您所建立的資源群組。 您也可以使用搜尋方塊,改為依資源群組的名稱尋找。
在開啟的視窗中選取資源群組,然後選取 [刪除資源群組]。
在新視窗中輸入要刪除的資源群組名稱,然後選取 [刪除]。
下一步
在本快速入門中,您已了解如何執行無伺服器聊天應用程式。 現在,您可以開始建置自己的應用程式。