在 Azure 雲端服務 (傳統) 上使用 Express 建置和部署 Node.js Web 應用程式
重要
截至 2024 年 9 月 1 日,所有客戶的雲端服務 (傳統) 均已淘汰。 自 2024 年 10 月起,Microsoft 將停止並關閉任何執行中的現有部署,且資料將永久遺失。 新部署應該使用 Azure Resource Manager 型的新部署模型 Azure 雲端服務 (延伸支援)。
Node.js 包含核心執行時期的一組最低功能。 開發人員在開發 Node.js 應用程式時,通常會使用非 Microsoft 模組來提供更多功能。 在本教學課程中,您會使用 Express (英文) 模組來建立新的應用程式,此模組提供用於建立 Node.js Web 應用程式的模型檢視控制架構。
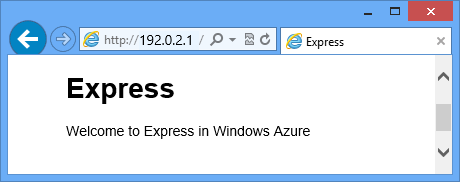
下列螢幕擷取畫面會顯示完成的應用程式:

建立雲端服務專案
請執行下列步驟來建立名為 expressapp 的新雲端服務專案:
從 [開始功能表] 或 [開始畫面] 搜尋 Windows PowerShell。 最後,用滑鼠右鍵按一下 [Windows PowerShell],然後選取 [以系統管理員身分執行]。

變更至 c:\node 目錄,然後輸入下列命令來建立名為
expressapp的新解決方案和名為 WebRole1 的 Web 角色:PS C:\node> New-AzureServiceProject expressapp PS C:\Node\expressapp> Add-AzureNodeWebRole PS C:\Node\expressapp> Set-AzureServiceProjectRole WebRole1 Node 0.10.21注意
Add-AzureNodeWebRole 預設會使用較舊版的 Node.js。 上述 Set-AzureServiceProjectRole 行會指示 Azure 使用 v0.10.21 版節點。 請注意這些參數會區分大小寫。 您可以檢查 WebRole1\package.json 中的 engines 屬性,確認已選取正確的 Node.js 版本。
安裝 Express
發出下列命令來安裝 Express 產生器:
PS C:\node\expressapp> npm install express-generator -g下列螢幕擷取畫面顯示 npm 命令的輸出。 您的輸出應類似於下列輸出。

切換至 WebRole1 目錄,然後使用 express 命令來產生新的應用程式:
PS C:\node\expressapp\WebRole1> express若要繼續,請在系統提示覆寫先前的應用程式時,輸入 y 或 yes。 Express 會產生 app.js 檔案和資料夾結構來建置應用程式。

若要安裝 package.json 檔案中定義的其他相依性,請輸入下列命令:
PS C:\node\expressapp\WebRole1> npm install
使用下列命令,將 bin/www 檔案複製到 server.js。 此步驟可讓雲端服務找到此應用程式的進入點。
PS C:\node\expressapp\WebRole1> copy bin/www server.js此命令完成之後,您應該會在 WebRole1 目錄中擁有 server.js 檔案。
修改 server.js ,從下一行程式碼中移除其中一個 '.' 字元。
var app = require('../app');當您依此修改後,程式碼行應顯示如下:
var app = require('./app');我們已將檔案 (先前為
bin/www) 移至與應用程式檔案所需的相同目錄,因此這是必要的變更。 完成此變更之後,儲存 server.js 檔案。使用下列命令,在 Azure 模擬器中執行應用程式:
PS C:\node\expressapp\WebRole1> Start-AzureEmulator -launch
修改檢視
現在,修改檢視來顯示「歡迎在 Azure 中使用 Express」訊息。
輸入下列命令來開啟 index.jade 檔案:
PS C:\node\expressapp\WebRole1> notepad views/index.jade
Jade 是 Express 應用程式使用的預設檢視引擎。
修改最後一行文字,加上 in Azure。

儲存檔案並結束 [記事本]。
若要查看變更,請重新整理瀏覽器。

測試應用程式之後,請使用 Stop-AzureEmulator Cmdlet 來停止模擬器。
將應用程式發行至 Azure
在 Azure PowerShell 視窗中,請使用 Publish-AzureServiceProject Cmdlet 將應用程式部署至雲端服務
PS C:\node\expressapp\WebRole1> Publish-AzureServiceProject -ServiceName myexpressapp -Location "East US" -Launch
部署作業完成時,瀏覽器會開啟並顯示網頁。

下一步
如需詳細資訊,請參閱 Node.js 開發人員中心。