使用 Azure Pipelines 發佈 NuGet 套件 (YAML/傳統)
Azure DevOps Services | Azure DevOps Server 2022 - Azure DevOps Server 2019
使用 Azure Pipelines,您可以使用傳統或 YAML 管線,將 NuGet 套件發佈至組織中的 Azure Artifacts 摘要、其他組織中,以及公用登錄,例如 nuget.org。 在本文中,您將學會如何:
- 將套件發佈至內部摘要
- 將套件發佈至不同組織中的摘要
- 套件版本控制
必要條件
如果您還沒有摘要,請建立 新的摘要 。
如果您使用自我裝載代理程式,請確定已安裝 .NET Core SDK (2.1.400+) 和 NuGet (4.8.0.5385+)。
將 NuGet 套件發佈至相同組織中的摘要
注意
若要使用 Azure Pipelines 將套件發佈至摘要,請確定 專案集合組建服務和 專案的 組建服務 身分識別都會獲得 摘要發行者(參與者) 角色,這些角色會指派給您的摘要設定。 如需詳細資訊,請參閱 管理許可權 。
登入您的 Azure DevOps 組織,然後瀏覽至您的專案。
選取 [ 管線],然後選取您的管線定義。
選取 [ 編輯],然後將下列代碼段新增至您的 YAML 管線。
steps:
- task: NuGetToolInstaller@1                            # Minimum required NuGet version: 4.8.0.5385+.
  displayName: 'NuGet Tool Installer'

- task: NuGetAuthenticate@0
  displayName: 'NuGet Authenticate'

- script: |
      nuget.exe push -Source "https://pkgs.dev.azure.com/<ORGANIZATION_NAME>/<PROJECT_NAME>/_packaging/<FEED_NAME>/nuget/v3/index.json" -ApiKey az $(Build.ArtifactStagingDirectory)\*.nupkg
  displayName: Push
登入您的 Azure DevOps 組織,然後瀏覽至您的專案。
選取 [ 管線],然後選取您的管線定義。
選取 [ 編輯],然後將下列代碼段新增至您的 YAML 管線。
steps:
- task: NuGetToolInstaller@1                            # Minimum required NuGet version: 4.8.0.5385+.
  displayName: 'NuGet Tool Installer'

- task: NuGetAuthenticate@1
  displayName: 'NuGet Authenticate'

- script: |
      nuget.exe push -Source "https://pkgs.dev.azure.com/<ORGANIZATION_NAME>/<PROJECT_NAME>/_packaging/<FEED_NAME>/nuget/v3/index.json" -ApiKey az $(Build.ArtifactStagingDirectory)\*.nupkg
  displayName: Push
將 NuGet 套件發佈至另一個組織中的摘要
若要將 NuGet 套件發佈至不同 Azure DevOps 組織中的摘要,您必須先在目標組織中建立個人存取令牌 (PAT)。 瀏覽至載入目標摘要的組織,並使用封裝>讀取和寫入範圍建立個人存取權杖。 建立 PAT 之後,請將它複製並儲存在安全的位置,因為您需要在下一節中設定服務連線。
登入管線將執行所在的 Azure DevOps 組織,然後流覽至您的專案。
流覽至您的項目設定>服務連線。
選取 [ 新增服務連線],選取 [NuGet],然後選取 [ 下一步]。
選取 [外部 Azure DevOps Server ] 作為 [驗證] 方法,然後輸入您的目標 摘要 URL。 貼上 您稍早建立的個人存取令牌 、為您的服務連線提供名稱,並在適用於您的案例時檢查 [授與所有管線 的訪問許可權]。
當完成時,選擇儲存。
登入您的 Azure DevOps 組織,然後瀏覽至您的專案。
選取 [ 管線],然後選取您的管線定義。
選取 [ 編輯],然後將下列代碼段新增至您的 YAML 管線。
- task: NuGetToolInstaller@1                                # Minimum required NuGet version: 4.8.0.5385+.
  displayName: 'NuGet Tool Installer'

- task: NuGetAuthenticate@1
  inputs:
    nuGetServiceConnections: <SERVICE_CONNECTION_NAME>

- script: |
      nuget.exe push -Source "https://pkgs.dev.azure.com/<ORGANIZATION_NAME>/<PROJECT_NAME>/_packaging/<FEED_NAME>/nuget/v3/index.json" -ApiKey az $(Build.ArtifactStagingDirectory)\*.nupkg
  displayName: Push
登入您的 Azure DevOps 組織,然後瀏覽至您的專案。
選取 [ 管線],然後選取您的管線定義。
選取 [ 編輯],然後將下列代碼段新增至您的 YAML 管線。
- task: NuGetToolInstaller@1                            # Minimum required NuGet version: 4.8.0.5385+.
  displayName: 'NuGet Tool Installer'

- task: NuGetAuthenticate@0
  inputs:
    nuGetServiceConnections: <SERVICE_CONNECTION_NAME>

- script: |
    nuget.exe push -Source "https://pkgs.dev.azure.com/<ORGANIZATION_NAME>/<PROJECT_NAME>/_packaging/<FEED_NAME>/nuget/v3/index.json" -ApiKey az $(Build.ArtifactStagingDirectory)\*.nupkg
  displayName: Push
NuGet 工作套件版本控制
Azure Pipelines 支持 語意版本控制 ,並提供下列 NuGet 工作的組態選項:
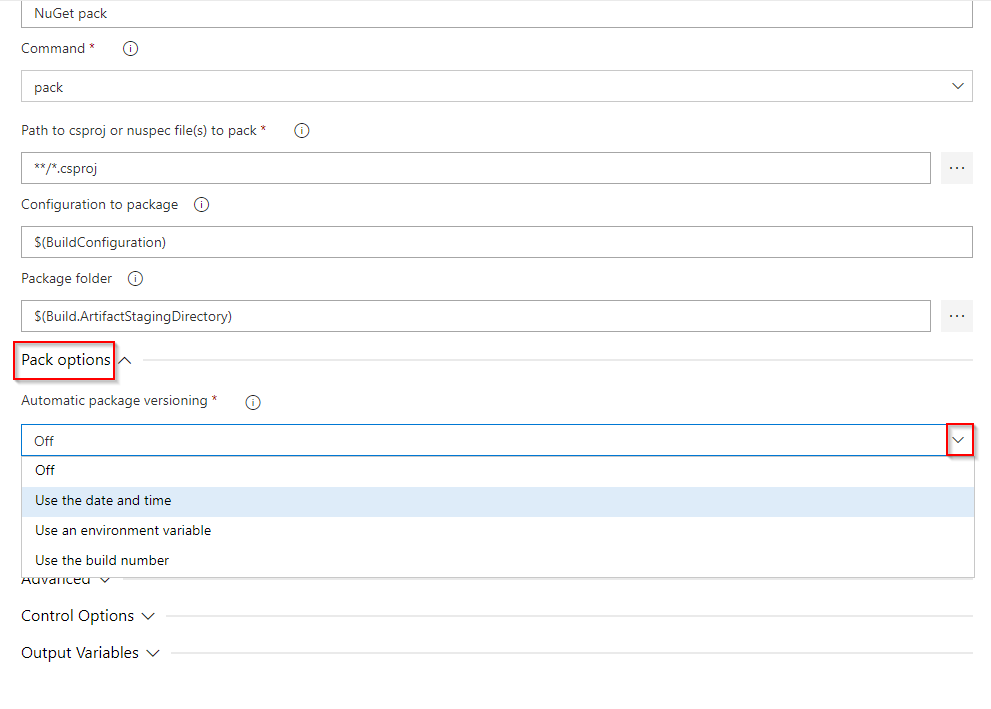
使用日期和時間 (傳統) | byPrereleaseNumber (YAML):您的套件版本會遵循格式: Major.Minor.Patch-ci-datetime ,您可以在其中彈性地自定義 Major、Minor 和 Patch 值。
使用環境變數 (傳統) | byEnvVar (YAML):您的套件版本會設定為指定環境變數的值。
使用組建編號 (傳統) | byBuildNumber (YAML):您的套件版本會設定為組建編號。 請確定您在管線 選項 中將組建編號格式定義為
$(BuildDefinitionName)_$(Year:yyyy).$(Month).$(DayOfMonth)$(Rev:.r)。 若要在 YAML 中指定格式,請在管線根目錄新增name:屬性,並定義您的格式。
以下範例示範如何使用日期和時間版本設定來產生格式化為: Major.Minor.Patch-ci-datetime 的 SemVer 兼容套件。
variables:
  Major: '1'
  Minor: '0'
  Patch: '0'

steps:
- task: NuGetCommand@2
  inputs:
    command: pack
    versioningScheme: byPrereleaseNumber
    majorVersion: '$(Major)'
    minorVersion: '$(Minor)'
    patchVersion: '$(Patch)'
注意
DotNetCore 和 DotNetStandard 套件應該與工作一起 DotNetCoreCLI@2 封裝,以避免 System.InvalidCastExceptions。 如需詳細資訊, 請參閱 .NET Core CLI 工作。
task: DotNetCoreCLI@2
inputs:
    command: pack
    versioningScheme: byPrereleaseNumber
    majorVersion: '$(Major)'
    minorVersion: '$(Minor)'
    patchVersion: '$(Patch)'


