快速入門:建立具有多個公用 IP 位址的 Azure 防火牆 - Bicep
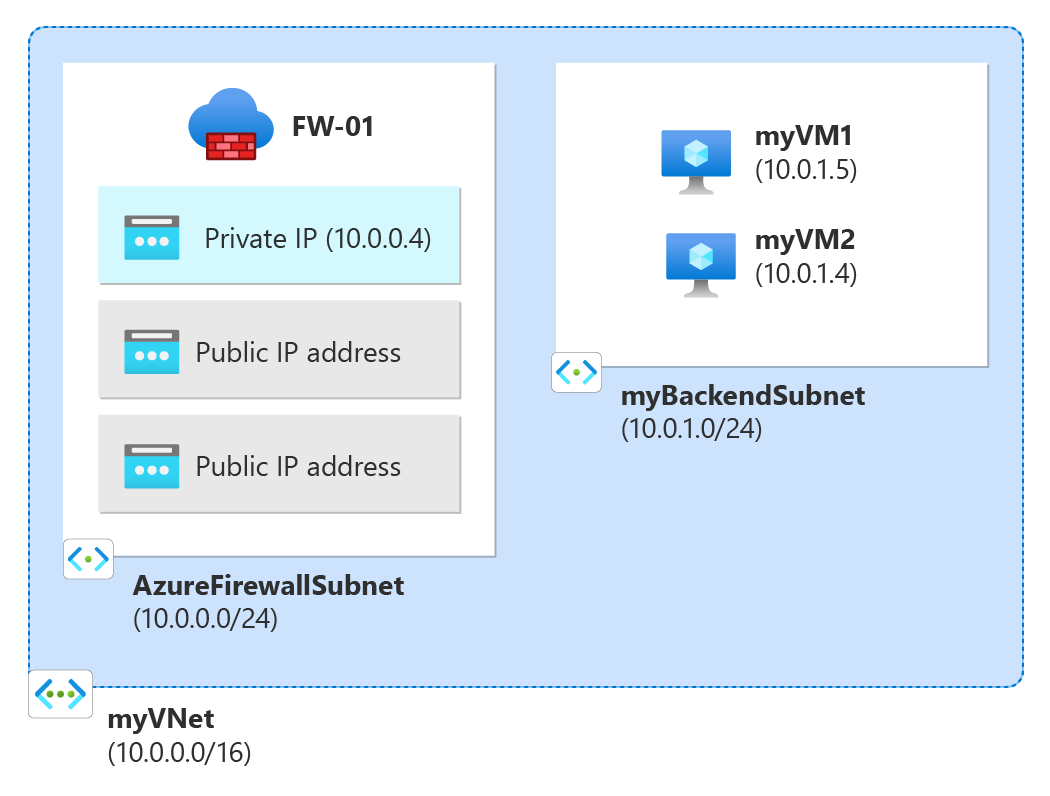
在本快速入門中,您會使用 Bicep 檔案,從公用 IP 位址前置詞部署具有多個公用 IP 位址的 Azure 防火牆。 已部署的防火牆具有 NAT 規則集合規則,可允許 RDP 連線到兩部 Windows Server 2019 虛擬機器。
Bicep 是使用宣告式語法來部署 Azure 資源的特定領域語言 (DSL)。 其提供簡潔的語法、可靠的類型安全,並支援程式碼重複使用。 Bicep 能夠為您在 Azure 中的基礎結構即程式碼解決方案,提供最佳的製作體驗。
如需具有多個公用 IP 位址之 Azure 防火牆的詳細資訊,請參閱 使用 Azure PowerShell 部署具有多個公用 IP 位址的 Azure 防火牆。
必要條件
- 具有有效訂用帳戶的 Azure 帳戶。 免費建立帳戶。
檢閱 Bicep 檔案
此 Bicep 檔案會建立具有兩個公用 IP 位址的 Azure 防火牆,以及支援 Azure 防火牆所需的資源。
此快速入門中使用的 Bicep 檔案是來自 Azure 快速入門範本。
@description('Admin username for the backend servers')
param adminUsername string

@description('Password for the admin account on the backend servers')
@secure()
param adminPassword string

@description('Location for all resources.')
param location string = resourceGroup().location

@description('Size of the virtual machine.')
param vmSize string = 'Standard_B2ms'

var virtualMachineName = 'myVM'
var virtualNetworkName = 'myVNet'
var networkInterfaceName = 'net-int'
var ipConfigName = 'ipconfig'
var ipPrefixName = 'public_ip_prefix'
var ipPrefixSize = 31
var publicIpAddressName = 'public_ip'
var nsgName = 'vm-nsg'
var firewallName = 'FW-01'
var vnetPrefix = '10.0.0.0/16'
var fwSubnetPrefix = '10.0.0.0/24'
var backendSubnetPrefix = '10.0.1.0/24'
var azureFirewallSubnetId = subnet.id
var azureFirewallIpConfigurations = [for i in range(0, 2): {
  name: 'IpConf${(i + 1)}'
  properties: {
    subnet: ((i == 0) ? json('{"id": "${azureFirewallSubnetId}"}') : null)
    publicIPAddress: {
      id: publicIPAddress[i].id
    }
  }
}]

resource nsg 'Microsoft.Network/networkSecurityGroups@2023-09-01' = [for i in range(0, 2): {
  name: '${nsgName}${i + 1}'
  location: location
  properties: {
    securityRules: [
      {
        name: 'RDP'
        properties: {
          protocol: 'Tcp'
          sourcePortRange: '*'
          destinationPortRange: '3389'
          sourceAddressPrefix: '*'
          destinationAddressPrefix: '*'
          access: 'Allow'
          priority: 300
          direction: 'Inbound'
        }
      }
    ]
  }
}]

resource ipprefix 'Microsoft.Network/publicIPPrefixes@2023-09-01' = {
  name: ipPrefixName
  location: location
  properties: {
    prefixLength: ipPrefixSize
    publicIPAddressVersion: 'IPv4'
  }
  sku: {
    name: 'Standard'
  }
}

resource publicIPAddress 'Microsoft.Network/publicIPAddresses@2023-09-01' = [for i in range(0, 2): {
  name: '${publicIpAddressName}${i + 1}'
  location: location
  sku: {
    name: 'Standard'
  }
  properties: {
    publicIPAddressVersion: 'IPv4'
    publicIPAllocationMethod: 'Static'
    publicIPPrefix: {
      id: ipprefix.id
    }
    idleTimeoutInMinutes: 4
  }
}]

resource virtualNetwork 'Microsoft.Network/virtualNetworks@2023-09-01' = {
  name: virtualNetworkName
  location: location
  properties: {
    addressSpace: {
      addressPrefixes: [
        vnetPrefix
      ]
    }
    subnets: [
      {
        name: 'myBackendSubnet'
        properties: {
          addressPrefix: backendSubnetPrefix
          routeTable: {
            id: routeTable.id
          }
          privateEndpointNetworkPolicies: 'Enabled'
          privateLinkServiceNetworkPolicies: 'Enabled'
        }
      }
    ]
    enableDdosProtection: false
    enableVmProtection: false
  }
}

resource subnet 'Microsoft.Network/virtualNetworks/subnets@2023-09-01' = {
  parent: virtualNetwork
  name: 'AzureFirewallSubnet'
  properties: {
    addressPrefix: fwSubnetPrefix
    privateEndpointNetworkPolicies: 'Enabled'
    privateLinkServiceNetworkPolicies: 'Enabled'
  }
}

resource virtualMachine 'Microsoft.Compute/virtualMachines@2023-09-01' = [for i in range(0, 2): {
  name: '${virtualMachineName}${i+1}'
  location: location
  properties: {
    hardwareProfile: {
      vmSize: vmSize
    }
    storageProfile: {
      imageReference: {
        publisher: 'MicrosoftWindowsServer'
        offer: 'WindowsServer'
        sku: '2019-Datacenter'
        version: 'latest'
      }
      osDisk: {
        osType: 'Windows'
        createOption: 'FromImage'
        caching: 'ReadWrite'
        managedDisk: {
          storageAccountType: 'StandardSSD_LRS'
        }
        diskSizeGB: 127
      }
    }
    osProfile: {
      computerName: '${virtualMachineName}${i+1}'
      adminUsername: adminUsername
      adminPassword: adminPassword
      windowsConfiguration: {
        provisionVMAgent: true
        enableAutomaticUpdates: true
      }
      allowExtensionOperations: true
    }
    networkProfile: {
      networkInterfaces: [
        {
          id: netInterface[i].id
        }
      ]
    }
  }
}]

resource netInterface 'Microsoft.Network/networkInterfaces@2023-09-01' = [for i in range(0, 2): {
  name: '${networkInterfaceName}${i + 1}'
  location: location
  properties: {
    ipConfigurations: [
      {
        name: '${ipConfigName}${i + 1}'
        properties: {
          subnet: {
            id: virtualNetwork.properties.subnets[0].id
          }
          primary: true
        }
      }
    ]
    enableAcceleratedNetworking: false
    enableIPForwarding: false
    networkSecurityGroup: {
      id: nsg[i].id
    }
  }
}]

resource firewall 'Microsoft.Network/azureFirewalls@2023-09-01' = {
  name: firewallName
  location: location
  properties: {
    sku: {
      name: 'AZFW_VNet'
      tier: 'Standard'
    }
    threatIntelMode: 'Deny'
    ipConfigurations: azureFirewallIpConfigurations
    applicationRuleCollections: [
      {
        name: 'web'
        properties: {
          priority: 100
          action: {
            type: 'Allow'
          }
          rules: [
            {
              name: 'wan-address'
              protocols: [
                {
                  protocolType: 'Http'
                  port: 80
                }
                {
                  protocolType: 'Https'
                  port: 443
                }
              ]
              targetFqdns: [
                'getmywanip.com'
              ]
              sourceAddresses: [
                '*'
              ]
            }
            {
              name: 'google'
              protocols: [
                {
                  protocolType: 'Http'
                  port: 80
                }
                {
                  protocolType: 'Https'
                  port: 443
                }
              ]
              targetFqdns: [
                'www.google.com'
              ]
              sourceAddresses: [
                '10.0.1.0/24'
              ]
            }
            {
              name: 'wupdate'
              protocols: [
                {
                  protocolType: 'Http'
                  port: 80
                }
                {
                  protocolType: 'Https'
                  port: 443
                }
              ]
              fqdnTags: [
                'WindowsUpdate'
              ]
              sourceAddresses: [
                '*'
              ]
            }
          ]
        }
      }
    ]
    natRuleCollections: [
      {
        name: 'Coll-01'
        properties: {
          priority: 100
          action: {
            type: 'Dnat'
          }
          rules: [
            {
              name: 'rdp-01'
              protocols: [
                'TCP'
              ]
              translatedAddress: '10.0.1.4'
              translatedPort: '3389'
              sourceAddresses: [
                '*'
              ]
              destinationAddresses: [
                publicIPAddress[0].properties.ipAddress
              ]
              destinationPorts: [
                '3389'
              ]
            }
            {
              name: 'rdp-02'
              protocols: [
                'TCP'
              ]
              translatedAddress: '10.0.1.5'
              translatedPort: '3389'
              sourceAddresses: [
                '*'
              ]
              destinationAddresses: [
                publicIPAddress[1].properties.ipAddress
              ]
              destinationPorts: [
                '3389'
              ]
            }
          ]
        }
      }
    ]
  }
}

resource routeTable 'Microsoft.Network/routeTables@2023-09-01' = {
  name: 'rt-01'
  location: location
  properties: {
    disableBgpRoutePropagation: false
    routes: [
      {
        name: 'fw'
        properties: {
          addressPrefix: '0.0.0.0/0'
          nextHopType: 'VirtualAppliance'
          nextHopIpAddress: '10.0.0.4'
        }
      }
    ]
  }
}

output name string = firewall.name
output resourceId string = firewall.id
output location string = location
output resourceGroupName string = resourceGroup().name
範本中定義了多個 Azure 資源:
- Microsoft.Network/networkSecurityGroups
- Microsoft.Network/publicIPPrefix
- Microsoft.Network/publicIPAddresses
- Microsoft.Network/virtualNetworks
- Microsoft.Compute/virtualMachines
- Microsoft.Storage/storageAccounts
- Microsoft.Network/networkInterfaces
- Microsoft.Network/azureFirewalls
- Microsoft.Network/routeTables
部署 Bicep 檔案
將 Bicep 檔案以 main.bicep 儲存至本機電腦。
使用 Azure CLI 或 Azure PowerShell 部署 Bicep 檔案。
az group create --name exampleRG --location eastus az deployment group create --resource-group exampleRG --template-file main.bicep --parameters adminUsername=<admin-username>注意
將 admin-username<> 取代為後端伺服器的管理員使用者名稱。
系統會提示您輸入管理員密碼。
當部署完成時,您應該會看到指出部署成功的訊息。
驗證部署
在 Azure 入口網站中,檢閱已部署的資源。 請注意防火牆的公用 IP 位址。
使用遠端桌面連線連線到防火牆公用 IP 位址。 成功的連線會示範允許連線到後端伺服器的防火牆 NAT 規則。
清除資源
當您不再需要先前為防火牆建立的資源時,請刪除資源群組。 這會移除防火牆和所有相關資源。
呼叫 Remove-AzResourceGroup Cmdlet 以刪除資源群組:
Remove-AzResourceGroup -Name "exampleRG"
