轉換 IoT Central 應用程式內的資料以進行匯出
IoT 裝置會以各種格式傳送資料。 若要在IoT解決方案中使用裝置資料,您可能需要在將裝置資料匯出至其他服務之前先轉換裝置資料。
本文說明如何在 IoT Central 應用程式中,將裝置資料轉換成資料匯出定義的一部分。
IoT Central 資料匯出定義的轉換可讓您在將裝置數據匯出至目的地之前,先操作裝置數據的格式和結構。 您可以在匯出定義中指定每個目的地的轉換。 每個訊息都會通過轉換來建立輸出記錄,以導出至目的地。
使用轉換來重新建構 JSON 承載、重新命名欄位、篩選出欄位,以及對遙測值執行簡單的計算。 例如,使用轉換將訊息轉換成符合目的地結構描述的表格式格式,例如 Azure 資料總管資料表。
下列影片將為您介紹 IoT Central 資料轉換:
選取轉換
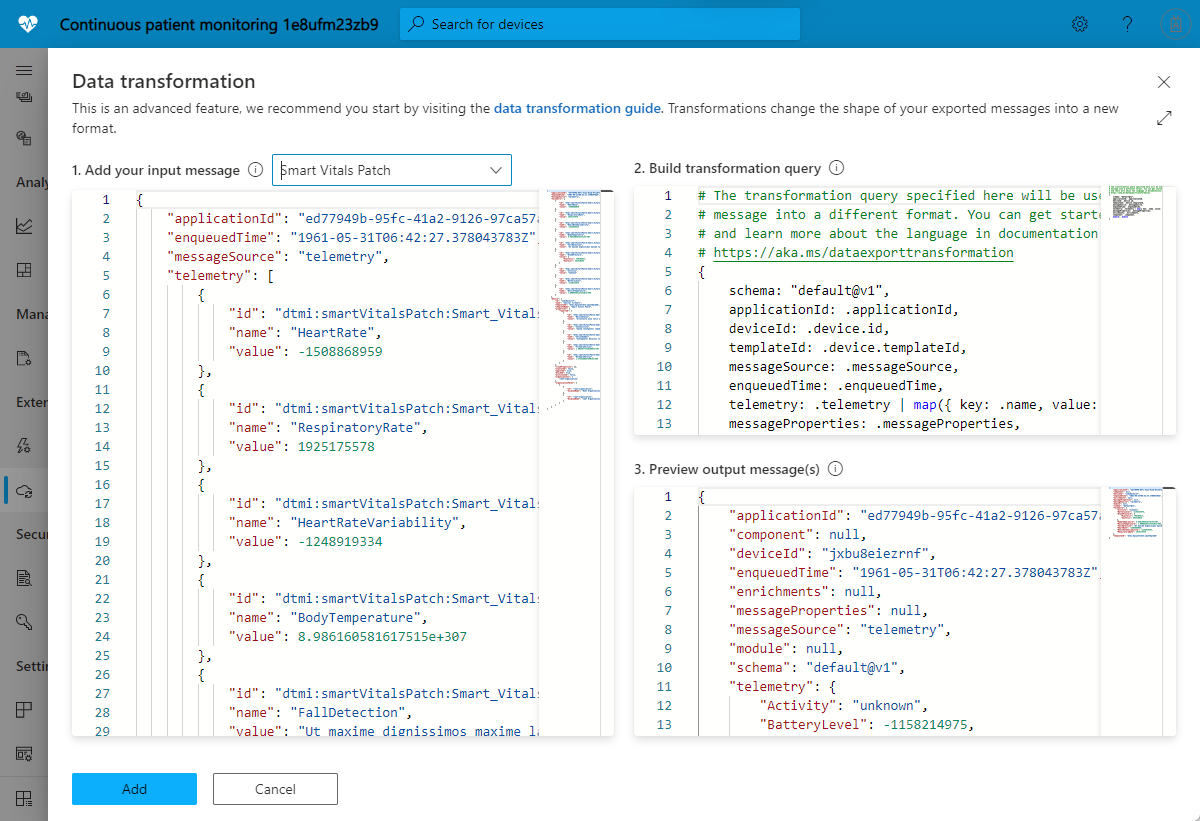
若要在數據匯出定義中新增目的地的轉換,請選取 [+ 轉換 ],如下列螢幕快照所示:
[資料轉換] 面板可讓您指定轉換。 在 [1. 新增輸入訊息] 區段中,您可輸入想要通過轉換的範例訊息。 您也可以選取裝置範本來產生範例訊息。 在 [2. 建置轉換查詢] 區段中,您可以輸入可轉換輸入訊息的查詢。 [3. 預覽輸出訊息] 區段會顯示轉換的結果:
提示
如果您不知道輸入訊息的格式,請使用 . 作為查詢,將訊息保持原樣匯出到目的地,例如 Webhook。 然後將 Webhook 收到的訊息貼到 [1.新增輸入訊息]。 然後建置轉換查詢,將此訊息處理為所需的輸出格式。
建置轉換查詢
轉換引擎會使用開放原始碼 JQ JSON 處理器來重新建構和格式化 JSON 承載。 若要指定轉換,您可撰寫 JQ 查詢,以使用 JQ 的內建篩選條件、函式和功能。 如需一些查詢範例,請參閱範例轉換查詢。 若要深入了解如何撰寫 JQ 查詢,請參閱 JQ 手冊。
轉換前訊息結構
您可以從 IoT Central 匯出下列資料串流:遙測、屬性變更、裝置連線活動、裝置生命週期事件,以及裝置範本生命週期事件。 每種資料類型都有特定的結構,其中包含遙測值、應用程式資訊、裝置中繼資料和屬性值等資訊。
下列範例顯示遙測訊息的狀態。 此資料全都可供您的轉換使用。 訊息的結構與其他訊息類型類似,但有一些類型特有欄位。 您可以使用 [新增輸入訊息] 功能,根據應用程式中的裝置範本產生範例訊息。
{
  "applicationId": "00001111-aaaa-2222-bbbb-3333cccc4444",
  "device": {
    "id": "31edabe6-e0b9-4c83-b0df-d12e95745b9f",
    "name": "Scripted Device - 31edabe6-e0b9-4c83-b0df-d12e95745b9f",
    "cloudProperties": [],
    "properties": {
      "reported": [
        {
          "id": "urn:smartKneeBrace:Smart_Vitals_Patch_wr:FirmwareVersion:1",
          "name": "FirmwareVersion",
          "value": 1.0
        }
      ]
    },
    "templateId": "urn:sbq3croo:modelDefinition:nf7st1wn3",
    "templateName": "Smart Knee Brace"
  },
  "telemetry": [
      {
        "id": "urn:continuousPatientMonitoringTemplate:Smart_Knee_Brace_6wm:Acceleration:1",
        "name": "Acceleration",
        "value": {
          "x": 19.212770659918583,
          "y": 20.596296675217335,
          "z": 54.04859440697045
        }
      },
      {
        "id": "urn:continuousPatientMonitoringTemplate:Smart_Knee_Brace_6wm:RangeOfMotion:1",
        "name": "RangeOfMotion",
        "value": 110
      }
  ],
  "enqueuedTime": "2021-03-23T19:55:56.971Z",
  "enrichments": {
      "your-enrichment-key": "enrichment-value"
  },
  "messageProperties": {
      "prop1": "prop-value"
  },
  "messageSource": "telemetry"
}
提示
使用 IoT Central 應用程式 UI 中的 [新增輸入訊息] 功能,查看其他資料匯出類型的範例訊息結構,例如屬性變更。
範例轉換查詢
下列查詢範例會使用上一節所示的遙測訊息。
範例 1:下列 JQ 查詢會從輸入訊息輸出每個遙測片段,作為個別的輸出訊息:
.telemetry[]
JSON 輸出:
{
  "id": "urn:continuousPatientMonitoringTemplate:Smart_Knee_Brace_6wm:Acceleration:1",
  "name": "Acceleration",
  "value": {
    "x": 19.212770659918583,
    "y": 20.596296675217335,
    "z": 54.04859440697045
  }
},
{
  "id": "urn:continuousPatientMonitoringTemplate:Smart_Knee_Brace_6wm:RangeOfMotion:1",
  "name": "RangeOfMotion",
  "value": 110
}
提示
若要將輸出變更為具有遙測類型陣列的單一訊息,請使用查詢 .telemetry。
範例 2:下列 JQ 查詢會將輸入遙測陣列轉換成以遙測名稱作為索引鍵的物件:
.telemetry | map({ key: .name, value: .value }) | from_entries
JSON 輸出:
{
  "Acceleration": {
    "x": 19.212770659918583,
    "y": 20.596296675217335,
    "z": 54.04859440697045
  },
  "RangeOfMotion": 110
}
範例 3:下列 JQ 查詢會尋找 RangeOfMotion 遙測值,並使用公式 rad = degree * pi / 180 將其從度轉換成弧度。 此查詢也會示範如何匯入和使用 iotc 模組:
import "iotc" as iotc;
{
  rangeOfMotion: (
    .telemetry
    | iotc::find(.name == "RangeOfMotion").value
    | . * 3.14159265358979323846 / 180
  )
}
JSON 輸出:
{
  "rangeOfMotion": 1.9198621771937625
}
範例 4:若要將輸入訊息巧妙地處理成表格式格式,您可以將每則匯出的訊息對應至一或多個資料列。 資料列輸出會以邏輯方式表示為 JSON 物件,其中資料行名稱是索引鍵,而資料行值是值:
{
    "<column 1 name>": "<column 1 value>",
    "<column 2 name>": "<column 2 value>",
    ...
}
提示
當您匯出至 Azure Data Explorer 時,請使用表格式格式。
下列 JQ 查詢會將資料列寫入資料表,以儲存不同裝置上的 rangeOfMotion 遙測。 查詢會將裝置識別碼、排入佇列的時間和動作範圍對應到具有下列資料行的資料表:
import "iotc" as iotc;
{
    deviceId: .deviceId,
    timestamp: .enqueuedTime,
    rangeOfMotion: .telemetry | iotc::find(.name == "RangeOfMotion").value
}
JSON 格式的輸出:
{
  "deviceId": "31edabe6-e0b9-4c83-b0df-d12e95745b9f",
  "timestamp": "2021-03-23T19:55:56.971Z",
  "rangeOfMotion": 110
}
IoT Central 模組
JQ 模組是自訂函式的集合。 在轉換查詢中,您可以匯入內建的 IoT Central 特定模組,其中包含可讓您更輕鬆地撰寫查詢的函式。 若要匯入 IoT Central 模組,請使用下列指示詞:
import "iotc" as iotc;
IoT Central 模組包含下列函式:
find(expression):find 函式可讓您尋找特定陣列元素,例如承載中的遙測值或屬性項目。 函式輸入是陣列,而參數會定義 JQ 篩選條件,以針對陣列中的每個元素執行。 函式會傳回篩選條件評估為 true 的每個陣列元素:
例如,若要尋找稱為 RangeOfMotion 的特定遙測值:
.telemetry | iotc::find(.name == "RangeOfMotion")
案例
下列案例會使用轉換功能來自訂特定目的地的裝置資料格式。
案例 1:將裝置資料匯出至 Azure Data Explorer
在此案例中,您會轉換裝置資料以符合 Azure Data Explorer 中的固定結構描述,其中每個遙測值都會顯示為資料表中的資料行,而每個資料列都代表單一訊息。 例如:
| DeviceId | 時間戳記 | T1 | T2 | T3 |
|---|---|---|---|---|
| "31edabe6-e0b9-4c83-b0df-d12e95745b9f" | "2021-03-23T19:55:56.971Z | 1.18898 | 1.434709 | 2.97008 |
若要匯出與此資料表相容的資料,每則匯出的訊息都必須如下列物件所示。 此物件代表單一資料列,其中索引鍵是資料行名稱,而值是每個資料行中要放置的值:
{
    "Timestamp": <value-of-Timestamp>,
    "DeviceId": <value-of-deviceId>,
    "T1": <value-of-T1>,
    "T2": <value-of-T2>,
    "T3": <value-of-T3>,
}
在此案例中,裝置會在如下列範例所示的輸入訊息中傳送 t1、t2 和 t3 遙測值:
{
  "applicationId": "11112222-bbbb-3333-cccc-4444dddd5555",
  "enqueuedTime": "1933-01-26T03:10:44.480001324Z",
  "messageSource": "telemetry",
  "telemetry": [
    {
      "id": "dtmi:temperaturesensor288:sensors1lr:t1;1",
      "name": "t1",
      "value": 1.1889838348731093e+308
    },
    {
      "id": "dtmi:temperaturesensor288:sensors1lr:t2;1",
      "name": "t2",
      "value": 1.4347093391531383e+308
    },
    {
      "id": "dtmi:temperaturesensor288:sensors1lr:t3;1",
      "name": "t3",
      "value": 2.9700885230380616e+307
    }
  ],
  "device": {
    "id": "oozrnl1zs857",
    "name": "haptic alarm",
    "templateId": "dtmi:modelDefinition:nhhbjotee:qytxnp8hi",
    "templateName": "hapticsensors",
    "properties": {
      "reported": []
    },
    "cloudProperties": [],
    "simulated": true,
    "approved": false,
    "blocked": false,
    "provisioned": true
  }
}
下列 JQ 查詢會輸出 T1、T2 和 T3 遙測值、Timestamp 和 deviceId,因為有一則訊息包含符合 Azure Data Explorer 資料表結構描述的索引鍵/值組:
import "iotc" as iotc;
{
  deviceId: .device.id,
  Timestamp: .enqueuedTime,
  T1: .telemetry | iotc::find(.name == "t1").value,
  T2: .telemetry | iotc::find(.name == "t2").value,
  T3: .telemetry | iotc::find(.name == "t3").value,
}
JSON 輸出:
{
  "T1": 1.1889838348731093e+308,
  "T2": 1.4347093391531383e+308,
  "T3": 2.9700885230380616e+307,
  "Timestamp": "1933-01-26T03:10:44.480001324Z",
  "deviceId": "oozrnl1zs857"
}
若要深入了解如何將 Azure Data Explorer 叢集和資料庫新增為匯出目的地,請參閱建立 Azure Data Explorer目的地。
案例 2:分解遙測陣列
在此案例中,裝置會在一則訊息中傳送下列遙測陣列:
{
  "applicationId": "22223333-cccc-4444-dddd-5555eeee6666",
  "enqueuedTime": "1909-10-10T07:11:56.078161042Z",
  "messageSource": "telemetry",
  "telemetry": [
    {
      "id": "dtmi:sample1:data;1",
      "name": "data",
      "value": [
        {
          "id": "subdevice1",
          "values": {
              "running": true,
              "cycleCount": 2315
          }
        },
        {
          "id": "subdevice2",
          "values": {
              "running": false,
              "cycleCount": 824567
          }
        }
      ]
    },
    {
      "id": "dtmi:sample1:parentStatus;1",
      "name": "parentStatus",
      "value": "healthy"
    }
  ],
  "device": {
    "id": "9xwhr7khkfri",
    "name": "wireless port",
    "templateId": "dtmi:hpzy1kfcbt2:umua7dplmbd",
    "templateName": "Smart Vitals Patch",
    "properties": {
      "reported": [
        {
          "id": "dtmi:sample1:prop;1",
          "name": "Connectivity",
          "value": "Tenetur ut quasi minus ratione voluptatem."
        }
      ]
    },
    "cloudProperties": [],
    "simulated": true,
    "approved": true,
    "blocked": false,
    "provisioned": false
  }
}
您想要轉換此裝置資料以符合下列資料表結構描述:
| cycleCount | deviceId | enqueuedTime | parentStatus | 執行中 | subdeviceId |
|---|---|---|---|---|---|
| 2315 | "9xwhr7khkfri" | "1909-10-10T07:11:56.078161042Z" | "healthy" | true | "subdevice1" |
| 824567 | "9xwhr7khkfri" | "1909-10-10T07:11:56.078161042Z" | "healthy" | false | "subdevice2" |
下列 JQ 查詢會針對訊息中的每個子裝置項目建立個別的輸出訊息,並包含來自基底訊息和父代裝置的一些常見資訊。 此查詢會將輸出扁平化,並區隔資料中以單一訊息形式送達的邏輯劃分:
import "iotc" as iotc;
{
    enqueuedTime: .enqueuedTime,
    deviceId: .device.id,
    parentStatus: .telemetry | iotc::find(.name == "parentStatus").value
} + (
    .telemetry
    | iotc::find(.name == "data").value[]
    | {
        subdeviceId: .id,
        running: .values.running,
        cycleCount: .values.cycleCount
    }
)
JSON 輸出:
{
    "cycleCount": 2315,
    "deviceId": "9xwhr7khkfri",
    "enqueuedTime": "1909-10-10T07:11:56.078161042Z",
    "parentStatus": "healthy",
    "running": true,
    "subdeviceId": "subdevice1"
},
{
    "cycleCount": 824567,
    "deviceId": "9xwhr7khkfri",
    "enqueuedTime": "1909-10-10T07:11:56.078161042Z",
    "parentStatus": "healthy",
    "running": false,
    "subdeviceId": "subdevice2"
}
案例 3:Power BI 串流
Power BI 即時串流功能可讓您檢視儀錶板中的數據,以低延遲即時更新。 若要深入了解,請參閱 Power BI 中的即時串流。
若要使用 IoT Central 搭配 Power BI 串流,請設定 Webhook 匯出,以特定格式傳送要求主體。 此範例假設您有包含下列結構描述的 Power BI 串流資料集:
  {
    "bloodPressureDiastolic": 161438124,
    "bloodPressureSystolic": -966387879,
    "deviceId": "9xwhr7khkfri",
    "deviceName": "wireless port",
    "heartRate": -633994413,
    "heartRateVariability": -37514094,
    "respiratoryRate": 1582211310,
    "timestamp": "1909-10-10T07:11:56.078161042Z"
  }
若要建立 Webhook 匯出目的地,您需要 Power BI 串流資料集的 REST API URL 端點。
在此案例中,裝置會傳送類似下列範例的遙測訊息:
{
  "applicationId": "22223333-cccc-4444-dddd-5555eeee6666",
  "enqueuedTime": "1909-10-10T07:11:56.078161042Z",
  "messageSource": "telemetry",
  "telemetry": [
    {
      "id": "dtmi:smartVitalsPatch:Smart_Vitals_Patch_37p:HeartRate;1",
      "name": "HeartRate",
      "value": -633994413
    },
    {
      "id": "dtmi:smartVitalsPatch:Smart_Vitals_Patch_37p:RespiratoryRate;1",
      "name": "RespiratoryRate",
      "value": 1582211310
    },
    {
      "id": "dtmi:smartVitalsPatch:Smart_Vitals_Patch_37p:HeartRateVariability;1",
      "name": "HeartRateVariability",
      "value": -37514094
    },
    {
      "id": "dtmi:smartVitalsPatch:Smart_Vitals_Patch_37p:BodyTemperature;1",
      "name": "BodyTemperature",
      "value": 5.323322666478241e+307
    },
    {
      "id": "dtmi:smartVitalsPatch:Smart_Vitals_Patch_37p:FallDetection;1",
      "name": "FallDetection",
      "value": "Earum est nobis at voluptas id qui."
    },
    {
      "id": "dtmi:smartVitalsPatch:Smart_Vitals_Patch_37p:BloodPressure;1",
      "name": "BloodPressure",
      "value": {
        "Diastolic": 161438124,
        "Systolic": -966387879
      }
    }
  ],
  "device": {
    "id": "9xwhr7khkfri",
    "name": "wireless port",
    "templateId": "dtmi:hpzy1kfcbt2:umua7dplmbd",
    "templateName": "Smart Vitals Patch",
    "properties": {
      "reported": [
        {
          "id": "dtmi:smartVitalsPatch:Smart_Vitals_Patch_wr:DeviceStatus;1",
          "name": "DeviceStatus",
          "value": "Id optio iste vero et neque sit."
        }
      ]
    },
    "cloudProperties": [],
    "simulated": true,
    "approved": true,
    "blocked": false,
    "provisioned": false
  }
}
下列 JQ 查詢會將輸入訊息轉換成適合 Webhook 的格式,以傳送至 Power BI 串流資料集。 此範例包含篩選準則,只輸出特定裝置範本的訊息。 您可以使用資料匯出篩選功能,依裝置範本進行篩選:
import "iotc" as iotc;
if .device.templateId == "dtmi:hpzy1kfcbt2:umua7dplmbd" then
    {
        deviceId: .device.id,
        timestamp: .enqueuedTime,
        deviceName: .device.name,
        bloodPressureSystolic: .telemetry | iotc::find(.name == "BloodPressure").value.Systolic,
        bloodPressureDiastolic: .telemetry | iotc::find(.name == "BloodPressure").value.Diastolic,
        heartRate: .telemetry | iotc::find(.name == "HeartRate").value,
        heartRateVariability: .telemetry | iotc::find(.name == "HeartRateVariability").value,
        respiratoryRate: .telemetry | iotc::find(.name == "RespiratoryRate").value
    }
else
    empty
end
JSON 輸出:
{
  "bloodPressureDiastolic": 161438124,
  "bloodPressureSystolic": -966387879,
  "deviceId": "9xwhr7khkfri",
  "deviceName": "wireless port",
  "heartRate": -633994413,
  "heartRateVariability": -37514094,
  "respiratoryRate": 1582211310,
  "timestamp": "1909-10-10T07:11:56.078161042Z"
}
案例 4:將資料匯出至 Azure Data Explorer,並在 Power BI 中將其視覺化
在此案例中,您會將資料匯出至 Azure Data Explorer,然後使用連接器將 Power BI 中的資料視覺化。 若要深入了解如何將 Azure Data Explorer 叢集和資料庫新增為匯出目的地,請參閱建立 Azure Data Explorer目的地。
此案例使用具有下列結構描述的 Azure Data Explorer 資料表:
.create table smartvitalspatch (
  EnqueuedTime:datetime,
  Message:string,
  Application:string,
  Device:string,
  Simulated:boolean,
  Template:string,
  Module:string,
  Component:string,
  Capability:string,
  Value:dynamic
)
在此案例中,裝置會傳送類似下列範例的遙測訊息:
{
    "applicationId": "22223333-cccc-4444-dddd-5555eeee6666",
    "enqueuedTime": "1909-10-10T07:11:56.078161042Z",
    "messageSource": "telemetry",
    "telemetry": [
        {
            "id": "dtmi:smartVitalsPatch:Smart_Vitals_Patch_37p:HeartRate;1",
            "name": "HeartRate",
            "value": -633994413
        },
        {
            "id": "dtmi:smartVitalsPatch:Smart_Vitals_Patch_37p:RespiratoryRate;1",
            "name": "RespiratoryRate",
            "value": 1582211310
        },
        {
            "id": "dtmi:smartVitalsPatch:Smart_Vitals_Patch_37p:HeartRateVariability;1",
            "name": "HeartRateVariability",
            "value": -37514094
        },
        {
            "id": "dtmi:smartVitalsPatch:Smart_Vitals_Patch_37p:BodyTemperature;1",
            "name": "BodyTemperature",
            "value": 5.323322666478241e+307
        },
        {
            "id": "dtmi:smartVitalsPatch:Smart_Vitals_Patch_37p:FallDetection;1",
            "name": "FallDetection",
            "value": "Earum est nobis at voluptas id qui."
        },
        {
            "id": "dtmi:smartVitalsPatch:Smart_Vitals_Patch_37p:BloodPressure;1",
            "name": "BloodPressure",
            "value": {
                "Diastolic": 161438124,
                "Systolic": -966387879
            }
        }
    ],
    "device": {
        "id": "9xwhr7khkfri",
        "name": "wireless port",
        "templateId": "dtmi:hpzy1kfcbt2:umua7dplmbd",
        "templateName": "Smart Vitals Patch",
        "properties": {
            "reported": [
                {
                    "id": "dtmi:smartVitalsPatch:Smart_Vitals_Patch_wr:DeviceStatus;1",
                    "name": "DeviceStatus",
                    "value": "Id optio iste vero et neque sit."
                }
            ]
        },
        "cloudProperties": [],
        "simulated": true,
        "approved": true,
        "blocked": false,
        "provisioned": false
    }
}
下列 JQ 查詢會將輸入訊息轉換成每個遙測值的個別輸出訊息。 此轉換會產生符合 Azure Data Explorer資料表結構描述的輸出。 轉換會使用 entity-attribute-value 結構描述,其中每個資料列都會保存單一遙測值,而遙測的名稱是相同資料列中個別資料行中的值:
. as $in | .telemetry[] | {
  EnqueuedTime: $in.enqueuedTime,
  Message: $in.messageId,
  Application: $in.applicationId,
  Device: $in.device.id,
  Simulated: $in.device.simulated,
  Template: ($in.device.templateName // ""),
  Module: ($in.module // ""),
  Component: ($in.component // ""),
  Capability: .name,
  Value: .value
}
JSON 輸出:
{
  "Application": "22223333-cccc-4444-dddd-5555eeee6666",
  "Capability": "HeartRate",
  "Component": "",
  "Device": "9xwhr7khkfri",
  "EnqueuedTime": "1909-10-10T07:11:56.078161042Z",
  "Message": null,
  "Module": "",
  "Simulated": true,
  "Template": "Smart Vitals Patch",
  "Value": -633994413
},
{
  "Application": "22223333-cccc-4444-dddd-5555eeee6666",
  "Capability": "RespiratoryRate",
  "Component": "",
  "Device": "9xwhr7khkfri",
  "EnqueuedTime": "1909-10-10T07:11:56.078161042Z",
  "Message": null,
  "Module": "",
  "Simulated": true,
  "Template": "Smart Vitals Patch",
  "Value": 1582211310
},
{
  "Application": "22223333-cccc-4444-dddd-5555eeee6666",
  "Capability": "HeartRateVariability",
  "Component": "",
  "Device": "9xwhr7khkfri",
  "EnqueuedTime": "1909-10-10T07:11:56.078161042Z",
  "Message": null,
  "Module": "",
  "Simulated": true,
  "Template": "Smart Vitals Patch",
  "Value": -37514094
},
{
  "Application": "22223333-cccc-4444-dddd-5555eeee6666",
  "Capability": "BodyTemperature",
  "Component": "",
  "Device": "9xwhr7khkfri",
  "EnqueuedTime": "1909-10-10T07:11:56.078161042Z",
  "Message": null,
  "Module": "",
  "Simulated": true,
  "Template": "Smart Vitals Patch",
  "Value": 5.323322666478241e+307
},
{
  "Application": "22223333-cccc-4444-dddd-5555eeee6666",
  "Capability": "FallDetection",
  "Component": "",
  "Device": "9xwhr7khkfri",
  "EnqueuedTime": "1909-10-10T07:11:56.078161042Z",
  "Message": null,
  "Module": "",
  "Simulated": true,
  "Template": "Smart Vitals Patch",
  "Value": "Earum est nobis at voluptas id qui."
},
{
  "Application": "22223333-cccc-4444-dddd-5555eeee6666",
  "Capability": "BloodPressure",
  "Component": "",
  "Device": "9xwhr7khkfri",
  "EnqueuedTime": "1909-10-10T07:11:56.078161042Z",
  "Message": null,
  "Module": "",
  "Simulated": true,
  "Template": "Smart Vitals Patch",
  "Value": {
      "Diastolic": 161438124,
      "Systolic": -966387879
  }
}
輸出資料會匯出至您的 Azure Data Explorer 叢集。 若要在 Power BI 中將匯出的資料視覺化,請完成下列步驟:
- 安裝 Power BI 應用程式。 您可以從使用 Power BI Desktop 從資料取得深入解析以至採用動作下載 Power BI Desktop 應用程式。
- 從 GitHub 下載 Power BI Desktop IoT Central ADX Connector.pbit 檔案。
- 使用 Power BI Desktop 應用程式開啟您在上一個步驟中下載的 IoT Central ADX Connector.pbit 檔案。 出現提示時,輸入您先前記下的 Azure Data Explorer 叢集、資料庫和資料表資訊。
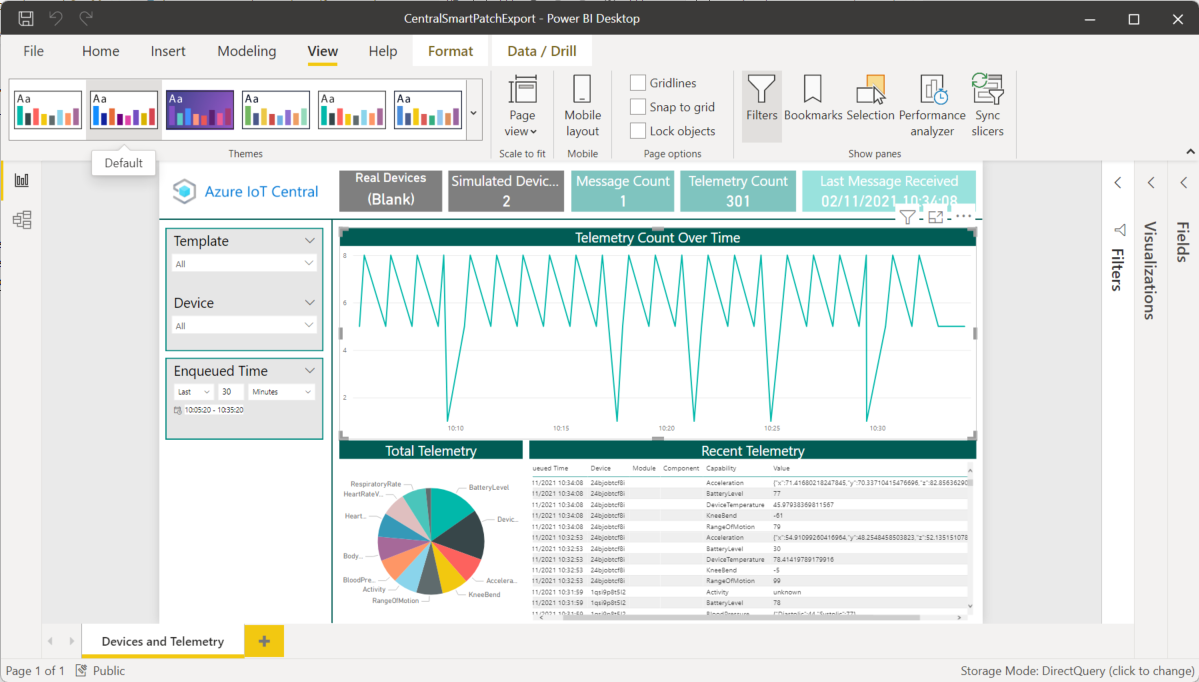
現在,您可以將 Power BI 中的資料視覺化:

下一步
既然您已了解如何在 IoT Central 中轉換資料,建議的下一個步驟是了解如何在 IoT Central 中使用分析。

