將資料從 Microsoft Defender 全面偵測回應連線至 Microsoft Sentinel
適用於 Microsoft Sentinel 的 Microsoft Defender 全面偵測回應連接器可讓您將所有 Defender 全面偵測回應事件、警示和進階搜捕事件串流至 Microsoft Sentinel。 此連接器會讓事件在兩個入口網站之間保持同步。 Defender 全面偵測回應事件包括來自所有 Microsoft Defender 產品和服務的警示、實體和其他相關資訊。 如需詳細資訊,請參閱 Microsoft Defender 全面偵測回應與 Microsoft Sentinel 的整合。
Defender 全面偵測回應連接器,特別是其事件整合功能,是整合安全性作業平台的基礎。 如果您要將 Microsoft Sentinel 上線至 Microsoft Defender 入口網站,您必須先啟用此連接器與事件整合。
重要
Microsoft Sentinel 現已在 Microsoft Defender 入口網站中 Microsoft 統一的安全性作業平台中正式推出。 如需詳細資訊,請參閱 Microsoft Defender 入口網站中的 Microsoft Sentinel。
必要條件
開始之前,您必須具有如本章節所述的適當授權、存取權以及已設定資源。
- 您必須具有 Microsoft Defender 全面偵測回應的有效授權,如 Microsoft Defender 全面偵測回應必要條件中所述。
- 您的用戶必須在您想要串流記錄的租使用者上具有 安全性系統管理員 角色,或對等的許可權。
- 您必須擁有您 Microsoft Sentinel 工作區的讀取和寫入權限。
- 若要對連接器設定進行任何變更,您的帳戶必須是與您 Microsoft Sentinel 工作區相關聯之相同 Microsoft Entra 租用戶的成員。
- 從 Microsoft Sentinel 中 [內容中樞] 安裝適用於 Microsoft Defender 全面偵測回應的解決方案。 如需詳細資訊,請參閱探索和管理 Microsoft Sentinel 現成可用的內容。
- 根據您的組織適當地授與 Microsoft Sentinel 的存取權。 如需詳細資訊,請參閱 Microsoft Sentinel 中的角色和權限。
針對透過適用於身分識別的 Microsoft Defender 進行內部部署 Active Directory 同步處理:
- 您的租用戶必須上線至適用於身分識別的 Microsoft Defender。
- 您必須已安裝適用於身分識別的 Microsoft Defender 感應器。
連線到 Microsoft Defender 全面偵測回應
在 Microsoft Sentinel 中,選取 [資料連接器]。 從資源庫選取 [Microsoft Defender 全面偵測回應] 以及 [開啟連接器] 頁面。
[設定] 區段有三個部分:
連線事件和警示可讓您在 Microsoft Defender 全面偵測回應與 Microsoft Sentinel 之間進行基本整合,並在兩個平台之間同步處理事件及其警示。
連線實體可透過適用於身分識別的 Microsoft Defender,將內部部署的 Active Directory使用者身分識別整合到 Microsoft Sentinel。
連線事件 可讓您從 Defender 元件收集原始的進階搜捕事件。
如需詳細資訊,請參閱 Microsoft Defender 全面偵測回應與 Microsoft Sentinel 的整合。
與事件和警示連線
若要擷取並同步處理 Microsoft Defender 全面偵測回應事件及其所有警示至 Microsoft Sentinel 事件佇列,請完成下列步驟。
標示標籤為 [關閉這些產品的所有 Microsoft 事件建立規則。建議採用] 的核取方塊,以避免重複事件。 一旦連線 Microsoft Defender 全面偵測回應連接器,就不會再顯示此核取方塊。
選取 [連線事件與警示] 按鈕。
確認 Microsoft Sentinel 正在收集 Microsoft Defender 全面偵測回應事件資料。 在 Azure 入口網站的 Microsoft Sentinel [記錄] 中,於查詢視窗中執行下列陳述式:
   SecurityIncident
   |    where ProviderName == "Microsoft 365 Defender"
當您啟用 Microsoft Defender 全面偵測回應連接器時,先前連線的任何 Microsoft Defender 元件的連接器都會在背景自動中斷連線。 雖然這些連接器會繼續顯示連線,但資料不會經過這些連接器。
連線實體
使用適用於身分識別的 Microsoft Defender 將使用者實體從您內部部署的 Active Directory 同步處理至 Microsoft Sentinel。
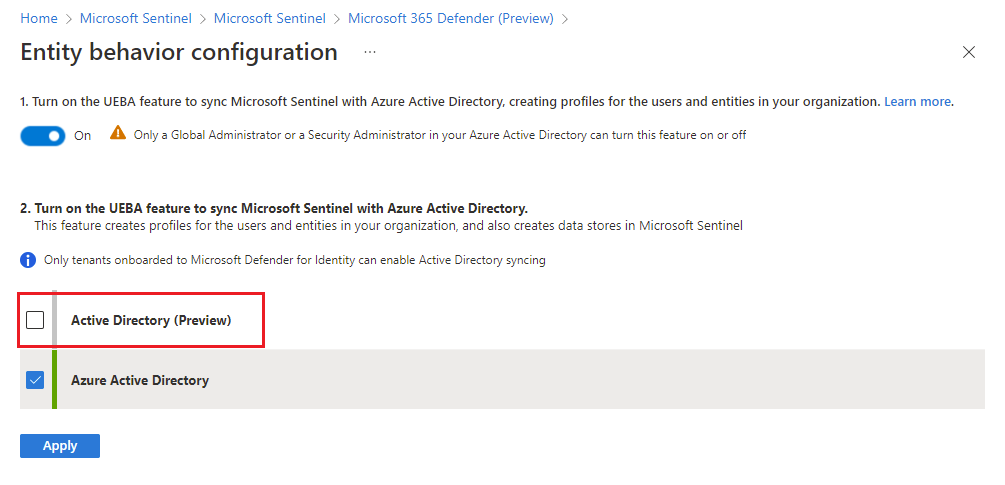
選取 [移至 UEBA 設定頁面] 連結。
在 [實體行為設定] 頁面中,如果您未啟用 UEBA,那麼請在頁面頂端將切換開關 [開啟]。
標示 [Active Directory (預覽)] 核取方塊,然後選取 [套用]。
連線事件
如果您想要從適用於端點的 Microsoft Defender 或適用於 Office 365 的 Microsoft Defender 收集進階搜捕事件,則可以從其對應的進階搜捕資料表收集下列類型的事件。
標記具有您想要收集之事件類型的資料表的核取方塊:
資料表名稱 事件種類 DeviceInfo 電腦資訊,包括 OS 資訊 DeviceNetworkInfo 裝置的網路屬性,包括實體介面卡、IP 和 MAC 位址,以及連線的網路和網域 DeviceProcessEvents 流程建立及相關事件 DeviceNetworkEvents 網路連線及相關事件 DeviceFileEvents 檔案建立、修改及其他檔案系統事件 DeviceRegistryEvents 登錄項目的建立及修改 DeviceLogonEvents 裝置上的登入及其他驗證事件 DeviceImageLoadEvents DLL 載入事件 DeviceEvents 多種事件類型,包括由 Windows Defender 防毒軟體和惡意探索保護等安全性控制項所觸發的事件 DeviceFileCertificateInfo 從端點的憑證驗證事件中取得的已簽署檔案憑證資訊 選取套用變更。
若要在 Log Analytics 的進階搜捕資料表中執行查詢,請在查詢視窗中輸入資料表名稱。
確認資料擷取
連接器頁面中的資料圖形指出您正在擷取資料。 發現其各針對事件 (Incident)、警示和事件 (Event) 顯示一行,而 events 行是所有已啟用資料表的事件量彙總。 啟用連接器之後,使用下列 KQL 查詢來產生更特定的圖形。
針對傳入 Microsoft Defender 全面偵測回應事件的圖表,使用下列 KQL 查詢:
let Now = now();
(range TimeGenerated from ago(14d) to Now-1d step 1d
| extend Count = 0
| union isfuzzy=true (
    SecurityIncident
    | where ProviderName == "Microsoft 365 Defender"
    | summarize Count = count() by bin_at(TimeGenerated, 1d, Now)
)
| summarize Count=max(Count) by bin_at(TimeGenerated, 1d, Now)
| sort by TimeGenerated
| project Value = iff(isnull(Count), 0, Count), Time = TimeGenerated, Legend = "Events")
| render timechart
使用下列 KQL 查詢,以針對單一資料表產生事件量圖形 (將 DeviceEvents 資料表變更為您選擇的必要資料表):
let Now = now();
(range TimeGenerated from ago(14d) to Now-1d step 1d
| extend Count = 0
| union isfuzzy=true (
    DeviceEvents
    | summarize Count = count() by bin_at(TimeGenerated, 1d, Now)
)
| summarize Count=max(Count) by bin_at(TimeGenerated, 1d, Now)
| sort by TimeGenerated
| project Value = iff(isnull(Count), 0, Count), Time = TimeGenerated, Legend = "Events")
| render timechart
下一步
在此文件中,您已了解如何使用 Microsoft Defender 全面偵測回應連接器,將 Microsoft Defender 全面偵測回應事件、警示和 Microsoft Defender 服務的進階搜捕事件資料整合至 Microsoft Sentinel。
若要在整合安全性作業平台中使用與 Defender 全面偵測回應整合的 Microsoft Sentinel,請參閱將 Microsoft Sentinel 連線至 Microsoft Defender 全面偵測回應。