教學課程:使用驗證碼流程讓使用者登入並從 Angular 單頁應用程式 (SPA) 呼叫 Microsoft Graph API
在本教學課程中,您會建置一個 Angular 單頁應用程式 (SPA),以使用 PKCE 的授權碼流程,將使用者登入及呼叫 Microsoft Graph API。 您所建置的 SPA 會使用適用於 Angular v2 的 Microsoft 驗證程式庫 (MSAL)。
在本教學課程中:
- 在 Microsoft Entra 系統管理中心註冊應用程式
- 使用
npm建立 Angular 專案 - 新增程式碼以支援使用者登入和登出
- 新增程式碼以呼叫 Microsoft Graph API
- 測試應用程式
MSAL Angular v2 改良了 MSAL Angular v1,可在瀏覽器中支援使用 PKCE 的授權碼流程,而非隱含授與流程。 建議對單頁應用程式使用受 PKCE 保護的授權碼流程,因為此流程比隱含流程更安全。 MSAL Angular v2 不支援隱含流程。
必要條件
- 用於執行本機網頁伺服器的 Node.js。
- 用於修改專案檔的 Visual Studio Code 或其他編輯器。
此範例應用程式的運作方式
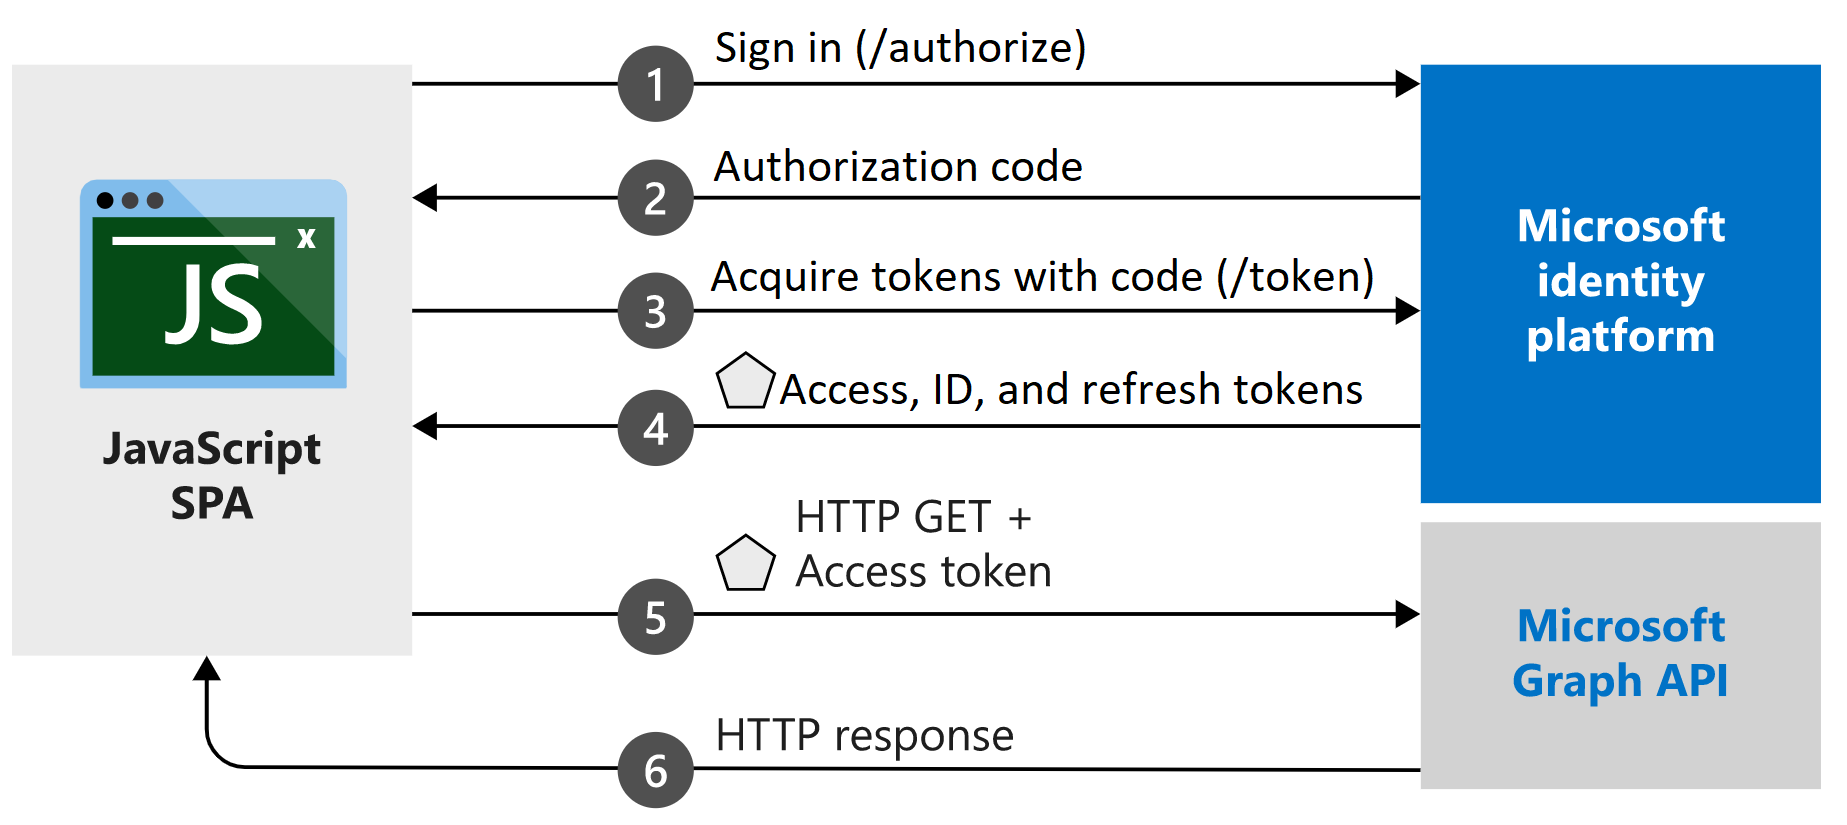
此教學課程中建立的範例應用程式可讓 Angular SPA 查詢 Microsoft Graph API,或查詢可接受由 Microsoft 身分識別平台所簽發權杖的 Web API。 此應用程式使用適用於 Angular v2 的 Microsoft 驗證程式庫 (MSAL),這是 MSAL.js 第 2 版程式庫的包裝函式。 MSAL Angular 啟用 Angular 9+ 應用程式,藉由使用 Microsoft Entra ID 來驗證企業使用者,同時驗證具有 Microsoft 帳戶和社交身分識別 (例如 Facebook、Google 和 LinkedIn) 的使用者。 程式庫也可啟用應用程式,並取得 Microsoft 雲端服務或 Microsoft Graph 的存取權。
在此案例中,當使用者登入之後,系統會透過授權標頭要求一個存取權杖,並將其新增到 HTTP 要求。 MSAL 會處理權杖取得和續約事項。
程式庫
本教學課程會使用下列程式庫:
| 程式庫 | 描述 |
|---|---|
| MSAL Angular | 適用於 Angular 包裝函式的 Microsoft Authentication Library |
| MSAL 瀏覽器 | 適用於 JavaScript 第 2 版瀏覽器套件的 Microsoft 驗證程式庫 |
您可以在 GitHub 上的 microsoft-authentication-library-for-js 存放庫中找到所有 MSAL.js 程式庫的原始程式碼。
取得完整的程式碼範例
您想要改為下載本教學課程的已完成範例專案嗎? 複製 ms-identity-javascript-angular-spa
git clone https://github.com/Azure-Samples/ms-identity-javascript-angular-spa.git
若要繼續進行本教學課程並自行建置應用程式,請繼續進行下一節,註冊應用程式和記錄識別碼。
註冊應用程式和記錄識別碼
提示
根據您開始使用的入口網站,本文中的步驟可能略有不同。
若要完成註冊,請提供應用程式名稱、指定支援的帳戶類型,以及新增重新導向 URI。 註冊之後,應用程式 [概觀] 窗格會顯示應用程式原始程式碼中所需的識別碼。
- 以至少應用程式開發人員的身分登入 Microsoft Entra 系統管理中心。
- 如有多個租用戶的存取權,請使用頂端功能表中的 [設定] 圖示
 ,從 [目錄 + 訂用帳戶] 功能表來切換要在其中註冊應用程式的租用戶。
 - 瀏覽至 [身分識別] > [應用程式] > [應用程式註冊]。
- 選取新增註冊。
- 輸入應用程式的名稱,例如 Angular-SPA-auth-code。
- 在 [支援的帳戶類型] 區段中,選取 [僅限此組織目錄中的帳戶]。 如需不同帳戶類型的資訊,請選取 [協助我選擇] 選項。
- 在 [重新導向 URI (選用)] 底下,使用下拉式功能表來選取 [單頁應用程式 (SPA)],然後輸入
http://localhost:4200到文字方塊中。 - 選取註冊。
- 註冊完成時,將會顯示應用程式的 [概觀] 窗格。 記錄 [目錄 (租用戶) 識別碼] 和 [應用程式 (用戶端) 識別碼],以用於您的應用程式原始程式碼。
建立專案
開啟 Visual Studio Code,選取 [檔案] > [開啟資料夾...]。瀏覽至並選取您要在其中建立專案的位置。
選取 [終端機] > [新增終端機] 來開啟新的終端機。
- 您可能需要切換終端機類型。 選取終端機中 + 圖示旁的向下箭號,然後選取 [命令提示字元]。
執行下列命令以建立名稱為
msal-angular-tutorial的新 Angular 專案、安裝 Angular Material 元件程式庫、MSAL 瀏覽器、MSAL Angular,並產生 home 和 profile 元件。npm install -g @angular/cli ng new msal-angular-tutorial --routing=true --style=css --strict=false cd msal-angular-tutorial npm install @angular/material @angular/cdk npm install @azure/msal-browser @azure/msal-angular ng generate component home ng generate component profile
設定應用程式並編輯基底 UI
開啟 src/app/app.module.ts。
MsalModule和MsalInterceptor需要與isIE常數一起新增到imports。 您也會新增資料模組。 將檔案的整個內容取代為下列內容片段:import { BrowserModule } from "@angular/platform-browser"; import { BrowserAnimationsModule } from "@angular/platform-browser/animations"; import { NgModule } from "@angular/core"; import { MatButtonModule } from "@angular/material/button"; import { MatToolbarModule } from "@angular/material/toolbar"; import { MatListModule } from "@angular/material/list"; import { AppRoutingModule } from "./app-routing.module"; import { AppComponent } from "./app.component"; import { HomeComponent } from "./home/home.component"; import { ProfileComponent } from "./profile/profile.component"; import { MsalModule, MsalRedirectComponent } from "@azure/msal-angular"; import { PublicClientApplication } from "@azure/msal-browser"; const isIE = window.navigator.userAgent.indexOf("MSIE ") > -1 || window.navigator.userAgent.indexOf("Trident/") > -1; @NgModule({ declarations: [AppComponent, HomeComponent, ProfileComponent], imports: [ BrowserModule, BrowserAnimationsModule, AppRoutingModule, MatButtonModule, MatToolbarModule, MatListModule, MsalModule.forRoot( new PublicClientApplication({ auth: { clientId: "Enter_the_Application_Id_here", // Application (client) ID from the app registration authority: "Enter_the_Cloud_Instance_Id_Here/Enter_the_Tenant_Info_Here", // The Azure cloud instance and the app's sign-in audience (tenant ID, common, organizations, or consumers) redirectUri: "Enter_the_Redirect_Uri_Here", // This is your redirect URI }, cache: { cacheLocation: "localStorage", storeAuthStateInCookie: isIE, // Set to true for Internet Explorer 11 }, }), null, null ), ], providers: [], bootstrap: [AppComponent, MsalRedirectComponent], }) export class AppModule {}將下列值取代為從 Microsoft Entra 系統管理中心取得的值。 如需可用之可設定選項的詳細資訊,請參閱將用戶端應用程式初始化 \(英文\)。
clientId- 應用程式 (也稱為用戶端) 的識別碼。 將Enter_the_Application_Id_Here取代為先前從已註冊應用程式 [概觀] 頁面記錄的 [應用程式 (用戶端) 識別碼]。authority- 這是由兩個部分組成:- 執行個體是雲端提供者的端點。 針對主要或全域 Azure 雲端,請輸入
https://login.microsoftonline.com。 在國家雲端中檢查並找出不同的可用端點。 - 租用戶識別碼是註冊應用程式的租用戶識別碼。 將
_Enter_the_Tenant_Info_Here取代為先前從已註冊應用程式 [概觀] 頁面記錄的 [目錄 (租用戶) 識別碼] 值。
- 執行個體是雲端提供者的端點。 針對主要或全域 Azure 雲端,請輸入
redirectUri- 在應用程式成功授權並授與授權碼或存取權杖時,授權伺服器會將使用者傳送過去的位置。 把Enter_the_Redirect_Uri_Here替換為http://localhost:4200。
開啟 src/app/app-routing.module.ts,並將路由新增至 home 和 profile 元件。 將檔案的整個內容取代為下列內容片段:
import { NgModule } from "@angular/core";
import { Routes, RouterModule } from "@angular/router";
import { BrowserUtils } from "@azure/msal-browser";
import { HomeComponent } from "./home/home.component";
import { ProfileComponent } from "./profile/profile.component";

const routes: Routes = [
  {
    path: "profile",
    component: ProfileComponent,
  },
  {
    path: "",
    component: HomeComponent,
  },
];

const isIframe = window !== window.parent && !window.opener;

@NgModule({
  imports: [
    RouterModule.forRoot(routes, {
      // Don't perform initial navigation in iframes or popups
      initialNavigation:
        !BrowserUtils.isInIframe() && !BrowserUtils.isInPopup()
          ? "enabledNonBlocking"
          : "disabled", // Set to enabledBlocking to use Angular Universal
    }),
  ],
  exports: [RouterModule],
})
export class AppRoutingModule {}
開啟 src/app/app.component.html,並將現有的程式碼取代為下列內容:
<mat-toolbar color="primary">
  <a class="title" href="/">{{ title }}</a>

  <div class="toolbar-spacer"></div>

  <a mat-button [routerLink]="['profile']">Profile</a>

  <button mat-raised-button *ngIf="!loginDisplay" (click)="login()">Login</button>

</mat-toolbar>
<div class="container">
  <!--This is to avoid reload during acquireTokenSilent() because of hidden iframe -->
  <router-outlet *ngIf="!isIframe"></router-outlet>
</div>
開啟 src/style.css 以定義 CSS:
@import "~@angular/material/prebuilt-themes/deeppurple-amber.css";

html,
body {
  height: 100%;
}
body {
  margin: 0;
  font-family: Roboto, "Helvetica Neue", sans-serif;
}
.container {
  margin: 1%;
}
開啟 src/app/app.component.css,以將 CSS 樣式新增至應用程式:
.toolbar-spacer {
  flex: 1 1 auto;
}

a.title {
  color: white;
}
使用快顯視窗登入
開啟 src/app/app.component.ts,並將檔案的內容取代為下列內容,以使用快顯視窗登入使用者:
import { MsalService } from '@azure/msal-angular';
import { Component, OnInit } from '@angular/core';

@Component({
  selector: 'app-root',
  templateUrl: './app.component.html',
  styleUrls: ['./app.component.css']
})
export class AppComponent implements OnInit {
  title = 'msal-angular-tutorial';
  isIframe = false;
  loginDisplay = false;

  constructor(private authService: MsalService) { }

  ngOnInit() {
    this.isIframe = window !== window.parent && !window.opener;
  }

  login() {
    this.authService.loginPopup()
      .subscribe({
        next: (result) => {
          console.log(result);
          this.setLoginDisplay();
        },
        error: (error) => console.log(error)
      });
  }

  setLoginDisplay() {
    this.loginDisplay = this.authService.instance.getAllAccounts().length > 0;
  }
}
使用重新導向登入
更新 src/app/app.module.ts 以針對
MsalRedirectComponent啟動程序。 這是會處理重新導向的專用重新導向元件。 將MsalModule匯入與AppComponent啟動程序變更為類似下列內容:... import { MsalModule, MsalRedirectComponent } from '@azure/msal-angular'; // Updated import ... bootstrap: [AppComponent, MsalRedirectComponent] // MsalRedirectComponent bootstrapped here ...開啟 src/index.html,並將此檔案的整個內容取代為下列程式碼片段,以新增
<app-redirect>選取器:<!doctype html> <html lang="en"> <head> <meta charset="utf-8"> <title>msal-angular-tutorial</title> <base href="/"> <meta name="viewport" content="width=device-width, initial-scale=1"> <link rel="icon" type="image/x-icon" href="favicon.ico"> </head> <body> <app-root></app-root> <app-redirect></app-redirect> </body> </html>開啟 src/app/app.component.ts,並將程式碼取代為下列內容,以使用完整框架重新導向來登入使用者:
import { MsalService } from '@azure/msal-angular';
import { Component, OnInit } from '@angular/core';

@Component({
  selector: 'app-root',
  templateUrl: './app.component.html',
  styleUrls: ['./app.component.css']
})
export class AppComponent implements OnInit {
  title = 'msal-angular-tutorial';
  isIframe = false;
  loginDisplay = false;

  constructor(private authService: MsalService) { }

  ngOnInit() {
    this.isIframe = window !== window.parent && !window.opener;
  }

  login() {
    this.authService.loginRedirect();
  }

  setLoginDisplay() {
    this.loginDisplay = this.authService.instance.getAllAccounts().length > 0;
  }
}
瀏覽至 src/app/home/home.component.ts,並將此檔案的整個內容取代為下列程式碼片段,以訂閱
LOGIN_SUCCESS事件:import { Component, OnInit } from '@angular/core'; import { MsalBroadcastService, MsalService } from '@azure/msal-angular'; import { EventMessage, EventType, InteractionStatus } from '@azure/msal-browser'; import { filter } from 'rxjs/operators'; @Component({ selector: 'app-home', templateUrl: './home.component.html', styleUrls: ['./home.component.css'] }) export class HomeComponent implements OnInit { constructor(private authService: MsalService, private msalBroadcastService: MsalBroadcastService) { } ngOnInit(): void { this.msalBroadcastService.msalSubject$ .pipe( filter((msg: EventMessage) => msg.eventType === EventType.LOGIN_SUCCESS), ) .subscribe((result: EventMessage) => { console.log(result); }); } }
條件式轉譯
為了只針對已驗證的使用者轉譯特定使用者介面 (UI),元件必須訂閱 MsalBroadcastService 以查看使用者是否已登入,並已完成互動。
將
MsalBroadcastService新增至 src/app/app.component.ts 並且訂閱可觀察的inProgress$,在轉譯 UI 之前檢查互動是否已完成以及帳戶是否已登入。 您的程式碼現在看起來應該像這樣:import { Component, OnInit, OnDestroy } from '@angular/core'; import { MsalService, MsalBroadcastService } from '@azure/msal-angular'; import { InteractionStatus } from '@azure/msal-browser'; import { Subject } from 'rxjs'; import { filter, takeUntil } from 'rxjs/operators'; @Component({ selector: 'app-root', templateUrl: './app.component.html', styleUrls: ['./app.component.css'] }) export class AppComponent implements OnInit, OnDestroy { title = 'msal-angular-tutorial'; isIframe = false; loginDisplay = false; private readonly _destroying$ = new Subject<void>(); constructor(private broadcastService: MsalBroadcastService, private authService: MsalService) { } ngOnInit() { this.isIframe = window !== window.parent && !window.opener; this.broadcastService.inProgress$ .pipe( filter((status: InteractionStatus) => status === InteractionStatus.None), takeUntil(this._destroying$) ) .subscribe(() => { this.setLoginDisplay(); }) } login() { this.authService.loginRedirect(); } setLoginDisplay() { this.loginDisplay = this.authService.instance.getAllAccounts().length > 0; } ngOnDestroy(): void { this._destroying$.next(undefined); this._destroying$.complete(); } }更新 src/app/home/home.component.ts 中的程式碼,在更新 UI 之前也檢查互動是否已完成。 您的程式碼現在看起來應該像這樣:
import { Component, OnInit } from '@angular/core';
import { MsalBroadcastService, MsalService } from '@azure/msal-angular';
import { EventMessage, EventType, InteractionStatus } from '@azure/msal-browser';
import { filter } from 'rxjs/operators';

@Component({
  selector: 'app-home',
  templateUrl: './home.component.html',
  styleUrls: ['./home.component.css']
})
export class HomeComponent implements OnInit {
  loginDisplay = false;

  constructor(private authService: MsalService, private msalBroadcastService: MsalBroadcastService) { }

  ngOnInit(): void {
    this.msalBroadcastService.msalSubject$
      .pipe(
        filter((msg: EventMessage) => msg.eventType === EventType.LOGIN_SUCCESS),
      )
      .subscribe((result: EventMessage) => {
        console.log(result);
      });

    this.msalBroadcastService.inProgress$
      .pipe(
        filter((status: InteractionStatus) => status === InteractionStatus.None)
      )
      .subscribe(() => {
        this.setLoginDisplay();
      })
  }

  setLoginDisplay() {
    this.loginDisplay = this.authService.instance.getAllAccounts().length > 0;
  }
}
將 src/app/home/home.component.html 中的程式碼取代為下列條件式顯示:
<div *ngIf="!loginDisplay">
    <p>Please sign-in to see your profile information.</p>
</div>

<div *ngIf="loginDisplay">
    <p>Login successful!</p>
    <p>Request your profile information by clicking Profile above.</p>
</div>
實作 Angular 防護
MsalGuard 類別可用於保護路由並在存取受保護的路由之前要求進行驗證。 下列步驟會將 MsalGuard 新增至 Profile 路由。 保護 Profile 路由表示即便使用者未使用 Login 按鈕登入,在使用者嘗試存取 Profile 路由或選取 Profile 按鈕時,MsalGuard 都會在顯示 Profile 頁面之前,提示使用者透過快顯視窗或重新導向進行驗證。
MsalGuard 是易於使用的類別,可用來改善使用者體驗,但不應依賴此類別來確保安全性。 攻擊者可能會遇到用戶端防護,而且您應該確保伺服器不會傳回使用者不應存取的任何資料。
在 src/app/app.module.ts 中新增
MsalGuard類別作為您的應用程式的提供者,並且新增MsalGuard的設定。 稍後可以在authRequest中提供取得權杖所需的範圍,Guard 的互動類型可以設定為Redirect或Popup。 您的程式碼應該看起來與下列範例相同:import { BrowserModule } from "@angular/platform-browser"; import { BrowserAnimationsModule } from "@angular/platform-browser/animations"; import { NgModule } from "@angular/core"; import { MatButtonModule } from "@angular/material/button"; import { MatToolbarModule } from "@angular/material/toolbar"; import { MatListModule } from "@angular/material/list"; import { AppRoutingModule } from "./app-routing.module"; import { AppComponent } from "./app.component"; import { HomeComponent } from "./home/home.component"; import { ProfileComponent } from "./profile/profile.component"; import { MsalModule, MsalRedirectComponent, MsalGuard, } from "@azure/msal-angular"; // MsalGuard added to imports import { PublicClientApplication, InteractionType, } from "@azure/msal-browser"; // InteractionType added to imports const isIE = window.navigator.userAgent.indexOf("MSIE ") > -1 || window.navigator.userAgent.indexOf("Trident/") > -1; @NgModule({ declarations: [AppComponent, HomeComponent, ProfileComponent], imports: [ BrowserModule, BrowserAnimationsModule, AppRoutingModule, MatButtonModule, MatToolbarModule, MatListModule, MsalModule.forRoot( new PublicClientApplication({ auth: { clientId: "Enter_the_Application_Id_here", authority: "Enter_the_Cloud_Instance_Id_Here/Enter_the_Tenant_Info_Here", redirectUri: "Enter_the_Redirect_Uri_Here", }, cache: { cacheLocation: "localStorage", storeAuthStateInCookie: isIE, }, }), { interactionType: InteractionType.Redirect, // MSAL Guard Configuration authRequest: { scopes: ["user.read"], }, }, null ), ], providers: [ MsalGuard, // MsalGuard added as provider here ], bootstrap: [AppComponent, MsalRedirectComponent], }) export class AppModule {}在 src/app/app-routing.module.ts 中於您想要保護的路由上設定
MsalGuard:import { NgModule } from "@angular/core"; import { Routes, RouterModule } from "@angular/router"; import { BrowserUtils } from "@azure/msal-browser"; import { HomeComponent } from "./home/home.component"; import { ProfileComponent } from "./profile/profile.component"; import { MsalGuard } from "@azure/msal-angular"; const routes: Routes = [ { path: "profile", component: ProfileComponent, canActivate: [MsalGuard], }, { path: "", component: HomeComponent, }, ]; const isIframe = window !== window.parent && !window.opener; @NgModule({ imports: [ RouterModule.forRoot(routes, { // Don't perform initial navigation in iframes or popups initialNavigation: !BrowserUtils.isInIframe() && !BrowserUtils.isInPopup() ? "enabledNonBlocking" : "disabled", // Set to enabledBlocking to use Angular Universal }), ], exports: [RouterModule], }) export class AppRoutingModule {}在 src/app/app.component.ts 中調整登入呼叫,將保護設定中的
authRequest集合帶入帳戶。 您的程式碼現在應該看起來類似下列範例:import { Component, OnInit, OnDestroy, Inject } from '@angular/core'; import { MsalService, MsalBroadcastService, MSAL_GUARD_CONFIG, MsalGuardConfiguration } from '@azure/msal-angular'; import { InteractionStatus, RedirectRequest } from '@azure/msal-browser'; import { Subject } from 'rxjs'; import { filter, takeUntil } from 'rxjs/operators'; @Component({ selector: 'app-root', templateUrl: './app.component.html', styleUrls: ['./app.component.css'] }) export class AppComponent implements OnInit, OnDestroy { title = 'msal-angular-tutorial'; isIframe = false; loginDisplay = false; private readonly _destroying$ = new Subject<void>(); constructor(@Inject(MSAL_GUARD_CONFIG) private msalGuardConfig: MsalGuardConfiguration, private broadcastService: MsalBroadcastService, private authService: MsalService) { } ngOnInit() { this.isIframe = window !== window.parent && !window.opener; this.broadcastService.inProgress$ .pipe( filter((status: InteractionStatus) => status === InteractionStatus.None), takeUntil(this._destroying$) ) .subscribe(() => { this.setLoginDisplay(); }) } login() { if (this.msalGuardConfig.authRequest){ this.authService.loginRedirect({...this.msalGuardConfig.authRequest} as RedirectRequest); } else { this.authService.loginRedirect(); } } setLoginDisplay() { this.loginDisplay = this.authService.instance.getAllAccounts().length > 0; } ngOnDestroy(): void { this._destroying$.next(undefined); this._destroying$.complete(); } }
取得權杖
Angular Interceptor
MSAL Angular 會提供 Interceptor 類別給已知受保護的資源,而該類別可為使用 Angular http 用戶端的傳出要求自動取得權杖。
在 src/app/app.module.ts 中新增
Interceptor作為您的應用程式的提供者,具有其設定。 您的程式碼現在應該看起來類似下列範例:import { BrowserModule } from "@angular/platform-browser"; import { BrowserAnimationsModule } from "@angular/platform-browser/animations"; import { NgModule } from "@angular/core"; import { HTTP_INTERCEPTORS, HttpClientModule } from "@angular/common/http"; // Import import { MatButtonModule } from "@angular/material/button"; import { MatToolbarModule } from "@angular/material/toolbar"; import { MatListModule } from "@angular/material/list"; import { AppRoutingModule } from "./app-routing.module"; import { AppComponent } from "./app.component"; import { HomeComponent } from "./home/home.component"; import { ProfileComponent } from "./profile/profile.component"; import { MsalModule, MsalRedirectComponent, MsalGuard, MsalInterceptor, } from "@azure/msal-angular"; // Import MsalInterceptor import { InteractionType, PublicClientApplication, } from "@azure/msal-browser"; const isIE = window.navigator.userAgent.indexOf("MSIE ") > -1 || window.navigator.userAgent.indexOf("Trident/") > -1; @NgModule({ declarations: [AppComponent, HomeComponent, ProfileComponent], imports: [ BrowserModule, BrowserAnimationsModule, AppRoutingModule, MatButtonModule, MatToolbarModule, MatListModule, HttpClientModule, MsalModule.forRoot( new PublicClientApplication({ auth: { clientId: "Enter_the_Application_Id_Here", authority: "Enter_the_Cloud_Instance_Id_Here/Enter_the_Tenant_Info_Here", redirectUri: "Enter_the_Redirect_Uri_Here", }, cache: { cacheLocation: "localStorage", storeAuthStateInCookie: isIE, }, }), { interactionType: InteractionType.Redirect, authRequest: { scopes: ["user.read"], }, }, { interactionType: InteractionType.Redirect, // MSAL Interceptor Configuration protectedResourceMap: new Map([ ["Enter_the_Graph_Endpoint_Here/v1.0/me", ["user.read"]], ]), } ), ], providers: [ { provide: HTTP_INTERCEPTORS, useClass: MsalInterceptor, multi: true, }, MsalGuard, ], bootstrap: [AppComponent, MsalRedirectComponent], }) export class AppModule {}受保護的資源是以
protectedResourceMap的形式提供。 您在protectedResourceMap集合中提供的 URL 會區分大小寫。 針對每個資源,新增要在存取權杖中要求傳回的範圍。例如:
- 適用於 Microsoft Graph 的
["user.read"] - 適用於自訂 Web API 的
["<Application ID URL>/scope"](也就是,api://<Application ID>/access_as_user)
修改
protectedResourceMap中的值,如下所述:Enter_the_Graph_Endpoint_Here是應用程式所應通訊的 Microsoft Graph API 執行個體。 針對全球 Microsoft Graph API 端點,請將此字串取代為https://graph.microsoft.com。 針對國家雲端部署中的端點,請參閱 Microsoft Graph 文件中的國家雲端部署。
- 適用於 Microsoft Graph 的
取代 src/app/profile/profile.component.ts 中的程式碼,以 HTTP 要求擷取使用者設定檔,並以 Microsoft Graph 端點取代
GRAPH_ENDPOINT:import { Component, OnInit } from '@angular/core'; import { HttpClient } from '@angular/common/http'; const GRAPH_ENDPOINT = 'Enter_the_Graph_Endpoint_Here/v1.0/me'; type ProfileType = { givenName?: string, surname?: string, userPrincipalName?: string, id?: string }; @Component({ selector: 'app-profile', templateUrl: './profile.component.html', styleUrls: ['./profile.component.css'] }) export class ProfileComponent implements OnInit { profile!: ProfileType; constructor( private http: HttpClient ) { } ngOnInit() { this.getProfile(); } getProfile() { this.http.get(GRAPH_ENDPOINT) .subscribe(profile => { this.profile = profile; }); } }取代 src/app/profile/profile.component.html 中的 UI,以顯示設定檔資訊:
<div>
    <p><strong>First Name: </strong> {{profile?.givenName}}</p>
    <p><strong>Last Name: </strong> {{profile?.surname}}</p>
    <p><strong>Email: </strong> {{profile?.userPrincipalName}}</p>
    <p><strong>Id: </strong> {{profile?.id}}</p>
</div>
登出
更新 src/app/app.component.html 中的程式碼,有條件地顯示
Logout按鈕:<mat-toolbar color="primary"> <a class="title" href="/">{{ title }}</a> <div class="toolbar-spacer"></div> <a mat-button [routerLink]="['profile']">Profile</a> <button mat-raised-button *ngIf="!loginDisplay" (click)="login()">Login</button> <button mat-raised-button *ngIf="loginDisplay" (click)="logout()">Logout</button> </mat-toolbar> <div class="container"> <!--This is to avoid reload during acquireTokenSilent() because of hidden iframe --> <router-outlet *ngIf="!isIframe"></router-outlet> </div>
使用重新導向登出
更新 src/app/app.component.ts 中的程式碼,以使用重新導向登出使用者:
import { Component, OnInit, OnDestroy, Inject } from '@angular/core';
import { MsalService, MsalBroadcastService, MSAL_GUARD_CONFIG, MsalGuardConfiguration } from '@azure/msal-angular';
import { InteractionStatus, RedirectRequest } from '@azure/msal-browser';
import { Subject } from 'rxjs';
import { filter, takeUntil } from 'rxjs/operators';

@Component({
  selector: 'app-root',
  templateUrl: './app.component.html',
  styleUrls: ['./app.component.css']
})
export class AppComponent implements OnInit, OnDestroy {
  title = 'msal-angular-tutorial';
  isIframe = false;
  loginDisplay = false;
  private readonly _destroying$ = new Subject<void>();

  constructor(@Inject(MSAL_GUARD_CONFIG) private msalGuardConfig: MsalGuardConfiguration, private broadcastService: MsalBroadcastService, private authService: MsalService) { }

  ngOnInit() {
    this.isIframe = window !== window.parent && !window.opener;

    this.broadcastService.inProgress$
    .pipe(
      filter((status: InteractionStatus) => status === InteractionStatus.None),
      takeUntil(this._destroying$)
    )
    .subscribe(() => {
      this.setLoginDisplay();
    })
  }

  login() {
    if (this.msalGuardConfig.authRequest){
      this.authService.loginRedirect({...this.msalGuardConfig.authRequest} as RedirectRequest);
    } else {
      this.authService.loginRedirect();
    }
  }

  logout() { // Add log out function here
    this.authService.logoutRedirect({
      postLogoutRedirectUri: 'http://localhost:4200'
    });
  }

  setLoginDisplay() {
    this.loginDisplay = this.authService.instance.getAllAccounts().length > 0;
  }

  ngOnDestroy(): void {
    this._destroying$.next(undefined);
    this._destroying$.complete();
  }
}
使用快顯視窗登出
更新 src/app/app.component.ts 中的程式碼,以使用快顯視窗登出使用者:
import { Component, OnInit, OnDestroy, Inject } from '@angular/core';
import { MsalService, MsalBroadcastService, MSAL_GUARD_CONFIG, MsalGuardConfiguration } from '@azure/msal-angular';
import { InteractionStatus, PopupRequest } from '@azure/msal-browser';
import { Subject } from 'rxjs';
import { filter, takeUntil } from 'rxjs/operators';

@Component({
  selector: 'app-root',
  templateUrl: './app.component.html',
  styleUrls: ['./app.component.css']
})
export class AppComponent implements OnInit, OnDestroy {
  title = 'msal-angular-tutorial';
  isIframe = false;
  loginDisplay = false;
  private readonly _destroying$ = new Subject<void>();

  constructor(@Inject(MSAL_GUARD_CONFIG) private msalGuardConfig: MsalGuardConfiguration, private broadcastService: MsalBroadcastService, private authService: MsalService) { }

  ngOnInit() {
    this.isIframe = window !== window.parent && !window.opener;

    this.broadcastService.inProgress$
    .pipe(
      filter((status: InteractionStatus) => status === InteractionStatus.None),
      takeUntil(this._destroying$)
    )
    .subscribe(() => {
      this.setLoginDisplay();
    })
  }

  login() {
    if (this.msalGuardConfig.authRequest){
      this.authService.loginPopup({...this.msalGuardConfig.authRequest} as PopupRequest)
        .subscribe({
          next: (result) => {
            console.log(result);
            this.setLoginDisplay();
          },
          error: (error) => console.log(error)
        });
    } else {
      this.authService.loginPopup()
        .subscribe({
          next: (result) => {
            console.log(result);
            this.setLoginDisplay();
          },
          error: (error) => console.log(error)
        });
    }
  }

  logout() { // Add log out function here
    this.authService.logoutPopup({
      mainWindowRedirectUri: "/"
    });
  }

  setLoginDisplay() {
    this.loginDisplay = this.authService.instance.getAllAccounts().length > 0;
  }

  ngOnDestroy(): void {
    this._destroying$.next(undefined);
    this._destroying$.complete();
  }
}
測試您的程式碼
從應用程式資料夾在命令提示字元中執行命令,以啟動網頁伺服器來接聽此連接埠:
npm install
npm start
在瀏覽器中,輸入
http://localhost:4200,您應該會看到如下所示的頁面。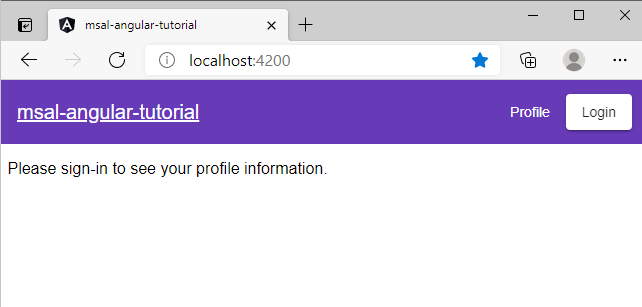
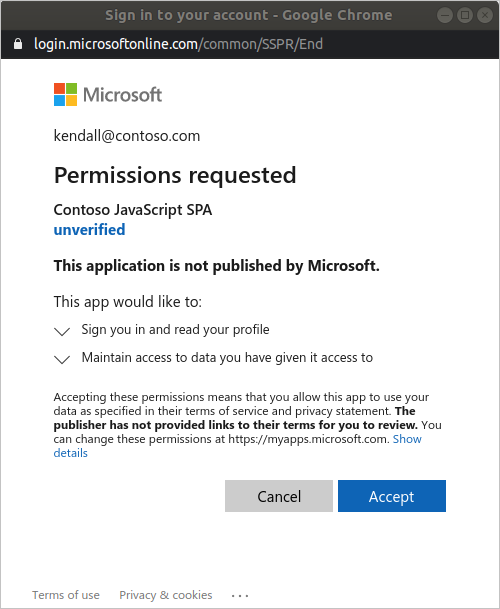
選取 [接受],將應用程式權限授與您的設定檔。 這會在您第一次開始登入時發生。
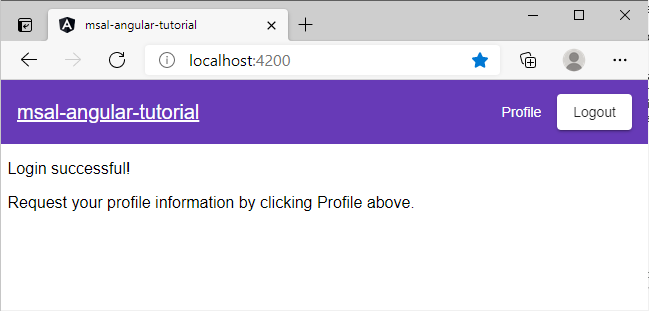
同意後,如果您同意所要求的權限,Web 應用程式將顯示成功的登入頁面。
請選取 [設定檔],以檢視呼叫 Microsoft Graph API 時的回應所傳回的使用者設定檔資訊:

新增範圍與委派的權限
Microsoft Graph API 需要 User.Read 範圍才能讀取使用者的設定檔。 User.Read 範圍會自動新增至每個應用程式註冊。 Microsoft Graph 的其他 API 與您後端伺服器的自訂 API,可能需要其他範圍。 例如,Microsoft Graph API 需要 Mail.Read 範圍才能列出使用者的電子郵件。
新增範圍時,系統可能會提示使用者針對新增的範圍額外提供同意。
注意
系統可能會在您增加範圍數目時,提示使用者同意其他事項。
說明與支援
如果您需要協助、想要回報問題,或想要深入了解您的支援選項,請參閱 開發人員的協助與支援。
下一步
- 若要深入了解,請建置 React 單頁應用程式 (SPA),以在下列多部分教學課程系列中登入使用者。