快速入門:使用 Azure CLI 部署 Azure Kubernetes Service (AKS) 叢集
Azure Kubernetes Service (AKS) 是受控 Kubernetes 服務,可讓您快速部署及管理叢集。 在此快速入門中,您可了解如何:
- 使用 Azure 入口網站部署 Azure CLI。
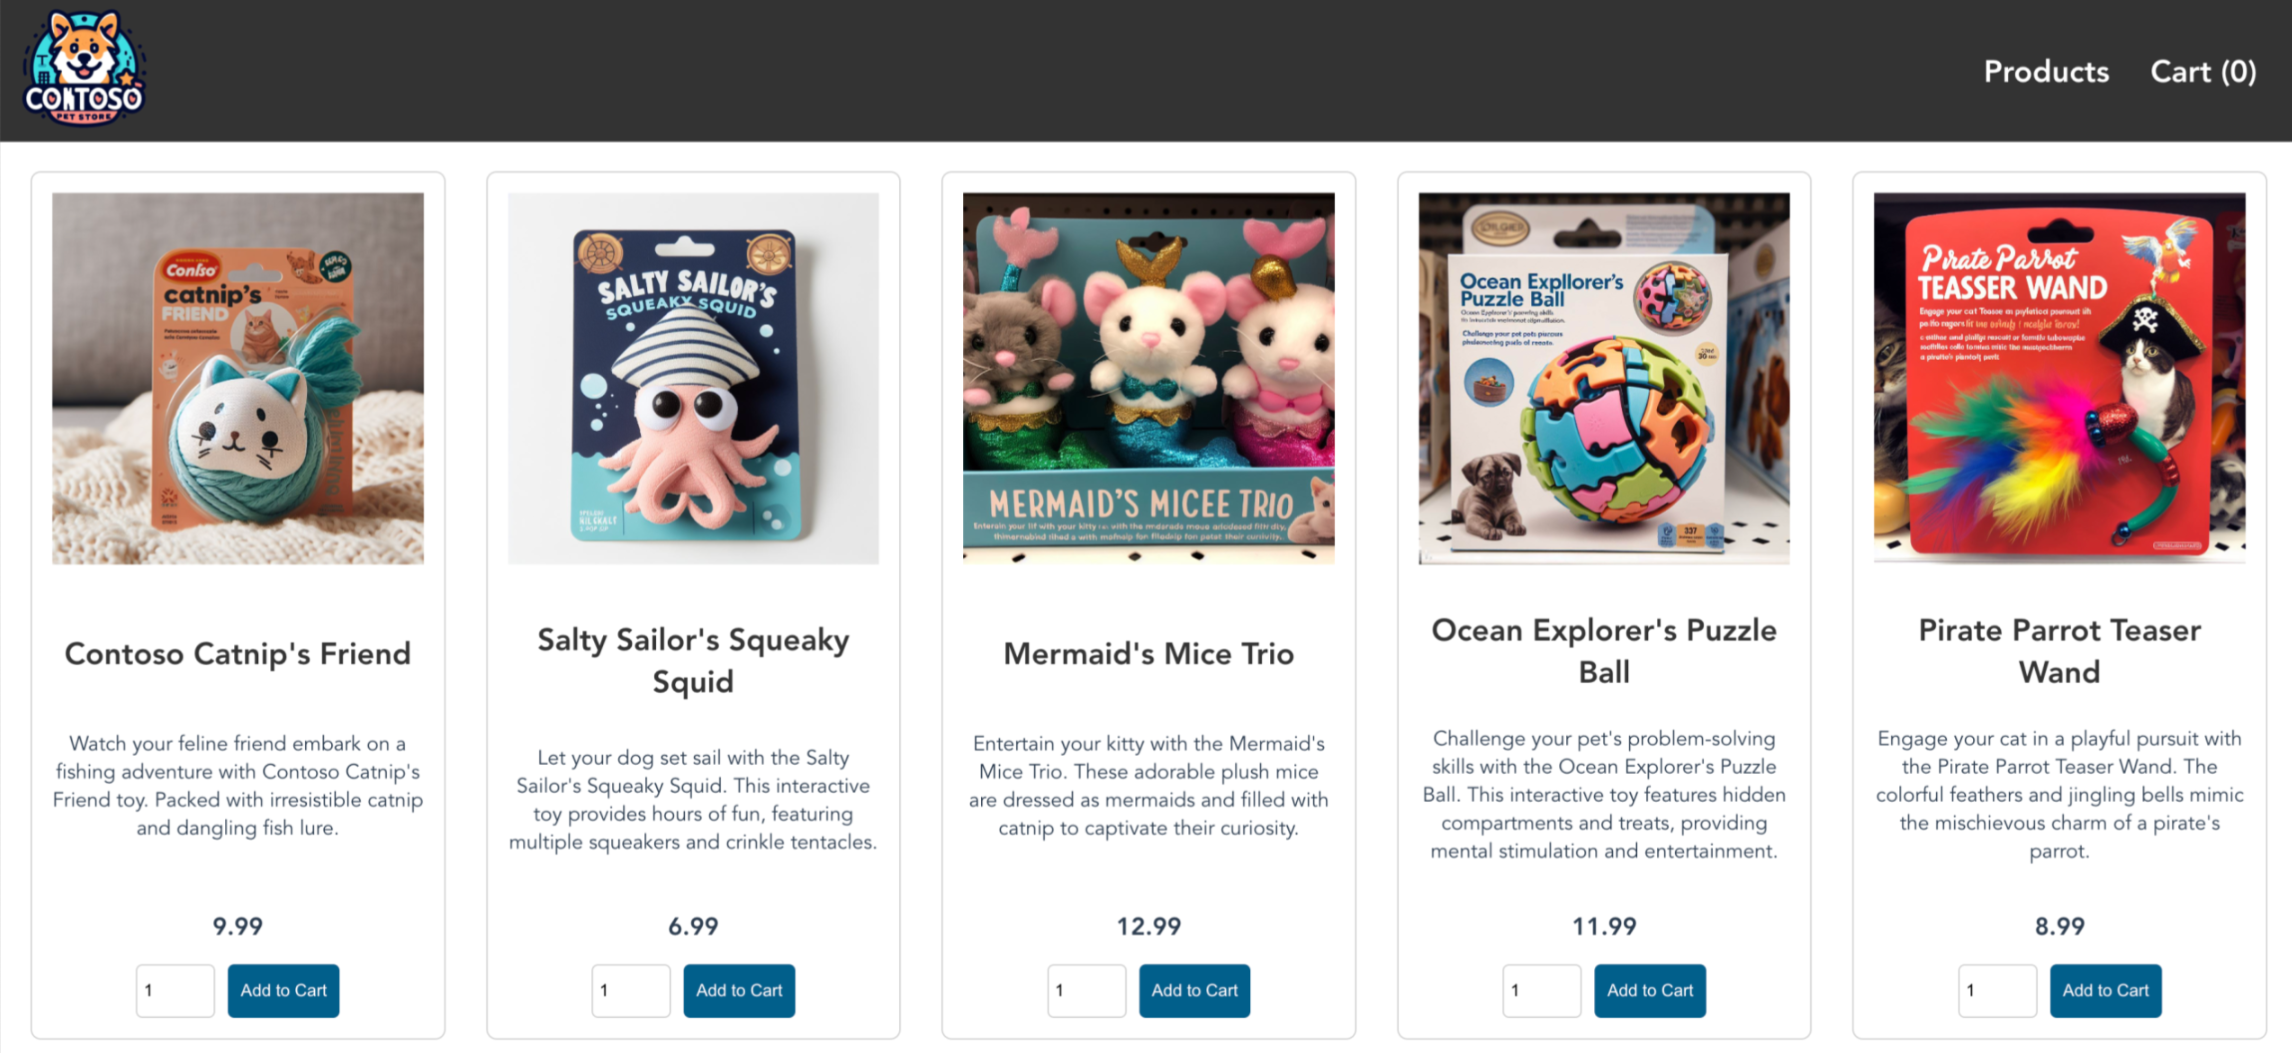
- 使用一組微服務和 Web 前端模擬零售情節,執行多容器應用程式範例。
注意
若要開始快速佈建 AKS 叢集,本文包含僅針對評估目的部署具有預設設定值之叢集的步驟。 在部署生產就緒叢集之前,建議您先熟悉我們的基準參考架構,考慮其如何符合您的業務需求。
開始之前
本快速入門假設您已有 Kubernetes 概念的基本知識。 如需詳細資訊,請參閱 Azure Kubernetes Services (AKS) 的 Kubernetes 核心概念。
- 如果您沒有 Azure 訂用帳戶,請在開始之前先建立 Azure 免費帳戶。
在 Azure Cloud Shell 中使用 Bash 環境。 如需詳細資訊,請參閱 Azure Cloud Shell 中的 Bash 快速入門。
若要在本地執行 CLI 參考命令,請安裝 Azure CLI。 若您在 Windows 或 macOS 上執行,請考慮在 Docker 容器中執行 Azure CLI。 如需詳細資訊,請參閱〈如何在 Docker 容器中執行 Azure CLI〉。
如果您使用的是本機安裝,請使用 az login 命令,透過 Azure CLI 來登入。 請遵循您終端機上顯示的步驟,完成驗證程序。 如需其他登入選項,請參閱使用 Azure CLI 登入。
出現提示時,請在第一次使用時安裝 Azure CLI 延伸模組。 如需擴充功能詳細資訊,請參閱使用 Azure CLI 擴充功能。
執行 az version 以尋找已安裝的版本和相依程式庫。 若要升級至最新版本,請執行 az upgrade。
- 本文需要 2.0.64 版或更新版本的 Azure CLI。 若您使用的是 Azure Cloud Shell,即已安裝最新版本。
- 請確保您用來建立叢集的身分識別擁有適當的最低權限。 如需 AKS 存取和身分識別的詳細資訊,請參閱 Azure Kubernetes Service (AKS) 的存取與身分識別選項。
- 如果您有多個 Azure 訂用帳戶,請使用 az account set 命令來選取應對資源計費的適當訂用帳戶識別碼。 如需詳細資訊,請參閱 如何管理 Azure 訂用帳戶 – Azure CLI。
定義環境變數
定義下列環境變數,以在整個快速入門中使用:
export RANDOM_ID="$(openssl rand -hex 3)"
export MY_RESOURCE_GROUP_NAME="myAKSResourceGroup$RANDOM_ID"
export REGION="westeurope"
export MY_AKS_CLUSTER_NAME="myAKSCluster$RANDOM_ID"
export MY_DNS_LABEL="mydnslabel$RANDOM_ID"
建立資源群組
Azure 資源群組是部署及管理 Azure 資源所在的邏輯群組。 建立資源群組時,系統會提示您指定位置。 此位置是資源群組中繼資料的儲存位置,如果未在資源建立期間指定另一個區域,此位置也會是您在 Azure 中執行資源的位置。
使用 az group create 命令建立資源群組。
az group create --name $MY_RESOURCE_GROUP_NAME --location $REGION
結果:
{
  "id": "/subscriptions/xxxxxxxx-xxxx-xxxx-xxxx-xxxxxxxxxxxx/resourceGroups/myAKSResourceGroupxxxxxx",
  "location": "eastus",
  "managedBy": null,
  "name": "testResourceGroup",
  "properties": {
    "provisioningState": "Succeeded"
  },
  "tags": null,
  "type": "Microsoft.Resources/resourceGroups"
}
建立 AKS 叢集
使用 az aks create 命令建立 AKS 叢集。 下列範例會建立具有一個節點的叢集,並啟用系統指派的受控識別。
az aks create \
    --resource-group $MY_RESOURCE_GROUP_NAME \
    --name $MY_AKS_CLUSTER_NAME \
    --node-count 1 \
    --generate-ssh-keys
注意
建立新叢集時,AKS 會自動建立第二個資源群組來儲存 AKS 資源。 如需詳細資訊,請參閱為何會使用 AKS 建立兩個資源群組?
連線至叢集
若要管理 Kubernetes 叢集,請使用 Kubernetes 命令列用戶端 kubectl。 如果您使用 Azure Cloud Shell,則 kubectl 已安裝。 若要在本機安裝 kubectl,請使用 az aks install-cli 命令。
使用 az aks get-credentials 命令,設定
kubectl連線到 Kubernetes 叢集。 此命令會下載憑證並設定 Kubernetes CLI 以供使用。az aks get-credentials --resource-group $MY_RESOURCE_GROUP_NAME --name $MY_AKS_CLUSTER_NAME使用 kubectl get nodes 命令來確認與叢集的連線。 此命令會傳回叢集節點的清單。
kubectl get nodes
部署應用程式
若要部署應用程式,您可以使用資訊清單檔來建立執行 AKS 市集應用程式所需的所有物件。 Kubernetes 資訊清單檔會定義叢集所需的狀態,例如要執行哪些容器映像。 資訊清單包含下列 Kubernetes 部署和服務:
- 市集前端:供客戶檢視產品和下單的 Web 應用程式。
- 產品服務:顯示產品資訊。
- 訂單服務:下單。
- Rabbit MQ:訂單佇列的訊息佇列。
注意
除非是針對生產環境的永續性儲存,否則不建議執行具狀態容器,例如 Rabbit MQ。 這裡使用具狀態容器是為了簡單起見,但我們建議使用受管理的服務,例如 Azure CosmosDB 或 Azure 服務匯流排。
建立名為
aks-store-quickstart.yaml的檔案,然後將下列資訊清單複製進來:apiVersion: apps/v1 kind: StatefulSet metadata: name: rabbitmq spec: serviceName: rabbitmq replicas: 1 selector: matchLabels: app: rabbitmq template: metadata: labels: app: rabbitmq spec: nodeSelector: "kubernetes.io/os": linux containers: - name: rabbitmq image: mcr.microsoft.com/mirror/docker/library/rabbitmq:3.10-management-alpine ports: - containerPort: 5672 name: rabbitmq-amqp - containerPort: 15672 name: rabbitmq-http env: - name: RABBITMQ_DEFAULT_USER value: "username" - name: RABBITMQ_DEFAULT_PASS value: "password" resources: requests: cpu: 10m memory: 128Mi limits: cpu: 250m memory: 256Mi volumeMounts: - name: rabbitmq-enabled-plugins mountPath: /etc/rabbitmq/enabled_plugins subPath: enabled_plugins volumes: - name: rabbitmq-enabled-plugins configMap: name: rabbitmq-enabled-plugins items: - key: rabbitmq_enabled_plugins path: enabled_plugins --- apiVersion: v1 data: rabbitmq_enabled_plugins: | [rabbitmq_management,rabbitmq_prometheus,rabbitmq_amqp1_0]. kind: ConfigMap metadata: name: rabbitmq-enabled-plugins --- apiVersion: v1 kind: Service metadata: name: rabbitmq spec: selector: app: rabbitmq ports: - name: rabbitmq-amqp port: 5672 targetPort: 5672 - name: rabbitmq-http port: 15672 targetPort: 15672 type: ClusterIP --- apiVersion: apps/v1 kind: Deployment metadata: name: order-service spec: replicas: 1 selector: matchLabels: app: order-service template: metadata: labels: app: order-service spec: nodeSelector: "kubernetes.io/os": linux containers: - name: order-service image: ghcr.io/azure-samples/aks-store-demo/order-service:latest ports: - containerPort: 3000 env: - name: ORDER_QUEUE_HOSTNAME value: "rabbitmq" - name: ORDER_QUEUE_PORT value: "5672" - name: ORDER_QUEUE_USERNAME value: "username" - name: ORDER_QUEUE_PASSWORD value: "password" - name: ORDER_QUEUE_NAME value: "orders" - name: FASTIFY_ADDRESS value: "0.0.0.0" resources: requests: cpu: 1m memory: 50Mi limits: cpu: 75m memory: 128Mi startupProbe: httpGet: path: /health port: 3000 failureThreshold: 5 initialDelaySeconds: 20 periodSeconds: 10 readinessProbe: httpGet: path: /health port: 3000 failureThreshold: 3 initialDelaySeconds: 3 periodSeconds: 5 livenessProbe: httpGet: path: /health port: 3000 failureThreshold: 5 initialDelaySeconds: 3 periodSeconds: 3 initContainers: - name: wait-for-rabbitmq image: busybox command: ['sh', '-c', 'until nc -zv rabbitmq 5672; do echo waiting for rabbitmq; sleep 2; done;'] resources: requests: cpu: 1m memory: 50Mi limits: cpu: 75m memory: 128Mi --- apiVersion: v1 kind: Service metadata: name: order-service spec: type: ClusterIP ports: - name: http port: 3000 targetPort: 3000 selector: app: order-service --- apiVersion: apps/v1 kind: Deployment metadata: name: product-service spec: replicas: 1 selector: matchLabels: app: product-service template: metadata: labels: app: product-service spec: nodeSelector: "kubernetes.io/os": linux containers: - name: product-service image: ghcr.io/azure-samples/aks-store-demo/product-service:latest ports: - containerPort: 3002 env: - name: AI_SERVICE_URL value: "http://ai-service:5001/" resources: requests: cpu: 1m memory: 1Mi limits: cpu: 2m memory: 20Mi readinessProbe: httpGet: path: /health port: 3002 failureThreshold: 3 initialDelaySeconds: 3 periodSeconds: 5 livenessProbe: httpGet: path: /health port: 3002 failureThreshold: 5 initialDelaySeconds: 3 periodSeconds: 3 --- apiVersion: v1 kind: Service metadata: name: product-service spec: type: ClusterIP ports: - name: http port: 3002 targetPort: 3002 selector: app: product-service --- apiVersion: apps/v1 kind: Deployment metadata: name: store-front spec: replicas: 1 selector: matchLabels: app: store-front template: metadata: labels: app: store-front spec: nodeSelector: "kubernetes.io/os": linux containers: - name: store-front image: ghcr.io/azure-samples/aks-store-demo/store-front:latest ports: - containerPort: 8080 name: store-front env: - name: VUE_APP_ORDER_SERVICE_URL value: "http://order-service:3000/" - name: VUE_APP_PRODUCT_SERVICE_URL value: "http://product-service:3002/" resources: requests: cpu: 1m memory: 200Mi limits: cpu: 1000m memory: 512Mi startupProbe: httpGet: path: /health port: 8080 failureThreshold: 3 initialDelaySeconds: 5 periodSeconds: 5 readinessProbe: httpGet: path: /health port: 8080 failureThreshold: 3 initialDelaySeconds: 3 periodSeconds: 3 livenessProbe: httpGet: path: /health port: 8080 failureThreshold: 5 initialDelaySeconds: 3 periodSeconds: 3 --- apiVersion: v1 kind: Service metadata: name: store-front spec: ports: - port: 80 targetPort: 8080 selector: app: store-front type: LoadBalancer如需 YAML 資訊清單檔案的詳細資訊,請參閱部署和 YAML 資訊清單。
如果您在本地建立並儲存 YAML 檔案,則可以選取 [上傳/下載檔案] 按鈕,然後從本地文件系統選取檔案,將資訊清單檔上傳至 CloudShell 裡的預設目錄。
使用
kubectl apply命令來部署應用程式,並指定 YAML 資訊清單的名稱。kubectl apply -f aks-store-quickstart.yaml
測試應用程式
您可以造訪公用 IP 位址或應用程式 URL 來驗證應用程式是否正在執行。
使用下列命令取得應用程式 URL:
runtime="5 minutes"
endtime=$(date -ud "$runtime" +%s)
while [[ $(date -u +%s) -le $endtime ]]
do
   STATUS=$(kubectl get pods -l app=store-front -o 'jsonpath={..status.conditions[?(@.type=="Ready")].status}')
   echo $STATUS
   if [ "$STATUS" == 'True' ]
   then
      export IP_ADDRESS=$(kubectl get service store-front --output 'jsonpath={..status.loadBalancer.ingress[0].ip}')
      echo "Service IP Address: $IP_ADDRESS"
      break
   else
      sleep 10
   fi
done
curl $IP_ADDRESS
結果:
<!doctype html>
<html lang="">
   <head>
      <meta charset="utf-8">
      <meta http-equiv="X-UA-Compatible" content="IE=edge">
      <meta name="viewport" content="width=device-width,initial-scale=1">
      <link rel="icon" href="/favicon.ico">
      <title>store-front</title>
      <script defer="defer" src="/js/chunk-vendors.df69ae47.js"></script>
      <script defer="defer" src="/js/app.7e8cfbb2.js"></script>
      <link href="/css/app.a5dc49f6.css" rel="stylesheet">
   </head>
   <body>
      <div id="app"></div>
   </body>
</html>
echo "You can now visit your web server at $IP_ADDRESS"
選取叢集
如果您不打算進行後續的 AKS 教學課程,請清除不必要資源以避免 Azure 費用。 您可以使用 az group delete (部分機器翻譯) 命令移除資源群組、容器服務和所有相關資源。
注意
在本快速入門中,是以系統指派的受控識別 (預設身分識別選項) 來建立 AKS 叢集。 平台會管理這個身分識別,您不需要手動移除它。
下一步
在本快速入門中,您已部署 Kubernetes 叢集,接著將簡單多容器應用程式部署到此叢集。 這個範例應用程式僅供示範之用,並不代表 Kube 應用程式的全部最佳做法。 如需針對生產使用 AKS 建立完整解決方案的指引,請參閱 AKS 解決方案指引。
若要深入了解 AKS,並逐步完成部署範例的完整程式碼,請繼續 Kube 叢集教學課程。


