了解如何從在 Azure App Service 上執行的 Web 應用程式存取 Microsoft Graph。
您想要新增從 Web 應用程式存取 Microsoft Graph 的權限,並以登入的使用者身分執行某些動作。 本節說明如何將委派的權限授與 Web 應用程式,並從 Microsoft Entra ID 取得登入使用者的設定檔資訊。
在本教學課程中,您將瞭解如何:
- 將委派的權限授與 Web 應用程式。
- 為已登入的使用者從 Web 應用程式呼叫 Microsoft Graph。
如果您沒有 Azure 帳戶,請在開始之前建立 免費帳戶 。
先決條件
- 在 Azure App Service 上執行且已啟用 App Service 驗證/授權模組的 Web 應用程式。
授與呼叫 Microsoft Graph 的前端存取權
您已在 Web 應用程式上啟用驗證和授權,Web 應用程式會向 Microsoft 身分識別平台註冊,並受到 Microsoft Entra 應用程式的支援。 在此步驟中,您會為使用者提供用來存取 Microsoft Graph 的 Web 應用程式權限。 (技術上,您會為 Web 應用程式的 Microsoft Entra 應用程式提供用來存取使用者 Microsoft Graph Microsoft Entra 應用程式的權限。)
在 [Microsoft Entra 系統管理中心] 中,選取 [ 應用程式]。
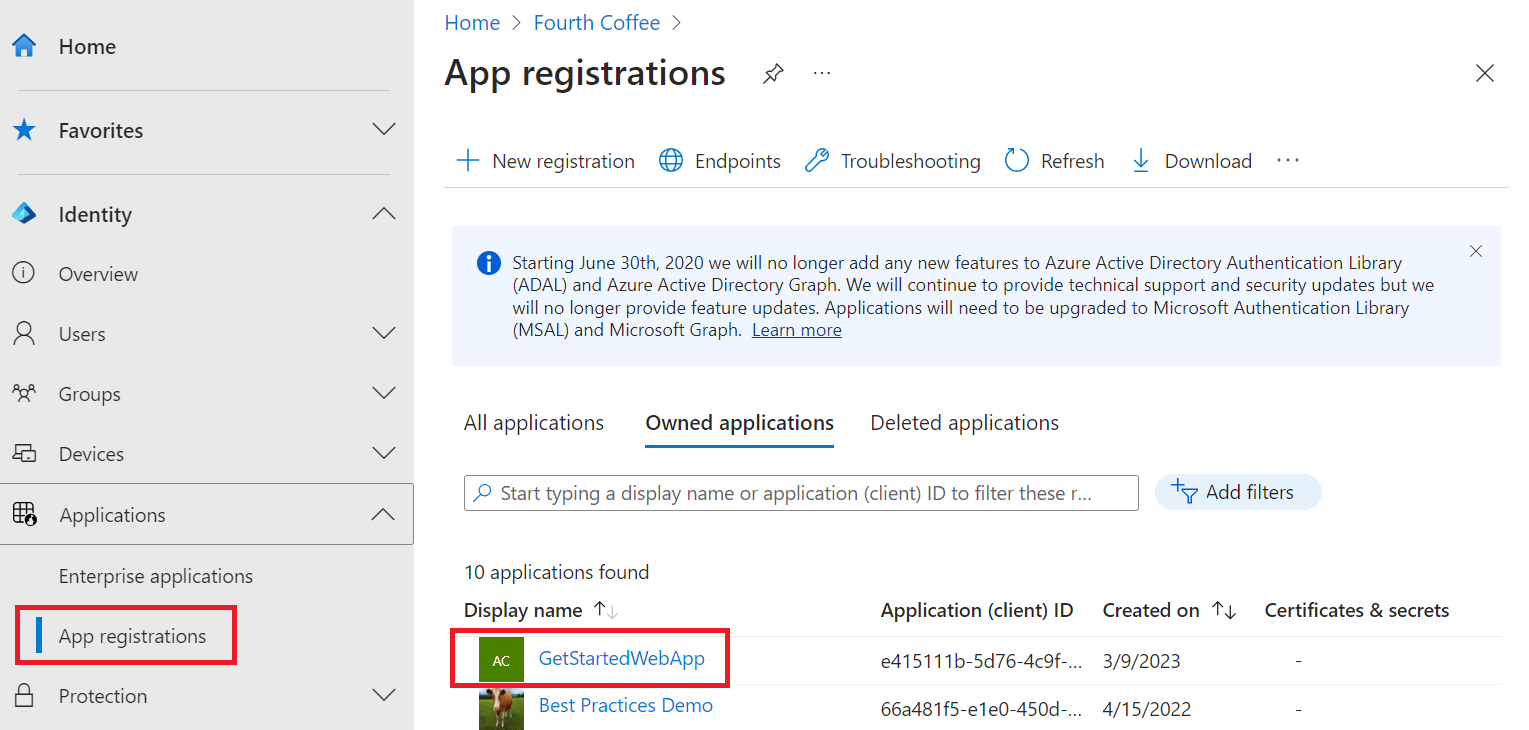
選取 [應用程式註冊]>[擁有的應用程式]>[檢視此目錄中的所有應用程式]。 選取您的 Web 應用程式名稱,然後選取 [API 權限]。
選取 [新增權限],然後選取 Microsoft API 和 Microsoft Graph。
選取 [委派的權限],然後從清單中選取 [User.Read]。 選取新增權限。
設定 App Service 以返回可用的存取憑證
Web 應用程式現在具有必要權限,能夠以登入使用者的身分存取 Microsoft Graph。 在此步驟中,您會設定 App Service 驗證和授權,讓自己取得可用來存取 Microsoft Graph 的存取權杖。 針對此步驟,您必須為下游服務 (Microsoft Graph) 新增 User.Read 範圍:https://graph.microsoft.com/User.Read。
這很重要
如果您未設定 App Service 傳回可用的存取權杖,當您在程式碼中呼叫 Microsoft Graph API 時,就會收到 CompactToken parsing failed with error code: 80049217 錯誤。
移至 Azure 資源總管並使用資源樹狀結構,找出您的 Web 應用程式。 此資源 URL 應類似於 https://resources.azure.com/subscriptions/subscriptionId/resourceGroups/SecureWebApp/providers/Microsoft.Web/sites/SecureWebApp20200915115914。
Azure 資源總管現在已開啟,並在資源樹中選取了您的 Web 應用程式。
在頁面頂端選取 [讀取/寫入],以啟用 Azure 資源的編輯。
在左側瀏覽器中,向下切入至 [config]>[authsettingsV2]。
在 [authsettingsV2] 檢視中,選取 [編輯]。
尋找 identityProviders -> 的 login 區段,並新增下列 loginParameters 設定:
"loginParameters":[ "response_type=code id_token","scope=openid offline_access profile https://graph.microsoft.com/User.Read" ]。"identityProviders": { "azureActiveDirectory": { "enabled": true, "login": { "loginParameters":[ "response_type=code id_token", "scope=openid offline_access profile https://graph.microsoft.com/User.Read" ] } } } },選取 [PUT] 來儲存您的設定。 此設定可能需要幾分鐘才會生效。 您的 Web 應用程式現在已設定為使用適當的存取權杖來存取 Microsoft Graph。 如果您沒有這麼做,Microsoft Graph 會傳回錯誤,指出精簡權杖的格式不正確。
使用 .NET 呼叫 Microsoft Graph
您的應用程式現已具有必要的權限,且會將 Microsoft Graph 的用戶端識別碼新增至登入參數。
使用 Microsoft.Identity.Web library,Web 應用程式會取得 Microsoft Graph 驗證的存取權杖。 在 1.2.0 和更新版本中,Microsoft.Identity.Web 會與 App Service 整合,並可與 App Service 驗證/授權模組一起執行。 Microsoft.Identity.Web 偵測到網頁應用程式託管於 App Service,並自動從 App Service 注入的請求標頭取得存取權杖 X-MS-TOKEN-AAD-ACCESS-TOKEN (詳見 應用程式程式碼中的 Retrieve tokens)。 您不需要在程式碼中手動存取此標頭。 接著會使用 Microsoft Graph API,將存取權杖傳遞給已驗證的要求。
若要查看應用程式範例中的此程式碼,請參閱:
備註
Web 應用程式中的基本驗證/授權不需要 Microsoft.Identity.Web 程式庫,也不需使用 Microsoft Graph 驗證要求。 您可以只啟用 App Service 驗證/授權模組,安全地呼叫下游 API。
不過,App Service 的驗證/授權是針對更基本的驗證案例所設計。 針對更複雜的案例 (例如,處理自訂宣告),您需要有 Microsoft.Identity.Web 程式庫或 Microsoft 驗證程式庫。 一開始還有更多的安裝和設定工作,但是 Microsoft.Identity.Web 程式庫可以與 App Service 驗證/授權模組一起執行。 之後,當 Web 應用程式需要處理更複雜的案例時,您可以停用 App Service 驗證/授權模組,而 Microsoft.Identity.Web 會是您應用程式的一部分。
安裝用戶端程式庫套件
使用 .NET Core 命令行介面或 Visual Studio 中的套件管理員控制台,在專案中安裝 Microsoft.Identity.Web 和 Microsoft.Identity.Web.MicrosoftGraph NuGet 套件。
.NET Core 命令行
開啟命令列,並切換至包含專案檔的目錄。
執行安裝命令。
dotnet add package Microsoft.Identity.Web.MicrosoftGraph

dotnet add package Microsoft.Identity.Web
套件管理員主控台
在 Visual Studio 中開啟專案/方案,然後使用工具>NuGet 套件管理員>套件管理員主控台命令開啟主控台。
執行安裝命令。
Install-Package Microsoft.Identity.Web.GraphServiceClient

Install-Package Microsoft.Identity.Web
Startup.cs
在 Startup.cs 檔案中,AddMicrosoftIdentityWebApp 方法會將 Microsoft.Identity.Web 新增至您的 Web 應用程式。
AddMicrosoftGraph 方法會新增 Microsoft Graph 支援。 如需管理累加式同意和條件式存取的資訊, 請閱讀這項資訊。
using Microsoft.AspNetCore.Builder;
using Microsoft.AspNetCore.Hosting;
using Microsoft.Extensions.Configuration;
using Microsoft.Extensions.DependencyInjection;
using Microsoft.Extensions.Hosting;
using Microsoft.Identity.Web;
using Microsoft.AspNetCore.Authentication.OpenIdConnect;

// Some code omitted for brevity.
public class Startup
{
    // This method gets called by the runtime. Use this method to add services to the container.
    public void ConfigureServices(IServiceCollection services)
    {
      services.AddOptions();
      string[] initialScopes = Configuration.GetValue<string>("DownstreamApi:Scopes")?.Split(' ');

      services.AddAuthentication(OpenIdConnectDefaults.AuthenticationScheme)
              .AddMicrosoftIdentityWebApp(Configuration.GetSection("AzureAd"))
              .EnableTokenAcquisitionToCallDownstreamApi(initialScopes)
                      .AddMicrosoftGraph(Configuration.GetSection("DownstreamApi"))
                      .AddInMemoryTokenCaches();

      services.AddAuthorization(options =>
      {
          // By default, all incoming requests will be authorized according to the default policy
          options.FallbackPolicy = options.DefaultPolicy;
      });
      services.AddRazorPages()
          .AddMvcOptions(options => {})
          .AddMicrosoftIdentityUI();

      services.AddControllersWithViews()
              .AddMicrosoftIdentityUI();
    }
}
appsettings.json
AzureAd 會指定 Microsoft.Identity.Web 連結庫的組態。 在 Microsoft Entra 系統管理中心中,從入口網站功能表中選取 [應用程式],然後選取 [應用程式註冊]。 選取您在啟用 [App Service 驗證/授權] 模組時所建立的應用程式註冊。 (應用程式註冊應該擁有與 Web 應用程式相同的名稱。)您可以在應用程式註冊的概觀頁面中找到租用戶識別碼和用戶端識別碼。 您可以在租用戶的 Microsoft Entra 概觀頁面找到此網域名稱。
Graph 會指定應用程式所需的 Microsoft Graph 端點和初始範圍。
{
  "AzureAd": {
    "Instance": "https://login.microsoftonline.com/",
    "Domain": "[Enter the domain of your tenant, e.g. contoso.onmicrosoft.com]",
    "TenantId": "[Enter 'common', or 'organizations' or the Tenant Id (Obtained from the Microsoft Entra admin center. Select 'Endpoints' from the 'App registrations' blade and use the GUID in any of the URLs), e.g. da41245a5-11b3-996c-00a8-4d99re19f292]",
    "ClientId": "[Enter the Client Id (Application ID obtained from the Microsoft Entra admin center), e.g. ba74781c2-53c2-442a-97c2-3d60re42f403]",
    "ClientSecret": "[Copy the client secret added to the app from the Microsoft Entra admin center]",
    "ClientCertificates": [
    ],
    // the following is required to handle Continuous Access Evaluation challenges
    "ClientCapabilities": [ "cp1" ],
    "CallbackPath": "/signin-oidc"
  },
  "DownstreamApis": {
    "MicrosoftGraph": {
      // Specify BaseUrl if you want to use Microsoft graph in a national cloud.
      // See https://learn.microsoft.com/graph/deployments#microsoft-graph-and-graph-explorer-service-root-endpoints
      // "BaseUrl": "https://graph.microsoft.com/v1.0",

      // Set RequestAppToken this to "true" if you want to request an application token (to call graph on
      // behalf of the application). The scopes will then automatically
      // be ['https://graph.microsoft.com/.default'].
      // "RequestAppToken": false

      // Set Scopes to request (unless you request an app token).
      "Scopes": [ "User.Read" ]

      // See https://aka.ms/ms-id-web/downstreamApiOptions for all the properties you can set.
    }
  },
  "Logging": {
    "LogLevel": {
      "Default": "Information",
      "Microsoft": "Warning",
      "Microsoft.Hosting.Lifetime": "Information"
    }
  },
  "AllowedHosts": "*"
}
代表使用者呼叫 Microsoft Graph
下列範例示範如何以已登入使用者的身分呼叫 Microsoft Graph,並取得一些使用者資訊。
GraphServiceClient 物件會插入至控制器,並由 Microsoft.Identity.Web 程式庫為您設定驗證。
// Index.cshtml.cs
using System.Threading.Tasks;
using Microsoft.AspNetCore.Mvc.RazorPages;
using Microsoft.Graph;
using System.IO;
using Microsoft.Identity.Web;
using Microsoft.Extensions.Logging;

// Some code omitted for brevity.

[AuthorizeForScopes(Scopes = new[] { "User.Read" })]
public class IndexModel : PageModel
{
    private readonly ILogger<IndexModel> _logger;
    private readonly GraphServiceClient _graphServiceClient;

    public IndexModel(ILogger<IndexModel> logger, GraphServiceClient graphServiceClient)
    {
        _logger = logger;
        _graphServiceClient = graphServiceClient;
    }

    public async Task OnGetAsync()
    {
        try
        {
            var user = await _graphServiceClient.Me.GetAsync();
            ViewData["Me"] = user;
            ViewData["name"] = user.DisplayName;

            using (var photoStream = await _graphServiceClient.Me.Photo.Content.GetAsync())
            {
                byte[] photoByte = ((MemoryStream)photoStream).ToArray();
                ViewData["photo"] = Convert.ToBase64String(photoByte);
            }
        }
        catch (Exception ex)
        {
            ViewData["photo"] = null;
        }
    }
}
清理資源
如果您已完成此多部分教學課程中的所有步驟,就會在資源群組中建立應用程式服務、應用程式服務主控方案和儲存體帳戶。 您也會在 Microsoft Entra ID 中建立應用程式註冊。 如果您選擇外部組態,您可能已建立新的外部租戶。 當不再需要這些資源和應用程式註冊時,請加以刪除,才不會繼續累積費用。
在本教學課程中,您將瞭解如何:
- 刪除遵循教學課程時所建立的 Azure 資源。
刪除資源群組
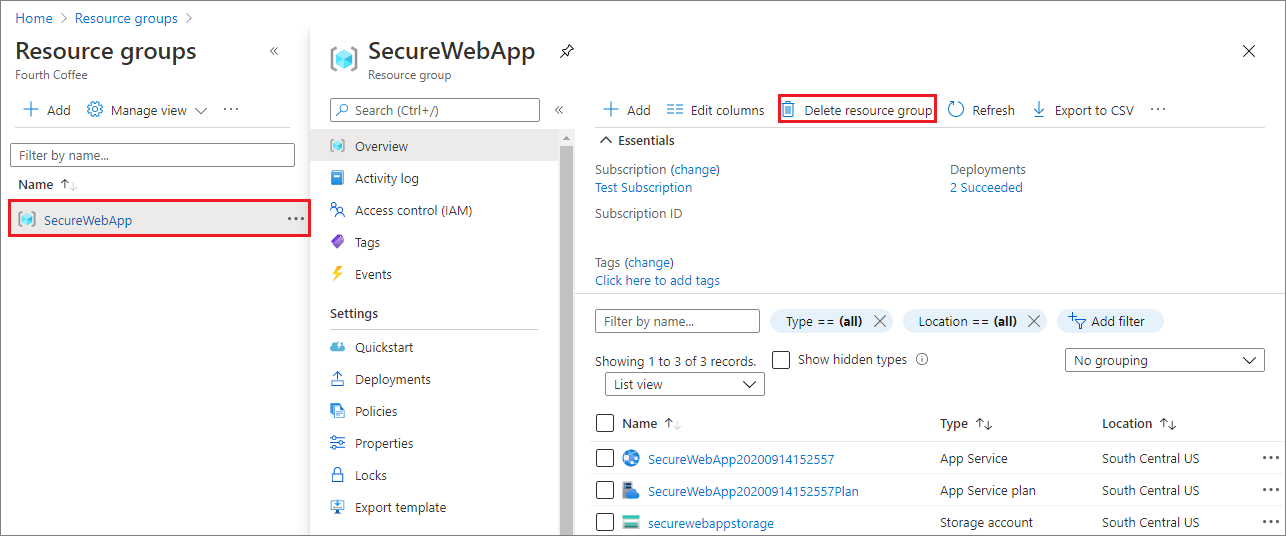
在 Azure 入口網站中,從入口網站功能表選取 [資源群組],然後選取包含您應用程式服務和應用程式服務方案的資源群組。
選取 [刪除資源群組] 來刪除群組及所有資源。

此命令可能需要幾分鐘的時間來執行。
刪除應用程式註冊
在 Microsoft Entra 系統管理中心中,選取 [應用程式]> [應用程式註冊]。 然後選取您建立的應用程式。

在應用程式註冊概觀中,選取 [刪除]。

刪除外部租戶
如果您已建立新的外部租用戶,則可以加以刪除 (部分內容可能是機器或 AI 翻譯)。 在 Microsoft Entra 系統管理中心中,瀏覽至 [身分識別]> [概觀]>[管理租使用者]。
選取您要刪除的租用戶,然後選取 [刪除]。
您可能需要先完成必要的動作,才能刪除租用戶。 例如,您可能需要刪除租戶中的所有使用者流程和應用程式註冊。
如果您已準備好刪除租用戶,請選取 [刪除]。
後續步驟
在本教程中,您將學到如何:
- 將委派的權限授與 Web 應用程式。
- 為已登入的使用者從 Web 應用程式呼叫 Microsoft Graph。