使用 Resource Manager 範本建立 Azure 自動化帳戶
Azure 自動化為雲端式自動化和設定服務,有助跨 Azure 和非 Azure 環境一致管理。 本文顯示如何部署可建立自動化帳戶的 Azure Resource Manager 範本 (ARM 範本)。 相較於其他部署方法,使用 ARM 範本所需的步驟比較少。 JSON 範本會針對您的環境中可能用於標準設定的參數,指定預設值。 您可以將範本儲存在 Azure 儲存體帳戶中,以在組織內共用存取。 如需有關使用範本的詳細資訊,請參閱使用 ARM 範本和 Azure CLI 部署資源。
Azure Resource Manager 範本是一個 JavaScript 物件標記法 (JSON) 檔案,會定義專案的基礎結構和設定。 範本使用宣告式語法。 您可以描述預期的部署,而不需要撰寫程式設計命令順序來建立部署。
範例範本會執行下列步驟:
- 自動化建立 Azure 監視器 Log Analytics 工作區。
- 自動化建立 Azure 自動化帳戶。
- 將自動化帳戶連結至 Log Analytics 工作區。
- 將範例自動化 Runbook 新增至帳戶。
如果您沒有 Azure 訂用帳戶,請在開始前建立免費帳戶。
必要條件
如果您是 Azure 自動化和 Azure 監視器的新手,請務必了解設定詳細資料。 當您嘗試建立、設定和使用連結至新自動化帳戶的 Log Analytics 工作區時,這些了解可以協助您避免錯誤。
請檢閱其他詳細資料,以全面了解工作區設定選項,例如,存取控制模式、定價層、保留和容量保留層級。
請參閱工作區對應,以指定內嵌或參數檔案中支援的區域。 只有特定區域支援連結 Log Analytics 工作區以及訂用帳戶中的自動化帳戶。
如果您是 Azure 監視器記錄的新手,而且尚未部署工作區,請參閱工作區設計指引。 此文件將協助您了解存取控制,並協助您了解對貴組織建議的設計實作策略。
檢閱範本
本文中使用的範本是來自 Azure 快速入門範本。
{
  "$schema": "https://schema.management.azure.com/schemas/2019-04-01/deploymentTemplate.json#",
  "contentVersion": "1.0.0.0",
  "parameters": {
    "workspaceName": {
      "type": "string",
      "metadata": {
        "description": "Workspace name"
      }
    },
    "sku": {
      "type": "string",
      "defaultValue": "pergb2018",
      "allowedValues": [
        "pergb2018",
        "Free",
        "Standalone",
        "PerNode",
        "Standard",
        "Premium"
      ],
      "metadata": {
        "description": "Pricing tier: perGB2018 or legacy tiers (Free, Standalone, PerNode, Standard or Premium), which are not available to all customers."
      }
    },
    "dataRetention": {
      "type": "int",
      "defaultValue": 30,
      "minValue": 7,
      "maxValue": 730,
      "metadata": {
        "description": "Number of days to retain data."
      }
    },
    "location": {
      "type": "string",
      "defaultValue": "[resourceGroup().location]",
      "metadata": {
        "description": "Specifies the location in which to create the workspace."
      }
    },
    "automationAccountName": {
      "type": "string",
      "metadata": {
        "description": "Automation account name"
      }
    },
    "sampleGraphicalRunbookName": {
      "type": "String",
      "defaultValue": "AzureAutomationTutorial"
    },
    "sampleGraphicalRunbookDescription": {
      "type": "String",
      "defaultValue": "An example runbook that gets all the Resource Manager resources by using the Run As account (service principal)."
    },
    "samplePowerShellRunbookName": {
      "type": "String",
      "defaultValue": "AzureAutomationTutorialScript"
    },
    "samplePowerShellRunbookDescription": {
      "type": "String",
      "defaultValue": "An example runbook that gets all the Resource Manager resources by using the Run As account (service principal)."
    },
    "samplePython2RunbookName": {
      "type": "String",
      "defaultValue": "AzureAutomationTutorialPython2"
    },
    "samplePython2RunbookDescription": {
      "type": "String",
      "defaultValue": "An example runbook that gets all the Resource Manager resources by using the Run As account (service principal)."
    },
    "_artifactsLocation": {
      "type": "string",
      "defaultValue": "[deployment().properties.templateLink.uri]",
      "metadata": {
        "description": "URI to artifacts location"
      }
    },
    "_artifactsLocationSasToken": {
      "type": "securestring",
      "defaultValue": "",
      "metadata": {
        "description": "The sasToken required to access _artifactsLocation.  When the template is deployed using the accompanying scripts, a sasToken will be automatically generated"
      }
    }
  },
  "resources": [
    {
      "type": "Microsoft.OperationalInsights/workspaces",
      "apiVersion": "2020-08-01",
      "name": "[parameters('workspaceName')]",
      "location": "[parameters('location')]",
      "properties": {
        "sku": {
          "name": "[parameters('sku')]"
        },
        "retentionInDays": "[parameters('dataRetention')]",
        "features": {
          "searchVersion": 1,
          "legacy": 0
        }
      }
    },
    {
      "type": "Microsoft.Automation/automationAccounts",
      "apiVersion": "2020-01-13-preview",
      "name": "[parameters('automationAccountName')]",
      "location": "[parameters('location')]",
      "dependsOn": [
        "[parameters('workspaceName')]"
      ],
      "identity": {
        "type": "SystemAssigned"
      },
      "properties": {
        "sku": {
          "name": "Basic"
        }
      },
      "resources": [
        {
          "type": "runbooks",
          "apiVersion": "2020-01-13-preview",
          "name": "[parameters('sampleGraphicalRunbookName')]",
          "location": "[parameters('location')]",
          "dependsOn": [
            "[parameters('automationAccountName')]"
          ],
          "properties": {
            "runbookType": "GraphPowerShell",
            "logProgress": "false",
            "logVerbose": "false",
            "description": "[parameters('sampleGraphicalRunbookDescription')]",
            "publishContentLink": {
              "uri": "[uri(parameters('_artifactsLocation'), concat('scripts/AzureAutomationTutorial.graphrunbook', parameters('_artifactsLocationSasToken')))]",
              "version": "1.0.0.0"
            }
          }
        },
        {
          "type": "runbooks",
          "apiVersion": "2020-01-13-preview",
          "name": "[parameters('samplePowerShellRunbookName')]",
          "location": "[parameters('location')]",
          "dependsOn": [
            "[parameters('automationAccountName')]"
          ],
          "properties": {
            "runbookType": "PowerShell",
            "logProgress": "false",
            "logVerbose": "false",
            "description": "[parameters('samplePowerShellRunbookDescription')]",
            "publishContentLink": {
              "uri": "[uri(parameters('_artifactsLocation'), concat('scripts/AzureAutomationTutorial.ps1', parameters('_artifactsLocationSasToken')))]",
              "version": "1.0.0.0"
            }
          }
        },
        {
          "type": "runbooks",
          "apiVersion": "2020-01-13-preview",
          "name": "[parameters('samplePython2RunbookName')]",
          "location": "[parameters('location')]",
          "dependsOn": [
            "[parameters('automationAccountName')]"
          ],
          "properties": {
            "runbookType": "Python2",
            "logProgress": "false",
            "logVerbose": "false",
            "description": "[parameters('samplePython2RunbookDescription')]",
            "publishContentLink": {
              "uri": "[uri(parameters('_artifactsLocation'), concat('scripts/AzureAutomationTutorialPython2.py', parameters('_artifactsLocationSasToken')))]",
              "version": "1.0.0.0"
            }
          }
        }
      ]
    },
    {
      "type": "Microsoft.OperationalInsights/workspaces/linkedServices",
      "apiVersion": "2020-08-01",
      "name": "[concat(parameters('workspaceName'), '/' , 'Automation')]",
      "location": "[parameters('location')]",
      "dependsOn": [
        "[parameters('workspaceName')]",
        "[parameters('automationAccountName')]"
      ],
      "properties": {
        "resourceId": "[resourceId('Microsoft.Automation/automationAccounts', parameters('automationAccountName'))]"
      }
    }
  ]
}
範本中定義的 Azure 資源:
- Microsoft.OperationalInsights/workspaces:建立 Azure Log Analytics 工作區。
- Microsoft.Automation/automationAccounts:建立 Azure 自動化帳戶。
- Microsoft.Automation/automationAccounts:建立 Azure 自動化帳戶 Runbook。
部署範本
選取下方的 [部署至 Azure] 按鈕來登入 Azure,並開啟 ARM 範本。

輸入或選取下列值:
屬性 描述 訂用帳戶 從下拉式清單中,選取您的 Azure 訂用帳戶。 資源群組 從下拉式清單中選取現有資源群組,或選取 [新建]。 區域 此值會自動填入。 工作區名稱 為新的 Log Analytics 工作區輸入名稱。 SKU 預設為在 2018 年 4 月定價模型中發行的每 GB 定價層。 如果您想要在選擇加入 2018 年 4 月定價模型的訂用帳戶中建立或設定 Log Analytics 工作區,則唯一有效的 Log Analytics 定價層是 PerGB2018。資料保留 預設值為 30 天。 Location 此值會以資源群組所用的位置來自動填入。 自動化帳戶名稱 為新的自動化帳戶輸入名稱。 範例圖形化 Runbook 名稱 保持原狀。 範例圖形化 Runbook 描述 保持原狀。 範例 PowerShell Runbook 名稱 保持原狀。 範例 PowerShell Runbook 描述 保持原狀。 範例 Python2Runbook 名稱 保持原狀。 範例 Python2Runbook 描述 保持原狀。 _artifacts 位置 保持原狀。*連到成品位置的 URI。 _artifacts 位置 Sas 權杖 保留空白。 存取 _artifactsLocation所需的 sasToken。 使用隨附指令碼來部署範本時,將會自動產生sasToken。* 當您嘗試從 PowerShell、CLI 或入口網站中的範本功能執行 ARM 範本時,如果未正確設定
_artifactsLocation參數,便會收到類似下列的錯誤訊息:"message": "Deployment template validation failed: 'The template resource '_artifactsLocation' at line '96' and column '31' is not valid: The language expression property 'templateLink' doesn't exist, available properties are 'template, templateHash, parameters, mode, debugSetting, provisioningState'.. Please see https://aka.ms/arm-template-expressions for usage details.'."若要避免這個錯誤,當在入口網站中從範本功能執行時,請為
_artifactsLocation參數指定下列值 -https://raw.githubusercontent.com/Azure/azure-quickstart-templates/master/quickstarts/microsoft.automation/101-automation/azuredeploy.json。當您從 PowerShell 執行時,請包含參數及其值
-TemplateUri https://raw.githubusercontent.com/Azure/azure-quickstart-templates/master/quickstarts/microsoft.automation/101-automation/azuredeploy.json。當您從 Azure CLI 執行時,請包含參數及其值 -
--template-uri https://raw.githubusercontent.com/Azure/azure-quickstart-templates/master/quickstarts/microsoft.automation/101-automation/azuredeploy.json。如需 PowerShell/CLI 的參考,請參閱使用範本一節下的建立 Azure 自動化帳戶 (microsoft.com)。
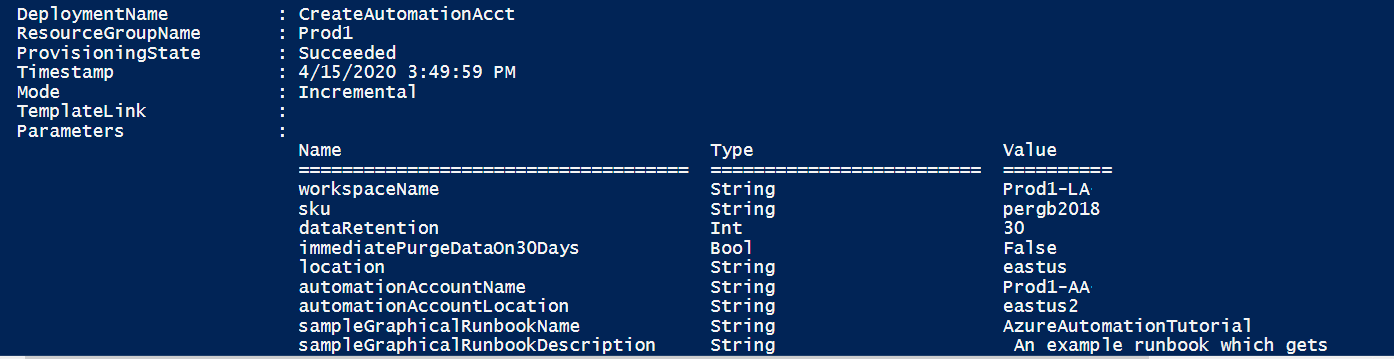
選取 [檢閱 + 建立],然後選取 [建立]。 部署需要幾分鐘的時間才能完成。 完成時,輸出會類似如下影像:
檢閱已部署的資源
部署完成後,您會收到部署成功通知,內有 [移至資源] 連結。 您的 [資源群組] 頁面會列出您的新資源。 從清單中,選取新的自動化帳戶。
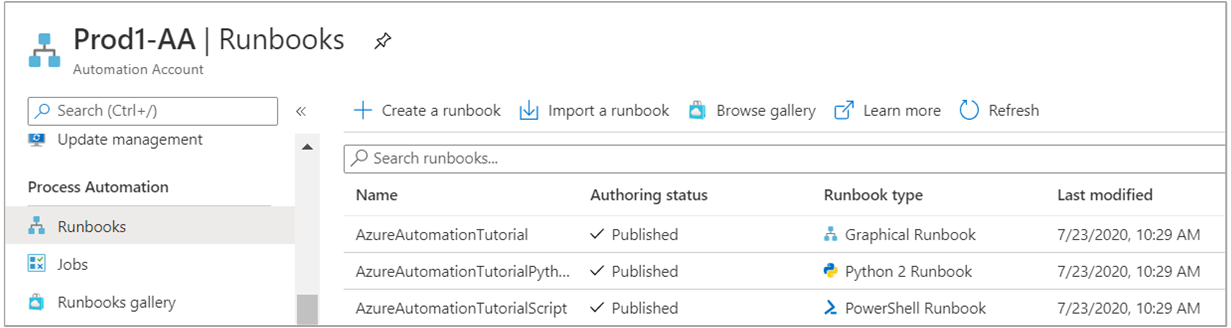
從左側的 [程序自動化] 下,選取 [Runbook]。 [Runbook] 頁面上會列出三個使用自動化帳戶建立的範例 Runbook。
從左側的 [相關資源] 底下,選取 [連結工作區]。 在 [連結的工作區] 頁面上,其會顯示您稍早指定連結至自動化帳戶的 Log Analytics 工作區。

下一步
為您的自動化帳戶設定診斷設定,以將 Runbook 作業狀態和作業串流傳送至連結的 Log Analytics 工作區。
意見反應
即將登場:在 2024 年,我們將逐步淘汰 GitHub 問題作為內容的意見反應機制,並將它取代為新的意見反應系統。 如需詳細資訊,請參閱:https://aka.ms/ContentUserFeedback。
提交並檢視相關的意見反應