使用 Azure 轉送將內部部署 WCF 服務公開至雲端中的 Web 應用程式
本文示範如何使用 Microsoft Azure 和 Visual Studio 建置混合式雲端應用程式。 您將建立可在雲端上使用多個 Azure 資源的應用程式。 本教學課程可協助您了解:
- 如何建立 Web 服務或調整現有的 Web 服務,以供 Web 方案使用。
- 如何使用 Azure Windows Communication Foundation (WCF) 轉送服務,在 Azure 應用程式與在其他位置裝載的 Web 服務之間共用資料。
您將在本教學課程中執行下列工作:
- 安裝本教學課程的必要條件。
- 檢閱案例。
- 建立命名空間。
- 建立內部部署伺服器。
- 建立 ASP .NET 應用程式。
- 在本機執行應用程式。
- 將 Web 應用程式部署至 Azure。
- 在 Azure 上執行應用程式。
必要條件
若要完成本教學課程,您需要下列必要條件:
- Azure 訂用帳戶。 如果您沒有 Azure 訂用帳戶,請在開始前建立免費帳戶。
- Visual Studio 2015 或更新版本。 本教學課程中的範例使用 Visual Studio 2019。
- 適用於 .NET 的 Azure SDK。 從 SDK 下載頁面進行安裝。
Azure 轉送如何透過混合式解決方案提供協助
商務解決方案通常是由自訂程式碼和現有功能所組成。 自訂程式碼可處理全新且獨特的商務需求。 已就緒的解決方案和系統可提供現有功能。
眾多方案架構爭相開始使用雲端,以期能夠更輕鬆地處理擴充需求並降低操作成本。 在這麼做之後,他們發現想要做為其解決方案建置組塊的現有服務資產是在公司防火牆內,無法供雲端方案輕易使用。 許多內部服務並不是以可輕易在公司網路邊緣公開的方式建置或主控。
Azure 轉送使用現有 WCF Web 服務,並使那些服務可供公司周邊外之解決方案安全存取,不需要進行會干擾公司網路基礎結構的變更。 此類轉送服務仍然裝載在其現有環境,但它們會將接聽連入工作階段和要求的工作委派給雲端裝載的轉送服務。 Azure 轉送也可使用共用存取簽章 (SAS) 驗證,保護那些服務免受未經授權的存取。
檢閱案例
在本教學課程中,您將建立 ASP.NET 網站,讓您可在產品庫存頁面上看到產品清單。
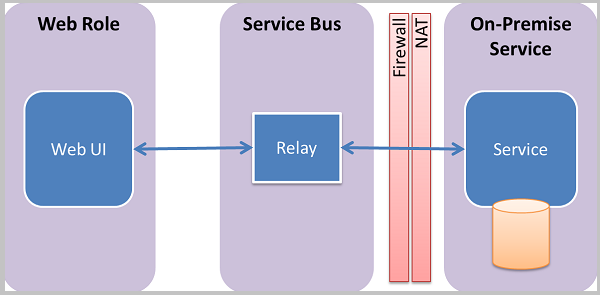
此教學課程假設您有現有內部部署系統中的產品資訊,並使用 Azure 轉送來連接該系統。 在簡單主控台應用程式中執行的 Web 服務會模擬這種情況。 其中包含一組記憶體內部產品。 您可以在自己的電腦上執行此主控台應用程式,並將 Web 角色部署至 Azure。 如此一來,您將會看到在 Azure 資料中心內執行的 Web 角色如何呼叫您的電腦。 雖然您的電腦通常會位於至少一個防火牆和網路位址轉譯 (NAT) 層後面,但仍會發生此呼叫。
設定開發環境
開始開發 Azure 應用程式之前,請先下載工具並設定開發環境:
- 從 SDK 下載頁面安裝 Azure SDK for .NET。
- 在 .NET 資料行中,選擇您所使用的 Visual Studio 版本。 本教學課程使用 Visual Studio 2019。
- 當系統提示您執行或儲存安裝程式時,請選取 [執行]。
- 在 [Web Platform Installer] 對話方塊中,選取 [安裝] 並繼續安裝。
完成安裝後,您就具有開始開發應用程式所需的一切。 SDK 包含可讓您在 Visual Studio 輕易開發 Azure 應用程式的工具。
建立命名空間
第一個步驟是建立命名空間,並取得共用存取簽章 (SAS) 金鑰。 命名空間會為每個透過轉送服務公開的應用程式提供應用程式界限。 建立服務命名空間時,系統會自動產生 SAS 金鑰。 服務命名空間與 SAS 金鑰的組合會提供一個認證,供 Azure 用來驗證對應用程式的存取權。
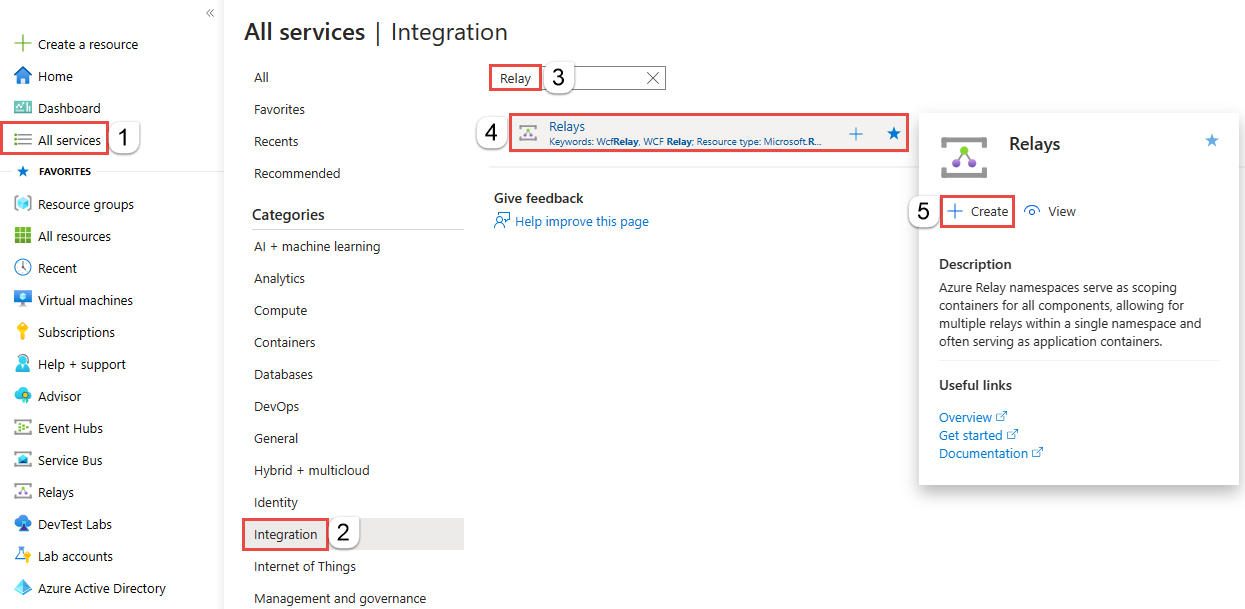
登入 Azure 入口網站。
選取左側功能表上的 [所有服務]。 選取 [整合],並搜尋「轉送」,再將滑鼠移至 [轉送] 上方,然後選取 [建立]。
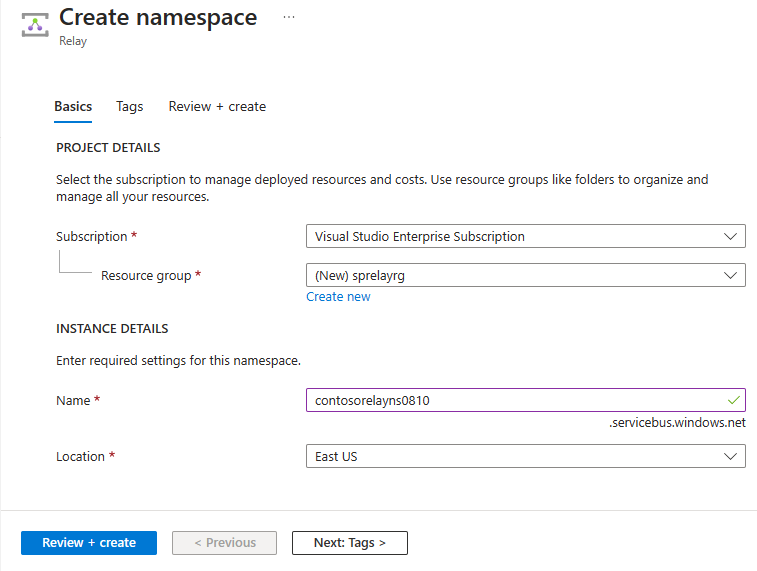
在 [建立命名空間] 頁面上,遵循下列步驟:
選擇要在其中建立命名空間的 Azure 訂用帳戶。
針對資源群組,選擇將放置命名空間的現有資源群組,或是建立新的資源群組。
輸入轉送命名空間的名稱。
選取要用來裝載命名空間的區域。
選取頁面底部的 [檢閱 + 建立] 。
在 [檢閱 + 建立] 頁面上,選取 [建立]。
幾分鐘後,您會看到命名空間的 [轉送] 頁面。
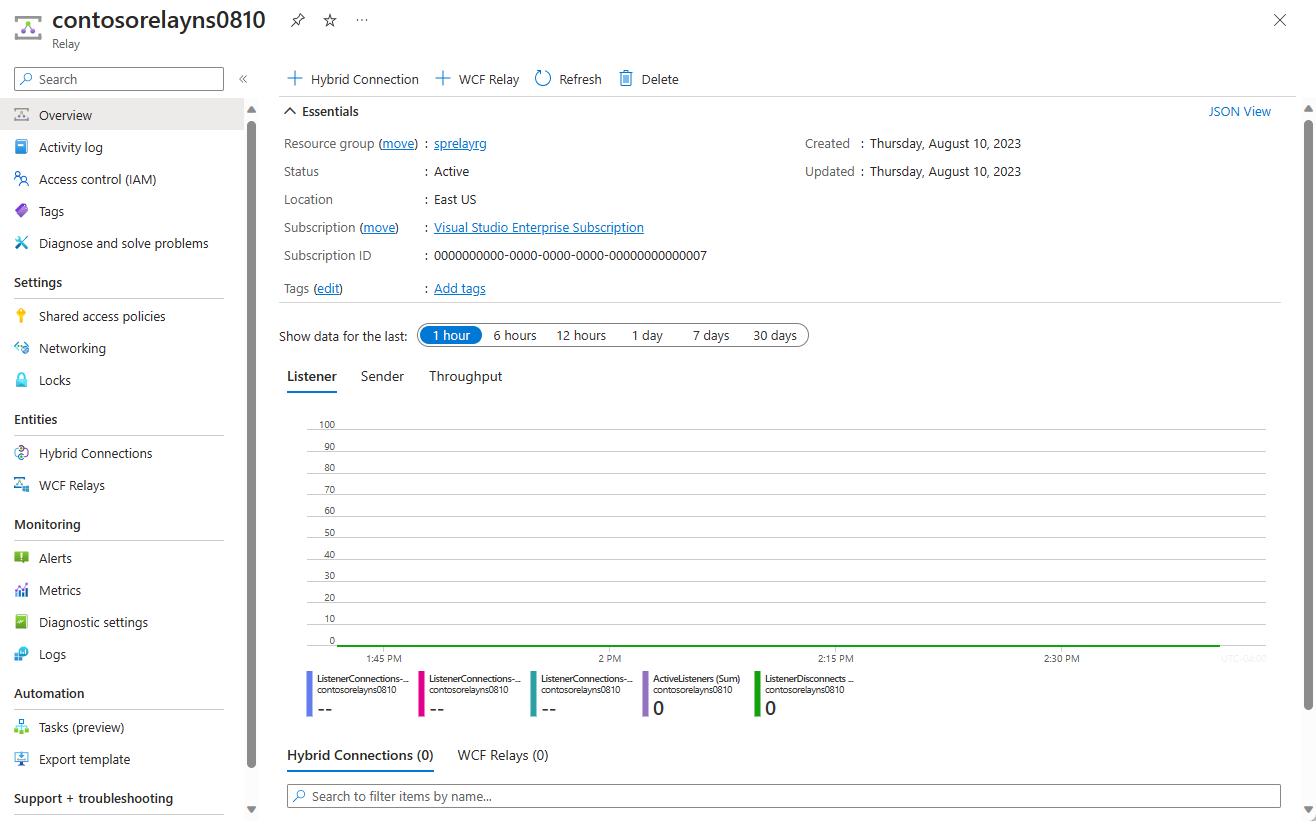
取得管理認證
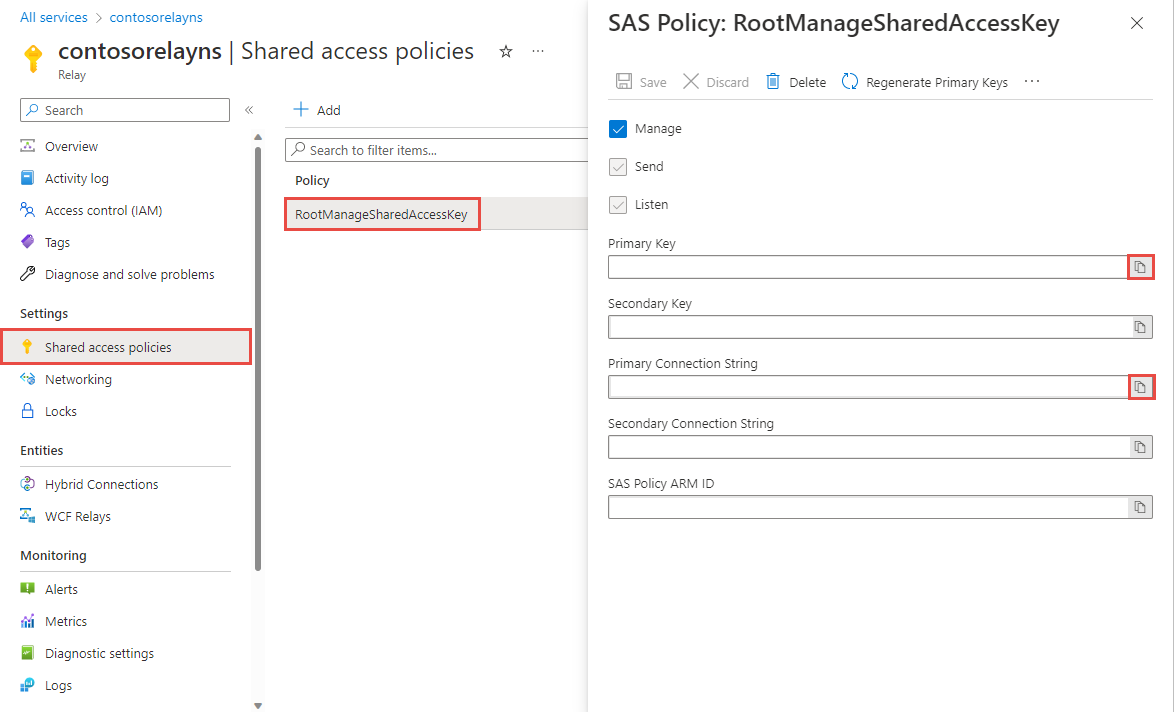
在 [轉送] 頁面上,選取左側功能表上的 [共用存取原則]。 `
在 [共用存取原則] 頁面上,選取 [RootManageSharedAccessKey]。
在 [SAS 原則: RootManageSharedAccessKey] 下,選取 [主要連接字串] 旁的 [複製] 按鈕。 此動作會將連接字串複製到剪貼簿以供稍後使用。 將此值貼到記事本或一些其他暫存位置。
重複前一個步驟,複製 [主要金鑰] 的值並貼到暫存位置以供稍後使用。
建立內部部署伺服器
首先,您將建置模擬的內部部署產品目錄系統。 此專案是 Visual Studio 主控台應用程式,會使用 Azure 服務匯流排 NuGet 套件來納入服務匯流排程式庫和組態設定。
以系統管理員身分啟動 Microsoft Visual Studio。 若要這樣做,請以滑鼠右鍵按一下 Visual Studio 程式圖示,然後選取 [以系統管理員身分執行]。
在 Visual Studio 中,選取 [建立新專案]。
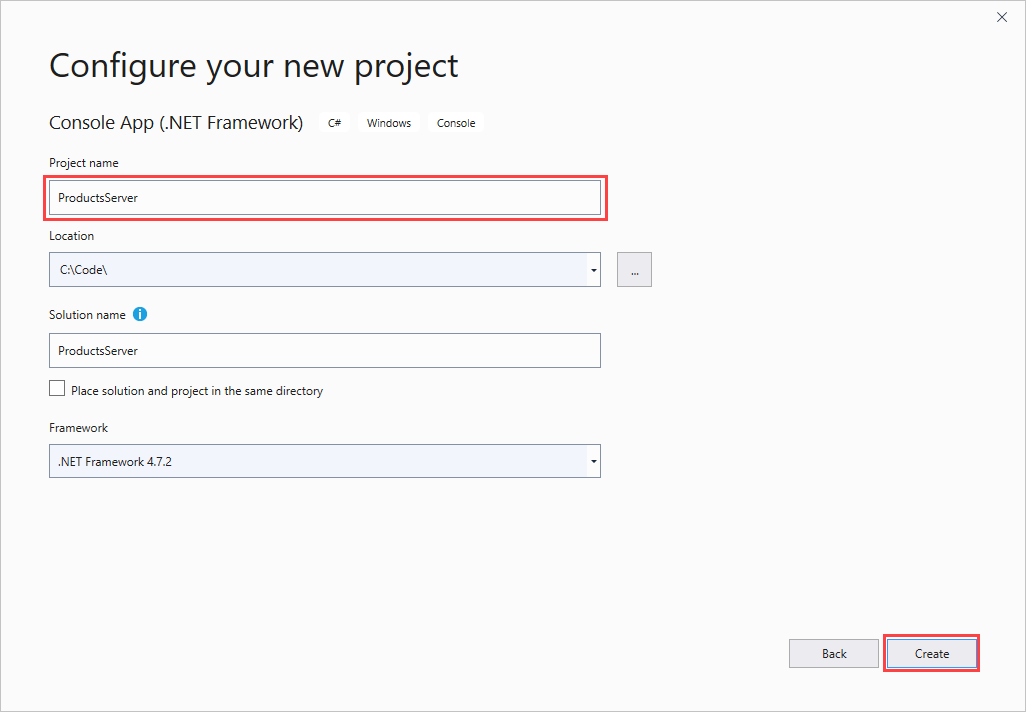
在 [建立新專案] 中,針對 C# 選取 [主控台應用程式 (.NET Framework)],然後選取 [下一步]。
將專案命名為 ProductsServer,然後選取 [建立]。
在 [方案總管] 中,以滑鼠右鍵按一下 ProductsServer 專案,然後選取 [管理 NuGet 套件]。
選取 [瀏覽],然後搜尋並選擇 WindowsAzure.ServiceBus。 選取 [安裝] 並接受使用條款。

現在會參考必要的用戶端組件。
新增產品連絡人的新類別。 在 [方案總管] 中,以滑鼠右鍵按一下 ProductsServer 專案,然後選取 [新增]>[類別]。
在 [名稱] 中,輸入 ProductsContract.cs 名稱,然後選取 [新增]。
對您的解決方案進行下列程式碼變更:
在 ProductsContract.cs 中,將命名空間定義取代為下列程式碼,以定義服務的連絡人。
namespace ProductsServer
{
    using System.Collections.Generic;
    using System.Runtime.Serialization;
    using System.ServiceModel;

    // Define the data contract for the service
    [DataContract]
    // Declare the serializable properties.
    public class ProductData
    {
        [DataMember]
        public string Id { get; set; }
        [DataMember]
        public string Name { get; set; }
        [DataMember]
        public string Quantity { get; set; }
    }

    // Define the service contract.
    [ServiceContract]
    interface IProducts
    {
        [OperationContract]
        IList<ProductData> GetProducts();

    }

    interface IProductsChannel : IProducts, IClientChannel
    {
    }
}
在 Program.cs 中,將命名空間定義取代為下列程式碼,為它新增設定檔服務和主機。
namespace ProductsServer
{
    using System;
    using System.Linq;
    using System.Collections.Generic;
    using System.ServiceModel;

    // Implement the IProducts interface.
    class ProductsService : IProducts
    {

        // Populate array of products for display on website
        ProductData[] products =
            new []
                {
                    new ProductData{ Id = "1", Name = "Rock",
                                     Quantity = "1"},
                    new ProductData{ Id = "2", Name = "Paper",
                                     Quantity = "3"},
                    new ProductData{ Id = "3", Name = "Scissors",
                                     Quantity = "5"},
                    new ProductData{ Id = "4", Name = "Well",
                                     Quantity = "2500"},
                };

        // Display a message in the service console application
        // when the list of products is retrieved.
        public IList<ProductData> GetProducts()
        {
            Console.WriteLine("GetProducts called.");
            return products;
        }

    }

    class Program
    {
        // Define the Main() function in the service application.
        static void Main(string[] args)
        {
            var sh = new ServiceHost(typeof(ProductsService));
            sh.Open();

            Console.WriteLine("Press ENTER to close");
            Console.ReadLine();

            sh.Close();
        }
    }
}
在 [方案總管] 中按兩下 App.config,以在 Visual Studio 編輯器中開啟該檔案。 在
<system.ServiceModel>元素底部 (但仍在<system.ServiceModel>內),新增以下 XML 程式碼。重要
請以您命名空間的名稱取代
yourServiceNamespace,並以您先前從入口網站擷取到的 SAS 金鑰取代yourKey:<services> <service name="ProductsServer.ProductsService"> <endpoint address="sb://yourServiceNamespace.servicebus.windows.net/products" binding="netTcpRelayBinding" contract="ProductsServer.IProducts" behaviorConfiguration="products"/> </service> </services> <behaviors> <endpointBehaviors> <behavior name="products"> <transportClientEndpointBehavior> <tokenProvider> <sharedAccessSignature keyName="RootManageSharedAccessKey" key="yourKey" /> </tokenProvider> </transportClientEndpointBehavior> </behavior> </endpointBehaviors> </behaviors>注意
transportClientEndpointBehavior所造成的錯誤只是警告,並非本範例的執行問題。仍是在 App.config 中,請以您先前從入口網站取得的連接字串來取代
<appSettings>元素中的連接字串值。<appSettings> <!-- Service Bus specific app settings for messaging connections --> <add key="Microsoft.ServiceBus.ConnectionString" value="Endpoint=sb://yourNamespace.servicebus.windows.net/;SharedAccessKeyName=RootManageSharedAccessKey;SharedAccessKey=yourKey"/> </appSettings>選取 Ctrl+Shift+B,或選取 [建置]>[建置方案] 來建置應用程式並驗證您的工作到目前為止是否正確無誤。
建立 ASP.NET 應用程式
在本節中,您將建置簡單的 ASP.NET 應用程式,來顯示從產品服務擷取的資料。
建立專案
確定 Visual Studio 是以管理員身分執行。
在 Visual Studio 中,選取 [建立新專案]。
在 [建立新專案] 中,針對 C# 選取 [ASP.NET Web 應用程式 (.NET Framework)],然後選取 [下一步]。
將專案命名為 ProductsPortal,然後選取 [建立]。
在 [建立新的 ASP.NET Web 應用程式] 中,選擇 [MVC],然後選取 [驗證] 下的 [變更]。

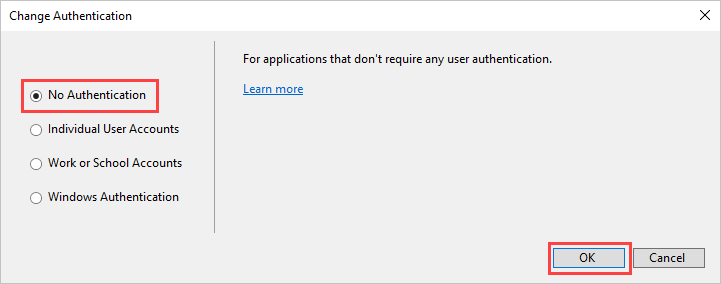
在 [變更驗證] 中,選擇 [不需要驗證],然後選取 [確定]。 在本教學課程中,您會部署不需要使用者登入的應用程式。
回到 [建立新的 ASP.NET Web 應用程式],選取 [建立] 以建立 MVC 應用程式。
設定新 Web 應用程式的 Azure 資源。 請遵循發佈 Web 應用程式中的步驟。 然後,回到本教學課程並繼續進行下一個步驟。
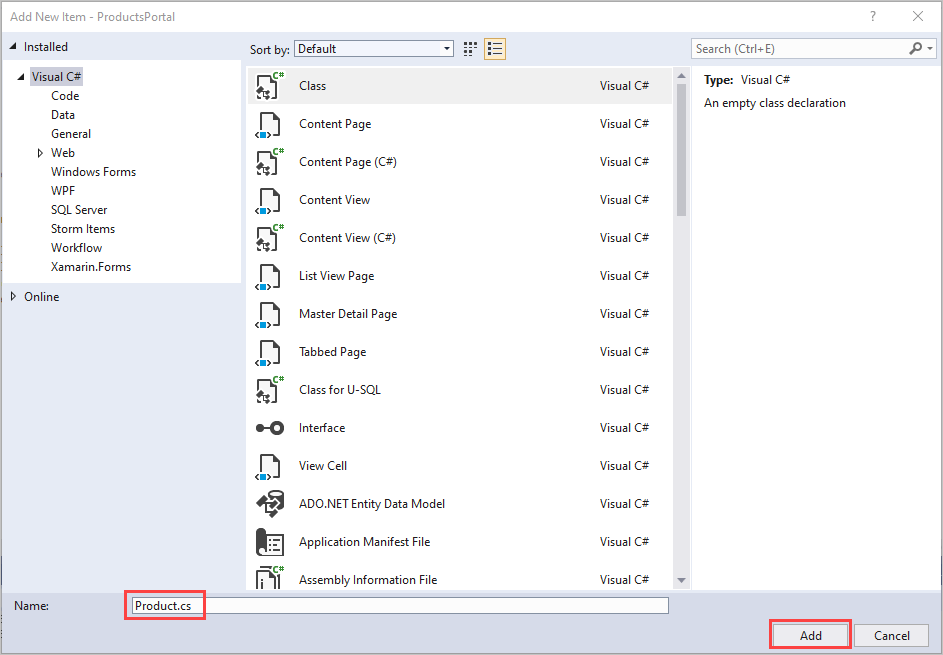
在 [方案總管] 中,以滑鼠右鍵按一下 [模型],選取 [新增]>[類別]。
將此類別命名為 Product.cs,然後選取 [新增]。
修改 Web 應用程式
在 Visual Studio 的 Product.cs 檔案中,將現有的命名空間定義取代為下列程式碼:
 // Declare properties for the products inventory.
 namespace ProductsWeb.Models
 {
    public class Product
    {
        public string Id { get; set; }
        public string Name { get; set; }
        public string Quantity { get; set; }
    }
 }
在 [方案總管] 中展開 [控制器],然後按兩下 HomeController.cs 以在 Visual Studio 中開啟檔案。
在 HomeController.cs 檔案中,以下列程式碼取代現有的命名空間定義:
namespace ProductsWeb.Controllers
{
    using System.Collections.Generic;
    using System.Web.Mvc;
    using Models;

    public class HomeController : Controller
    {
        // Return a view of the products inventory.
        public ActionResult Index(string Identifier, string ProductName)
        {
            var products = new List<Product>
                {new Product {Id = Identifier, Name = ProductName}};
            return View(products);
        }
     }
}
在 [方案總管] 中,展開 [檢視]>[共用],然後按兩下 _Layout.cshtml 以在 Visual Studio 編輯器中開啟檔案。
將所有出現的
My ASP.NET Application變更為 [Northwind Traders 產品]。移除
Home、About和Contact連結。 在下列範例中,刪除反白顯示的程式碼。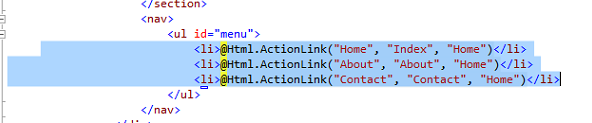
在 [方案總管] 中,展開 [檢視]>[首頁],然後按兩下 Index.cshtml 以在 Visual Studio 編輯器中開啟檔案。 將檔案的整個內容取代為下列程式碼:
@model IEnumerable<ProductsWeb.Models.Product>

@{
         ViewBag.Title = "Index";
}

<h2>Prod Inventory</h2>

<table>
          <tr>
              <th>
                  @Html.DisplayNameFor(model => model.Name)
              </th>
              <th></th>
              <th>
                  @Html.DisplayNameFor(model => model.Quantity)
              </th>
          </tr>

@foreach (var item in Model) {
          <tr>
              <td>
                  @Html.DisplayFor(modelItem => item.Name)
              </td>
              <td>
                  @Html.DisplayFor(modelItem => item.Quantity)
              </td>
          </tr>
}

</table>
若要驗證您的工作到目前為止是否正確無誤,您可以選取 Ctrl+Shift+B 來建置專案。
在本機執行應用程式
執行應用程式以驗證它是否能正常運作。
- 確定 ProductsPortal 為作用中專案。 在 [方案總管] 的專案名稱上按一下滑鼠右鍵,然後選取 [設定為啟始專案]。
- 在 Visual Studio 中,選取 F5。
您的應用程式應該就會出現在瀏覽器中並正在執行。
組合在一起
下一步是利用 ASP.NET 應用程式連接內部部署產品伺服器。
請在 Visual Studio 重新開啟您在建立 ASP.NET 應用程式一節中建立的 ProductsPortal 專案 (如果尚未開啟)。
類似於建立內部部署伺服器一節中的步驟,將 NuGet 套件新增至專案參考。 在 [方案總管] 中,以滑鼠右鍵按一下 ProductsPortal 專案,然後選取 [管理 NuGet 套件]。
搜尋 WindowsAzure.ServiceBus 並選取 WindowsAzure.ServiceBus 項目。 然後完成安裝並關閉此對話方塊。
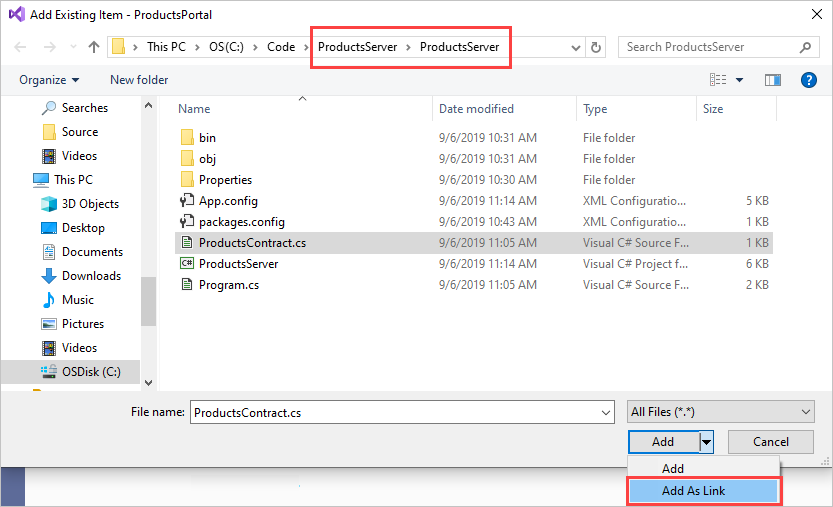
在 [方案總管] 中,以滑鼠右鍵按一下 ProductsPortal 專案,然後選取 [新增]>[現有項目]。
從 ProductsServer 主控台專案導覽至 ProductsContract.cs 檔案。 反白顯示 ProductsContract.cs。 選取 [新增] 旁邊的向下箭頭,然後選擇 [新增做為連結]。
現在會在 Visual Studio 編輯器中開啟 HomeController.cs 檔案,並將命名空間定義取代為下列程式碼。 請務必以轉送命名空間名稱取代
yourServiceNamespace,並以 SAS 金鑰取代yourKey。 此程式碼可讓用戶端呼叫內部部署服務,並傳回呼叫結果。namespace ProductsWeb.Controllers { using System.Linq; using System.ServiceModel; using System.Web.Mvc; using Microsoft.ServiceBus; using Models; using ProductsServer; public class HomeController : Controller { // Declare the channel factory. static ChannelFactory<IProductsChannel> channelFactory; static HomeController() { // Create shared access signature token credentials for authentication. channelFactory = new ChannelFactory<IProductsChannel>(new NetTcpRelayBinding(), "sb://yourServiceNamespace.servicebus.windows.net/products"); channelFactory.Endpoint.Behaviors.Add(new TransportClientEndpointBehavior { TokenProvider = TokenProvider.CreateSharedAccessSignatureTokenProvider( "RootManageSharedAccessKey", "yourKey") }); } public ActionResult Index() { using (IProductsChannel channel = channelFactory.CreateChannel()) { // Return a view of the products inventory. return this.View(from prod in channel.GetProducts() select new Product { Id = prod.Id, Name = prod.Name, Quantity = prod.Quantity }); } } } }在 [方案總管] 中,以滑鼠右鍵按一下 ProductsPortal 解決方案。 請務必以滑鼠右鍵按一下解決方案,而非專案。 選取 [新增]>[現有專案]。
導覽至 ProductsServer 專案,然後按兩下 ProductsServer.csproj 方案檔來新增它。
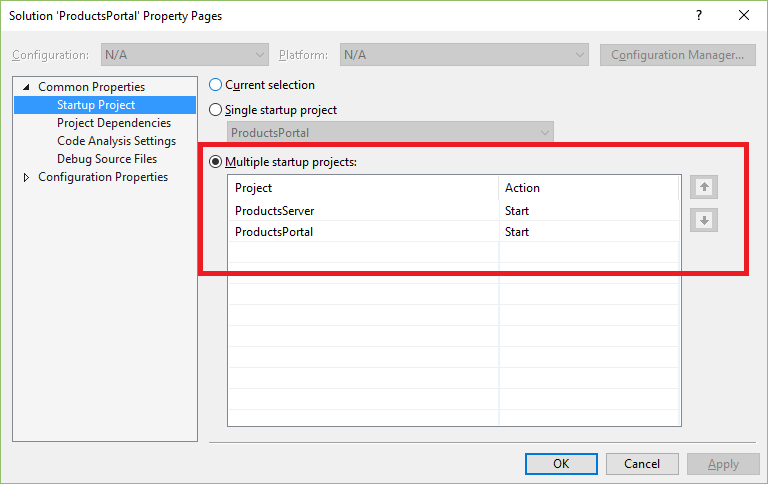
必須執行 ProductsServer 才能在 ProductsPortal 上顯示資料。 在 [方案總管] 中,以滑鼠右鍵按一下 ProductsPortal 解決方案,然後選取 [屬性] 以顯示 [屬性頁]。
選取 [通用屬性]>[啟始專案],然後選擇 [多個啟始專案]。 確定 ProductsServer 和 ProductsPortal 依序出現,且兩者的 [動作] 皆為 [啟動]。
選取左側的 [通用屬性]>[專案相依性]。
針對 [專案],選擇 ProductsPortal。 確定已選取 [ProductsServer]。
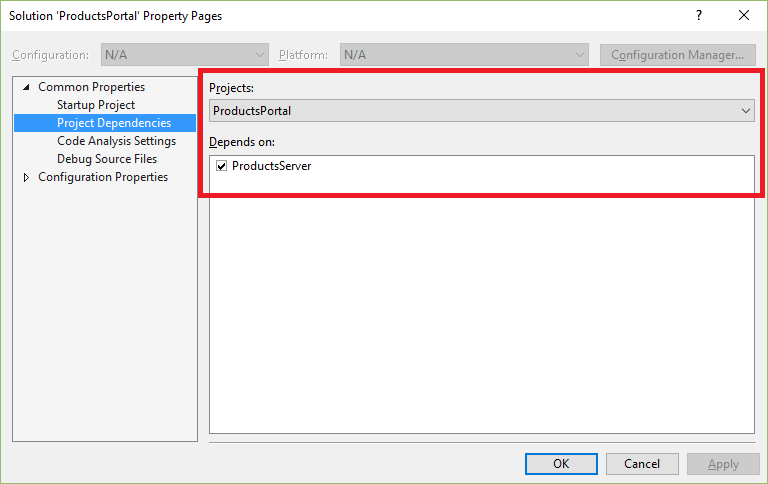
針對 [專案],選擇 ProductsServer。 確定未選取 ProductsPortal,然後選取 [確定] 以儲存變更。
在本機執行專案
若要在本機測試應用程式,請在 Visual Studio 中選取 F5。 內部部署伺服器 ProductsServer 應該會先啟動,然後 ProductsPortal 應用程式應在瀏覽器視窗中啟動。 此時,您將看到從產品服務內部部署系統擷取的產品庫存清單資料。
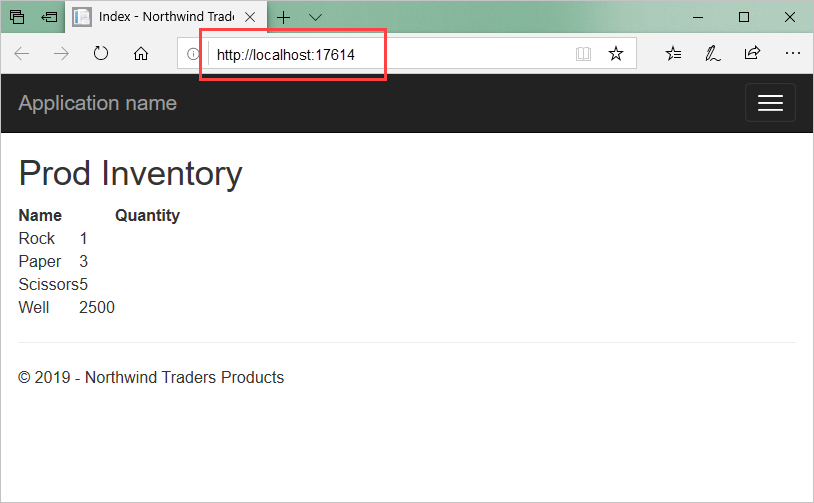
選取 ProductsPortal 頁面上的 [重新整理]。 每次重新整理頁面時,您會看到伺服器應用程式在呼叫來自 ProductsServer 的 GetProducts() 時顯示一則訊息。
先關閉這兩個應用程式,才能繼續下一個區段。
將 ProductsPortal 專案部署至 Azure Web 應用程式
下一個步驟是重新發佈 Azure Web 應用程式 ProductsPortal 前端:
在 [方案總管] 中,以滑鼠右鍵按一下 ProductsPortal 專案並選取 [發佈]。 在 [發佈] 頁面中,選取 [發佈]。
注意
在部署後自動啟動 ProductsPortal Web 專案時,您可在瀏覽器視窗中看到錯誤訊息。 這是預期的,且因為 ProductsServer 應用程式尚未執行而出現。
選取已部署 Web 應用程式的 URL。 您稍後將會用到此 URL。 您也可以從 Visual Studio 中的 [Azure App Service 活動] 視窗中取得此 URL:

關閉瀏覽器視窗以停止執行中的應用程式。
在雲端執行此應用程式之前,您必須確定 ProductsPortal 是從 Visual Studio 內以 Web 應用程式的形式啟動。
在 Visual Studio 中,以滑鼠右鍵按一下 ProductsPortal 專案,然後選取 [屬性]。
選取 Web。 在 [啟動動作] 下,選擇 [開始 URL]。 輸入先前部署之 Web 應用程式的 URL,在此範例中為
https://productsportal20190906122808.azurewebsites.net/。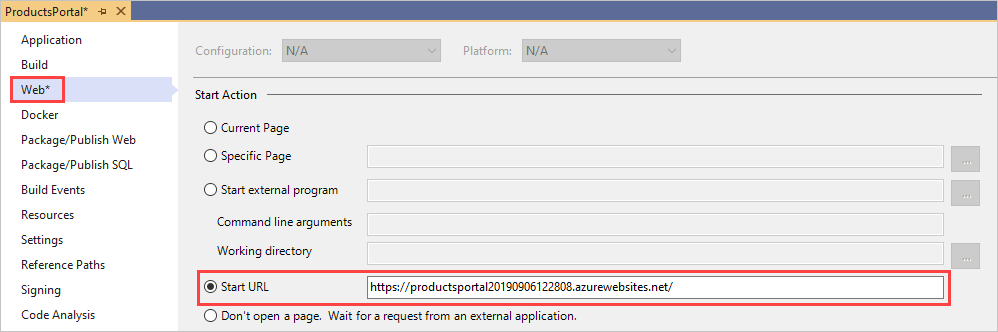
選取 [檔案]>[儲存全部]。
選取 [建置]>[重建解決方案]。
執行應用程式
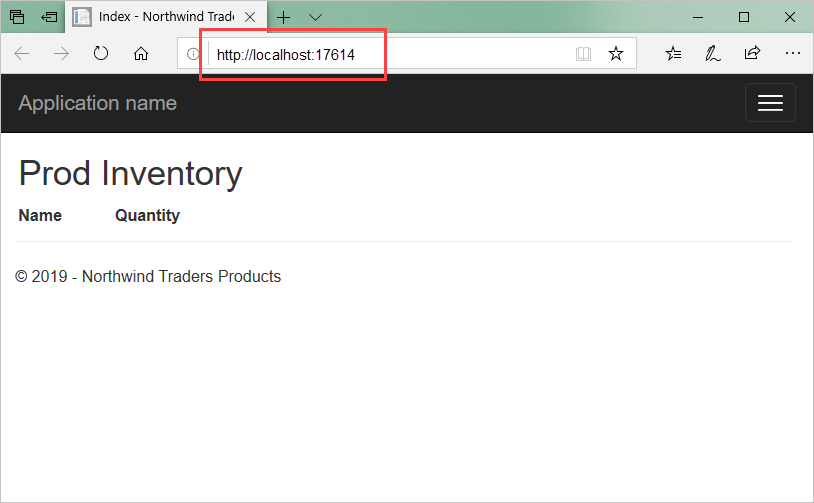
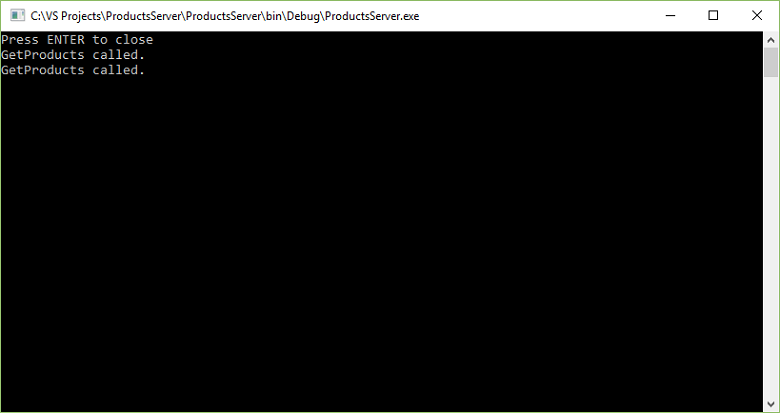
選取 F5 以建置並執行應用程式。 內部部署伺服器 (即 ProductsServer 主控台應用程式) 應該會第一個啟動,然後 ProductsPortal 應用程式應該會在瀏覽器視窗中啟動,如此處所示:
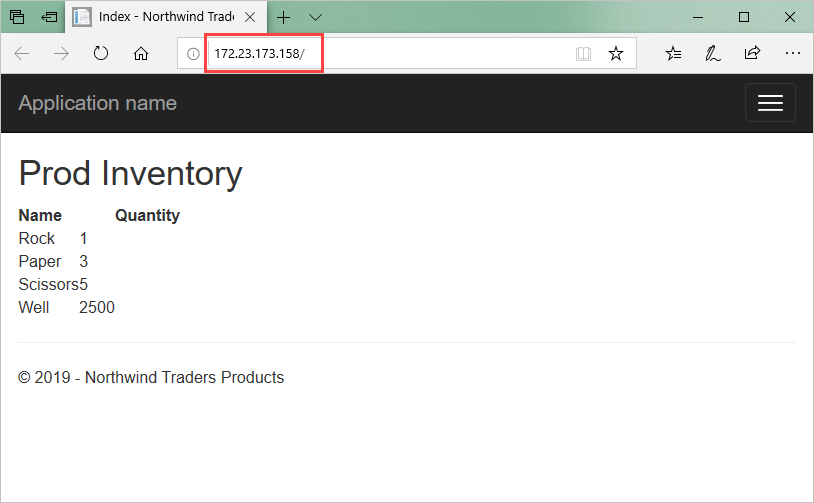
產品庫存清單會列出從產品服務內部部署系統擷取的資料,並在 Web 應用程式中顯示該資料。 檢查 URL,確定 ProductsPortal 正在雲端中以 Azure Web 應用程式的形式執行。
重要
ProductsServer 主控台應用程式必須正在執行中,而且能夠提供資料給 ProductsPortal 應用程式。 如果瀏覽器顯示錯誤,請等候幾秒,讓 ProductsServer 載入並顯示下列訊息,然後重新整理瀏覽器。
回到瀏覽器中,重新整理 ProductsPortal 頁面。 每次重新整理頁面時,您會看到伺服器應用程式在呼叫來自 ProductsServer 的 GetProducts() 時顯示一則訊息。
下一步
前進到下列教學課程:
意見反應
即將登場:在 2024 年,我們將逐步淘汰 GitHub 問題作為內容的意見反應機制,並將它取代為新的意見反應系統。 如需詳細資訊,請參閱:https://aka.ms/ContentUserFeedback。
提交並檢視相關的意見反應