教學課程:使用通知中樞和 Bing 空間資料傳送以位置為基礎的推播通知
在本教學課程中,您將學習如何使用 Azure 通知中樞和 Bing 空間資料來傳遞以位置為基礎的推播通知。
在本教學課程中,您會執行下列步驟:
- 設定資料來源
- 設定 UWP 應用程式
- 設定後端
- 測試通用 Windows 平台 (UWP) 應用程式中的推播通知
必要條件
- Azure 訂用帳戶。 如果您沒有 Azure 訂用帳戶,請在開始前建立免費 Azure 帳戶。
- Visual Studio 2015 Update 1 或更新版本 (Community Edition。
- 最新版的 Azure SDK。
- Bing 地圖服務開發人員中心帳戶 (您可以免費建立帳戶並將此帳戶關聯到您的 Microsoft 帳戶)。
設定資料來源
登入 Bing 地圖服務開發人員中心。
在上方導覽列中,選取 [資料來源],然後選取 [管理資料來源]。
![[管理資料來源] 頁面上的 Bing 地圖開發人員中心螢幕擷取畫面,並以紅色框選 [將資料上傳為資料來源] 選項。](media/notification-hubs-geofence/bing-maps-manage-data.png)
如果您沒有現有的資料來源,您會看到建立資料來源的連結。 選取 [上傳資料以作為資料來源]。 您也可以使用 [資料來源]>[上傳資料] 功能表。
![[上傳資料來源] 對話方塊的螢幕擷取畫面。](media/notification-hubs-geofence/bing-maps-create-data.png)
使用下列內容,在硬碟上建立
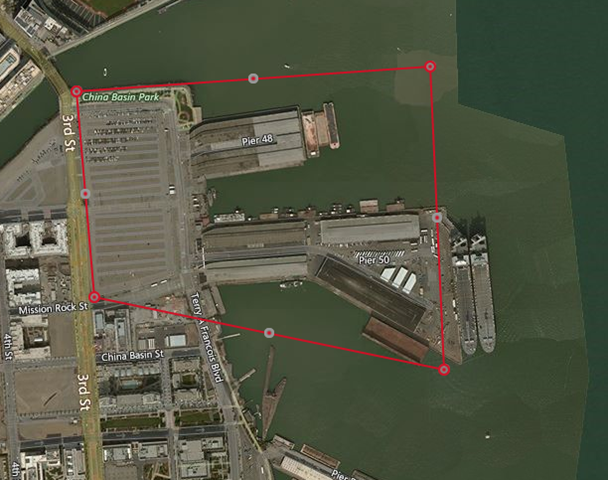
NotificationHubsGeofence.pipe檔案:在本教學課程中,您會使用構成舊金山濱水區域的管道式檔案範例:Bing Spatial Data Services, 1.0, TestBoundaries EntityID(Edm.String,primaryKey)|Name(Edm.String)|Longitude(Edm.Double)|Latitude(Edm.Double)|Boundary(Edm.Geography) 1|SanFranciscoPier|||POLYGON ((-122.389825 37.776598,-122.389438 37.773087,-122.381885 37.771849,-122.382186 37.777022,-122.389825 37.776598))此管道檔案代表以下實體︰

在 [上傳資料來源] 頁面上,執行下列動作:
選取 [管道] 作為 [資料格式]。
瀏覽並選取您在上一個步驟中建立的
NotificationHubGeofence.pipe檔案。選取 [上傳] 按鈕。
注意
您可能會收到提示,要求您為 [主要金鑰] 指定不同於 [查詢金鑰] 的新金鑰。 請直接透過儀表板建立新的金鑰,然後重新整理資料來源上傳頁面。
上傳資料檔案後,您必須確實發佈資料來源。 選取 [資料來源] ->[管理資料來源],如同之前所做的動作。
在清單中選取您的資料來源,並在 [動作] 資料行中選擇 [發佈]。
![[管理資料來源] 頁面上的 Bing 地圖開發人員中心螢幕擷取畫面,其中已選取 [地理編碼資料] 索引標籤,並以紅色框選 [發佈] 選項。](media/notification-hubs-geofence/publish-button.png)
切換至 [已發佈的資料來源] 索引標籤,確認在清單中有看到您的資料來源。
![[管理資料來源] 頁面上的 Bing 地圖開發人員中心螢幕擷取畫面,並已選取 [已發佈的資料來源] 索引標籤。](media/notification-hubs-geofence/bing-maps-published-data.png)
選取編輯。 您一眼就能看到您在資料中引入的位置。
![[編輯實體資料] 頁面的螢幕擷取畫面,其中顯示美國西部的地圖和以紫紅色原點標示的舊金山濱水區。](media/notification-hubs-geofence/bing-maps-data-details.png)
此時,入口網站並不會顯示您建立之地理柵欄的邊界,您只需要確認指定的位置位於適當區域內。
現在您已符合資料來源的所有要求。 若要取得 API 呼叫之要求 URL 的詳細資料,請在 Bing 地圖服務開發人員中心選擇 [資料來源],然後選取 [資料來源資訊]。
![[資料來源資訊] 頁面上的 Bing 地圖服務開發人員中心螢幕擷取畫面。](media/notification-hubs-geofence/bing-maps-data-info.png)
我們可以對查詢 URL 端點執行查詢,以檢查裝置目前是否位於某個位置的邊界內。 若要執行這項檢查,您只要對查詢 URL 執行 GET 呼叫,並附加下列參數︰
?spatialFilter=intersects(%27POINT%20LONGITUDE%20LATITUDE)%27)&$format=json&key=QUERY_KEYBing 地圖服務會自動執行計算,以檢查裝置是否在地理柵欄內。 一旦您透過瀏覽器 (或 cURL) 執行要求,您將會收到標準 JSON 回應︰

只有當位置點確實位於指定邊界內時,才會出現此回應。 如果不在邊界內,您將會收到空白的 results 貯體︰

設定 UWP 應用程式
在 Visual Studio 中,開始 [空白應用程式 (通用 Windows)] 類型的新專案。
![Visual Studio [新增專案] 對話方塊的螢幕擷取畫面,其中已醒目提示 [空白應用程式 (通用 Windows)] Visual C# 選項。](media/notification-hubs-geofence/notification-hubs-create-blank-app.png)
建立好專案之後,您應該就能控管應用程式本身。 現在,我們將進行地理柵欄基礎結構的各項設定。 由於您會使用 Bing 服務來進行這項解決方案,因此會有可供您查詢特定位置框架的公用 REST API 端點︰
http://spatial.virtualearth.net/REST/v1/data/請指定下列參數以讓端點開始運作︰
資料來源識別碼和資料來源名稱 – 在 Bing 地圖服務 API 中,資料來源包含了各種分門別類的中繼資料,例如營業據點和營業時間。
實體名稱 – 您想要作為通知參考點的實體。
Bing 地圖服務 API 金鑰 – 您稍早建立 Bing 開發人員中心帳戶時取得的金鑰。
現在您已經備妥資料來源,接下來您可以開始處理 UWP 應用程式。
啟用應用程式的位置服務。 在 [方案總管] 中開啟
Package.appxmanifest檔案。
在剛剛開啟的 [套件屬性] 索引標籤中,切換至 [功能] 索引標籤,並選取 [位置]。
![[封裝屬性] 對話方塊的螢幕擷取畫面,其中顯示已醒目提示 [位置] 選項的 [功能] 索引標籤。](media/notification-hubs-geofence/vs-package-location.png)
在方案中建立名為
Core的新資料夾,並在其中新增名為LocationHelper.cs的新檔案:![已醒目提示新 [核心] 資料夾的方案總管螢幕擷取畫面。](media/notification-hubs-geofence/vs-location-helper.png)
LocationHelper類別的程式碼可透過系統 API 取得使用者位置:using System; using System.Threading.Tasks; using Windows.Devices.Geolocation; namespace NotificationHubs.Geofence.Core { public class LocationHelper { private static readonly uint AppDesiredAccuracyInMeters = 10; public async static Task<Geoposition> GetCurrentLocation() { var accessStatus = await Geolocator.RequestAccessAsync(); switch (accessStatus) { case GeolocationAccessStatus.Allowed: { Geolocator geolocator = new Geolocator { DesiredAccuracyInMeters = AppDesiredAccuracyInMeters }; return await geolocator.GetGeopositionAsync(); } default: { return null; } } } } }若要深入了解如何在 UWP 應用程式中取得使用者位置,請參閱取得使用者的位置。
若要確認實際上是否能取得位置,請開啟主頁面的程式碼端 (
MainPage.xaml.cs)。 在MainPage建構函式中為Loaded事件建立新的事件處理常式。public MainPage() { this.InitializeComponent(); this.Loaded += MainPage_Loaded; }事件處理常式的實作如下︰
private async void MainPage_Loaded(object sender, RoutedEventArgs e)
{
    var location = await LocationHelper.GetCurrentLocation();

    if (location != null)
    {
        Debug.WriteLine(string.Concat(location.Coordinate.Longitude,
            " ", location.Coordinate.Latitude));
    }
}
執行應用程式,並允許它存取您的位置。
![[讓通知中樞地理柵欄存取您的位置] 對話方塊的螢幕擷取畫面。](media/notification-hubs-geofence/notification-hubs-location-access.png)
一旦應用程式啟動,您應該就能在 [輸出] 視窗中看到座標︰
![顯示座標的 [輸出] 視窗螢幕擷取畫面。](media/notification-hubs-geofence/notification-hubs-location-output.png)
現在您知道能正常取得位置了,接著您可以選擇移除「已載入」事件處理常式,因為您不會再用到此處理常式。
下一步是擷取位置變更。 在
LocationHelper類別中,新增PositionChanged的事件處理常式:geolocator.PositionChanged += Geolocator_PositionChanged;實作後將會在 [輸出] 視窗中顯示位置座標︰
private static async void Geolocator_PositionChanged(Geolocator sender, PositionChangedEventArgs args)
{
    await CoreApplication.MainView.CoreWindow.Dispatcher.RunAsync(CoreDispatcherPriority.Normal, () =>
    {
        Debug.WriteLine(string.Concat(args.Position.Coordinate.Longitude, " ", args.Position.Coordinate.Latitude));
    });
}
設定後端
從 GitHub 下載 .NET 後端範例。
下載完成後,在 Visual Studio 中依序開啟
NotifyUsers資料夾和NotifyUsers.sln檔案。將
AppBackend專案設定為 [啟始專案] 並加以啟動。![醒目提示 [設定為啟動專案] 選項的方案右鍵功能表螢幕擷取畫面。](media/notification-hubs-geofence/vs-startup-project.png)
專案已設定為會將推播通知傳送至目標裝置,所以您只需要做兩件事 – 指定用於通知中樞的正確連接字串,並新增邊界識別以便只在使用者位於地理柵欄內時才傳送通知。
若要設定連接字串,請開啟
Models資料夾內的Notifications.cs。NotificationHubClient.CreateClientFromConnectionString函式應該會包含可在 Azure 入口網站內取得之通知中樞的相關資訊 (請查看 [設定] 的 [存取原則] 頁面內部)。 儲存經過更新的組態檔。為 Bing 地圖服務 API 結果建立模型。 若要這麼做,最簡單的方式是開啟
Models資料夾,然後選擇 [新增]>[類別]。 將其命名為GeofenceBoundary.cs。 完成時,從在第一節取得的 API 回應中複製 JSON。 在 Visual Studio 中,使用 [編輯]>[選擇性貼上]>[將 JSON 貼上為類別]。如此一來,您就能確保物件會確實依其設計目的還原序列化。 所產生的類別集應該會類似於下列類別︰
namespace AppBackend.Models
{
    public class Rootobject
    {
        public D d { get; set; }
    }

    public class D
    {
        public string __copyright { get; set; }
        public Result[] results { get; set; }
    }

    public class Result
    {
        public __Metadata __metadata { get; set; }
        public string EntityID { get; set; }
        public string Name { get; set; }
        public float Longitude { get; set; }
        public float Latitude { get; set; }
        public string Boundary { get; set; }
        public string Confidence { get; set; }
        public string Locality { get; set; }
        public string AddressLine { get; set; }
        public string AdminDistrict { get; set; }
        public string CountryRegion { get; set; }
        public string PostalCode { get; set; }
    }

    public class __Metadata
    {
        public string uri { get; set; }
    }
}
接下來,開啟
Controllers>NotificationsController.cs。 更新 Post 呼叫以說明目標經緯度。 若要這麼做,請直接新增下列兩個字串到函式簽章 –latitude和longitude。public async Task<HttpResponseMessage> Post(string pns, [FromBody]string message, string to_tag, string latitude, string longitude)在稱為
ApiHelper.cs的專案內建立新類別 – 您將使用它來連線到 Bing,以確認位置點邊界的交叉點。 實作IsPointWithinBounds函式,如下列程式碼所示:public class ApiHelper { public static readonly string ApiEndpoint = "{YOUR_QUERY_ENDPOINT}?spatialFilter=intersects(%27POINT%20({0}%20{1})%27)&$format=json&key={2}"; public static readonly string ApiKey = "{YOUR_API_KEY}"; public static bool IsPointWithinBounds(string longitude,string latitude) { var json = new WebClient().DownloadString(string.Format(ApiEndpoint, longitude, latitude, ApiKey)); var result = JsonConvert.DeserializeObject<Rootobject>(json); if (result.d.results != null && result.d.results.Count() > 0) { return true; } else { return false; } } }重要
請務必將 API 端點替換為您稍早從 Bing 開發人員中心取得的查詢 URL (API 金鑰也要如此處理)。
如果查詢後有得到結果,這表示指定位置點位於地理柵欄邊界內,因此函式會傳回
true。 如果查詢不到任何結果,Bing 就會告訴您位置點位於查閱框架外部,因此函式會傳回false。在
NotificationsController.cs中,於 switch 陳述式前建立檢查︰if (ApiHelper.IsPointWithinBounds(longitude, latitude)) { switch (pns.ToLower()) { case "wns": //// Windows 8.1 / Windows Phone 8.1 var toast = @"<toast><visual><binding template=""ToastText01""><text id=""1"">" + "From " + user + ": " + message + "</text></binding></visual></toast>"; outcome = await Notifications.Instance.Hub.SendWindowsNativeNotificationAsync(toast, userTag); // Windows 10 specific Action Center support toast = @"<toast><visual><binding template=""ToastGeneric""><text id=""1"">" + "From " + user + ": " + message + "</text></binding></visual></toast>"; outcome = await Notifications.Instance.Hub.SendWindowsNativeNotificationAsync(toast, userTag); break; } }
在 UWP 應用程式中測試推播通知
在 UWP 應用程式中,您現在應該能夠測試通知了。 在
LocationHelper類別內建立新函式SendLocationToBackend:public static async Task SendLocationToBackend(string pns, string userTag, string message, string latitude, string longitude) { var POST_URL = "http://localhost:8741/api/notifications?pns=" + pns + "&to_tag=" + userTag + "&latitude=" + latitude + "&longitude=" + longitude; using (var httpClient = new HttpClient()) { try { await httpClient.PostAsync(POST_URL, new StringContent("\"" + message + "\"", System.Text.Encoding.UTF8, "application/json")); } catch (Exception ex) { Debug.WriteLine(ex.Message); } } }注意
將
POST_URL設定為已部署的 Web 應用程式所在位置。 現在您可以在本機加以執行,但由於您要著手部署公用版本,因此必須使用外部提供者加以裝載。註冊 UWP 應用程式以取得推播通知。 在 Visual Studio 中,選擇 [專案]>[市集]>[將應用程式與市集建立關聯]。
![方案右鍵功能表的螢幕擷取畫面,並已醒目提示 [市集] 和 [將應用程式與市集建立關聯] 選項。](media/notification-hubs-geofence/vs-associate-with-store.png)
一旦您登入開發人員帳戶,請務必選取現有應用程式或建立新應用程式並讓封裝與其建立關聯。
移至開發人員中心,然後開啟您建立的應用程式。 選擇 [服務]>[推播通知]>[線上服務網站]。
記下網站上的 [應用程式密碼] 和 [套件 SID]。 在 Azure 入口網站中需要用到這兩個項目 – 開啟通知中樞、選擇 [設定]>[Notification Services]>[Windows] \(WNS\),然後在必要欄位中輸入資訊。
![顯示 [設定] 頁面的螢幕擷取畫面,其中已醒目提示 [Notification Services] 和 [Windows (WNS)] 選項,並已填入套件 SID 和安全性金鑰值。](media/notification-hubs-geofence/notification-hubs-wns.png)
選擇儲存。
在 [方案總管] 中開啟 [參考],然後選取 [管理 NuGet 套件]。 新增 Microsoft Azure 服務匯流排受控程式庫的參考 – 只要搜尋
WindowsAzure.Messaging.Managed並將它新增至專案即可。![[管理 Nuget 套件] 對話方塊的螢幕擷取畫面,其中已醒目提示 WindowsAzure.Messaging.Managed 套件。](media/notification-hubs-geofence/vs-nuget.png)
為了進行測試,可以再次建立
MainPage_Loaded事件處理常式,並對其新增下列程式碼片段︰var channel = await PushNotificationChannelManager.CreatePushNotificationChannelForApplicationAsync(); var hub = new NotificationHub("HUB_NAME", "HUB_LISTEN_CONNECTION_STRING"); var result = await hub.RegisterNativeAsync(channel.Uri); // Displays the registration ID so you know it was successful if (result.RegistrationId != null) { Debug.WriteLine("Reg successful."); }程式碼會使用通知中樞註冊應用程式。 現在可以開時進行了!
在
LocationHelper的Geolocator_PositionChanged處理常式內,您可以新增一段測試程式碼以強制將位置放在地理柵欄內︰await LocationHelper.SendLocationToBackend("wns", "TEST_USER", "TEST", "37.7746", "-122.3858");因為您不會傳遞實際座標 (目前可能不在邊界內),而是使用預先定義的測試值,因此會在更新時看到通知出現︰

下一步
您可能還需要遵循幾個步驟以確定方案已可用於生產環境。
- 首先,您需要確保地理柵欄是動態的。 這需要對 Bing API 進行一些額外處理,才能在現有資料來源內上傳新邊界。 如需詳細資訊,請參閱 Bing 空間資料服務 API 文件。
- 接著,由於您要確保會對正確的參與者進行傳遞,因此您可以透過 標記功能鎖定這些人。
在此教學課程所示解決方案所說明的案例中,您可能會有各種不同目標平台,因此這裡並未限制只有系統特有功能才能使用地理柵欄。 也就是說,通用 Windows 平台內建提供了相關功能來 偵測地理柵欄。