教學課程:使用 Kestrel 新增 Service Fabric 應用程式的 HTTPS 端點
本教學課程是 系列的第三 部分。 瞭解如何在 Azure Service Fabric 中執行的 ASP.NET Core 服務中新增 HTTPS 端點。 完成時,您有一個投票應用程式,其已啟用 HTTPS 的 ASP.NET Core Web 前端接聽埠 443。 如果您不想在教學課程系列的第一部分中手動建立投票應用程式,您可以下載原始程式碼以取得已完成的應用程式。
在本教學課程中,您會了解如何:
- 在服務中定義 HTTPS 端點
- 設定 Kestrel 以使用 HTTPS
- 在遠端叢集節點上安裝 TLS/SSL 憑證
- 為 NetworkService 授與憑證私鑰的存取權
- 在 Azure Load Balancer 中開啟連接埠 443
- 將應用程式部署到遠端叢集
本教學課程系列會示範如何:
- 建置 .NET Service Fabric 應用程式
- 將應用程式部署到遠端叢集
- 將 HTTPS 端點新增至 ASP.NET Core 前端服務 (本教學課程)
- 使用 Azure Pipelines 設定 CI/CD
- 設定應用程式的監視和診斷
注意
建議您使用 Azure Az PowerShell 模組來與 Azure 互動。 若要開始使用,請參閱 安裝 Azure PowerShell。 若要了解如何移轉至 Az PowerShell 模組,請參閱將 Azure PowerShell 從 AzureRM 移轉至 Az。
必要條件
開始進行本教學課程之前:
- 如果您沒有 Azure 訂閱,請建立免費帳戶。
- 安裝 Visual Studio 2019 16.5 版或更新版本,包括 Azure 開發工作負載和 ASP.NET 和 Web 開發工作負載。
- 安裝 Service Fabric SDK。
取得憑證或建立自我簽署的開發憑證
對於生產應用程式,使用憑證授權單位 (CA) 提供的憑證。 基於開發和測試目的,您可以建立和使用自我簽署憑證。 Service Fabric SDK 包含 CertSetup.ps1 腳本。 腳本會建立自我簽署憑證,並將其匯入 至 Cert:\LocalMachine\My 證書存儲。 以系統管理員身分開啟命令提示字元窗口,然後執行下列命令,以建立主體為 “CN=mytestcert” 的憑證:
PS C:\program files\microsoft sdks\service fabric\clustersetup\secure> .\CertSetup.ps1 -Install -CertSubjectName CN=mytestcert
如果您已經有憑證個人資訊交換 (PFX) 檔案,請執行下列命令,將憑證匯入 Cert:\LocalMachine\My 證書存儲:
PS C:\mycertificates> Import-PfxCertificate -FilePath .\mysslcertificate.pfx -CertStoreLocation Cert:\LocalMachine\My -Password (ConvertTo-SecureString "!Passw0rd321" -AsPlainText -Force)


   PSParentPath: Microsoft.PowerShell.Security\Certificate::LocalMachine\My

Thumbprint                                Subject
----------                                -------
3B138D84C077C292579BA35E4410634E164075CD  CN=zwin7fh14scd.westus.cloudapp.azure.com
在服務資訊清單中定義 HTTPS 端點
使用 [ 以系統管理員身分執行] 選項開啟 Visual Studio,然後開啟投票解決方案。 在 [方案總管] 中,開啟 VotingWeb/PackageRoot/ServiceManifest.xml。 服務資訊清單會定義服務端點。 尋找 區 Endpoints 段並編輯端點的值 ServiceEndpoint 。 將名稱變更為 EndpointHttps、將通訊協定設定為 https、將類型設定為 Input,並將埠變更為 443。 儲存您的變更。
<?xml version="1.0" encoding="utf-8"?>
<ServiceManifest Name="VotingWebPkg"
                 Version="1.0.0"
                 xmlns="http://schemas.microsoft.com/2011/01/fabric"
                 xmlns:xsd="https://www.w3.org/2001/XMLSchema"
                 xmlns:xsi="https://www.w3.org/2001/XMLSchema-instance">
  <ServiceTypes>
    <StatelessServiceType ServiceTypeName="VotingWebType" />
  </ServiceTypes>

  <CodePackage Name="Code" Version="1.0.0">
    <EntryPoint>
      <ExeHost>
        <Program>VotingWeb.exe</Program>
        <WorkingFolder>CodePackage</WorkingFolder>
      </ExeHost>
    </EntryPoint>
  </CodePackage>

  <ConfigPackage Name="Config" Version="1.0.0" />

  <Resources>
    <Endpoints>
      <Endpoint Protocol="https" Name="EndpointHttps" Type="Input" Port="443" />
    </Endpoints>
  </Resources>
</ServiceManifest>
將 Kestrel 設定為使用 HTTPS
在 [方案總管] 中開啟 VotingWeb/VotingWeb.cs 檔案。 將 Kestrel 設定為使用 HTTPS,並在 Cert:\LocalMachine\My 存放區中查閱憑證。 加入下列 using 陳述式:
using System.Net;
using Microsoft.Extensions.Configuration;
using System.Security.Cryptography.X509Certificates;
更新的值 ServiceInstanceListener ,以使用新的 EndpointHttps 端點並接聽埠 443。 當您將 Web 主機設定為使用 Kestrel 伺服器時,您必須設定 Kestrel 以接聽所有網路介面上的 IPv6 位址: opt.Listen(IPAddress.IPv6Any, port, listenOptions => {...}。
new ServiceInstanceListener(
serviceContext =>
    new KestrelCommunicationListener(
        serviceContext,
        "EndpointHttps",
        (url, listener) =>
        {
            ServiceEventSource.Current.ServiceMessage(serviceContext, $"Starting Kestrel on {url}");

            return new WebHostBuilder()
                .UseKestrel(opt =>
                {
                    int port = serviceContext.CodePackageActivationContext.GetEndpoint("EndpointHttps").Port;
                    opt.Listen(IPAddress.IPv6Any, port, listenOptions =>
                    {
                        listenOptions.UseHttps(FindMatchingCertificateBySubject());
                        listenOptions.NoDelay = true;
                    });
                })
                .ConfigureAppConfiguration((builderContext, config) =>
                {
                    config.AddJsonFile("appsettings.json", optional: false, reloadOnChange: true);
                })

                .ConfigureServices(
                    services => services
                        .AddSingleton<HttpClient>(new HttpClient())
                        .AddSingleton<FabricClient>(new FabricClient())
                        .AddSingleton<StatelessServiceContext>(serviceContext))
                .UseContentRoot(Directory.GetCurrentDirectory())
                .UseStartup<Startup>()
                .UseServiceFabricIntegration(listener, ServiceFabricIntegrationOptions.None)
                .UseUrls(url)
                .Build();
        }))
接下來,新增下列方法,讓 Kestrel 可以使用主體,在 Cert:\LocalMachine\My 存放區中找到憑證。
mytestcert如果您使用先前的 PowerShell 命令建立自我簽署憑證,或使用憑證的 CN,請將 取代<your_CN_value>為 。
如果您使用 的本機部署 localhost,建議您使用 CN=localhost 來避免驗證例外狀況。
private X509Certificate2 FindMatchingCertificateBySubject(string subjectCommonName)
{
    using (var store = new X509Store(StoreName.My, StoreLocation.LocalMachine))
    {
        store.Open(OpenFlags.OpenExistingOnly | OpenFlags.ReadOnly);
        var certCollection = store.Certificates;
        var matchingCerts = new X509Certificate2Collection();

    foreach (var enumeratedCert in certCollection)
    {
      if (StringComparer.OrdinalIgnoreCase.Equals(subjectCommonName, enumeratedCert.GetNameInfo(X509NameType.SimpleName, forIssuer: false))
        && DateTime.Now < enumeratedCert.NotAfter
        && DateTime.Now >= enumeratedCert.NotBefore)
        {
          matchingCerts.Add(enumeratedCert);
        }
    }

        if (matchingCerts.Count == 0)
    {
        throw new Exception($"Could not find a match for a certificate with subject 'CN={subjectCommonName}'.");
    }

        return matchingCerts[0];
    }
}
將憑證私鑰的存取權授與網路服務
在先前的步驟中,您已將憑證匯入 開發計算機上的 Cert:\LocalMachine\My 存放區。
現在,明確提供執行服務 (網路服務, 預設) 存取憑證私鑰的帳戶。 您可以手動執行此步驟(使用 certlm.msc 工具),但最好是在服務指令清單的 中SetupEntryPoint設定啟動腳本來執行 PowerShell 腳本。
注意
Service Fabric 支援透過指紋或主體通用名稱來宣告端點憑證。 在此情況下,運行時間會將憑證私鑰的系結和配置設定為服務執行身分識別的身分識別。 運行時間也會監視憑證,以取得對應私鑰的變更、更新和配置更新。
設定服務安裝程式進入點
在 [方案總管] 中,開啟 VotingWeb/PackageRoot/ServiceManifest.xml。 在區 CodePackage 段中,新增 SetupEntryPoint 節點,然後新增 ExeHost 節點。 在 中 ExeHost,將設定 Program 為 Setup.bat,並將設定 WorkingFolder 為 CodePackage。 當 VotingWeb 服務啟動時,Setup.bat腳本會在VotingWeb.exe啟動之前,先在 CodePackage 資料夾中執行。
<?xml version="1.0" encoding="utf-8"?>
<ServiceManifest Name="VotingWebPkg"
                 Version="1.0.0"
                 xmlns="http://schemas.microsoft.com/2011/01/fabric"
                 xmlns:xsd="https://www.w3.org/2001/XMLSchema"
                 xmlns:xsi="https://www.w3.org/2001/XMLSchema-instance">
  <ServiceTypes>
    <StatelessServiceType ServiceTypeName="VotingWebType" />
  </ServiceTypes>

  <CodePackage Name="Code" Version="1.0.0">
    <SetupEntryPoint>
      <ExeHost>
        <Program>Setup.bat</Program>
        <WorkingFolder>CodePackage</WorkingFolder>
      </ExeHost>
    </SetupEntryPoint>

    <EntryPoint>
      <ExeHost>
        <Program>VotingWeb.exe</Program>
        <WorkingFolder>CodePackage</WorkingFolder>
      </ExeHost>
    </EntryPoint>
  </CodePackage>

  <ConfigPackage Name="Config" Version="1.0.0" />

  <Resources>
    <Endpoints>
      <Endpoint Protocol="https" Name="EndpointHttps" Type="Input" Port="443" />
    </Endpoints>
  </Resources>
</ServiceManifest>
新增批次和 PowerShell 設定指令碼
若要從的值 SetupEntryPoint執行 PowerShell,您可以在指向 PowerShell 檔案的批處理檔中執行 PowerShell.exe 。
首先,新增服務專案的批次檔案。 在 [方案總管] 中,以滑鼠右鍵按下 VotingWeb,然後選取 [新增>專案]。 新增名為 Setup.bat 的新檔案。 編輯 Setup.bat 檔案並新增以下組態:
powershell.exe -ExecutionPolicy Bypass -Command ".\SetCertAccess.ps1"
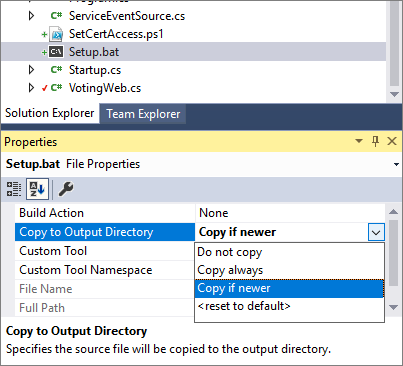
修改Setup.bat檔案的屬性,以在更新版本時將 [複製到輸出目錄] 設定為 [複製]。
在 [方案總管] 中,以滑鼠右鍵按下 VotingWeb。 然後,選取 [新增>專案],然後新增名為 SetCertAccess.ps1 的新檔案。 編輯 SetCertAccess.ps1 檔案以新增下列腳本:
$subject="mytestcert"
$userGroup="Network Service"

Write-Host "Checking permissions to certificate $subject.." -ForegroundColor DarkCyan

$cert = (gci Cert:\LocalMachine\My\ | where { $_.Subject.Contains($subject) })[-1]

if ($cert -eq $null)
{
    $message="Certificate with subject:"+$subject+" does not exist at Cert:\LocalMachine\My\"
    Write-Host $message -ForegroundColor Red
    exit 1;
}elseif($cert.HasPrivateKey -eq $false){
    $message="Certificate with subject:"+$subject+" does not have a private key"
    Write-Host $message -ForegroundColor Red
    exit 1;
}else
{
    $keyName=$cert.PrivateKey.CspKeyContainerInfo.UniqueKeyContainerName

    $keyPath = "C:\ProgramData\Microsoft\Crypto\RSA\MachineKeys\"

    if ($keyName -eq $null){
      $privateKey = [System.Security.Cryptography.X509Certificates.RSACertificateExtensions]::GetRSAPrivateKey($cert)
      $keyName = $privateKey.Key.UniqueName
      $keyPath = "C:\ProgramData\Microsoft\Crypto\Keys"
    }

    $fullPath=$keyPath+$keyName
    $acl=(Get-Item $fullPath).GetAccessControl('Access')


    $hasPermissionsAlready = ($acl.Access | where {$_.IdentityReference.Value.Contains($userGroup.ToUpperInvariant()) -and $_.FileSystemRights -eq [System.Security.AccessControl.FileSystemRights]::FullControl}).Count -eq 1

    if ($hasPermissionsAlready){
        Write-Host "Account $userGroup already has permissions to certificate '$subject'." -ForegroundColor Green
        return $false;
    } else {
        Write-Host "Need add permissions to '$subject' certificate..." -ForegroundColor DarkYellow

        $permission=$userGroup,"Full","Allow"
        $accessRule=new-object System.Security.AccessControl.FileSystemAccessRule $permission
        $acl.AddAccessRule($accessRule)
        Set-Acl $fullPath $acl

        Write-Output "Permissions were added"

        return $true;
    }
}
修改 SetCertAccess.ps1 檔案的屬性,以在更新版本時將 [複製到輸出目錄] 設定為 [複製]。
以系統管理員身分執行安裝腳本
根據預設,服務設定進入點可執行檔會使用與 Service Fabric 相同的認證來執行(通常是網路服務帳戶)。 SetCertAccess.ps1 需要系統管理員許可權。 在應用程式資訊清單中,您可以變更安全性權限,在本機系統管理員帳戶下執行啟動指令碼。
在 [方案總管] 中,開啟 Voting/ApplicationPackageRoot/ApplicationManifest.xml。 首先,建立區 Principals 段並新增新的使用者(例如 , SetupAdminUser。 將 SetupAdminUser 使用者帳戶新增至 Administrators 系統群組。
接下來,在 VotingWebPkg ServiceManifestImport 的 區段中,將 RunAsPolicy 設定為將安裝程式 管理員 User 主體套用至設定進入點。 此原則會告訴 Service Fabric Setup.bat檔案會以安裝程式 管理員 使用者身分執行(具有系統管理員許可權)。
<?xml version="1.0" encoding="utf-8"?>
<ApplicationManifest xmlns:xsd="https://www.w3.org/2001/XMLSchema" xmlns:xsi="https://www.w3.org/2001/XMLSchema-instance" ApplicationTypeName="VotingType" ApplicationTypeVersion="1.0.0" xmlns="http://schemas.microsoft.com/2011/01/fabric">
  <Parameters>
    <Parameter Name="VotingData_MinReplicaSetSize" DefaultValue="3" />
    <Parameter Name="VotingData_PartitionCount" DefaultValue="1" />
    <Parameter Name="VotingData_TargetReplicaSetSize" DefaultValue="3" />
    <Parameter Name="VotingWeb_InstanceCount" DefaultValue="-1" />
  </Parameters>
  <ServiceManifestImport>
    <ServiceManifestRef ServiceManifestName="VotingDataPkg" ServiceManifestVersion="1.0.0" />
    <ConfigOverrides />
  </ServiceManifestImport>
  <ServiceManifestImport>
    <ServiceManifestRef ServiceManifestName="VotingWebPkg" ServiceManifestVersion="1.0.0" />
    <ConfigOverrides />
    <Policies>
      <RunAsPolicy CodePackageRef="Code" UserRef="SetupAdminUser" EntryPointType="Setup" />
    </Policies>
  </ServiceManifestImport>
  <DefaultServices>
    <Service Name="VotingData">
      <StatefulService ServiceTypeName="VotingDataType" TargetReplicaSetSize="[VotingData_TargetReplicaSetSize]" MinReplicaSetSize="[VotingData_MinReplicaSetSize]">
        <UniformInt64Partition PartitionCount="[VotingData_PartitionCount]" LowKey="0" HighKey="25" />
      </StatefulService>
    </Service>
    <Service Name="VotingWeb" ServicePackageActivationMode="ExclusiveProcess">
      <StatelessService ServiceTypeName="VotingWebType" InstanceCount="[VotingWeb_InstanceCount]">
        <SingletonPartition />
      </StatelessService>
    </Service>
  </DefaultServices>
  <Principals>
    <Users>
      <User Name="SetupAdminUser">
        <MemberOf>
          <SystemGroup Name="Administrators" />
        </MemberOf>
      </User>
    </Users>
  </Principals>
</ApplicationManifest>
在本機執行應用程式
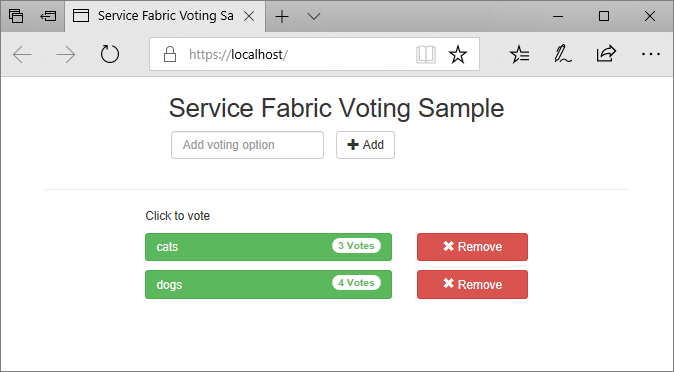
在 方案總管 中,選取 [投票] 應用程式,並將 [應用程式 URL] 屬性設定為 https://localhost:443。
儲存所有檔案,然後選取 F5 在本機執行應用程式。 應用程式部署之後,瀏覽器會開啟至 https://localhost:443。 如果您使用自我簽署憑證,您會看到計算機不信任此網站安全性的警告。 繼續前往網頁。
在叢集節點上安裝憑證
將應用程式部署至 Azure 之前,請在所有遠端叢集節點的 Cert:\LocalMachine\My 存放區中安裝憑證。 服務可以移至叢集的不同節點。 當前端 Web 服務在叢集節點上啟動時,啟動腳本會查閱憑證並設定訪問許可權。
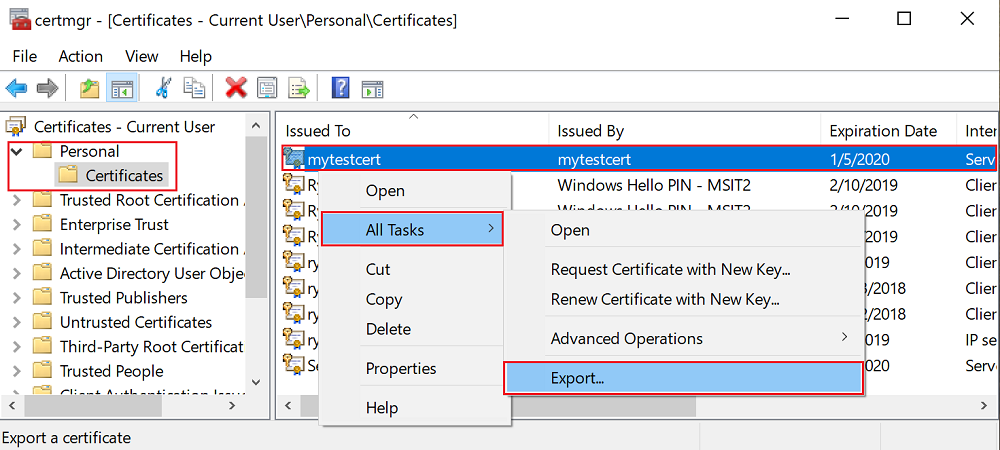
若要在叢集節點上安裝憑證,請先將憑證匯出為 PFX 檔案。 開啟 certlm.msc 應用程式檔案,然後移至 [個人>憑證]。 以滑鼠右鍵按兩下 mytestcert 憑證,然後選取[所有工作>匯出]。
在匯出精靈中,選取 [ 是]、匯出私鑰,然後選取 PFX 格式。 將檔案匯出至 C:\Users\sfuser\votingappcert.pfx。
接下來,使用 PowerShell 腳本在遠端叢集上安裝憑證。
警告
自我簽署的憑證已足夠用於開發和測試應用程式。 針對生產應用程式,請使用證書頒發機構單位 (CA) 的憑證,而不是使用自我簽署憑證。
在 Azure Load Balancer 和虛擬網路中開啟連接埠 443
如果未開啟負載平衡器,請在負載平衡器中開啟埠 443:
$probename = "AppPortProbe6"
$rulename="AppPortLBRule6"
$RGname="voting_RG"
$port=443

# Get the load balancer resource
$resource = Get-AzResource | Where {$_.ResourceGroupName –eq $RGname -and $_.ResourceType -eq "Microsoft.Network/loadBalancers"}
$slb = Get-AzLoadBalancer -Name $resource.Name -ResourceGroupName $RGname

# Add a new probe configuration to the load balancer
$slb | Add-AzLoadBalancerProbeConfig -Name $probename -Protocol Tcp -Port $port -IntervalInSeconds 15 -ProbeCount 2

# Add rule configuration to the load balancer
$probe = Get-AzLoadBalancerProbeConfig -Name $probename -LoadBalancer $slb
$slb | Add-AzLoadBalancerRuleConfig -Name $rulename -BackendAddressPool $slb.BackendAddressPools[0] -FrontendIpConfiguration $slb.FrontendIpConfigurations[0] -Probe $probe -Protocol Tcp -FrontendPort $port -BackendPort $port

# Set the goal state for the load balancer
$slb | Set-AzLoadBalancer
針對相關聯的虛擬網路執行相同的動作:
$rulename="allowAppPort$port"
$nsgname="voting-vnet-security"
$RGname="voting_RG"
$port=443

# Get the network security group resource
$nsg = Get-AzNetworkSecurityGroup -Name $nsgname -ResourceGroupName $RGname

# Add the inbound security rule.
$nsg | Add-AzNetworkSecurityRuleConfig -Name $rulename -Description "Allow app port" -Access Allow `
    -Protocol * -Direction Inbound -Priority 3891 -SourceAddressPrefix "*" -SourcePortRange * `
    -DestinationAddressPrefix * -DestinationPortRange $port

# Update the network security group
$nsg | Set-AzNetworkSecurityGroup
將應用程式部署至 Azure
儲存所有檔案,從 [偵錯] 切換至 [發行],然後選取 [F6] 以重建。 在 方案總管 中,以滑鼠右鍵按兩下 [投票],然後選取 [發佈]。 選取在將應用程式部署到叢集中建立之叢集的連線端點。,或選取另一個叢集。 選取 [發佈 ] 將應用程式發佈至遠端叢集。
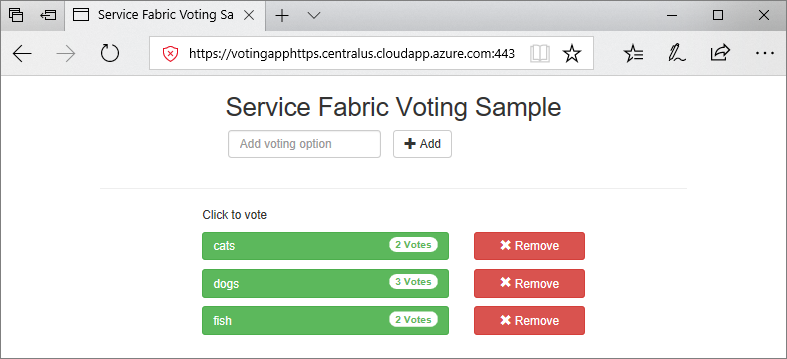
當應用程式部署時,請開啟網頁瀏覽器並移至 https://mycluster.region.cloudapp.azure.com:443 (使用叢集的連線端點更新 URL)。 如果您使用自我簽署憑證,您會看到計算機不信任此網站安全性的警告。 繼續前往網頁。
後續步驟
前進到下一個教學課程:
意見反應
即將登場:在 2024 年,我們將逐步淘汰 GitHub 問題作為內容的意見反應機制,並將它取代為新的意見反應系統。 如需詳細資訊,請參閱:https://aka.ms/ContentUserFeedback。
提交並檢視相關的意見反應