You, the VMs and the IaaS
There is a lot of literature on internet on how to create a Virtual Machine (VM) using Windows Azure but there is not so much when it comes to moving your Virtual Machines into Azure.
The general idea around this approach is to allow you to take a VM that is running in your datacenter and move it to the cloud. The may steps to perform this are the following :
- Make sure the VM is compatible with Azure
- Copy the VHD to the cloud
- Create the VM with the VHD we have just uploaded
There are additional elements to consider if you want to have service continuity. For example if you want to keep the network connectivity, you need to implement a Virtual Network (post to come later). On this article, we’ll concentrate on the move operation itself.
I'm going to describe how to perform the operation with the user interface then we'll see how to do it with Powershell.
Compatibility of your VM with Windows Azure
At this time, you have to be aware of the following three constraints with the VM you want to move to Windows Azure :
1- The virtual hard disk must have a VHD format.
VHDX are not yet supported, if your VM is running on a VHDX file, don’t panic, you can easily convert a VHDX to a VHD as follow:
Go to the properties of the VM an select the disk you want to convert, click “edit”. In the available actions, select Convert.
You only need to select the format you want :
2- The virtual hard disk must have a fixed size.
Dynamically expanding disks are not supported. If you are using the wizard, you can change this in the next screen :
3- The system disk must not be larger than 127 Gb.
If you have created a VM with a system disk that is larger than 127 Gb, you must shrink it. This can easily be done by using the disk manager in the VM as shown bellow :
Copy the VHD to the cloud
Before you can actually copy the VHD file to Windows Azure, you need to prepare the following three things :
- Have the latest Azure Powershell installed on your machine
- Have the Azure publishing settings
- Have an Azure storage account and a container
- Upload the VHD to Azure
1- Get the Azure Powershell cmdlets
You need the latest version from here : https://github.com/WindowsAzure/azure-sdk-tools/downloads
The official page (https://www.windowsazure.com/en-us/manage/downloads/) will be updated soon.
2-Download and Import your publishing settings
Open the “Windows Azure Powershell” that you have just installed and type :
Get-AzurePublishSettingsFile
This will open your browser at this page https://windows.azure.com/download/publishprofile.aspx?client=nodejs&lang=en
Save the .publishsettings file on your computer then type the following command:
Import-AzurePublishSettingsFile C:\AzureCorpAccount.publishsettings
After running this cmdlet, the configuration data to access you subscription are stored in your user profile : C:\Users\<alias>\AppData\Roaming\Windows Azure Powershel.
If you need to clean your environment, you can delete the files in this folder. You’ll have to reimport the publishsettings.
3- Have an azure storage account and container
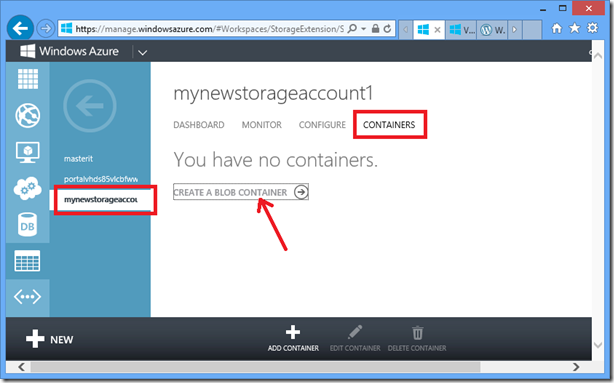
Create a new Storage Account (unless you already have one that you want to use) :
Give it a name that is unique
Once the creation has completed you can create a container. This step is optional.
The access to the container can be private, it is sufficient for what we want to do.
Now we are ready to copy the file to Azure !
4- Upload the VHD to Azure
The old way was to use CSUpload but now, thanks to the December 2012 Azure Powershell Cmdlets we can simply go to our Azure Powershell and type the following :
Select-AzureSubscription ‘mysubscription’
Add-AzureVHD –LocalFilePath ‘c:\VHD\demovm.vhd’ –Destination ‘https://mynewstorageaccount1.blob.core.windows.net/demo/demovm.vhd”
Note 1: you can copy the storage account name from the Azure web interface.
Note 2: If blob container that you specify does not exist, the powershell cmdlet will create it for you.
Note 3: There is no UI in the Azure management portal as this time to upload a file to a blob container.
Wait for the upload to complete before you continue with the remaining steps.
Once completed :
Now we are ready for the last step.
Create you VM with the VHD we have just uploaded
In order to create your VM, you need to follow those steps :
- Create a “disk” that you associate with your VHD file
- Create a VM using the Azure disk
- Create or verify the endpoint
The VHD that you have uploaded can be associated with the azure object called an “Image”. The main difference between the disk and the image is that an image can be used to create multiple VMs from the same base. Therefore the OS that you plan to use for an Image has to be sysprep’ed. In our case, because we want to move an existing VM to Azure, we will not sysprep it and we must use the Azure disks.
1- Create the Azure “disk” that correspond to our VM
In the user interface, simply go to “Virtual Machines” then “Disks”
Then fill the form as bellow :
The name will be displayed when you create your VM and need to select a disk. You can either type the VHD URL or simply browse through your storage accounts and blob containers.
Don’t forget to check the box indicating that the VHD contains an operating system and specify which type of OS it contains. As a reminder, we support several distributions of Linux in Windows Azure.
2- Create a VM using the Azure disk
You only have to go to the “Virtual Machine Instances” tab to create your VM.
Select “From Gallery” in the wizard.
Select the disk you have just uploaded.
Continue the wizard that will create the VM in Azure.
You will be asked for two different names :
- The “Virtual Machine Name”, this is used only into your subscription. It is used for display purposes and has no interference with anything else.
- The “DNS Name”, this name is used in Azure to identify your VM on Internet. This name must be unique and the system will verify it before it let you continue the Wizard.
If you have created a Virtual Network, it will appear in the list of places where you can connect your VM. We will cover part of the Azure networking in a different post.
Once the VM has been created we need to verify or create the appropriate endpoints.
3- Create or verify the endpoint
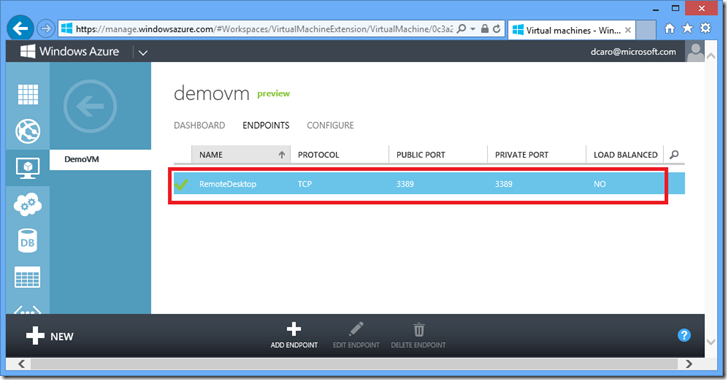
Select the VM that you have just created and go to the “Endpoints” tab.
You should have a configuration similar to this one :
The endpoint that is created by default the one that allows you to RDP to your VM from outside of the Azure datacenter (ie Internet). It can be very useful if you need to see what’s happening in the cloud but, for any reason, if you want or need to disable it, you can safely delete the endpoint and create it again when you need it.
With Powershell :
This step is creating the mot basic network configuration for the VM that we have just uploaded to Azure. In the post related to Azure Networking we’ll cover this aspect in more détails.
With Powershell
0- Prepare your environement
Get the Azure Powershell cmdlets
You need the latest version from here : https://github.com/WindowsAzure/azure-sdk-tools/downloads
The official page (https://www.windowsazure.com/en-us/manage/downloads/) will be updated soon.
Download and Import your publishing settings
Open the “Windows Azure Powershell” that you have just installed and type :
Get-AzurePublishSettingsFile
This will open your browser at this page https://windows.azure.com/download/publishprofile.aspx?client=nodejs&lang=en
Save the .publishsettings file on your computer then type the following command:
Import-AzurePublishSettingsFile C:\AzureCorpAccount.publishsettings
After running this cmdlet, the configuration data to access you subscription are stored in your user profile : C:\Users\<alias>\AppData\Roaming\Windows Azure Powershel.
If you need to clean your environment, you can delete the files in this folder. You’ll have to reimport the publishsettings.
1- Convert the VHDX fle to a fixed VHD file
Convert-VHD -Path .\DemoVHD.vhdx -DestinationPath .\DemoVHD.vhd –VHDType Fixed
With this cmdlet you can use of the –DeleteSource parameter. It will delete the .VHDX file so make sure you have a good backup of the file before using it.
2- Get the Azure publishing settings
Get-AzurePublishSettingsFile
Import-AzurePublishSettingsFile C:\AzureCorpAccount.publishsettings
3- Create the Azure storage account
New-AzureStorageAccount –StorageAccountName 'mynewstorageaccount1' –Location 'West Europe'
4- Upload the VHD file to the Azure blob storage
Select-AzureSubscription ‘mysubscription’
Add-AzureVHD –LocalFilePath ‘c:\VHD\demovm.vhd’ –Destination ‘https://mynewstorageaccount1.blob.core.windows.net/demo/demovm.vhd”
5- Add the VHD to the list of disks we will be able to use later
Add-AzureDisk –DiskName 'DemoDisk' -MediaLocation 'https://mynewstorageaccount1.blob.core.windows.net/demo/demoVHD' -OS Windows
6- Create a VM Configuration
New-AzureVMConfig -DiskName 'DemoDisk' -InstanceSize Small -Name 'DemoVM' | New-AzureVM -ServiceName 'demoVMdcaro' -AffinityGroup 'MyAffinityGroup'
That’s it !
We have moved a Virtual Machine from a hyper-V running on-premises to the cloud, actually Windows Azure !
This post is intentionally going through all the steps you need to do at least the first time you’ll perform this operation. The first time, it may seem a bit long but, once you have you configuration in place and the VM properly configured, moving VMs around from on-premises to the public cloud is a piece of cake.
Also System Center 2012 SP1 brings a nice automation around this process.
Happy testing of the IaaS with Windows Azure !
Additional resources and further reading
Try Windows Azure: You can sign-up for a free trial of 90 days from this location : https://www.windowsazure.com/en-us/pricing/free-trial/
You can read more about Azure and the IaaS on the following sites :
- Michael Washam’s blog : https://michaelwasham.com/
- Avkash Chauhan’s blog : https://blogs.msdn.com/b/avkashchauhan/archive/2012/11/20/how-does-windows-azure-powershell-import-publishsettings-using-import-azurepublishsettingsfile-command.aspx
- Azure documentation to create an image : https://www.windowsazure.com/en-us/manage/windows/common-tasks/upload-a-vhd/
- The CSUpload reference page : https://msdn.microsoft.com/en-us/library/windowsazure/gg466228.aspx
This post is relying on the Azure Cmdlet update of December 2012. You will find a complete list of the changes introduced with this release at this location : https://michaelwasham.com/2012/12/14/new-windows-azure-powershell-update-december-2012/


