在 ASP.NET Core 中設定憑證驗證
Microsoft.AspNetCore.Authentication.Certificate 包含類似 ASP.NET Core 憑證驗證的實作。 遠在到達 ASP.NET Core 之前,就會會在 TLS 層級發生憑證驗證。 更準確地說,這是一個驗證處理常式,該常式會驗證憑證,然後提供可將該憑證解析為 ClaimsPrincipal的事件。
無論是 IIS、Kestrel、Azure Web Apps,或您使用的任何其他內容,您都必須設定伺服器進行憑證驗證。
Proxy 和負載平衡器案例
憑證驗證是一種具狀態情節,主要使用於 Proxy 或負載平衡器不會處理用戶端與伺服器之間流量的情況。 如果使用了 Proxy 或負載平衡器,則憑證驗證只有在 Proxy 或負載平衡器時才有效:
- 處理驗證。
- 將使用者驗證資訊傳遞至應用程式 (例如,在要求標頭中),以處理驗證資訊。
在使用 Proxy 和負載平衡器的環境中,憑證驗證的替代方案是 Active Directory 同盟服務 (ADFS) 搭配 OpenID Connect (OIDC)。
開始使用
取得 HTTPS 憑證、套用憑證,並將設定伺服器為需要憑證。
在 Web 應用程式中:
- 新增對 Microsoft.AspNetCore.Authentication.Certificate NuGet 套件的參考。
- 在
Program.cs中,呼叫builder.Services.AddAuthentication(CertificateAuthenticationDefaults.AuthenticationScheme).AddCertificate(...);。 提供對OnCertificateValidated的委派,以便對隨要求傳送的用戶端憑證執行任何補充驗證。 將該資訊轉換成ClaimsPrincipal,並在context.Principal屬性上加以設定。
如果驗證失敗,此處理程式會傳回 403 (Forbidden) 回應,而不是 401 (Unauthorized),正如您所預期。 原因是驗證應該在初始 TLS 連線期間發生。 到達達處理常式時,已經來不及了。 無法將連線從匿名連線升級為具有憑證的連線。
需要 UseAuthentication 才能將 HttpContext.User 設定為從憑證建立的 ClaimsPrincipal。 例如:
var builder = WebApplication.CreateBuilder(args);

builder.Services.AddAuthentication(
        CertificateAuthenticationDefaults.AuthenticationScheme)
    .AddCertificate();

var app = builder.Build();

app.UseAuthentication();

app.MapGet("/", () => "Hello World!");

app.Run();
上述範例示範新增憑證驗證的預設方式。 處理常式會使用通用憑證屬性來建構使用者主體。
設定憑證驗證
處理常式 CertificateAuthenticationOptions 有一些內建驗證,這是您應該在憑證上執行的最小驗證。 每個設定預設都會啟用。
AllowedCertificateTypes = Chained, SelfSigned, 或 All (Chained | SelfSigned)
預設值:CertificateTypes.Chained
這項檢查會驗證只允許適當的憑證類型。 如果應用程式使用自我簽署憑證,則必須將此選項設定為 CertificateTypes.All 或 CertificateTypes.SelfSigned。
ChainTrustValidationMode
用戶端所提供的憑證必須鏈結至受信任的根憑證。 此檢查可控制哪些信任存放區包含這些根憑證。
根據預設,處理常式會使用系統信任存放區。 如果出示的用戶端憑證需要鏈結至未出現在系統信任存放區中的根憑證,則可以將此選項設定為 X509ChainTrustMode.CustomRootTrust,讓處理常式使用 CustomTrustStore。
CustomTrustStore
預設值:空白 X509Certificate2Collection
如果處理常式的 ChainTrustValidationMode 屬性設定為 X509ChainTrustMode.CustomRootTrust,則此 X509Certificate2Collection 包含將用來驗證用戶端憑證到受信任根目錄的每個憑證,包括受信任的根目錄。
當用戶端出示屬於多層級憑證鏈結的憑證時,CustomTrustStore 必須包含鏈結中的每個發行的憑證。
ValidateCertificateUse
預設值:true
這項檢查會驗證用戶端提供的憑證是否具有用戶端驗證延伸金鑰使用 (EKU),或完全沒有 EKU。 如規格所述,如果未指定 EKU,則所有 EKU 都會被視為有效。
ValidateValidityPeriod
預設值:true
這項檢查會驗證憑證是否在其有效期間內。 每個要求發生時,處理常式可確保呈現時為有效的憑證在目前會話期間尚未過期。
RevocationFlag
預設值:X509RevocationFlag.ExcludeRoot
旗標,指定鏈結中要檢查哪些憑證是否被撤銷。
只有在憑證鏈結至根憑證時,才會執行撤銷檢查。
RevocationMode
預設值:X509RevocationMode.Online
旗標,指定撤銷檢查的執行方式。
連絡憑證授權單位時,指定線上檢查可能會導致長時間的延遲。
只有在憑證鏈結至根憑證時,才會執行撤銷檢查。
我可以將應用程式設定為只在特定路徑上要求憑證嗎?
這是不可能的。 請記住,憑證交換是在 HTTPS 交談開始時完成的,伺服器會在該連線上收到第一個要求之前完成,因此無法根據任何要求欄位來設定範圍。
處理常式事件
處理常式有兩個事件:
OnAuthenticationFailed:如果在驗證期間發生例外狀況,則會進行呼叫,並可讓您做出反應。OnCertificateValidated:在驗證憑證、通過驗證和建立預設主體之後呼叫。 此事件可讓您執行自己的驗證,並增強或取代主體。 如需範例,包括:判斷您的服務是否知道憑證。
建構您自己的主體。 請考慮下列範例:
builder.Services.AddAuthentication(
        CertificateAuthenticationDefaults.AuthenticationScheme)
    .AddCertificate(options =>
    {
        options.Events = new CertificateAuthenticationEvents
        {
            OnCertificateValidated = context =>
            {
                var claims = new[]
                {
                    new Claim(
                        ClaimTypes.NameIdentifier,
                        context.ClientCertificate.Subject,
                        ClaimValueTypes.String, context.Options.ClaimsIssuer),
                    new Claim(
                        ClaimTypes.Name,
                        context.ClientCertificate.Subject,
                        ClaimValueTypes.String, context.Options.ClaimsIssuer)
                };

                context.Principal = new ClaimsPrincipal(
                    new ClaimsIdentity(claims, context.Scheme.Name));
                context.Success();

                return Task.CompletedTask;
            }
        };
    });
如果您發現輸入憑證不符合額外的驗證,請呼叫 context.Fail("failure reason") 且附有失敗原因。
如需更好的功能,請呼叫在相依性插入中註冊的服務,以連線到資料庫或其他類型的使用者存放區。 使用傳遞至委派的內容來存取服務。 請考慮下列範例:
builder.Services.AddAuthentication(
        CertificateAuthenticationDefaults.AuthenticationScheme)
    .AddCertificate(options =>
    {
        options.Events = new CertificateAuthenticationEvents
        {
            OnCertificateValidated = context =>
            {
                var validationService = context.HttpContext.RequestServices
                    .GetRequiredService<ICertificateValidationService>();

                if (validationService.ValidateCertificate(context.ClientCertificate))
                {
                    var claims = new[]
                    {
                        new Claim(
                            ClaimTypes.NameIdentifier,
                            context.ClientCertificate.Subject,
                            ClaimValueTypes.String, context.Options.ClaimsIssuer),
                        new Claim(
                            ClaimTypes.Name,
                            context.ClientCertificate.Subject,
                            ClaimValueTypes.String, context.Options.ClaimsIssuer)
                    };

                    context.Principal = new ClaimsPrincipal(
                        new ClaimsIdentity(claims, context.Scheme.Name));
                    context.Success();
                }

                return Task.CompletedTask;
            }
        };
    });
就概念而言,憑證的驗證是授權問題。 例如,在授權原則中加入對簽發者或指紋的檢查,而非在 OnCertificateValidated 內,是完全可以接受的。
將伺服器設定為需要憑證
Kestrel
在 Program.cs 中設定 Kestrel ,如下所示:
var builder = WebApplication.CreateBuilder(args);

builder.Services.Configure<KestrelServerOptions>(options =>
{
    options.ConfigureHttpsDefaults(options =>
        options.ClientCertificateMode = ClientCertificateMode.RequireCertificate);
});
注意
透過呼叫 Listen 之前呼叫 ConfigureHttpsDefaults 所建立的端點,不會套用預設值。
IIS
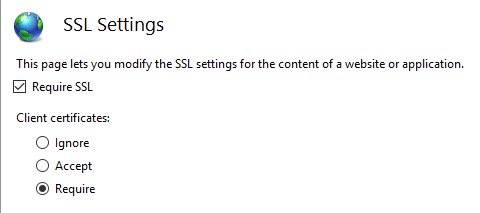
在 IIS 管理員中完成下列步驟:
- 從[連線]索引標籤中選取您的網站。
- 按兩下[功能檢視]視窗中的[SSL 設定]選項。
- 勾選[需要 SSL]核取方塊,然後選取[用戶端憑證]區段中的[需要]選項按鈕。
Azure 和自訂 Web Proxy
如需如何設定憑證轉送中介軟體,請參閱主機和部署檔。
在 Azure Web Apps 中使用憑證驗證
Azure 不需要轉送設定。 轉送設定是由憑證轉送中介軟體所設定。
注意
此案例需要憑證轉送中介軟體。
如需詳細資訊,請參閱在 Azure App Service 的程式碼中使用 TLS/SSL 憑證 (Azure 檔)。
在自訂 Web Proxy 中使用憑證驗證
AddCertificateForwarding 方法可用來指定:
- 用戶端標頭名稱。
- 如何載入憑證 (使用
HeaderConverter屬性)。
在自訂 Web Proxy 中,憑證會以自訂要求標頭的形式傳遞,例如 X-SSL-CERT。 若要使用它,請在 Program.cs 中設定憑證轉送:
builder.Services.AddCertificateForwarding(options =>
{
    options.CertificateHeader = "X-SSL-CERT";

    options.HeaderConverter = headerValue =>
    {
        X509Certificate2? clientCertificate = null;

        if (!string.IsNullOrWhiteSpace(headerValue))
        {
            clientCertificate = new X509Certificate2(StringToByteArray(headerValue));
        }

        return clientCertificate!;

        static byte[] StringToByteArray(string hex)
        {
            var numberChars = hex.Length;
            var bytes = new byte[numberChars / 2];

            for (int i = 0; i < numberChars; i += 2)
            {
                bytes[i / 2] = Convert.ToByte(hex.Substring(i, 2), 16);
            }

            return bytes;
        }
    };
});
如果 NGINX 使用設定 proxy_set_header ssl-client-cert $ssl_client_escaped_cert 或使用 NGINX 輸入在 Kubernetes 上部署的應用程式反向 Proxy,用戶端憑證會以 URL 編碼格式傳遞至應用程式。 若要使用憑證,請將它解碼如下:
builder.Services.AddCertificateForwarding(options =>
{
    options.CertificateHeader = "ssl-client-cert";

    options.HeaderConverter = (headerValue) =>
    {
        X509Certificate2? clientCertificate = null;

        if (!string.IsNullOrWhiteSpace(headerValue))
        {
            clientCertificate = X509Certificate2.CreateFromPem(
                WebUtility.UrlDecode(headerValue));
        }

        return clientCertificate!;
    };
});
在 Program.cs 中新增中介軟體。 呼叫 UseAuthentication 和 UseAuthorization 之前會呼叫 UseCertificateForwarding:
var app = builder.Build();

app.UseCertificateForwarding();

app.UseAuthentication();
app.UseAuthorization();
不同的類別可用來實作驗證邏輯。 因為在此範例中使用相同的自我簽署憑證,因此請確認只能使用您的憑證。 驗證用戶端憑證和伺服器憑證的指紋是否相符,否則可以使用任何憑證,而且足以進行驗證。 這會在 AddCertificate 方法內使用。 如果您使用中繼或子憑證,您也可以在這裡驗證主體或簽發者。
using System.Security.Cryptography.X509Certificates;

namespace CertAuthSample.Snippets;

public class SampleCertificateValidationService : ICertificateValidationService
{
    public bool ValidateCertificate(X509Certificate2 clientCertificate)
    {
        // Don't hardcode passwords in production code.
        // Use a certificate thumbprint or Azure Key Vault.
        var expectedCertificate = new X509Certificate2(
            Path.Combine("/path/to/pfx"), "1234");

        return clientCertificate.Thumbprint == expectedCertificate.Thumbprint;
    }
}
使用憑證和 IHttpClientFactory 實作 HttpClient
在下列範例中,用戶端憑證會使用來自處理常式的 ClientCertificates 屬性新增至 HttpClientHandler。 接著,這個處理常式可以使用 ConfigurePrimaryHttpMessageHandler 方法,在 HttpClient 的具名實例中使用。 這是在 Program.cs 中設定:
var clientCertificate =
    new X509Certificate2(
      Path.Combine(_environment.ContentRootPath, "sts_dev_cert.pfx"), "1234");

builder.Services.AddHttpClient("namedClient", c =>
{
}).ConfigurePrimaryHttpMessageHandler(() =>
{
    var handler = new HttpClientHandler();
    handler.ClientCertificates.Add(clientCertificate);
    return handler;
});
接著,您可以使用 IHttpClientFactory 來取得具有處理常式和憑證的具名實例。 在 Program.cs 中定義之用戶端名稱的 CreateClient 方法會用來取得實例。 您可以視需要使用用戶端來傳送 HTTP 要求:
public class SampleHttpService
{
    private readonly IHttpClientFactory _httpClientFactory;

    public SampleHttpService(IHttpClientFactory httpClientFactory)
        => _httpClientFactory = httpClientFactory;

    public async Task<JsonDocument> GetAsync()
    {
        var httpClient = _httpClientFactory.CreateClient("namedClient");
        var httpResponseMessage = await httpClient.GetAsync("https://example.com");

        if (httpResponseMessage.IsSuccessStatusCode)
        {
            return JsonDocument.Parse(
                await httpResponseMessage.Content.ReadAsStringAsync());
        }

        throw new ApplicationException($"Status code: {httpResponseMessage.StatusCode}");
    }
}
如果正確的憑證傳送至伺服器,則會傳回資料。 如果沒有傳送憑證或錯誤的憑證,則會傳回 HTTP 403 狀態碼。
在 PowerShell 中建立憑證
建立憑證是設定此流程中最困難的部分。 您可以使用 New-SelfSignedCertificate PowerShell Cmdlet 來建立根憑證。 建立憑證時,請使用強式密碼。 請務必新增 KeyUsageProperty 參數和 KeyUsage 參數,如下所示。
建立根 CA
New-SelfSignedCertificate -DnsName "root_ca_dev_damienbod.com", "root_ca_dev_damienbod.com" -CertStoreLocation "cert:\LocalMachine\My" -NotAfter (Get-Date).AddYears(20) -FriendlyName "root_ca_dev_damienbod.com" -KeyUsageProperty All -KeyUsage CertSign, CRLSign, DigitalSignature

$mypwd = ConvertTo-SecureString -String "1234" -Force -AsPlainText

Get-ChildItem -Path cert:\localMachine\my\"The thumbprint..." | Export-PfxCertificate -FilePath C:\git\root_ca_dev_damienbod.pfx -Password $mypwd

Export-Certificate -Cert cert:\localMachine\my\"The thumbprint..." -FilePath root_ca_dev_damienbod.crt
注意
-DnsName 參數值必須符合應用程式的部署目標。 例如,用於開發的「localhost。
在受信任的根目錄中安裝
您的主機系統上必須信任根憑證。 憑證授權單位單位未建立的根憑證預設不會受到信任。 如需如何在 Windows 上信任根憑證的資訊,請參閱此問題。
中繼憑證
中繼憑證現在可以從根憑證建立。 並非所有使用案例都需要此項目,但您可能需要建立許多憑證,或需要啟動或停用憑證群組。 需要 TextExtension 參數,才能在憑證的基本條件約束中設定路徑長度。
然後,中繼憑證可以新增至 Windows 主機系統中的受信任中繼憑證。
$mypwd = ConvertTo-SecureString -String "1234" -Force -AsPlainText

$parentcert = ( Get-ChildItem -Path cert:\LocalMachine\My\"The thumbprint of the root..." )

New-SelfSignedCertificate -certstorelocation cert:\localmachine\my -dnsname "intermediate_dev_damienbod.com" -Signer $parentcert -NotAfter (Get-Date).AddYears(20) -FriendlyName "intermediate_dev_damienbod.com" -KeyUsageProperty All -KeyUsage CertSign, CRLSign, DigitalSignature -TextExtension @("2.5.29.19={text}CA=1&pathlength=1")

Get-ChildItem -Path cert:\localMachine\my\"The thumbprint..." | Export-PfxCertificate -FilePath C:\git\AspNetCoreCertificateAuth\Certs\intermediate_dev_damienbod.pfx -Password $mypwd

Export-Certificate -Cert cert:\localMachine\my\"The thumbprint..." -FilePath intermediate_dev_damienbod.crt
從中繼憑證建立子憑證
子憑證可以從中繼憑證建立。 這是終端實體,不需要建立更多子憑證。
$parentcert = ( Get-ChildItem -Path cert:\LocalMachine\My\"The thumbprint from the Intermediate certificate..." )

New-SelfSignedCertificate -certstorelocation cert:\localmachine\my -dnsname "child_a_dev_damienbod.com" -Signer $parentcert -NotAfter (Get-Date).AddYears(20) -FriendlyName "child_a_dev_damienbod.com"

$mypwd = ConvertTo-SecureString -String "1234" -Force -AsPlainText

Get-ChildItem -Path cert:\localMachine\my\"The thumbprint..." | Export-PfxCertificate -FilePath C:\git\AspNetCoreCertificateAuth\Certs\child_a_dev_damienbod.pfx -Password $mypwd

Export-Certificate -Cert cert:\localMachine\my\"The thumbprint..." -FilePath child_a_dev_damienbod.crt
從根憑證建立子憑證
您也可以直接從根憑證建立子憑證。
$rootcert = ( Get-ChildItem -Path cert:\LocalMachine\My\"The thumbprint from the root cert..." )

New-SelfSignedCertificate -certstorelocation cert:\localmachine\my -dnsname "child_a_dev_damienbod.com" -Signer $rootcert -NotAfter (Get-Date).AddYears(20) -FriendlyName "child_a_dev_damienbod.com"

$mypwd = ConvertTo-SecureString -String "1234" -Force -AsPlainText

Get-ChildItem -Path cert:\localMachine\my\"The thumbprint..." | Export-PfxCertificate -FilePath C:\git\AspNetCoreCertificateAuth\Certs\child_a_dev_damienbod.pfx -Password $mypwd

Export-Certificate -Cert cert:\localMachine\my\"The thumbprint..." -FilePath child_a_dev_damienbod.crt
範例根 - 中繼憑證 - 憑證
$mypwdroot = ConvertTo-SecureString -String "1234" -Force -AsPlainText
$mypwd = ConvertTo-SecureString -String "1234" -Force -AsPlainText

New-SelfSignedCertificate -DnsName "root_ca_dev_damienbod.com", "root_ca_dev_damienbod.com" -CertStoreLocation "cert:\LocalMachine\My" -NotAfter (Get-Date).AddYears(20) -FriendlyName "root_ca_dev_damienbod.com" -KeyUsageProperty All -KeyUsage CertSign, CRLSign, DigitalSignature

Get-ChildItem -Path cert:\localMachine\my\0C89639E4E2998A93E423F919B36D4009A0F9991 | Export-PfxCertificate -FilePath C:\git\root_ca_dev_damienbod.pfx -Password $mypwdroot

Export-Certificate -Cert cert:\localMachine\my\0C89639E4E2998A93E423F919B36D4009A0F9991 -FilePath root_ca_dev_damienbod.crt

$rootcert = ( Get-ChildItem -Path cert:\LocalMachine\My\0C89639E4E2998A93E423F919B36D4009A0F9991 )

New-SelfSignedCertificate -certstorelocation cert:\localmachine\my -dnsname "child_a_dev_damienbod.com" -Signer $rootcert -NotAfter (Get-Date).AddYears(20) -FriendlyName "child_a_dev_damienbod.com" -KeyUsageProperty All -KeyUsage CertSign, CRLSign, DigitalSignature -TextExtension @("2.5.29.19={text}CA=1&pathlength=1")

Get-ChildItem -Path cert:\localMachine\my\BA9BF91ED35538A01375EFC212A2F46104B33A44 | Export-PfxCertificate -FilePath C:\git\AspNetCoreCertificateAuth\Certs\child_a_dev_damienbod.pfx -Password $mypwd

Export-Certificate -Cert cert:\localMachine\my\BA9BF91ED35538A01375EFC212A2F46104B33A44 -FilePath child_a_dev_damienbod.crt

$parentcert = ( Get-ChildItem -Path cert:\LocalMachine\My\BA9BF91ED35538A01375EFC212A2F46104B33A44 )

New-SelfSignedCertificate -certstorelocation cert:\localmachine\my -dnsname "child_b_from_a_dev_damienbod.com" -Signer $parentcert -NotAfter (Get-Date).AddYears(20) -FriendlyName "child_b_from_a_dev_damienbod.com"

Get-ChildItem -Path cert:\localMachine\my\141594A0AE38CBBECED7AF680F7945CD51D8F28A | Export-PfxCertificate -FilePath C:\git\AspNetCoreCertificateAuth\Certs\child_b_from_a_dev_damienbod.pfx -Password $mypwd

Export-Certificate -Cert cert:\localMachine\my\141594A0AE38CBBECED7AF680F7945CD51D8F28A -FilePath child_b_from_a_dev_damienbod.crt
使用根、中繼或子憑證時,憑證可以視需要使用指紋或 PublicKey 進行驗證:
using System.Security.Cryptography.X509Certificates;

namespace CertAuthSample.Snippets;

public class SampleCertificateThumbprintsValidationService : ICertificateValidationService
{
    private readonly string[] validThumbprints = new[]
    {
        "141594A0AE38CBBECED7AF680F7945CD51D8F28A",
        "0C89639E4E2998A93E423F919B36D4009A0F9991",
        "BA9BF91ED35538A01375EFC212A2F46104B33A44"
    };

    public bool ValidateCertificate(X509Certificate2 clientCertificate)
        => validThumbprints.Contains(clientCertificate.Thumbprint);
}
憑證驗證快取
ASP.NET Core 5.0 和更新版本支援啟用將驗證結果快取的能力。 快取可以大幅改善憑證驗證的效能,因為驗證是昂貴的作業。
根據預設,憑證驗證會停用快取。 若要啟用快取,請在 中 Program.cs 呼叫 AddCertificateCache:
builder.Services.AddAuthentication(
        CertificateAuthenticationDefaults.AuthenticationScheme)
    .AddCertificate()
    .AddCertificateCache(options =>
    {
        options.CacheSize = 1024;
        options.CacheEntryExpiration = TimeSpan.FromMinutes(2);
    });
預設快取實作會將結果儲存在記憶體中。 您可以實作 ICertificateValidationCache,並使用相依性插入將它註冊,以提供您自己的快取。 例如: services.AddSingleton<ICertificateValidationCache, YourCache>() 。
選擇性用戶端憑證
本節提供應用程式的資訊,這些應用程式必須使用憑證來保護應用程式的子集。 例如,應用程式中的 Razor 頁面或控制器可能需要用戶端憑證。 這會以用戶端憑證的形式呈現挑戰:
- 是 TLS 功能,而不是 HTTP 功能。
- 會針對每個連線進行交涉,通常是在連線開始時,才能取得任何 HTTP 資料。
實作選擇性用戶端憑證的方法有兩種:
- 使用不同的主機名稱 (SNI) 和重新導向。 雖然設定時需要要更多工作,但建議您這麼做,因為它適用於大部分的環境和通訊協定。
- 在 HTTP 要求期間重新交涉。 這樣會有一些限制,不建議使用。
個別主機 (SNI)
在連線開始時,只會知道伺服器名稱指示 (SNI)†。 每個主機名稱都可以設定用戶端憑證,讓一個主機需要它們,而另一個主機則不需要它們。
- 設定網域和子網域的繫結:
- 例如,在
contoso.com和myClient.contoso.com上設定繫結。contoso.com主機不需要用戶端憑證,但myClient.contoso.com需要。 - 如需詳細資訊,請參閱:
- 例如,在
ASP.NET Core 5 和更新版本新增了更方便的支援,可重新導向以取得選擇性用戶端憑證。 如需詳細資訊,請參閱選擇性憑證範例。
- 對於需要用戶端憑證且沒有用戶端憑證的 Web 應用程式要求:
- 使用受用戶端憑證保護的子網域,重新導向至相同的頁面。
- 例如,重新導向至
myClient.contoso.com/requestedPage。 由於myClient.contoso.com/requestedPage的要求與contoso.com/requestedPage不同,因此用戶端會建立不同的連線,並提供用戶端憑證。 - 如需詳細資訊,請參閱 ASP.NET Core 中的授權簡介。
†伺服器名稱指示 (SNI) 是 TLS 延伸模組,可將虛擬網域納入 SSL 交涉的一部分。 這實際上表示虛擬功能變數名稱或主機名稱可用來識別網路端點。
重新交涉
TLS 重新交涉是用戶端和伺服器可以重新評估個別連線的加密需求的程式,包括先前未提供用戶端憑證時要求提供。 TLS 重新交涉有安全性風險,不建議這麼做,因為:
- 在 HTTP/1.1 中,伺服器必須先緩衝或取用任何在正式發行前小眾測試中的 HTTP 資料,例如 POST 要求主體,以確保重新交涉的連線是清楚的。 否則,重新交涉可能會停止回應或失敗。
- HTTP/2 和 HTTP/3 明確禁止重新交涉。
- 重新交涉有安全性風險。 TLS 1.3 已移除整個連線的重新交涉,並將它取代為新的擴充功能,使得連線開始時只要求用戶端憑證。 此機制會透過相同的 API 公開,但仍受限於緩衝和 HTTP 通訊協定版本的先前條件約束。
這項功能的實作和設定因伺服器和架構版本而異。
IIS
IIS 會代表您管理用戶端憑證交涉。 應用程式的子區段可讓 SslRequireCert 選項交涉這些要求的用戶端憑證。 如需詳細資訊,請參閱 IIS 文件中的設定。
IIS 會在重新交涉之前,自動緩衝任何要求本文資料,直到達到設定的大小限制為止。 超過限制的要求會遭到 413 回應的拒絕。 此限制預設為 48KB,並可透過設定 uploadReadAheadSize 來設定。
HttpSys
HttpSys 有兩個設定可控制用戶端憑證交涉,而且兩者都應該設定。 第一個位於 netsh.exe 的 http add sslcert clientcertnegotiation=enable/disable 下。 此旗標表示用戶端憑證是否應在連線開始時交涉,且應設定為選擇性用戶端憑證的 disable。 如需詳細資訊,請參閱 netsh 文件。
另一個設定是 ClientCertificateMethod。 當設定為 AllowRenegotation 時,用戶端憑證可以在要求期間重新交涉。
注意應用程式應該先緩衝處理或取用任何要求本文資料,然後再嘗試重新交涉,否則該要求可能會變成沒有回應。
應用程式可以先檢查 ClientCertificate 屬性,以查看憑證是否可用。 如果無法使用,請先確認要求本文已取用,再呼叫 GetClientCertificateAsync 來交涉要求本文。 請注意,如果用戶端拒絕提供 null 憑證,GetClientCertificateAsync 可能會傳回 Null 憑證。
注意 .NET 6 中 ClientCertificate 屬性的行為已變更。 如需詳細資訊,請參閱這個 GitHub 問題。
Kestrel
Kestrel 使用 [ClientCertificateMode] 選項控制用戶端憑證交涉。
ClientCertificateMode.DelayCertificate 是 .NET 6 或更新版本中可用的新選項。 設定時,應用程式可以檢查 ClientCertificate 屬性,以查看憑證是否可用。 如果無法使用,請先確認要求本文已取用,再呼叫 GetClientCertificateAsync 來交涉要求本文。 請注意,如果用戶端拒絕提供 null 憑證,GetClientCertificateAsync 可能會傳回 Null 憑證。
注意應用程式應該先緩衝處理或取用任何要求本文資料,然後再嘗試重新談判,否則 GetClientCertificateAsync 可能會擲回 InvalidOperationException: Client stream needs to be drained before renegotiation.。
如果您是以程式設計方式設定每一主機的 TLS 設定,則 .NET 6 和更新版本中有新的 UseHttps 多載,可透過TlsHandshakeCallbackContext.AllowDelayedClientCertificateNegotation重新交涉TlsHandshakeCallbackOptions和控制用戶端憑證。
Microsoft.AspNetCore.Authentication.Certificate 包含類似 ASP.NET Core 憑證驗證的實作。 遠在到達 ASP.NET Core 之前,就會會在 TLS 層級發生憑證驗證。 更準確地說,這是一個驗證處理常式,該常式會驗證憑證,然後提供可將該憑證解析為 ClaimsPrincipal的事件。
設定您的伺服器進行憑證驗證,無論它是 IIS、Kestrel、Azure Web Apps 或您使用的任何其他工具。
Proxy 和負載平衡器案例
憑證驗證是一種具狀態情節,主要使用於 Proxy 或負載平衡器不會處理用戶端與伺服器之間流量的情況。 如果使用了 Proxy 或負載平衡器,則憑證驗證只有在 Proxy 或負載平衡器時才有效:
- 處理驗證。
- 將使用者驗證資訊傳遞至應用程式 (例如,在要求標頭中),以處理驗證資訊。
在使用 Proxy 和負載平衡器的環境中,憑證驗證的替代方案是 Active Directory 同盟服務 (ADFS) 搭配 OpenID Connect (OIDC)。
開始使用
取得 HTTPS 憑證、套用憑證,並將設定伺服器為需要憑證。
在您的 Web 應用程式中,新增對 Microsoft.AspNetCore.Authentication.Certificate 套件的參考。 然後在 Startup.ConfigureServices 方法中,使用您的選項呼叫 services.AddAuthentication(CertificateAuthenticationDefaults.AuthenticationScheme).AddCertificate(...);,提供委派給 OnCertificateValidated,以便對傳送要求的用戶端憑證執行任何補充驗證。 將該資訊轉換成 ClaimsPrincipal ,並在 context.Principal 屬性上加以設定。
如果驗證失敗,此處理程式會傳回 403 (Forbidden) 回應,而不是 401 (Unauthorized),正如您所預期。 原因是驗證應該在初始 TLS 連線期間發生。 到達達處理常式時,已經來不及了。 無法將連線從匿名連線升級為具有憑證的連線。
同時在 Startup.Configure 方法中新增 app.UseAuthentication();。 否則,HttpContext.User 將不會設定為從憑證建立的 ClaimsPrincipal。 例如:
public void ConfigureServices(IServiceCollection services)
{
    services.AddAuthentication(
        CertificateAuthenticationDefaults.AuthenticationScheme)
        .AddCertificate()
        // Adding an ICertificateValidationCache results in certificate auth caching the results.
        // The default implementation uses a memory cache.
        .AddCertificateCache();

    // All other service configuration
}

public void Configure(IApplicationBuilder app, IHostingEnvironment env)
{
    app.UseAuthentication();

    // All other app configuration
}
上述範例示範新增憑證驗證的預設方式。 處理常式會使用通用憑證屬性來建構使用者主體。
設定憑證驗證
處理常式 CertificateAuthenticationOptions 有一些內建驗證,這是您應該在憑證上執行的最小驗證。 每個設定預設都會啟用。
AllowedCertificateTypes = Chained, SelfSigned, 或 All (Chained | SelfSigned)
預設值:CertificateTypes.Chained
這項檢查會驗證只允許適當的憑證類型。 如果應用程式使用自我簽署憑證,則必須將此選項設定為 CertificateTypes.All 或 CertificateTypes.SelfSigned。
ValidateCertificateUse
預設值:true
這項檢查會驗證用戶端提供的憑證是否具有用戶端驗證延伸金鑰使用 (EKU),或完全沒有 EKU。 如規格所述,如果未指定 EKU,則所有 EKU 都會被視為有效。
ValidateValidityPeriod
預設值:true
這項檢查會驗證憑證是否在其有效期間內。 每個要求發生時,處理常式可確保呈現時為有效的憑證在目前會話期間尚未過期。
RevocationFlag
預設值:X509RevocationFlag.ExcludeRoot
旗標,指定鏈結中要檢查哪些憑證是否被撤銷。
只有在憑證鏈結至根憑證時,才會執行撤銷檢查。
RevocationMode
預設值:X509RevocationMode.Online
旗標,指定撤銷檢查的執行方式。
連絡憑證授權單位時,指定線上檢查可能會導致長時間的延遲。
只有在憑證鏈結至根憑證時,才會執行撤銷檢查。
我可以將應用程式設定為只在特定路徑上要求憑證嗎?
這是不可能的。 請記住,憑證交換是在 HTTPS 交談開始時完成的,伺服器會在該連線上收到第一個要求之前完成,因此無法根據任何要求欄位來設定範圍。
處理常式事件
處理常式有兩個事件:
OnAuthenticationFailed:如果在驗證期間發生例外狀況,則會進行呼叫,並可讓您做出反應。OnCertificateValidated:在驗證憑證、通過驗證和建立預設主體之後呼叫。 此事件可讓您執行自己的驗證,並增強或取代主體。 如需範例,包括:判斷您的服務是否知道憑證。
建構您自己的主體。 請考慮
Startup.ConfigureServices中的下列範例:services.AddAuthentication( CertificateAuthenticationDefaults.AuthenticationScheme) .AddCertificate(options => { options.Events = new CertificateAuthenticationEvents { OnCertificateValidated = context => { var claims = new[] { new Claim( ClaimTypes.NameIdentifier, context.ClientCertificate.Subject, ClaimValueTypes.String, context.Options.ClaimsIssuer), new Claim(ClaimTypes.Name, context.ClientCertificate.Subject, ClaimValueTypes.String, context.Options.ClaimsIssuer) }; context.Principal = new ClaimsPrincipal( new ClaimsIdentity(claims, context.Scheme.Name)); context.Success(); return Task.CompletedTask; } }; });
如果您發現輸入憑證不符合額外的驗證,請呼叫 context.Fail("failure reason") 且附有失敗原因。
針對實際功能,您可能想要呼叫在相依性插入中註冊的服務,以連線到資料庫或其他類型的使用者存放區。 使用傳遞至委派的內容來存取您的服務。 請考慮 Startup.ConfigureServices 中的下列範例:
services.AddAuthentication(
    CertificateAuthenticationDefaults.AuthenticationScheme)
    .AddCertificate(options =>
    {
        options.Events = new CertificateAuthenticationEvents
        {
            OnCertificateValidated = context =>
            {
                var validationService =
                    context.HttpContext.RequestServices
                        .GetRequiredService<ICertificateValidationService>();

                if (validationService.ValidateCertificate(
                    context.ClientCertificate))
                {
                    var claims = new[]
                    {
                        new Claim(
                            ClaimTypes.NameIdentifier,
                            context.ClientCertificate.Subject,
                            ClaimValueTypes.String,
                            context.Options.ClaimsIssuer),
                        new Claim(
                            ClaimTypes.Name,
                            context.ClientCertificate.Subject,
                            ClaimValueTypes.String,
                            context.Options.ClaimsIssuer)
                    };

                    context.Principal = new ClaimsPrincipal(
                        new ClaimsIdentity(claims, context.Scheme.Name));
                    context.Success();
                }

                return Task.CompletedTask;
            }
        };
    });
就概念而言,憑證的驗證是授權問題。 例如,在授權原則中加入對簽發者或指紋的檢查,而非在 OnCertificateValidated 內,是完全可以接受的。
將伺服器設定為需要憑證
Kestrel
在 Program.cs 中設定 Kestrel ,如下所示:
public static void Main(string[] args)
{
    CreateHostBuilder(args).Build().Run();
}

public static IHostBuilder CreateHostBuilder(string[] args)
{
    return Host.CreateDefaultBuilder(args)
        .ConfigureWebHostDefaults(webBuilder =>
        {
            webBuilder.UseStartup<Startup>();
            webBuilder.ConfigureKestrel(o =>
            {
                o.ConfigureHttpsDefaults(o =>
                    o.ClientCertificateMode =  ClientCertificateMode.RequireCertificate);
            });
        });
}
注意
透過呼叫 Listen 之前呼叫 ConfigureHttpsDefaults 所建立的端點,不會套用預設值。
IIS
在 IIS 管理員中完成下列步驟:
- 從[連線]索引標籤中選取您的網站。
- 按兩下[功能檢視]視窗中的[SSL 設定]選項。
- 勾選[需要 SSL]核取方塊,然後選取[用戶端憑證]區段中的[需要]選項按鈕。
Azure 和自訂 Web Proxy
如需如何設定憑證轉送中介軟體,請參閱主機和部署檔。
在 Azure Web Apps 中使用憑證驗證
Azure 不需要轉送設定。 轉送設定是由憑證轉送中介軟體所設定。
注意
此案例需要憑證轉送中介軟體。
如需詳細資訊,請參閱在 Azure App Service 的程式碼中使用 TLS/SSL 憑證 (Azure 檔)。
在自訂 Web Proxy 中使用憑證驗證
AddCertificateForwarding 方法可用來指定:
- 用戶端標頭名稱。
- 如何載入憑證 (使用
HeaderConverter屬性)。
在自訂 Web Proxy 中,憑證會以自訂要求標頭的形式傳遞,例如 X-SSL-CERT。 若要使用它,請在 Startup.ConfigureServices 中設定憑證轉送:
public void ConfigureServices(IServiceCollection services)
{
    services.AddCertificateForwarding(options =>
    {
        options.CertificateHeader = "X-SSL-CERT";
        options.HeaderConverter = (headerValue) =>
        {
            X509Certificate2 clientCertificate = null;

            if(!string.IsNullOrWhiteSpace(headerValue))
            {
                byte[] bytes = StringToByteArray(headerValue);
                clientCertificate = new X509Certificate2(bytes);
            }

            return clientCertificate;
        };
    });
}

private static byte[] StringToByteArray(string hex)
{
    int NumberChars = hex.Length;
    byte[] bytes = new byte[NumberChars / 2];

    for (int i = 0; i < NumberChars; i += 2)
    {
        bytes[i / 2] = Convert.ToByte(hex.Substring(i, 2), 16);
    }

    return bytes;
}
如果 NGINX 使用設定 proxy_set_header ssl-client-cert $ssl_client_escaped_cert 或使用 NGINX 輸入在 Kubernetes 上部署的應用程式反向 Proxy,用戶端憑證會以 URL 編碼格式傳遞至應用程式。 若要使用憑證,請將它解碼如下:
在 Startup.ConfigureServices (Startup.cs) 中:
services.AddCertificateForwarding(options =>
{
    options.CertificateHeader = "ssl-client-cert";
    options.HeaderConverter = (headerValue) =>
    {
        X509Certificate2 clientCertificate = null;

        if (!string.IsNullOrWhiteSpace(headerValue))
        {
            string certPem = WebUtility.UrlDecode(headerValue);
            clientCertificate = X509Certificate2.CreateFromPem(certPem);
        }

        return clientCertificate;
    };
});
Startup.Configure 方法接著會新增中介軟體。 呼叫 UseAuthentication 和 UseAuthorization 之前會呼叫 UseCertificateForwarding:
public void Configure(IApplicationBuilder app, IWebHostEnvironment env)
{
    ...

    app.UseRouting();

    app.UseCertificateForwarding();
    app.UseAuthentication();
    app.UseAuthorization();

    app.UseEndpoints(endpoints =>
    {
        endpoints.MapControllers();
    });
}
不同的類別可用來實作驗證邏輯。 因為在此範例中使用相同的自我簽署憑證,因此請確認只能使用您的憑證。 驗證用戶端憑證和伺服器憑證的指紋是否相符,否則可以使用任何憑證,而且足以進行驗證。 這會在 AddCertificate 方法內使用。 如果您使用中繼或子憑證,您也可以在這裡驗證主體或簽發者。
using System.IO;
using System.Security.Cryptography.X509Certificates;

namespace AspNetCoreCertificateAuthApi
{
    public class MyCertificateValidationService
    {
        public bool ValidateCertificate(X509Certificate2 clientCertificate)
        {
            // Do not hardcode passwords in production code
            // Use thumbprint or key vault
            var cert = new X509Certificate2(
                Path.Combine("sts_dev_cert.pfx"), "1234");

            if (clientCertificate.Thumbprint == cert.Thumbprint)
            {
                return true;
            }

            return false;
        }
    }
}
使用憑證和 HttpClientHandler 實作 HttpClient
HttpClientHandler 可以直接新增到 HttpClient 類別的建構函式中。 建立 HttpClient 實例時應該小心。 接著,對於每個要求 HttpClient 都會傳送憑證。
private async Task<JsonDocument> GetApiDataUsingHttpClientHandler()
{
    var cert = new X509Certificate2(Path.Combine(_environment.ContentRootPath, "sts_dev_cert.pfx"), "1234");
    var handler = new HttpClientHandler();
    handler.ClientCertificates.Add(cert);
    var client = new HttpClient(handler);

    var request = new HttpRequestMessage()
    {
        RequestUri = new Uri("https://localhost:44379/api/values"),
        Method = HttpMethod.Get,
    };
    var response = await client.SendAsync(request);
    if (response.IsSuccessStatusCode)
    {
        var responseContent = await response.Content.ReadAsStringAsync();
        var data = JsonDocument.Parse(responseContent);
        return data;
    }

    throw new ApplicationException($"Status code: {response.StatusCode}, Error: {response.ReasonPhrase}");
}
使用憑證和來自 IHttpClientFactory 的具名 HttpClient 來實作 HttpClient
在下列範例中,用戶端憑證會使用來自處理常式的 ClientCertificates 屬性新增至 HttpClientHandler。 接著,這個處理常式可以使用 ConfigurePrimaryHttpMessageHandler 方法,在 HttpClient 的具名實例中使用。 這是在 Startup.ConfigureServices 中設定:
var clientCertificate =
    new X509Certificate2(
      Path.Combine(_environment.ContentRootPath, "sts_dev_cert.pfx"), "1234");

services.AddHttpClient("namedClient", c =>
{
}).ConfigurePrimaryHttpMessageHandler(() =>
{
    var handler = new HttpClientHandler();
    handler.ClientCertificates.Add(clientCertificate);
    return handler;
});
接著,您可以使用 IHttpClientFactory 來取得具有處理常式和憑證的具名實例。 在 Startup 類別中定義的用戶端名稱的 CreateClient 方法會用來取得實例。 您可以視需要使用用戶端傳送 HTTP 要求。
private readonly IHttpClientFactory _clientFactory;

public ApiService(IHttpClientFactory clientFactory)
{
    _clientFactory = clientFactory;
}

private async Task<JsonDocument> GetApiDataWithNamedClient()
{
    var client = _clientFactory.CreateClient("namedClient");

    var request = new HttpRequestMessage()
    {
        RequestUri = new Uri("https://localhost:44379/api/values"),
        Method = HttpMethod.Get,
    };
    var response = await client.SendAsync(request);
    if (response.IsSuccessStatusCode)
    {
        var responseContent = await response.Content.ReadAsStringAsync();
        var data = JsonDocument.Parse(responseContent);
        return data;
    }

    throw new ApplicationException($"Status code: {response.StatusCode}, Error: {response.ReasonPhrase}");
}
如果正確的憑證傳送至伺服器,則會傳回資料。 如果沒有傳送憑證或錯誤的憑證,則會傳回 HTTP 403 狀態碼。
在 PowerShell 中建立憑證
建立憑證是設定此流程中最困難的部分。 您可以使用 New-SelfSignedCertificate PowerShell Cmdlet 來建立根憑證。 建立憑證時,請使用強式密碼。 請務必新增 KeyUsageProperty 參數和 KeyUsage 參數,如下所示。
建立根 CA
New-SelfSignedCertificate -DnsName "root_ca_dev_damienbod.com", "root_ca_dev_damienbod.com" -CertStoreLocation "cert:\LocalMachine\My" -NotAfter (Get-Date).AddYears(20) -FriendlyName "root_ca_dev_damienbod.com" -KeyUsageProperty All -KeyUsage CertSign, CRLSign, DigitalSignature

$mypwd = ConvertTo-SecureString -String "1234" -Force -AsPlainText

Get-ChildItem -Path cert:\localMachine\my\"The thumbprint..." | Export-PfxCertificate -FilePath C:\git\root_ca_dev_damienbod.pfx -Password $mypwd

Export-Certificate -Cert cert:\localMachine\my\"The thumbprint..." -FilePath root_ca_dev_damienbod.crt
注意
-DnsName 參數值必須符合應用程式的部署目標。 例如,用於開發的「localhost。
在受信任的根目錄中安裝
您的主機系統上必須信任根憑證。 憑證授權單位單位未建立的根憑證預設不會受到信任。 如需如何在 Windows 上信任根憑證的資訊,請參閱此問題。
中繼憑證
中繼憑證現在可以從根憑證建立。 並非所有使用案例都需要此項目,但您可能需要建立許多憑證,或需要啟動或停用憑證群組。 需要 TextExtension 參數,才能在憑證的基本條件約束中設定路徑長度。
然後,中繼憑證可以新增至 Windows 主機系統中的受信任中繼憑證。
$mypwd = ConvertTo-SecureString -String "1234" -Force -AsPlainText

$parentcert = ( Get-ChildItem -Path cert:\LocalMachine\My\"The thumbprint of the root..." )

New-SelfSignedCertificate -certstorelocation cert:\localmachine\my -dnsname "intermediate_dev_damienbod.com" -Signer $parentcert -NotAfter (Get-Date).AddYears(20) -FriendlyName "intermediate_dev_damienbod.com" -KeyUsageProperty All -KeyUsage CertSign, CRLSign, DigitalSignature -TextExtension @("2.5.29.19={text}CA=1&pathlength=1")

Get-ChildItem -Path cert:\localMachine\my\"The thumbprint..." | Export-PfxCertificate -FilePath C:\git\AspNetCoreCertificateAuth\Certs\intermediate_dev_damienbod.pfx -Password $mypwd

Export-Certificate -Cert cert:\localMachine\my\"The thumbprint..." -FilePath intermediate_dev_damienbod.crt
從中繼憑證建立子憑證
子憑證可以從中繼憑證建立。 這是終端實體,不需要建立更多子憑證。
$parentcert = ( Get-ChildItem -Path cert:\LocalMachine\My\"The thumbprint from the Intermediate certificate..." )

New-SelfSignedCertificate -certstorelocation cert:\localmachine\my -dnsname "child_a_dev_damienbod.com" -Signer $parentcert -NotAfter (Get-Date).AddYears(20) -FriendlyName "child_a_dev_damienbod.com"

$mypwd = ConvertTo-SecureString -String "1234" -Force -AsPlainText

Get-ChildItem -Path cert:\localMachine\my\"The thumbprint..." | Export-PfxCertificate -FilePath C:\git\AspNetCoreCertificateAuth\Certs\child_a_dev_damienbod.pfx -Password $mypwd

Export-Certificate -Cert cert:\localMachine\my\"The thumbprint..." -FilePath child_a_dev_damienbod.crt
從根憑證建立子憑證
您也可以直接從根憑證建立子憑證。
$rootcert = ( Get-ChildItem -Path cert:\LocalMachine\My\"The thumbprint from the root cert..." )

New-SelfSignedCertificate -certstorelocation cert:\localmachine\my -dnsname "child_a_dev_damienbod.com" -Signer $rootcert -NotAfter (Get-Date).AddYears(20) -FriendlyName "child_a_dev_damienbod.com"

$mypwd = ConvertTo-SecureString -String "1234" -Force -AsPlainText

Get-ChildItem -Path cert:\localMachine\my\"The thumbprint..." | Export-PfxCertificate -FilePath C:\git\AspNetCoreCertificateAuth\Certs\child_a_dev_damienbod.pfx -Password $mypwd

Export-Certificate -Cert cert:\localMachine\my\"The thumbprint..." -FilePath child_a_dev_damienbod.crt
範例根 - 中繼憑證 - 憑證
$mypwdroot = ConvertTo-SecureString -String "1234" -Force -AsPlainText
$mypwd = ConvertTo-SecureString -String "1234" -Force -AsPlainText

New-SelfSignedCertificate -DnsName "root_ca_dev_damienbod.com", "root_ca_dev_damienbod.com" -CertStoreLocation "cert:\LocalMachine\My" -NotAfter (Get-Date).AddYears(20) -FriendlyName "root_ca_dev_damienbod.com" -KeyUsageProperty All -KeyUsage CertSign, CRLSign, DigitalSignature

Get-ChildItem -Path cert:\localMachine\my\0C89639E4E2998A93E423F919B36D4009A0F9991 | Export-PfxCertificate -FilePath C:\git\root_ca_dev_damienbod.pfx -Password $mypwdroot

Export-Certificate -Cert cert:\localMachine\my\0C89639E4E2998A93E423F919B36D4009A0F9991 -FilePath root_ca_dev_damienbod.crt

$rootcert = ( Get-ChildItem -Path cert:\LocalMachine\My\0C89639E4E2998A93E423F919B36D4009A0F9991 )

New-SelfSignedCertificate -certstorelocation cert:\localmachine\my -dnsname "child_a_dev_damienbod.com" -Signer $rootcert -NotAfter (Get-Date).AddYears(20) -FriendlyName "child_a_dev_damienbod.com" -KeyUsageProperty All -KeyUsage CertSign, CRLSign, DigitalSignature -TextExtension @("2.5.29.19={text}CA=1&pathlength=1")

Get-ChildItem -Path cert:\localMachine\my\BA9BF91ED35538A01375EFC212A2F46104B33A44 | Export-PfxCertificate -FilePath C:\git\AspNetCoreCertificateAuth\Certs\child_a_dev_damienbod.pfx -Password $mypwd

Export-Certificate -Cert cert:\localMachine\my\BA9BF91ED35538A01375EFC212A2F46104B33A44 -FilePath child_a_dev_damienbod.crt

$parentcert = ( Get-ChildItem -Path cert:\LocalMachine\My\BA9BF91ED35538A01375EFC212A2F46104B33A44 )

New-SelfSignedCertificate -certstorelocation cert:\localmachine\my -dnsname "child_b_from_a_dev_damienbod.com" -Signer $parentcert -NotAfter (Get-Date).AddYears(20) -FriendlyName "child_b_from_a_dev_damienbod.com"

Get-ChildItem -Path cert:\localMachine\my\141594A0AE38CBBECED7AF680F7945CD51D8F28A | Export-PfxCertificate -FilePath C:\git\AspNetCoreCertificateAuth\Certs\child_b_from_a_dev_damienbod.pfx -Password $mypwd

Export-Certificate -Cert cert:\localMachine\my\141594A0AE38CBBECED7AF680F7945CD51D8F28A -FilePath child_b_from_a_dev_damienbod.crt
使用根、中繼或子憑證時,您可以視需要使用指紋或 PublicKey 來驗證憑證。
using System.Collections.Generic;
using System.IO;
using System.Security.Cryptography.X509Certificates;

namespace AspNetCoreCertificateAuthApi
{
    public class MyCertificateValidationService
    {
        public bool ValidateCertificate(X509Certificate2 clientCertificate)
        {
            return CheckIfThumbprintIsValid(clientCertificate);
        }

        private bool CheckIfThumbprintIsValid(X509Certificate2 clientCertificate)
        {
            var listOfValidThumbprints = new List<string>
            {
                "141594A0AE38CBBECED7AF680F7945CD51D8F28A",
                "0C89639E4E2998A93E423F919B36D4009A0F9991",
                "BA9BF91ED35538A01375EFC212A2F46104B33A44"
            };

            if (listOfValidThumbprints.Contains(clientCertificate.Thumbprint))
            {
                return true;
            }

            return false;
        }
    }
}
憑證驗證快取
ASP.NET Core 5.0 和更新版本支援啟用將驗證結果快取的能力。 快取可以大幅改善憑證驗證的效能,因為驗證是昂貴的作業。
根據預設,憑證驗證會停用快取。 若要啟用快取,請在 中 Startup.ConfigureServices 呼叫 AddCertificateCache:
public void ConfigureServices(IServiceCollection services)
{
    services.AddAuthentication(
        CertificateAuthenticationDefaults.AuthenticationScheme)
            .AddCertificate()
            .AddCertificateCache(options =>
            {
                options.CacheSize = 1024;
                options.CacheEntryExpiration = TimeSpan.FromMinutes(2);
            });
}
預設快取實作會將結果儲存在記憶體中。 您可以實作 ICertificateValidationCache,並使用相依性插入將它註冊,以提供您自己的快取。 例如: services.AddSingleton<ICertificateValidationCache, YourCache>() 。
選擇性用戶端憑證
本節提供應用程式的資訊,這些應用程式必須使用憑證來保護應用程式的子集。 例如,應用程式中的 Razor 頁面或控制器可能需要用戶端憑證。 這會以用戶端憑證的形式呈現挑戰:
- 是 TLS 功能,而不是 HTTP 功能。
- 會針對每個連線進行交涉,通常是在連線開始時,才能取得任何 HTTP 資料。
實作選擇性用戶端憑證的方法有兩種:
- 使用不同的主機名稱 (SNI) 和重新導向。 雖然設定時需要要更多工作,但建議您這麼做,因為它適用於大部分的環境和通訊協定。
- 在 HTTP 要求期間重新交涉。 這樣會有一些限制,不建議使用。
個別主機 (SNI)
在連線開始時,只會知道伺服器名稱指示 (SNI)†。 每個主機名稱都可以設定用戶端憑證,讓一個主機需要它們,而另一個主機則不需要它們。
- 設定網域和子網域的繫結:
- 例如,在
contoso.com和myClient.contoso.com上設定繫結。contoso.com主機不需要用戶端憑證,但myClient.contoso.com需要。 - 如需詳細資訊,請參閱:
- 例如,在
ASP.NET Core 5 和更新版本新增了更方便的支援,可重新導向以取得選擇性用戶端憑證。 如需詳細資訊,請參閱選擇性憑證範例。
- 對於需要用戶端憑證且沒有用戶端憑證的 Web 應用程式要求:
- 使用受用戶端憑證保護的子網域,重新導向至相同的頁面。
- 例如,重新導向至
myClient.contoso.com/requestedPage。 由於myClient.contoso.com/requestedPage的要求與contoso.com/requestedPage不同,因此用戶端會建立不同的連線,並提供用戶端憑證。 - 如需詳細資訊,請參閱 ASP.NET Core 中的授權簡介。
†伺服器名稱指示 (SNI) 是 TLS 延伸模組,可將虛擬網域納入 SSL 交涉的一部分。 這實際上表示虛擬功能變數名稱或主機名稱可用來識別網路端點。
重新交涉
TLS 重新交涉是用戶端和伺服器可以重新評估個別連線的加密需求的程式,包括先前未提供用戶端憑證時要求提供。 TLS 重新交涉有安全性風險,不建議這麼做,因為:
- 在 HTTP/1.1 中,伺服器必須先緩衝或取用任何在正式發行前小眾測試中的 HTTP 資料,例如 POST 要求主體,以確保重新交涉的連線是清楚的。 否則,重新交涉可能會停止回應或失敗。
- HTTP/2 和 HTTP/3 明確禁止重新交涉。
- 重新交涉有安全性風險。 TLS 1.3 已移除整個連線的重新交涉,並將它取代為新的擴充功能,使得連線開始時只要求用戶端憑證。 此機制會透過相同的 API 公開,但仍受限於緩衝和 HTTP 通訊協定版本的先前條件約束。
這項功能的實作和設定因伺服器和架構版本而異。
IIS
IIS 會代表您管理用戶端憑證交涉。 應用程式的子區段可讓 SslRequireCert 選項交涉這些要求的用戶端憑證。 如需詳細資訊,請參閱 IIS 文件中的設定。
IIS 會在重新交涉之前,自動緩衝任何要求本文資料,直到達到設定的大小限制為止。 超過限制的要求會遭到 413 回應的拒絕。 此限制預設為 48KB,並可透過設定 uploadReadAheadSize 來設定。
HttpSys
HttpSys 有兩個設定可控制用戶端憑證交涉,而且兩者都應該設定。 第一個位於 netsh.exe 的 http add sslcert clientcertnegotiation=enable/disable 下。 此旗標表示用戶端憑證是否應在連線開始時交涉,且應設定為選擇性用戶端憑證的 disable。 如需詳細資訊,請參閱 netsh 文件。
另一個設定是 ClientCertificateMethod。 當設定為 AllowRenegotation 時,用戶端憑證可以在要求期間重新交涉。
注意應用程式應該先緩衝處理或取用任何要求本文資料,然後再嘗試重新交涉,否則該要求可能會變成沒有回應。
啟用 AllowRenegotation 時有一已知問題,會導致在存取 ClientCertificate 屬性時同步發生重新交涉。 呼叫 GetClientCertificateAsync 方法來避免這種情況。 在 .NET 6 中此問題已解決。 如需詳細資訊,請參閱這個 GitHub 問題。 請注意,如果用戶端拒絕提供 null 憑證,GetClientCertificateAsync 可能會傳回 Null 憑證。
Kestrel
Kestrel 使用 [ClientCertificateMode] 選項控制用戶端憑證交涉。
針對 .NET 5 和更早版本,Kestrel 不支援在連線開始之後重新交涉以取得用戶端憑證。 這項功能已在 .NET 6 中新增。
Microsoft.AspNetCore.Authentication.Certificate 包含類似 ASP.NET Core 憑證驗證的實作。 遠在到達 ASP.NET Core 之前,就會會在 TLS 層級發生憑證驗證。 更準確地說,這是一個驗證處理常式,該常式會驗證憑證,然後提供可將該憑證解析為 ClaimsPrincipal的事件。
設定您的伺服器進行憑證驗證,無論它是 IIS、Kestrel、Azure Web Apps 或您使用的任何其他工具。
Proxy 和負載平衡器案例
憑證驗證是一種具狀態情節,主要使用於 Proxy 或負載平衡器不會處理用戶端與伺服器之間流量的情況。 如果使用了 Proxy 或負載平衡器,則憑證驗證只有在 Proxy 或負載平衡器時才有效:
- 處理驗證。
- 將使用者驗證資訊傳遞至應用程式 (例如,在要求標頭中),以處理驗證資訊。
在使用 Proxy 和負載平衡器的環境中,憑證驗證的替代方案是 Active Directory 同盟服務 (ADFS) 搭配 OpenID Connect (OIDC)。
開始使用
取得 HTTPS 憑證、套用憑證,並將設定伺服器為需要憑證。
在您的 Web 應用程式中,新增對 Microsoft.AspNetCore.Authentication.Certificate 套件的參考。 然後在 Startup.ConfigureServices 方法中,使用您的選項呼叫 services.AddAuthentication(CertificateAuthenticationDefaults.AuthenticationScheme).AddCertificate(...);,提供委派給 OnCertificateValidated,以便對傳送要求的用戶端憑證執行任何補充驗證。 將該資訊轉換成 ClaimsPrincipal ,並在 context.Principal 屬性上加以設定。
如果驗證失敗,此處理程式會傳回 403 (Forbidden) 回應,而不是 401 (Unauthorized),正如您所預期。 原因是驗證應該在初始 TLS 連線期間發生。 到達達處理常式時,已經來不及了。 無法將連線從匿名連線升級為具有憑證的連線。
同時在 Startup.Configure 方法中新增 app.UseAuthentication();。 否則,HttpContext.User 將不會設定為從憑證建立的 ClaimsPrincipal。 例如:
public void ConfigureServices(IServiceCollection services)
{
    services.AddAuthentication(
        CertificateAuthenticationDefaults.AuthenticationScheme)
        .AddCertificate();

    // All other service configuration
}

public void Configure(IApplicationBuilder app, IHostingEnvironment env)
{
    app.UseAuthentication();

    // All other app configuration
}
上述範例示範新增憑證驗證的預設方式。 處理常式會使用通用憑證屬性來建構使用者主體。
設定憑證驗證
處理常式 CertificateAuthenticationOptions 有一些內建驗證,這是您應該在憑證上執行的最小驗證。 每個設定預設都會啟用。
AllowedCertificateTypes = Chained, SelfSigned, 或 All (Chained | SelfSigned)
預設值:CertificateTypes.Chained
這項檢查會驗證只允許適當的憑證類型。 如果應用程式使用自我簽署憑證,則必須將此選項設定為 CertificateTypes.All 或 CertificateTypes.SelfSigned。
ValidateCertificateUse
預設值:true
這項檢查會驗證用戶端提供的憑證是否具有用戶端驗證延伸金鑰使用 (EKU),或完全沒有 EKU。 如規格所述,如果未指定 EKU,則所有 EKU 都會被視為有效。
ValidateValidityPeriod
預設值:true
這項檢查會驗證憑證是否在其有效期間內。 每個要求發生時,處理常式可確保呈現時為有效的憑證在目前會話期間尚未過期。
RevocationFlag
預設值:X509RevocationFlag.ExcludeRoot
旗標,指定鏈結中要檢查哪些憑證是否被撤銷。
只有在憑證鏈結至根憑證時,才會執行撤銷檢查。
RevocationMode
預設值:X509RevocationMode.Online
旗標,指定撤銷檢查的執行方式。
連絡憑證授權單位時,指定線上檢查可能會導致長時間的延遲。
只有在憑證鏈結至根憑證時,才會執行撤銷檢查。
我可以將應用程式設定為只在特定路徑上要求憑證嗎?
這是不可能的。 請記住,憑證交換是在 HTTPS 交談開始時完成的,伺服器會在該連線上收到第一個要求之前完成,因此無法根據任何要求欄位來設定範圍。
處理常式事件
處理常式有兩個事件:
OnAuthenticationFailed:如果在驗證期間發生例外狀況,則會進行呼叫,並可讓您做出反應。OnCertificateValidated:在驗證憑證、通過驗證和建立預設主體之後呼叫。 此事件可讓您執行自己的驗證,並增強或取代主體。 如需範例,包括:判斷您的服務是否知道憑證。
建構您自己的主體。 請考慮
Startup.ConfigureServices中的下列範例:services.AddAuthentication( CertificateAuthenticationDefaults.AuthenticationScheme) .AddCertificate(options => { options.Events = new CertificateAuthenticationEvents { OnCertificateValidated = context => { var claims = new[] { new Claim( ClaimTypes.NameIdentifier, context.ClientCertificate.Subject, ClaimValueTypes.String, context.Options.ClaimsIssuer), new Claim(ClaimTypes.Name, context.ClientCertificate.Subject, ClaimValueTypes.String, context.Options.ClaimsIssuer) }; context.Principal = new ClaimsPrincipal( new ClaimsIdentity(claims, context.Scheme.Name)); context.Success(); return Task.CompletedTask; } }; });
如果您發現輸入憑證不符合額外的驗證,請呼叫 context.Fail("failure reason") 且附有失敗原因。
針對實際功能,您可能想要呼叫在相依性插入中註冊的服務,以連線到資料庫或其他類型的使用者存放區。 使用傳遞至委派的內容來存取您的服務。 請考慮 Startup.ConfigureServices 中的下列範例:
services.AddAuthentication(
    CertificateAuthenticationDefaults.AuthenticationScheme)
    .AddCertificate(options =>
    {
        options.Events = new CertificateAuthenticationEvents
        {
            OnCertificateValidated = context =>
            {
                var validationService =
                    context.HttpContext.RequestServices
                        .GetRequiredService<ICertificateValidationService>();

                if (validationService.ValidateCertificate(
                    context.ClientCertificate))
                {
                    var claims = new[]
                    {
                        new Claim(
                            ClaimTypes.NameIdentifier,
                            context.ClientCertificate.Subject,
                            ClaimValueTypes.String,
                            context.Options.ClaimsIssuer),
                        new Claim(
                            ClaimTypes.Name,
                            context.ClientCertificate.Subject,
                            ClaimValueTypes.String,
                            context.Options.ClaimsIssuer)
                    };

                    context.Principal = new ClaimsPrincipal(
                        new ClaimsIdentity(claims, context.Scheme.Name));
                    context.Success();
                }

                return Task.CompletedTask;
            }
        };
    });
就概念而言,憑證的驗證是授權問題。 例如,在授權原則中加入對簽發者或指紋的檢查,而非在 OnCertificateValidated 內,是完全可以接受的。
將伺服器設定為需要憑證
Kestrel
在 Program.cs 中設定 Kestrel ,如下所示:
public static void Main(string[] args)
{
    CreateHostBuilder(args).Build().Run();
}

public static IHostBuilder CreateHostBuilder(string[] args)
{
    return Host.CreateDefaultBuilder(args)
        .ConfigureWebHostDefaults(webBuilder =>
        {
            webBuilder.UseStartup<Startup>();
            webBuilder.ConfigureKestrel(o =>
            {
                o.ConfigureHttpsDefaults(o =>
                    o.ClientCertificateMode =  ClientCertificateMode.RequireCertificate);
            });
        });
}
注意
透過呼叫 Listen 之前呼叫 ConfigureHttpsDefaults 所建立的端點,不會套用預設值。
IIS
在 IIS 管理員中完成下列步驟:
- 從[連線]索引標籤中選取您的網站。
- 按兩下[功能檢視]視窗中的[SSL 設定]選項。
- 勾選[需要 SSL]核取方塊,然後選取[用戶端憑證]區段中的[需要]選項按鈕。
Azure 和自訂 Web Proxy
如需如何設定憑證轉送中介軟體,請參閱主機和部署檔。
在 Azure Web Apps 中使用憑證驗證
Azure 不需要轉送設定。 轉送設定是由憑證轉送中介軟體所設定。
注意
此案例需要憑證轉送中介軟體。
如需詳細資訊,請參閱在 Azure App Service 的程式碼中使用 TLS/SSL 憑證 (Azure 檔)。
在自訂 Web Proxy 中使用憑證驗證
AddCertificateForwarding 方法可用來指定:
- 用戶端標頭名稱。
- 如何載入憑證 (使用
HeaderConverter屬性)。
在自訂 Web Proxy 中,憑證會以自訂要求標頭的形式傳遞,例如 X-SSL-CERT。 若要使用它,請在 Startup.ConfigureServices 中設定憑證轉送:
public void ConfigureServices(IServiceCollection services)
{
    services.AddCertificateForwarding(options =>
    {
        options.CertificateHeader = "X-SSL-CERT";
        options.HeaderConverter = (headerValue) =>
        {
            X509Certificate2 clientCertificate = null;

            if(!string.IsNullOrWhiteSpace(headerValue))
            {
                byte[] bytes = StringToByteArray(headerValue);
                clientCertificate = new X509Certificate2(bytes);
            }

            return clientCertificate;
        };
    });
}

private static byte[] StringToByteArray(string hex)
{
    int NumberChars = hex.Length;
    byte[] bytes = new byte[NumberChars / 2];

    for (int i = 0; i < NumberChars; i += 2)
    {
        bytes[i / 2] = Convert.ToByte(hex.Substring(i, 2), 16);
    }

    return bytes;
}
如果 NGINX 使用設定 proxy_set_header ssl-client-cert $ssl_client_escaped_cert 或使用 NGINX 輸入在 Kubernetes 上部署的應用程式反向 Proxy,用戶端憑證會以 URL 編碼格式傳遞至應用程式。 若要使用憑證,請將它解碼如下:
將 System.Net 的命名空間新增至 Startup.cs 頂端:
using System.Net;
在 Startup.ConfigureServices 中:
services.AddCertificateForwarding(options =>
{
    options.CertificateHeader = "ssl-client-cert";
    options.HeaderConverter = (headerValue) =>
    {
        X509Certificate2 clientCertificate = null;

        if (!string.IsNullOrWhiteSpace(headerValue))
        {
            var bytes = UrlEncodedPemToByteArray(headerValue);
            clientCertificate = new X509Certificate2(bytes);
        }

        return clientCertificate;
    };
});
新增 UrlEncodedPemToByteArray 方法:
private static byte[] UrlEncodedPemToByteArray(string urlEncodedBase64Pem)
{
    var base64Pem = WebUtility.UrlDecode(urlEncodedBase64Pem);
    var base64Cert = base64Pem
        .Replace("-----BEGIN CERTIFICATE-----", string.Empty)
        .Replace("-----END CERTIFICATE-----", string.Empty)
        .Trim();

    return Convert.FromBase64String(base64Cert);
}
Startup.Configure 方法接著會新增中介軟體。 呼叫 UseAuthentication 和 UseAuthorization 之前會呼叫 UseCertificateForwarding:
public void Configure(IApplicationBuilder app, IWebHostEnvironment env)
{
    ...

    app.UseRouting();

    app.UseCertificateForwarding();
    app.UseAuthentication();
    app.UseAuthorization();

    app.UseEndpoints(endpoints =>
    {
        endpoints.MapControllers();
    });
}
不同的類別可用來實作驗證邏輯。 因為在此範例中使用相同的自我簽署憑證,因此請確認只能使用您的憑證。 驗證用戶端憑證和伺服器憑證的指紋是否相符,否則可以使用任何憑證,而且足以進行驗證。 這會在 AddCertificate 方法內使用。 如果您使用中繼或子憑證,您也可以在這裡驗證主體或簽發者。
using System.IO;
using System.Security.Cryptography.X509Certificates;

namespace AspNetCoreCertificateAuthApi
{
    public class MyCertificateValidationService
    {
        public bool ValidateCertificate(X509Certificate2 clientCertificate)
        {
            // Do not hardcode passwords in production code
            // Use thumbprint or key vault
            var cert = new X509Certificate2(
                Path.Combine("sts_dev_cert.pfx"), "1234");

            if (clientCertificate.Thumbprint == cert.Thumbprint)
            {
                return true;
            }

            return false;
        }
    }
}
使用憑證和 HttpClientHandler 實作 HttpClient
HttpClientHandler 可以直接新增到 HttpClient 類別的建構函式中。 建立 HttpClient 實例時應該小心。 接著,對於每個要求 HttpClient 都會傳送憑證。
private async Task<JsonDocument> GetApiDataUsingHttpClientHandler()
{
    var cert = new X509Certificate2(Path.Combine(_environment.ContentRootPath, "sts_dev_cert.pfx"), "1234");
    var handler = new HttpClientHandler();
    handler.ClientCertificates.Add(cert);
    var client = new HttpClient(handler);

    var request = new HttpRequestMessage()
    {
        RequestUri = new Uri("https://localhost:44379/api/values"),
        Method = HttpMethod.Get,
    };
    var response = await client.SendAsync(request);
    if (response.IsSuccessStatusCode)
    {
        var responseContent = await response.Content.ReadAsStringAsync();
        var data = JsonDocument.Parse(responseContent);
        return data;
    }

    throw new ApplicationException($"Status code: {response.StatusCode}, Error: {response.ReasonPhrase}");
}
使用憑證和來自 IHttpClientFactory 的具名 HttpClient 來實作 HttpClient
在下列範例中,用戶端憑證會使用來自處理常式的 ClientCertificates 屬性新增至 HttpClientHandler。 接著,這個處理常式可以使用 ConfigurePrimaryHttpMessageHandler 方法,在 HttpClient 的具名實例中使用。 這是在 Startup.ConfigureServices 中設定:
var clientCertificate =
    new X509Certificate2(
      Path.Combine(_environment.ContentRootPath, "sts_dev_cert.pfx"), "1234");

services.AddHttpClient("namedClient", c =>
{
}).ConfigurePrimaryHttpMessageHandler(() =>
{
    var handler = new HttpClientHandler();
    handler.ClientCertificates.Add(clientCertificate);
    return handler;
});
接著,您可以使用 IHttpClientFactory 來取得具有處理常式和憑證的具名實例。 在 Startup 類別中定義的用戶端名稱的 CreateClient 方法會用來取得實例。 您可以視需要使用用戶端傳送 HTTP 要求。
private readonly IHttpClientFactory _clientFactory;

public ApiService(IHttpClientFactory clientFactory)
{
    _clientFactory = clientFactory;
}

private async Task<JsonDocument> GetApiDataWithNamedClient()
{
    var client = _clientFactory.CreateClient("namedClient");

    var request = new HttpRequestMessage()
    {
        RequestUri = new Uri("https://localhost:44379/api/values"),
        Method = HttpMethod.Get,
    };
    var response = await client.SendAsync(request);
    if (response.IsSuccessStatusCode)
    {
        var responseContent = await response.Content.ReadAsStringAsync();
        var data = JsonDocument.Parse(responseContent);
        return data;
    }

    throw new ApplicationException($"Status code: {response.StatusCode}, Error: {response.ReasonPhrase}");
}
如果正確的憑證傳送至伺服器,則會傳回資料。 如果沒有傳送憑證或錯誤的憑證,則會傳回 HTTP 403 狀態碼。
在 PowerShell 中建立憑證
建立憑證是設定此流程中最困難的部分。 您可以使用 New-SelfSignedCertificate PowerShell Cmdlet 來建立根憑證。 建立憑證時,請使用強式密碼。 請務必新增 KeyUsageProperty 參數和 KeyUsage 參數,如下所示。
建立根 CA
New-SelfSignedCertificate -DnsName "root_ca_dev_damienbod.com", "root_ca_dev_damienbod.com" -CertStoreLocation "cert:\LocalMachine\My" -NotAfter (Get-Date).AddYears(20) -FriendlyName "root_ca_dev_damienbod.com" -KeyUsageProperty All -KeyUsage CertSign, CRLSign, DigitalSignature

$mypwd = ConvertTo-SecureString -String "1234" -Force -AsPlainText

Get-ChildItem -Path cert:\localMachine\my\"The thumbprint..." | Export-PfxCertificate -FilePath C:\git\root_ca_dev_damienbod.pfx -Password $mypwd

Export-Certificate -Cert cert:\localMachine\my\"The thumbprint..." -FilePath root_ca_dev_damienbod.crt
注意
-DnsName 參數值必須符合應用程式的部署目標。 例如,用於開發的「localhost。
在受信任的根目錄中安裝
您的主機系統上必須信任根憑證。 憑證授權單位單位未建立的根憑證預設不會受到信任。 如需如何在 Windows 上信任根憑證的資訊,請參閱此問題。
中繼憑證
中繼憑證現在可以從根憑證建立。 並非所有使用案例都需要此項目,但您可能需要建立許多憑證,或需要啟動或停用憑證群組。 需要 TextExtension 參數,才能在憑證的基本條件約束中設定路徑長度。
然後,中繼憑證可以新增至 Windows 主機系統中的受信任中繼憑證。
$mypwd = ConvertTo-SecureString -String "1234" -Force -AsPlainText

$parentcert = ( Get-ChildItem -Path cert:\LocalMachine\My\"The thumbprint of the root..." )

New-SelfSignedCertificate -certstorelocation cert:\localmachine\my -dnsname "intermediate_dev_damienbod.com" -Signer $parentcert -NotAfter (Get-Date).AddYears(20) -FriendlyName "intermediate_dev_damienbod.com" -KeyUsageProperty All -KeyUsage CertSign, CRLSign, DigitalSignature -TextExtension @("2.5.29.19={text}CA=1&pathlength=1")

Get-ChildItem -Path cert:\localMachine\my\"The thumbprint..." | Export-PfxCertificate -FilePath C:\git\AspNetCoreCertificateAuth\Certs\intermediate_dev_damienbod.pfx -Password $mypwd

Export-Certificate -Cert cert:\localMachine\my\"The thumbprint..." -FilePath intermediate_dev_damienbod.crt
從中繼憑證建立子憑證
子憑證可以從中繼憑證建立。 這是終端實體,不需要建立更多子憑證。
$parentcert = ( Get-ChildItem -Path cert:\LocalMachine\My\"The thumbprint from the Intermediate certificate..." )

New-SelfSignedCertificate -certstorelocation cert:\localmachine\my -dnsname "child_a_dev_damienbod.com" -Signer $parentcert -NotAfter (Get-Date).AddYears(20) -FriendlyName "child_a_dev_damienbod.com"

$mypwd = ConvertTo-SecureString -String "1234" -Force -AsPlainText

Get-ChildItem -Path cert:\localMachine\my\"The thumbprint..." | Export-PfxCertificate -FilePath C:\git\AspNetCoreCertificateAuth\Certs\child_a_dev_damienbod.pfx -Password $mypwd

Export-Certificate -Cert cert:\localMachine\my\"The thumbprint..." -FilePath child_a_dev_damienbod.crt
從根憑證建立子憑證
您也可以直接從根憑證建立子憑證。
$rootcert = ( Get-ChildItem -Path cert:\LocalMachine\My\"The thumbprint from the root cert..." )

New-SelfSignedCertificate -certstorelocation cert:\localmachine\my -dnsname "child_a_dev_damienbod.com" -Signer $rootcert -NotAfter (Get-Date).AddYears(20) -FriendlyName "child_a_dev_damienbod.com"

$mypwd = ConvertTo-SecureString -String "1234" -Force -AsPlainText

Get-ChildItem -Path cert:\localMachine\my\"The thumbprint..." | Export-PfxCertificate -FilePath C:\git\AspNetCoreCertificateAuth\Certs\child_a_dev_damienbod.pfx -Password $mypwd

Export-Certificate -Cert cert:\localMachine\my\"The thumbprint..." -FilePath child_a_dev_damienbod.crt
範例根 - 中繼憑證 - 憑證
$mypwdroot = ConvertTo-SecureString -String "1234" -Force -AsPlainText
$mypwd = ConvertTo-SecureString -String "1234" -Force -AsPlainText

New-SelfSignedCertificate -DnsName "root_ca_dev_damienbod.com", "root_ca_dev_damienbod.com" -CertStoreLocation "cert:\LocalMachine\My" -NotAfter (Get-Date).AddYears(20) -FriendlyName "root_ca_dev_damienbod.com" -KeyUsageProperty All -KeyUsage CertSign, CRLSign, DigitalSignature

Get-ChildItem -Path cert:\localMachine\my\0C89639E4E2998A93E423F919B36D4009A0F9991 | Export-PfxCertificate -FilePath C:\git\root_ca_dev_damienbod.pfx -Password $mypwdroot

Export-Certificate -Cert cert:\localMachine\my\0C89639E4E2998A93E423F919B36D4009A0F9991 -FilePath root_ca_dev_damienbod.crt

$rootcert = ( Get-ChildItem -Path cert:\LocalMachine\My\0C89639E4E2998A93E423F919B36D4009A0F9991 )

New-SelfSignedCertificate -certstorelocation cert:\localmachine\my -dnsname "child_a_dev_damienbod.com" -Signer $rootcert -NotAfter (Get-Date).AddYears(20) -FriendlyName "child_a_dev_damienbod.com" -KeyUsageProperty All -KeyUsage CertSign, CRLSign, DigitalSignature -TextExtension @("2.5.29.19={text}CA=1&pathlength=1")

Get-ChildItem -Path cert:\localMachine\my\BA9BF91ED35538A01375EFC212A2F46104B33A44 | Export-PfxCertificate -FilePath C:\git\AspNetCoreCertificateAuth\Certs\child_a_dev_damienbod.pfx -Password $mypwd

Export-Certificate -Cert cert:\localMachine\my\BA9BF91ED35538A01375EFC212A2F46104B33A44 -FilePath child_a_dev_damienbod.crt

$parentcert = ( Get-ChildItem -Path cert:\LocalMachine\My\BA9BF91ED35538A01375EFC212A2F46104B33A44 )

New-SelfSignedCertificate -certstorelocation cert:\localmachine\my -dnsname "child_b_from_a_dev_damienbod.com" -Signer $parentcert -NotAfter (Get-Date).AddYears(20) -FriendlyName "child_b_from_a_dev_damienbod.com"

Get-ChildItem -Path cert:\localMachine\my\141594A0AE38CBBECED7AF680F7945CD51D8F28A | Export-PfxCertificate -FilePath C:\git\AspNetCoreCertificateAuth\Certs\child_b_from_a_dev_damienbod.pfx -Password $mypwd

Export-Certificate -Cert cert:\localMachine\my\141594A0AE38CBBECED7AF680F7945CD51D8F28A -FilePath child_b_from_a_dev_damienbod.crt
使用根、中繼或子憑證時,您可以視需要使用指紋或 PublicKey 來驗證憑證。
using System.Collections.Generic;
using System.IO;
using System.Security.Cryptography.X509Certificates;

namespace AspNetCoreCertificateAuthApi
{
    public class MyCertificateValidationService
    {
        public bool ValidateCertificate(X509Certificate2 clientCertificate)
        {
            return CheckIfThumbprintIsValid(clientCertificate);
        }

        private bool CheckIfThumbprintIsValid(X509Certificate2 clientCertificate)
        {
            var listOfValidThumbprints = new List<string>
            {
                "141594A0AE38CBBECED7AF680F7945CD51D8F28A",
                "0C89639E4E2998A93E423F919B36D4009A0F9991",
                "BA9BF91ED35538A01375EFC212A2F46104B33A44"
            };

            if (listOfValidThumbprints.Contains(clientCertificate.Thumbprint))
            {
                return true;
            }

            return false;
        }
    }
}
選擇性用戶端憑證
本節提供應用程式的資訊,這些應用程式必須使用憑證來保護應用程式的子集。 例如,應用程式中的 Razor 頁面或控制器可能需要用戶端憑證。 這會以用戶端憑證的形式呈現挑戰:
- 是 TLS 功能,而不是 HTTP 功能。
- 會針對每個連線進行交涉,通常是在連線開始時,才能取得任何 HTTP 資料。
實作選擇性用戶端憑證的方法有兩種:
- 使用不同的主機名稱 (SNI) 和重新導向。 雖然設定時需要要更多工作,但建議您這麼做,因為它適用於大部分的環境和通訊協定。
- 在 HTTP 要求期間重新交涉。 這樣會有一些限制,不建議使用。
個別主機 (SNI)
在連線開始時,只會知道伺服器名稱指示 (SNI)†。 每個主機名稱都可以設定用戶端憑證,讓一個主機需要它們,而另一個主機則不需要它們。
- 設定網域和子網域的繫結:
- 例如,在
contoso.com和myClient.contoso.com上設定繫結。contoso.com主機不需要用戶端憑證,但myClient.contoso.com需要。 - 如需詳細資訊,請參閱:
- KestrelASP.NET Core 中的網頁伺服器:
- ListenOptions.UseHttps
- ClientCertificateMode
- 注意 Kestrel 目前不支援一個繫結上的多個 TLS 組態,您將需要兩個具有唯一 IP 或連接埠的繫結。 如需詳細資訊,請參閱這個 GitHub 問題。
- IIS
- HTTP.sys:設定 Windows Server
- KestrelASP.NET Core 中的網頁伺服器:
- 例如,在
ASP.NET Core 5 和更新版本新增了更方便的支援,可重新導向以取得選擇性用戶端憑證。 如需詳細資訊,請參閱選擇性憑證範例。
- 對於需要用戶端憑證且沒有用戶端憑證的 Web 應用程式要求:
- 使用受用戶端憑證保護的子網域,重新導向至相同的頁面。
- 例如,重新導向至
myClient.contoso.com/requestedPage。 由於myClient.contoso.com/requestedPage的要求與contoso.com/requestedPage不同,因此用戶端會建立不同的連線,並提供用戶端憑證。 - 如需詳細資訊,請參閱 ASP.NET Core 中的授權簡介。
†伺服器名稱指示 (SNI) 是 TLS 延伸模組,可將虛擬網域納入 SSL 交涉的一部分。 這實際上表示虛擬功能變數名稱或主機名稱可用來識別網路端點。
重新交涉
TLS 重新交涉是用戶端和伺服器可以重新評估個別連線的加密需求的程式,包括先前未提供用戶端憑證時要求提供。 TLS 重新交涉有安全性風險,不建議這麼做,因為:
- 在 HTTP/1.1 中,伺服器必須先緩衝或取用任何在正式發行前小眾測試中的 HTTP 資料,例如 POST 要求主體,以確保重新交涉的連線是清楚的。 否則,重新交涉可能會停止回應或失敗。
- HTTP/2 和 HTTP/3 明確禁止重新交涉。
- 重新交涉有安全性風險。 TLS 1.3 已移除整個連線的重新交涉,並將它取代為新的擴充功能,使得連線開始時只要求用戶端憑證。 此機制會透過相同的 API 公開,但仍受限於緩衝和 HTTP 通訊協定版本的先前條件約束。
這項功能的實作和設定因伺服器和架構版本而異。
IIS
IIS 會代表您管理用戶端憑證交涉。 應用程式的子區段可讓 SslRequireCert 選項交涉這些要求的用戶端憑證。 如需詳細資訊,請參閱 IIS 文件中的設定。
IIS 會在重新交涉之前,自動緩衝任何要求本文資料,直到達到設定的大小限制為止。 超過限制的要求會遭到 413 回應的拒絕。 此限制預設為 48KB,並可透過設定 uploadReadAheadSize 來設定。
HttpSys
HttpSys 有兩個設定可控制用戶端憑證交涉,而且兩者都應該設定。 第一個位於 netsh.exe 的 http add sslcert clientcertnegotiation=enable/disable 下。 此旗標表示用戶端憑證是否應在連線開始時交涉,且應設定為選擇性用戶端憑證的 disable。 如需詳細資訊,請參閱 netsh 文件。
另一個設定是 ClientCertificateMethod。 當設定為 AllowRenegotation 時,用戶端憑證可以在要求期間重新交涉。
注意應用程式應該先緩衝處理或取用任何要求本文資料,然後再嘗試重新交涉,否則該要求可能會變成沒有回應。
啟用 AllowRenegotation 時有一已知問題,會導致在存取 ClientCertificate 屬性時同步發生重新交涉。 呼叫 GetClientCertificateAsync 方法來避免這種情況。 在 .NET 6 中此問題已解決。 如需詳細資訊,請參閱這個 GitHub 問題。 請注意,如果用戶端拒絕提供 null 憑證,GetClientCertificateAsync 可能會傳回 Null 憑證。
Kestrel
Kestrel 使用 [ClientCertificateMode] 選項控制用戶端憑證交涉。
針對 .NET 5 和更早版本,Kestrel 不支援在連線開始之後重新交涉以取得用戶端憑證。 這項功能已在 .NET 6 中新增。
此 GitHub 討論問題中,對選擇性用戶端憑證留下問題、批註和其他意見反應。
意見反應
即將登場:在 2024 年,我們將逐步淘汰 GitHub 問題作為內容的意見反應機制,並將它取代為新的意見反應系統。 如需詳細資訊,請參閱:https://aka.ms/ContentUserFeedback。
提交並檢視相關的意見反應