ASP.NET Core 上的 Identity 簡介
ASP.NET Core Identity:
- 為支援使用者介面 (UI) 登入功能的 API。
- 管理使用者、密碼、設定檔資料、角色、宣告、權杖、電子郵件確認等等。
使用者可以使用儲存在 Identity 中的登入資訊或外部登入提供者來建立帳戶。 支援的外部登入提供者包括 Facebook、Google、Microsoft 帳戶和 Twitter。
如需有關如何在全域範圍內要求所有使用者進行驗證的資訊,請參閱需要驗證的使用者。
Identity 原始程式碼可在 GitHub 中取得。 Scaffold Identity 並檢視產生的檔案,以檢閱與 Identity 的範本互動。
Identity 通常會使用 SQL Server 資料庫來設定,以儲存使用者名稱、密碼和設定檔資料。 或者,也可以使用另一個永續性存放區,例如:Azure 表格儲存體。
在本主題中,您將了解如何使用 Identity 來註冊、登入和登出使用者。 注意:範本會將使用者的使用者名稱和電子郵件視為是相同的。 如需建立使用 Identity 之應用程式的詳細指示,請參閱後續步驟。
ASP.NET Core Identity 與 Microsoft 身分識別平台無關。 Microsoft 身分識別平台為:
- Azure Active Directory (Azure AD) 開發人員平台的演進。
- ASP.NET Core 應用程式中驗證和授權的替代身分識別解決方案。
ASP.NET Core Identity 會將使用者介面 (UI) 登入功能新增至 ASP.NET Core Web 應用程式。 若要保護 Web API 和 SPA,請使用下列其中一項:
- Microsoft Entra ID
- Azure Active Directory B2C (Azure AD B2C)
- Duende Identity 伺服器
Duende Identity 伺服器是適用於 ASP.NET Core 的 OpenID Connect 和 OAuth 2.0 架構。 Duende Identity 伺服器會啟用下列安全性功能:
- 驗證即服務 (AaaS)
- 多個應用程式類型的單一登入/登出 (SSO)
- API 的存取控制
- Federation Gateway
重要
Duende Software 可能會要求您支付授權費用才能在生產環境中使用 Duende Identity 伺服器。 如需詳細資訊,請參閱從 ASP.NET Core 5.0 移轉至 6.0。
如需詳細資訊,請參閱 Duende Identity 伺服器文件 (Duende Software 網站)。
檢視或下載範例程式碼 \(英文\) (如何下載)。
建立具有驗證功能的 Web 應用程式
使用個別使用者帳戶建立 ASP.NET Core Web 應用程式。
- 選取 [ASP.NET Core Web 應用程式] 範本。 將專案命名為 WebApp1,使其命名空間與專案下載相同。 按一下 [確定]。
- 在 [驗證類型] 輸入中,選取 [個別使用者帳戶]。
產生的專案提供 ASP.NET Core Identity 作為 Razor 類別庫。 類別 IdentityRazor 類別庫會公開具有 Identity 區域的端點。 例如:
- /Identity/Account/Login
- /Identity/Account/Logout
- /Identity/Account/Logout
套用移轉
套用移轉來初始化資料庫。
在套件管理員主控台 (PMC) 中執行下列命令:
Update-Database
測試註冊和登入
執行應用程式並註冊使用者。 視視窗大小而定,您可能需要選取瀏覽切換按鈕以查看 [註冊] 和 [登入] 連結。
檢視 Identity 資料庫
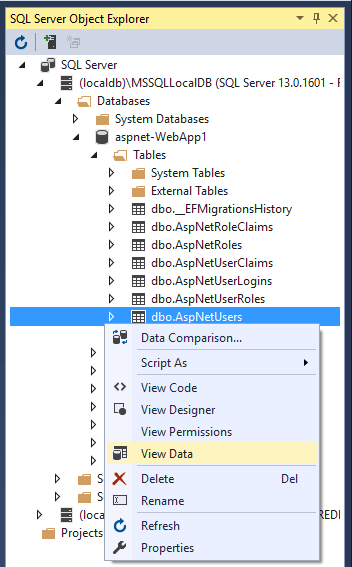
- 從 [檢視] 功能表中,選取 [SQL Server 物件總管] (SSOX)。
- 瀏覽至 [(localdb)MSSQLLocalDB(SQL Server 13)]。 以滑鼠右鍵按一下 [dbo.AspNetUsers]>[檢視資料]:
設定 Identity 服務
服務在 Program.cs 中新增。 典型的模式是依下列順序呼叫方法:
Add{Service}builder.Services.Configure{Service}
using Microsoft.AspNetCore.Identity;
using Microsoft.EntityFrameworkCore;
using WebApp1.Data;

var builder = WebApplication.CreateBuilder(args);

var connectionString = builder.Configuration.GetConnectionString("DefaultConnection");
builder.Services.AddDbContext<ApplicationDbContext>(options =>
    options.UseSqlServer(connectionString));
builder.Services.AddDatabaseDeveloperPageExceptionFilter();

builder.Services.AddDefaultIdentity<IdentityUser>(options => options.SignIn.RequireConfirmedAccount = true)
    .AddEntityFrameworkStores<ApplicationDbContext>();
builder.Services.AddRazorPages();

builder.Services.Configure<IdentityOptions>(options =>
{
    // Password settings.
    options.Password.RequireDigit = true;
    options.Password.RequireLowercase = true;
    options.Password.RequireNonAlphanumeric = true;
    options.Password.RequireUppercase = true;
    options.Password.RequiredLength = 6;
    options.Password.RequiredUniqueChars = 1;

    // Lockout settings.
    options.Lockout.DefaultLockoutTimeSpan = TimeSpan.FromMinutes(5);
    options.Lockout.MaxFailedAccessAttempts = 5;
    options.Lockout.AllowedForNewUsers = true;

    // User settings.
    options.User.AllowedUserNameCharacters =
    "abcdefghijklmnopqrstuvwxyzABCDEFGHIJKLMNOPQRSTUVWXYZ0123456789-._@+";
    options.User.RequireUniqueEmail = false;
});

builder.Services.ConfigureApplicationCookie(options =>
{
    // Cookie settings
    options.Cookie.HttpOnly = true;
    options.ExpireTimeSpan = TimeSpan.FromMinutes(5);

    options.LoginPath = "/Identity/Account/Login";
    options.AccessDeniedPath = "/Identity/Account/AccessDenied";
    options.SlidingExpiration = true;
});

var app = builder.Build();

if (app.Environment.IsDevelopment())
{
    app.UseMigrationsEndPoint();
}
else
{
    app.UseExceptionHandler("/Error");
    app.UseHsts();
}

app.UseHttpsRedirection();
app.UseStaticFiles();

app.UseRouting();

app.UseAuthentication();
app.UseAuthorization();

app.MapRazorPages();

app.Run();
上述程式碼使用 Identity 預設選項值進行設定。 服務透過相依性插入,向應用程式提供使用。
藉由呼叫 UseAuthentication 啟用 Identity。 UseAuthentication 將驗證中介軟體新增至要求管線。
範本產生的應用程式不會使用授權。 包含 app.UseAuthorization 是為了確保應用程式在新增授權時能以正確的順序新增。 UseRouting、UseAuthentication 和 UseAuthorization 必須依上述程式碼所示的順序呼叫。
如需 IdentityOptions 的詳細資訊,請參閱 IdentityOptions 和應用程式啟動。
Scaffold Register、Login、LogOut 和 RegisterConfirmation
新增 Register、Login、LogOut 和 RegisterConfirmation 檔案。 遵循使用授權將 Scaffold 身分識別轉換為 Razor 專案的指示,以產生本節中所示的程式碼。
檢查暫存器
當使用者按一下 Register 頁面上的 [註冊] 按鈕時,即會叫用 RegisterModel.OnPostAsync 動作。 使用者是由 CreateAsync(TUser) 在 _userManager 物件上所建立:
public async Task<IActionResult> OnPostAsync(string returnUrl = null)
{
    returnUrl = returnUrl ?? Url.Content("~/");
    ExternalLogins = (await _signInManager.GetExternalAuthenticationSchemesAsync())
                                          .ToList();
    if (ModelState.IsValid)
    {
        var user = new IdentityUser { UserName = Input.Email, Email = Input.Email };
        var result = await _userManager.CreateAsync(user, Input.Password);
        if (result.Succeeded)
        {
            _logger.LogInformation("User created a new account with password.");

            var code = await _userManager.GenerateEmailConfirmationTokenAsync(user);
            code = WebEncoders.Base64UrlEncode(Encoding.UTF8.GetBytes(code));
            var callbackUrl = Url.Page(
                "/Account/ConfirmEmail",
                pageHandler: null,
                values: new { area = "Identity", userId = user.Id, code = code },
                protocol: Request.Scheme);

            await _emailSender.SendEmailAsync(Input.Email, "Confirm your email",
                $"Please confirm your account by <a href='{HtmlEncoder.Default.Encode(callbackUrl)}'>clicking here</a>.");

            if (_userManager.Options.SignIn.RequireConfirmedAccount)
            {
                return RedirectToPage("RegisterConfirmation",
                                      new { email = Input.Email });
            }
            else
            {
                await _signInManager.SignInAsync(user, isPersistent: false);
                return LocalRedirect(returnUrl);
            }
        }
        foreach (var error in result.Errors)
        {
            ModelState.AddModelError(string.Empty, error.Description);
        }
    }

    // If we got this far, something failed, redisplay form
    return Page();
}
停用預設帳戶驗證
使用預設範本時,系統會將使用者重新導向至 Account.RegisterConfirmation 他們可以選取連結以確認帳戶的位置。 預設值 Account.RegisterConfirmation僅用於測試,應在生產應用程式中停用自動帳戶驗證。
若要在註冊時要求使用已確認的帳戶並防止立即登入,請在 /Areas/Identity/Pages/Account/RegisterConfirmation.cshtml.cs 中設定 DisplayConfirmAccountLink = false:
[AllowAnonymous]
public class RegisterConfirmationModel : PageModel
{
    private readonly UserManager<IdentityUser> _userManager;
    private readonly IEmailSender _sender;

    public RegisterConfirmationModel(UserManager<IdentityUser> userManager, IEmailSender sender)
    {
        _userManager = userManager;
        _sender = sender;
    }

    public string Email { get; set; }

    public bool DisplayConfirmAccountLink { get; set; }

    public string EmailConfirmationUrl { get; set; }

    public async Task<IActionResult> OnGetAsync(string email, string returnUrl = null)
    {
        if (email == null)
        {
            return RedirectToPage("/Index");
        }

        var user = await _userManager.FindByEmailAsync(email);
        if (user == null)
        {
            return NotFound($"Unable to load user with email '{email}'.");
        }

        Email = email;
        // Once you add a real email sender, you should remove this code that lets you confirm the account
        DisplayConfirmAccountLink = false;
        if (DisplayConfirmAccountLink)
        {
            var userId = await _userManager.GetUserIdAsync(user);
            var code = await _userManager.GenerateEmailConfirmationTokenAsync(user);
            code = WebEncoders.Base64UrlEncode(Encoding.UTF8.GetBytes(code));
            EmailConfirmationUrl = Url.Page(
                "/Account/ConfirmEmail",
                pageHandler: null,
                values: new { area = "Identity", userId = userId, code = code, returnUrl = returnUrl },
                protocol: Request.Scheme);
        }

        return Page();
    }
}
登入
登入表單會在下列情況下顯示:
- 已選取 [登入] 連結。
- 使用者嘗試存取其未獲授權存取的受限制頁面,或其尚未由系統進行驗證。
提交 [登入] 頁面上的表單時,即會呼叫 OnPostAsync 動作。 _signInManager 物件會在 PasswordSignInAsync 上呼叫。
public async Task<IActionResult> OnPostAsync(string returnUrl = null)
{
    returnUrl = returnUrl ?? Url.Content("~/");

    if (ModelState.IsValid)
    {
        // This doesn't count login failures towards account lockout
        // To enable password failures to trigger account lockout,
        // set lockoutOnFailure: true
        var result = await _signInManager.PasswordSignInAsync(Input.Email,
                           Input.Password, Input.RememberMe, lockoutOnFailure: true);
        if (result.Succeeded)
        {
            _logger.LogInformation("User logged in.");
            return LocalRedirect(returnUrl);
        }
        if (result.RequiresTwoFactor)
        {
            return RedirectToPage("./LoginWith2fa", new
            {
                ReturnUrl = returnUrl,
                RememberMe = Input.RememberMe
            });
        }
        if (result.IsLockedOut)
        {
            _logger.LogWarning("User account locked out.");
            return RedirectToPage("./Lockout");
        }
        else
        {
            ModelState.AddModelError(string.Empty, "Invalid login attempt.");
            return Page();
        }
    }

    // If we got this far, something failed, redisplay form
    return Page();
}
如需如何做出授權決策的資訊,請參閱 ASP.NET Core 中的授權簡介。
登出
[登出] 連結會叫用 LogoutModel.OnPost 動作。
using Microsoft.AspNetCore.Authorization;
using Microsoft.AspNetCore.Identity;
using Microsoft.AspNetCore.Mvc;
using Microsoft.AspNetCore.Mvc.RazorPages;
using Microsoft.Extensions.Logging;
using System.Threading.Tasks;

namespace WebApp1.Areas.Identity.Pages.Account
{
    [AllowAnonymous]
    public class LogoutModel : PageModel
    {
        private readonly SignInManager<IdentityUser> _signInManager;
        private readonly ILogger<LogoutModel> _logger;

        public LogoutModel(SignInManager<IdentityUser> signInManager, ILogger<LogoutModel> logger)
        {
            _signInManager = signInManager;
            _logger = logger;
        }

        public void OnGet()
        {
        }

        public async Task<IActionResult> OnPost(string returnUrl = null)
        {
            await _signInManager.SignOutAsync();
            _logger.LogInformation("User logged out.");
            if (returnUrl != null)
            {
                return LocalRedirect(returnUrl);
            }
            else
            {
                return RedirectToPage();
            }
        }
    }
}
在上述程式碼中,程式碼 return RedirectToPage(); 必須是重新導向,以讓瀏覽器執行新的要求,並更新使用者的身分識別。
SignOutAsync 清除儲存在 cookie 中的使用者宣告。
在 Pages/Shared/_LoginPartial.cshtml 中指定了 Post:
@using Microsoft.AspNetCore.Identity
@inject SignInManager<IdentityUser> SignInManager
@inject UserManager<IdentityUser> UserManager

<ul class="navbar-nav">
@if (SignInManager.IsSignedIn(User))
{
    <li class="nav-item">
        <a  class="nav-link text-dark" asp-area="Identity" asp-page="/Account/Manage/Index"
                                              title="Manage">Hello @User.Identity.Name!</a>
    </li>
    <li class="nav-item">
        <form class="form-inline" asp-area="Identity" asp-page="/Account/Logout"
                                  asp-route-returnUrl="@Url.Page("/", new { area = "" })"
                                  method="post" >
            <button  type="submit" class="nav-link btn btn-link text-dark">Logout</button>
        </form>
    </li>
}
else
{
    <li class="nav-item">
        <a class="nav-link text-dark" asp-area="Identity" asp-page="/Account/Register">Register</a>
    </li>
    <li class="nav-item">
        <a class="nav-link text-dark" asp-area="Identity" asp-page="/Account/Login">Login</a>
    </li>
}
</ul>
測試 Identity
預設 Web 專案範本允許匿名存取首頁。 若要測試 Identity,請新增 [Authorize]:
using Microsoft.AspNetCore.Authorization;
using Microsoft.AspNetCore.Mvc.RazorPages;
using Microsoft.Extensions.Logging;

namespace WebApp1.Pages
{
    [Authorize]
    public class PrivacyModel : PageModel
    {
        private readonly ILogger<PrivacyModel> _logger;

        public PrivacyModel(ILogger<PrivacyModel> logger)
        {
            _logger = logger;
        }

        public void OnGet()
        {
        }
    }
}
如果您已登入,請登出。執行應用程式並選取 Privacy 連結。 您會被重新導向至登入頁面。
探索 Identity
若要更詳細地探索 Identity:
- 建立完整的身分識別 UI 來源
- 檢查每個頁面的來源,並逐步執行偵錯工具。
Identity 元件
所有 Identity 相依的 NuGet 套件都包含在 ASP.NET Core 共用架構中。
Identity 的主要套件為 Microsoft.AspNetCore.Identity。 此套件包含 ASP.NET Core Identity 的核心介面集,且由 Microsoft.AspNetCore.Identity.EntityFrameworkCore 所包含。
移轉至 ASP.NET Core Identity
如需移轉現有 Identity 存放區的詳細資訊和指引,請參閱移轉驗證和 Identity。
設定密碼強度
如需設定最低密碼需求的範例,請參閱設定。
AddDefaultIdentity 和 AddIdentity
AddDefaultIdentity 是在 ASP.NET Core 2.1 中引進。 呼叫 AddDefaultIdentity 類似於呼叫下列項目:
如需詳細資訊,請參閱 AddDefaultIdentity 資源。
防止靜態 Identity 資產發佈
若要防止將靜態 Identity 資產 (Identity UI 的樣式表單和 JavaScript 檔案) 發佈至 Web 根目錄,請將下列 ResolveStaticWebAssetsInputsDependsOn 屬性和 RemoveIdentityAssets 目標新增至應用程式的專案檔:
<PropertyGroup>
  <ResolveStaticWebAssetsInputsDependsOn>RemoveIdentityAssets</ResolveStaticWebAssetsInputsDependsOn>
</PropertyGroup>

<Target Name="RemoveIdentityAssets">
  <ItemGroup>
    <StaticWebAsset Remove="@(StaticWebAsset)" Condition="%(SourceId) == 'Microsoft.AspNetCore.Identity.UI'" />
  </ItemGroup>
</Target>
後續步驟
ASP.NET Core Identity:
- 為支援使用者介面 (UI) 登入功能的 API。
- 管理使用者、密碼、設定檔資料、角色、宣告、權杖、電子郵件確認等等。
使用者可以使用儲存在 Identity 中的登入資訊或外部登入提供者來建立帳戶。 支援的外部登入提供者包括 Facebook、Google、Microsoft 帳戶和 Twitter。
如需有關如何在全域範圍內要求所有使用者進行驗證的資訊,請參閱需要驗證的使用者。
Identity 原始程式碼可在 GitHub 中取得。 Scaffold Identity 並檢視產生的檔案,以檢閱與 Identity 的範本互動。
Identity 通常會使用 SQL Server 資料庫來設定,以儲存使用者名稱、密碼和設定檔資料。 或者,也可以使用另一個永續性存放區,例如:Azure 表格儲存體。
在本主題中,您將了解如何使用 Identity 來註冊、登入和登出使用者。 注意:範本會將使用者的使用者名稱和電子郵件視為是相同的。 如需建立使用 Identity 之應用程式的詳細指示,請參閱後續步驟。
- Azure Active Directory (Azure AD) 開發人員平台的演進。
- ASP.NET Core 應用程式中驗證和授權的替代身分識別解決方案。
- 與 ASP.NET Core Identity 無關。
ASP.NET Core Identity 會將使用者介面 (UI) 登入功能新增至 ASP.NET Core Web 應用程式。 若要保護 Web API 和 SPA,請使用下列其中一項:
- Microsoft Entra ID
- Azure Active Directory B2C (Azure AD B2C)
- Duende Identity伺服器。 Duende Identity伺服器是協力廠商產品。
Duende Identity伺服器是適用於 ASP.NET Core 的 OpenID Connect 和 OAuth 2.0 架構。 Duende Identity伺服器會啟用下列安全性功能:
- 驗證即服務 (AaaS)
- 多個應用程式類型的單一登入/登出 (SSO)
- API 的存取控制
- Federation Gateway
如需詳細資訊,請參閱 Duende Identity伺服器概觀。
如需其他驗證提供者的詳細資訊,請參閱 ASP.NET Core 的社群 OSS 驗證選項
檢視或下載範例程式碼 \(英文\) (如何下載)。
建立具有驗證功能的 Web 應用程式
使用個別使用者帳戶建立 ASP.NET Core Web 應用程式。
- 選取 [檔案]> [新增]> [專案]。
- 選取 [ASP.NET Core Web 應用程式]。 將專案命名為 WebApp1,使其命名空間與專案下載相同。 按一下 [確定]。
- 選取 ASP.NET Core [Web 應用程式],然後選取 [變更驗證]。
- 選取 [個別使用者帳戶],然後按一下 [確定]。
產生的專案提供 ASP.NET Core Identity 作為 Razor 類別庫。 類別 IdentityRazor 類別庫會公開具有 Identity 區域的端點。 例如:
- /Identity/Account/Login
- /Identity/Account/Logout
- /Identity/Account/Logout
套用移轉
套用移轉來初始化資料庫。
在套件管理員主控台 (PMC) 中執行下列命令:
PM> Update-Database
測試註冊和登入
執行應用程式並註冊使用者。 視視窗大小而定,您可能需要選取瀏覽切換按鈕以查看 [註冊] 和 [登入] 連結。
檢視 Identity 資料庫
- 從 [檢視] 功能表中,選取 [SQL Server 物件總管] (SSOX)。
- 瀏覽至 [(localdb)MSSQLLocalDB(SQL Server 13)]。 以滑鼠右鍵按一下 [dbo.AspNetUsers]>[檢視資料]:
設定 Identity 服務
服務在 ConfigureServices 中新增。 典型模式是呼叫所有 Add{Service} 方法,然後呼叫 services.Configure{Service} 方法。
public void ConfigureServices(IServiceCollection services)
{
    services.AddDbContext<ApplicationDbContext>(options =>
     // options.UseSqlite(
        options.UseSqlServer(
            Configuration.GetConnectionString("DefaultConnection")));
    services.AddDefaultIdentity<IdentityUser>(options => options.SignIn.RequireConfirmedAccount = true)
        .AddEntityFrameworkStores<ApplicationDbContext>();
    services.AddRazorPages();

    services.Configure<IdentityOptions>(options =>
    {
        // Password settings.
        options.Password.RequireDigit = true;
        options.Password.RequireLowercase = true;
        options.Password.RequireNonAlphanumeric = true;
        options.Password.RequireUppercase = true;
        options.Password.RequiredLength = 6;
        options.Password.RequiredUniqueChars = 1;

        // Lockout settings.
        options.Lockout.DefaultLockoutTimeSpan = TimeSpan.FromMinutes(5);
        options.Lockout.MaxFailedAccessAttempts = 5;
        options.Lockout.AllowedForNewUsers = true;

        // User settings.
        options.User.AllowedUserNameCharacters =
        "abcdefghijklmnopqrstuvwxyzABCDEFGHIJKLMNOPQRSTUVWXYZ0123456789-._@+";
        options.User.RequireUniqueEmail = false;
    });

    services.ConfigureApplicationCookie(options =>
    {
        // Cookie settings
        options.Cookie.HttpOnly = true;
        options.ExpireTimeSpan = TimeSpan.FromMinutes(5);

        options.LoginPath = "/Identity/Account/Login";
        options.AccessDeniedPath = "/Identity/Account/AccessDenied";
        options.SlidingExpiration = true;
    });
}
上述醒目提示的程式碼使用 Identity 預設選項值進行設定。 服務透過相依性插入,向應用程式提供使用。
藉由呼叫 UseAuthentication 啟用 Identity。 UseAuthentication 將驗證中介軟體新增至要求管線。
public void Configure(IApplicationBuilder app, IWebHostEnvironment env)
{
    if (env.IsDevelopment())
    {
        app.UseDeveloperExceptionPage();
        app.UseDatabaseErrorPage();
    }
    else
    {
        app.UseExceptionHandler("/Error");
        app.UseHsts();
    }

    app.UseHttpsRedirection();
    app.UseStaticFiles();

    app.UseRouting();

    app.UseAuthentication();
    app.UseAuthorization();

    app.UseEndpoints(endpoints =>
    {
        endpoints.MapRazorPages();
    });
}
public void ConfigureServices(IServiceCollection services)
{
    services.AddDbContext<ApplicationDbContext>(options =>
        // options.UseSqlite(
        options.UseSqlServer(
            Configuration.GetConnectionString("DefaultConnection")));
    services.AddDatabaseDeveloperPageExceptionFilter();
    services.AddDefaultIdentity<IdentityUser>(options => options.SignIn.RequireConfirmedAccount = true)
        .AddEntityFrameworkStores<ApplicationDbContext>();
    services.AddRazorPages();

    services.Configure<IdentityOptions>(options =>
    {
        // Password settings.
        options.Password.RequireDigit = true;
        options.Password.RequireLowercase = true;
        options.Password.RequireNonAlphanumeric = true;
        options.Password.RequireUppercase = true;
        options.Password.RequiredLength = 6;
        options.Password.RequiredUniqueChars = 1;

        // Lockout settings.
        options.Lockout.DefaultLockoutTimeSpan = TimeSpan.FromMinutes(5);
        options.Lockout.MaxFailedAccessAttempts = 5;
        options.Lockout.AllowedForNewUsers = true;

        // User settings.
        options.User.AllowedUserNameCharacters =
        "abcdefghijklmnopqrstuvwxyzABCDEFGHIJKLMNOPQRSTUVWXYZ0123456789-._@+";
        options.User.RequireUniqueEmail = false;
    });

    services.ConfigureApplicationCookie(options =>
    {
        // Cookie settings
        options.Cookie.HttpOnly = true;
        options.ExpireTimeSpan = TimeSpan.FromMinutes(5);

        options.LoginPath = "/Identity/Account/Login";
        options.AccessDeniedPath = "/Identity/Account/AccessDenied";
        options.SlidingExpiration = true;
    });
}
上述程式碼使用 Identity 預設選項值進行設定。 服務透過相依性插入,向應用程式提供使用。
藉由呼叫 UseAuthentication 啟用 Identity。 UseAuthentication 將驗證中介軟體新增至要求管線。
public void Configure(IApplicationBuilder app, IWebHostEnvironment env)
{
    if (env.IsDevelopment())
    {
        app.UseDeveloperExceptionPage();
        app.UseMigrationsEndPoint();
    }
    else
    {
        app.UseExceptionHandler("/Error");
        app.UseHsts();
    }

    app.UseHttpsRedirection();
    app.UseStaticFiles();

    app.UseRouting();

    app.UseAuthentication();
    app.UseAuthorization();

    app.UseEndpoints(endpoints =>
    {
        endpoints.MapRazorPages();
    });
}
範本產生的應用程式不會使用授權。 包含 app.UseAuthorization 是為了確保應用程式在新增授權時能以正確的順序新增。 UseRouting、UseAuthentication、UseAuthorization 和 UseEndpoints 必須依上述程式碼所示的順序呼叫。
如需 IdentityOptions 和 Startup 的詳細資訊,請參閱 IdentityOptions 和應用程式啟動。
Scaffold Register、Login、LogOut 和 RegisterConfirmation
新增 Register、Login、LogOut 和 RegisterConfirmation 檔案。 遵循使用授權將 Scaffold 身分識別轉換為 Razor 專案的指示,以產生本節中所示的程式碼。
檢查暫存器
當使用者按一下 Register 頁面上的 [註冊] 按鈕時,即會叫用 RegisterModel.OnPostAsync 動作。 使用者是由 CreateAsync(TUser) 在 _userManager 物件上所建立:
public async Task<IActionResult> OnPostAsync(string returnUrl = null)
{
    returnUrl = returnUrl ?? Url.Content("~/");
    ExternalLogins = (await _signInManager.GetExternalAuthenticationSchemesAsync())
                                          .ToList();
    if (ModelState.IsValid)
    {
        var user = new IdentityUser { UserName = Input.Email, Email = Input.Email };
        var result = await _userManager.CreateAsync(user, Input.Password);
        if (result.Succeeded)
        {
            _logger.LogInformation("User created a new account with password.");

            var code = await _userManager.GenerateEmailConfirmationTokenAsync(user);
            code = WebEncoders.Base64UrlEncode(Encoding.UTF8.GetBytes(code));
            var callbackUrl = Url.Page(
                "/Account/ConfirmEmail",
                pageHandler: null,
                values: new { area = "Identity", userId = user.Id, code = code },
                protocol: Request.Scheme);

            await _emailSender.SendEmailAsync(Input.Email, "Confirm your email",
                $"Please confirm your account by <a href='{HtmlEncoder.Default.Encode(callbackUrl)}'>clicking here</a>.");

            if (_userManager.Options.SignIn.RequireConfirmedAccount)
            {
                return RedirectToPage("RegisterConfirmation",
                                      new { email = Input.Email });
            }
            else
            {
                await _signInManager.SignInAsync(user, isPersistent: false);
                return LocalRedirect(returnUrl);
            }
        }
        foreach (var error in result.Errors)
        {
            ModelState.AddModelError(string.Empty, error.Description);
        }
    }

    // If we got this far, something failed, redisplay form
    return Page();
}
停用預設帳戶驗證
使用預設範本時,系統會將使用者重新導向至 Account.RegisterConfirmation 他們可以選取連結以確認帳戶的位置。 預設值 Account.RegisterConfirmation僅用於測試,應在生產應用程式中停用自動帳戶驗證。
若要在註冊時要求使用已確認的帳戶並防止立即登入,請在 /Areas/Identity/Pages/Account/RegisterConfirmation.cshtml.cs 中設定 DisplayConfirmAccountLink = false:
[AllowAnonymous]
public class RegisterConfirmationModel : PageModel
{
    private readonly UserManager<IdentityUser> _userManager;
    private readonly IEmailSender _sender;

    public RegisterConfirmationModel(UserManager<IdentityUser> userManager, IEmailSender sender)
    {
        _userManager = userManager;
        _sender = sender;
    }

    public string Email { get; set; }

    public bool DisplayConfirmAccountLink { get; set; }

    public string EmailConfirmationUrl { get; set; }

    public async Task<IActionResult> OnGetAsync(string email, string returnUrl = null)
    {
        if (email == null)
        {
            return RedirectToPage("/Index");
        }

        var user = await _userManager.FindByEmailAsync(email);
        if (user == null)
        {
            return NotFound($"Unable to load user with email '{email}'.");
        }

        Email = email;
        // Once you add a real email sender, you should remove this code that lets you confirm the account
        DisplayConfirmAccountLink = false;
        if (DisplayConfirmAccountLink)
        {
            var userId = await _userManager.GetUserIdAsync(user);
            var code = await _userManager.GenerateEmailConfirmationTokenAsync(user);
            code = WebEncoders.Base64UrlEncode(Encoding.UTF8.GetBytes(code));
            EmailConfirmationUrl = Url.Page(
                "/Account/ConfirmEmail",
                pageHandler: null,
                values: new { area = "Identity", userId = userId, code = code, returnUrl = returnUrl },
                protocol: Request.Scheme);
        }

        return Page();
    }
}
登入
登入表單會在下列情況下顯示:
- 已選取 [登入] 連結。
- 使用者嘗試存取其未獲授權存取的受限制頁面,或其尚未由系統進行驗證。
提交 [登入] 頁面上的表單時,即會呼叫 OnPostAsync 動作。 _signInManager 物件會在 PasswordSignInAsync 上呼叫。
public async Task<IActionResult> OnPostAsync(string returnUrl = null)
{
    returnUrl = returnUrl ?? Url.Content("~/");

    if (ModelState.IsValid)
    {
        // This doesn't count login failures towards account lockout
        // To enable password failures to trigger account lockout,
        // set lockoutOnFailure: true
        var result = await _signInManager.PasswordSignInAsync(Input.Email,
                           Input.Password, Input.RememberMe, lockoutOnFailure: true);
        if (result.Succeeded)
        {
            _logger.LogInformation("User logged in.");
            return LocalRedirect(returnUrl);
        }
        if (result.RequiresTwoFactor)
        {
            return RedirectToPage("./LoginWith2fa", new
            {
                ReturnUrl = returnUrl,
                RememberMe = Input.RememberMe
            });
        }
        if (result.IsLockedOut)
        {
            _logger.LogWarning("User account locked out.");
            return RedirectToPage("./Lockout");
        }
        else
        {
            ModelState.AddModelError(string.Empty, "Invalid login attempt.");
            return Page();
        }
    }

    // If we got this far, something failed, redisplay form
    return Page();
}
如需如何做出授權決策的資訊,請參閱 ASP.NET Core 中的授權簡介。
登出
[登出] 連結會叫用 LogoutModel.OnPost 動作。
using Microsoft.AspNetCore.Authorization;
using Microsoft.AspNetCore.Identity;
using Microsoft.AspNetCore.Mvc;
using Microsoft.AspNetCore.Mvc.RazorPages;
using Microsoft.Extensions.Logging;
using System.Threading.Tasks;

namespace WebApp1.Areas.Identity.Pages.Account
{
    [AllowAnonymous]
    public class LogoutModel : PageModel
    {
        private readonly SignInManager<IdentityUser> _signInManager;
        private readonly ILogger<LogoutModel> _logger;

        public LogoutModel(SignInManager<IdentityUser> signInManager, ILogger<LogoutModel> logger)
        {
            _signInManager = signInManager;
            _logger = logger;
        }

        public void OnGet()
        {
        }

        public async Task<IActionResult> OnPost(string returnUrl = null)
        {
            await _signInManager.SignOutAsync();
            _logger.LogInformation("User logged out.");
            if (returnUrl != null)
            {
                return LocalRedirect(returnUrl);
            }
            else
            {
                return RedirectToPage();
            }
        }
    }
}
在上述程式碼中,程式碼 return RedirectToPage(); 必須是重新導向,以讓瀏覽器執行新的要求,並更新使用者的身分識別。
SignOutAsync 清除儲存在 cookie 中的使用者宣告。
在 Pages/Shared/_LoginPartial.cshtml 中指定了 Post:
@using Microsoft.AspNetCore.Identity
@inject SignInManager<IdentityUser> SignInManager
@inject UserManager<IdentityUser> UserManager

<ul class="navbar-nav">
@if (SignInManager.IsSignedIn(User))
{
    <li class="nav-item">
        <a  class="nav-link text-dark" asp-area="Identity" asp-page="/Account/Manage/Index"
                                              title="Manage">Hello @User.Identity.Name!</a>
    </li>
    <li class="nav-item">
        <form class="form-inline" asp-area="Identity" asp-page="/Account/Logout"
                                  asp-route-returnUrl="@Url.Page("/", new { area = "" })"
                                  method="post" >
            <button  type="submit" class="nav-link btn btn-link text-dark">Logout</button>
        </form>
    </li>
}
else
{
    <li class="nav-item">
        <a class="nav-link text-dark" asp-area="Identity" asp-page="/Account/Register">Register</a>
    </li>
    <li class="nav-item">
        <a class="nav-link text-dark" asp-area="Identity" asp-page="/Account/Login">Login</a>
    </li>
}
</ul>
測試 Identity
預設 Web 專案範本允許匿名存取首頁。 若要測試 Identity,請新增 [Authorize]:
using Microsoft.AspNetCore.Authorization;
using Microsoft.AspNetCore.Mvc.RazorPages;
using Microsoft.Extensions.Logging;

namespace WebApp1.Pages
{
    [Authorize]
    public class PrivacyModel : PageModel
    {
        private readonly ILogger<PrivacyModel> _logger;

        public PrivacyModel(ILogger<PrivacyModel> logger)
        {
            _logger = logger;
        }

        public void OnGet()
        {
        }
    }
}
如果您已登入,請登出。執行應用程式並選取 Privacy 連結。 您會被重新導向至登入頁面。
探索 Identity
若要更詳細地探索 Identity:
- 建立完整的身分識別 UI 來源
- 檢查每個頁面的來源,並逐步執行偵錯工具。
Identity 元件
所有 Identity 相依的 NuGet 套件都包含在 ASP.NET Core 共用架構中。
Identity 的主要套件為 Microsoft.AspNetCore.Identity。 此套件包含 ASP.NET Core Identity 的核心介面集,且由 Microsoft.AspNetCore.Identity.EntityFrameworkCore 所包含。
移轉至 ASP.NET Core Identity
如需移轉現有 Identity 存放區的詳細資訊和指引,請參閱移轉驗證和 Identity。
設定密碼強度
如需設定最低密碼需求的範例,請參閱設定。
防止靜態 Identity 資產發佈
若要防止將靜態 Identity 資產 (Identity UI 的樣式表單和 JavaScript 檔案) 發佈至 Web 根目錄,請將下列 ResolveStaticWebAssetsInputsDependsOn 屬性和 RemoveIdentityAssets 目標新增至應用程式的專案檔:
<PropertyGroup>
  <ResolveStaticWebAssetsInputsDependsOn>RemoveIdentityAssets</ResolveStaticWebAssetsInputsDependsOn>
</PropertyGroup>

<Target Name="RemoveIdentityAssets">
  <ItemGroup>
    <StaticWebAsset Remove="@(StaticWebAsset)" Condition="%(SourceId) == 'Microsoft.AspNetCore.Identity.UI'" />
  </ItemGroup>
</Target>
後續步驟
- ASP.NET Core Identity 原始程式碼
- AddDefaultIdentity 來源
- 如需使用 SQLite 設定 Identity 的相關資訊,請參閱此 GitHub 問題。
- 設定 Identity
- 使用以授權機制保護的使用者資料來建立 ASP.NET Core 應用程式
- 在 ASP.NET Core 專案中將使用者資料新增、下載和刪除至 Identity
- 允許為 ASP.NET Core 中的 TOTP 驗證器應用程式產生 QR 代碼
- 將驗證及 Identity 移轉至 ASP.NET Core 2.0
- ASP.NET Core 中的帳戶確認和密碼復原
- 在 ASP.NET Core 中使用 SMS 的雙因素驗證
- 在 Web 伺服陣列上裝載 ASP.NET Core
意見反應
即將登場:在 2024 年,我們將逐步淘汰 GitHub 問題作為內容的意見反應機制,並將它取代為新的意見反應系統。 如需詳細資訊,請參閱:https://aka.ms/ContentUserFeedback。
提交並檢視相關的意見反應