演講者:Tom Dykstra
Contoso University 範例 Web 應用程式示範如何使用 Entity Framework 5 Code First 和 Visual Studio 2012 建立 ASP.NET MVC 4 應用程式。 如需教學課程系列的資訊,請參閱本系列的第一個教學課程。
在上一個教學課程中,您已建立MVC應用程式,以使用 Entity Framework 和 SQL Server LocalDB 來儲存和顯示數據。 在本教學課程中,您將檢閱並自定義 CRUD (建立、讀取、更新、刪除)程序代碼,MVC Scaffolding 會在控制器和檢視中自動為您建立的程式代碼。
注意
實作存放庫模式,以在您的控制器及資料存取層之間建立抽象層是一種非常常見的做法。 若要讓這些教學課程保持簡單,您直到本系列稍後的教學課程才會實作存放庫。
在本教學課程中,您將建立下列網頁:


![顯示 [學生刪除] 頁面的螢幕快照。](implementing-basic-crud-functionality-with-the-entity-framework-in-asp-net-mvc-application/_static/image4.png)
建立詳細數據頁面
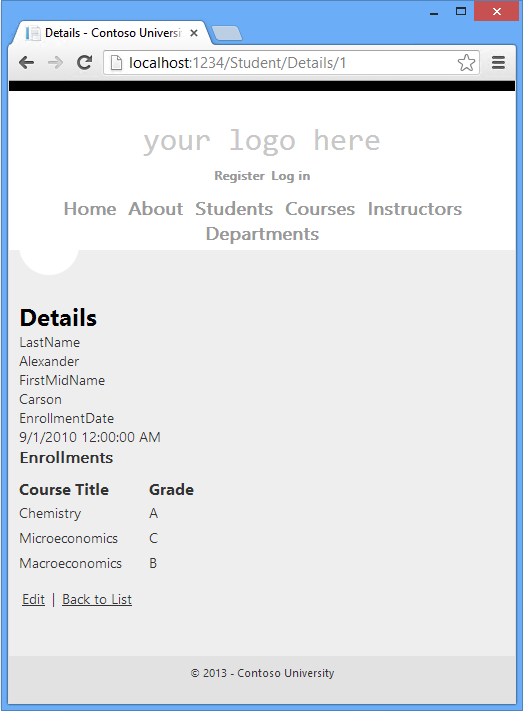
學生Index頁面的鷹架程式碼忽略了 Enrollments 屬性,因為該屬性包含一個集合。 在 Details 頁面中,您會在 HTML 資料表中顯示集合的內容。
在 Controllers\StudentController.cs中,檢視的 Details 動作方法會使用 Find 方法來擷取單 Student 一實體。
public ActionResult Details(int id = 0)
{
    Student student = db.Students.Find(id);
    if (student == null)
    {
        return HttpNotFound();
    }
    return View(student);
}
索引鍵值會當做 id 參數傳遞至 方法,並且來自 [索引] 頁面上 [詳細數據] 超連結中的路由數據。
打開 Views\Student\Details.cshtml。 每個欄位都使用
DisplayFor助手顯示,如下列範例所示:<div class="display-label"> @Html.DisplayNameFor(model => model.LastName) </div> <div class="display-field"> @Html.DisplayFor(model => model.LastName) </div>在
EnrollmentDate欄位之後,緊接在結尾fieldset標記之前,新增程式代碼以顯示註冊清單,如下列範例所示:<div class="display-label"> @Html.LabelFor(model => model.Enrollments) </div> <div class="display-field"> <table> <tr> <th>Course Title</th> <th>Grade</th> </tr> @foreach (var item in Model.Enrollments) { <tr> <td> @Html.DisplayFor(modelItem => item.Course.Title) </td> <td> @Html.DisplayFor(modelItem => item.Grade) </td> </tr> } </table> </div> </fieldset> <p> @Html.ActionLink("Edit", "Edit", new { id=Model.StudentID }) | @Html.ActionLink("Back to List", "Index") </p>此程式碼會以迴圈逐一巡覽
Enrollments導覽屬性中的實體。 對於屬性中的每個Enrollment實體,它顯示課程標題和成績。 課程標題是從儲存在Course實體的Course導航屬性中的Enrollments實體檢索的。 所有這些資料都會在需要時自動從資料庫中檢索。 (換句話說,您在這裡使用延遲載入。您未指定導覽屬性的急切式載入Courses,因此當您第一次嘗試存取該屬性時,就會將查詢傳送至資料庫以擷取數據。您可以在本系列稍後的閱讀相關數據教學課程中深入瞭解延遲載入和急切載入。選取 [學生] 索引標籤並按兩下亞歷山大·卡森的詳細資料連結,以執行頁面。 您會看到選取學生的課程及成績清單:
更新建立頁面
在 Controllers\StudentController.cs中,將 action 方法取代
HttpPost``Create為下列程式代碼,將區塊和 Bind 屬性新增try-catch至 Scaffolded 方法:[HttpPost] [ValidateAntiForgeryToken] public ActionResult Create( [Bind(Include = "LastName, FirstMidName, EnrollmentDate")] Student student) { try { if (ModelState.IsValid) { db.Students.Add(student); db.SaveChanges(); return RedirectToAction("Index"); } } catch (DataException /* dex */) { //Log the error (uncomment dex variable name after DataException and add a line here to write a log. ModelState.AddModelError("", "Unable to save changes. Try again, and if the problem persists see your system administrator."); } return View(student); }此程式碼將 ASP.NET MVC 模型綁定器建立的
Student實體新增至Students實體集,然後將變更儲存到資料庫。 (模型系結器是指 ASP.NET MVC 功能,可讓您更輕鬆地處理表單送出的數據;模型系結器會將張貼的表單值轉換成 CLR 類型,並將其傳遞至參數中的動作方法。在此情況下,模型系結器會使用集合中的Form屬性值,為您具現化Student實體。屬性
ValidateAntiForgeryToken有助於防止 跨網站要求偽造 攻擊。
> [!WARNING]
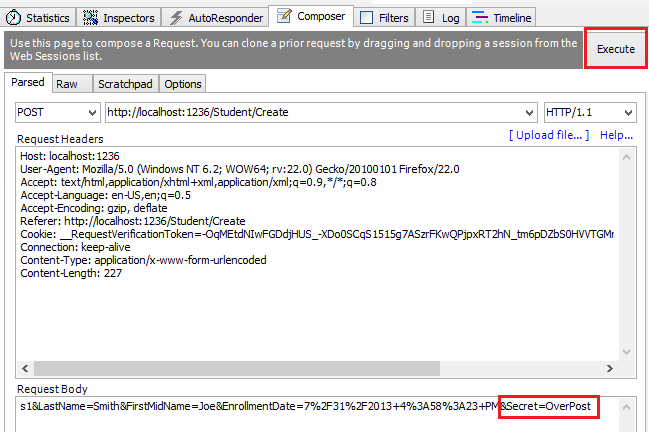
> Security - The `Bind` attribute is added to protect against *over-posting*. For example, suppose the `Student` entity includes a `Secret` property that you don't want this web page to update.
>
> [!code-csharp[Main](implementing-basic-crud-functionality-with-the-entity-framework-in-asp-net-mvc-application/samples/sample5.cs?highlight=7)]
>
> Even if you don't have a `Secret` field on the web page, a hacker could use a tool such as [fiddler](http://fiddler2.com/home), or write some JavaScript, to post a `Secret` form value. Without the [Bind](https://msdn.microsoft.com/library/system.web.mvc.bindattribute(v=vs.108).aspx) attribute limiting the fields that the model binder uses when it creates a `Student` instance*,* the model binder would pick up that `Secret` form value and use it to update the `Student` entity instance. Then whatever value the hacker specified for the `Secret` form field would be updated in your database. The following image shows the fiddler tool adding the `Secret` field (with the value "OverPost") to the posted form values.
>
> 
>
> The value "OverPost" would then be successfully added to the `Secret` property of the inserted row, although you never intended that the web page be able to update that property.
>
> It's a security best practice to use the `Include` parameter with the `Bind` attribute to *allowed attributes* fields. It's also possible to use the `Exclude` parameter to *blocked attributes* fields you want to exclude. The reason `Include` is more secure is that when you add a new property to the entity, the new field is not automatically protected by an `Exclude` list.
>
> Another alternative approach, and one preferred by many, is to use only view models with model binding. The view model contains only the properties you want to bind. Once the MVC model binder has finished, you copy the view model properties to the entity instance.
Other than the `Bind` attribute, the `try-catch` block is the only change you've made to the scaffolded code. If an exception that derives from [DataException](https://msdn.microsoft.com/library/system.data.dataexception.aspx) is caught while the changes are being saved, a generic error message is displayed. [DataException](https://msdn.microsoft.com/library/system.data.dataexception.aspx) exceptions are sometimes caused by something external to the application rather than a programming error, so the user is advised to try again. Although not implemented in this sample, a production quality application would log the exception (and non-null inner exceptions ) with a logging mechanism such as [ELMAH](https://code.google.com/p/elmah/).
The code in *Views\Student\Create.cshtml* is similar to what you saw in *Details.cshtml*, except that `EditorFor` and `ValidationMessageFor` helpers are used for each field instead of `DisplayFor`. The following example shows the relevant code:
[!code-cshtml[Main](implementing-basic-crud-functionality-with-the-entity-framework-in-asp-net-mvc-application/samples/sample6.cshtml)]
*Create.cshtml* also includes `@Html.AntiForgeryToken()`, which works with the `ValidateAntiForgeryToken` attribute in the controller to help prevent [cross-site request forgery](../../security/xsrfcsrf-prevention-in-aspnet-mvc-and-web-pages.md) attacks.
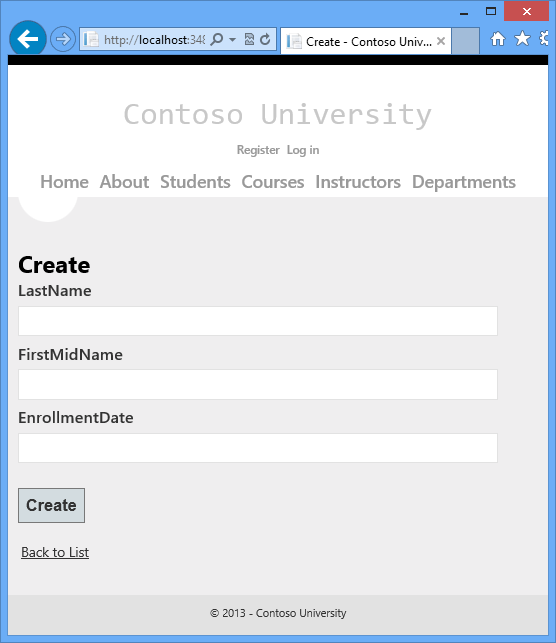
No changes are required in *Create.cshtml*.
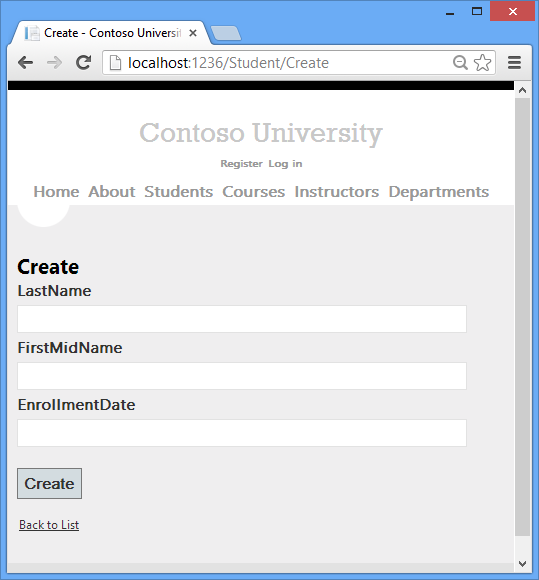
選取 [ 學生] 索引標籤並按兩下 [ 新建],以執行頁面。
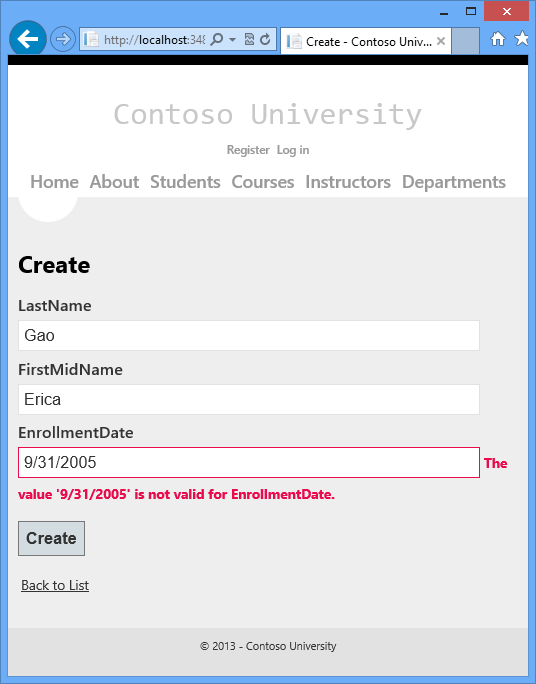
某些數據驗證預設會運作。 輸入名稱和無效日期,然後按一下建立以查看錯誤訊息。
下列醒目提示的程式代碼會顯示模型驗證檢查。
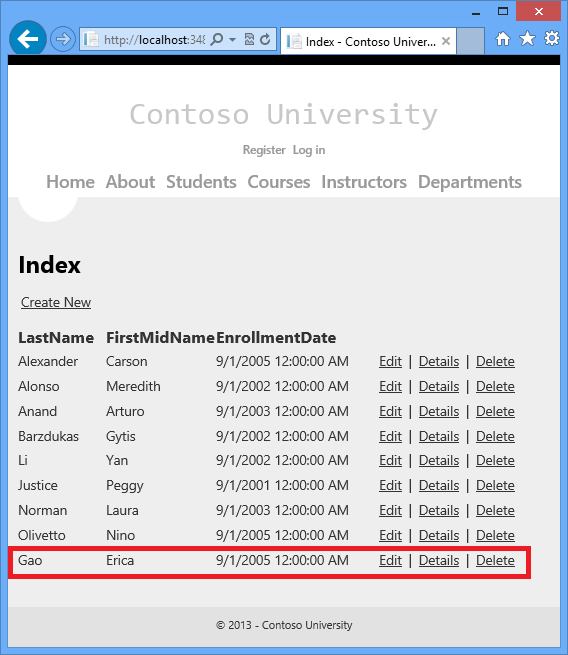
[HttpPost]
[ValidateAntiForgeryToken]
public ActionResult Create(Student student)
{
    if (ModelState.IsValid)
    {
        db.Students.Add(student);
        db.SaveChanges();
        return RedirectToAction("Index");
    }

    return View(student);
}
將日期變更為 2005/9/1/2005 等有效值,然後按兩下 [建立 ] 以查看新學生出現在 [索引 ] 頁面中。
更新編輯POST頁面
在 Controllers\StudentController.cs 中,HttpGetEdit方法(不含 HttpPost 屬性的方法)會使用 Find 方法來擷取選取Student的Details實體,如您在 方法中所見。 您不需要變更這個方法。
不過,將 action 方法取代HttpPostEdit為下列程式代碼,以新增try-catch區塊和 Bind 屬性:
[HttpPost]
[ValidateAntiForgeryToken]
public ActionResult Edit(
   [Bind(Include = "StudentID, LastName, FirstMidName, EnrollmentDate")]
   Student student)
{
   try
   {
      if (ModelState.IsValid)
      {
         db.Entry(student).State = EntityState.Modified;
         db.SaveChanges();
         return RedirectToAction("Index");
      }
   }
   catch (DataException /* dex */)
   {
      //Log the error (uncomment dex variable name after DataException and add a line here to write a log.
      ModelState.AddModelError("", "Unable to save changes. Try again, and if the problem persists see your system administrator.");
   }
   return View(student);
}
此程式代碼類似於您在方法中看到的內容HttpPostCreate。 不過,此程式代碼會在實體上設定旗標,指出實體已變更,而不是將模型系結器所建立的實體新增至實體集。 呼叫 SaveChanges 方法時,Modified 旗標會讓 Entity Framework 建立 SQL 語句來更新資料庫數據列。 資料庫數據列的所有數據行都會更新,包括使用者未變更的數據行,並忽略並行衝突。 (您將瞭解如何在本系列稍後的教學課程中處理並行。
實體狀態以及 Attach 和 SaveChanges 方法
資料庫內容會追蹤實體在記憶體中是否與其在資料庫中相對應的資料列保持同步,並且此項資訊會決定當您呼叫 SaveChanges 方法時會發生什麼事情。 例如,當您將新實體傳遞給 Add 方法時,該實體的狀態將設為 Added。 然後,當您呼叫 SaveChanges 方法時,資料庫上下文會發出 SQL INSERT 指令。
實體可能處於下列其中一種狀態:
Added. 該實體尚不存在於資料庫中。SaveChanges方法必須發出一個INSERT聲明。Unchanged.SaveChanges方法針對這個實體不需要進行任何動作。 當您從資料庫讀取一個實體時,實體便會以此狀態開始。Modified. 實體中一部分或全部的屬性值已經過修改。SaveChanges方法必須發出一個UPDATE聲明。Deleted. 實體已遭標示刪除。SaveChanges方法必須發出一個DELETE聲明。Detached. 實體未獲得資料庫內容追蹤。
在桌面應用程式中,狀態變更通常會自動進行設定。 在桌面類型的應用程式中,您讀取實體並變更其某些屬性值。 這會使得其實體狀態自動變更為 Modified。 然後,當您呼叫 SaveChanges 時,實體框架會產生一條 SQL 語句 UPDATE,該語句僅更新您變更的實際屬性。
Web 應用程式的斷開連接性質不允許這種連續的序列。 讀取實體的 DbContext 在頁面呈現後被釋放。 當呼叫 HttpPostEdit 動作方法時,會發出一個新請求,並且您有一個新的 DbContext 執行個體,因此您必須手動將實體狀態設為 然後,當您呼叫 Modified. 時,實體框架會更新資料庫行的所有列SaveChanges,因為 context 無法知道您更改了哪些屬性。
如果希望 SQL Update 語句只更新使用者實際變更的欄位,可以透過某種方式 (例如隱藏欄位) 保存原始值,以便在呼叫 HttpPostEdit 方法時可用。 然後,您可以使用原始值來建立 Student 實體、使用該原始版本的實體呼叫 Attach 方法、將實體的值更新為新的值,然後呼叫 SaveChanges. 如需詳細資訊,請參閱 MSDN Data Developer Center 中的實體狀態和 SaveChanges 和 Local Data 。
Views\Student\Edit.cshtml 中的程式代碼類似於您在 Create.cshtml 中看到的程序代碼,而且不需要變更。
選取 [ 學生] 索引標籤,然後按兩下 [編輯 ] 超連結,以執行頁面。
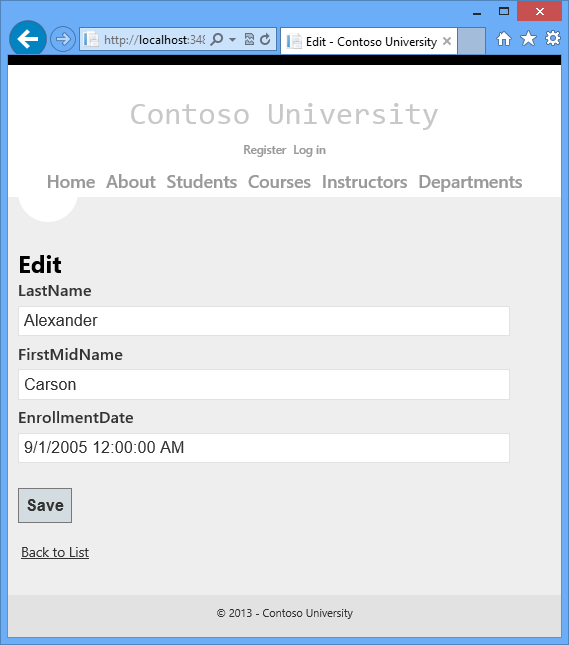
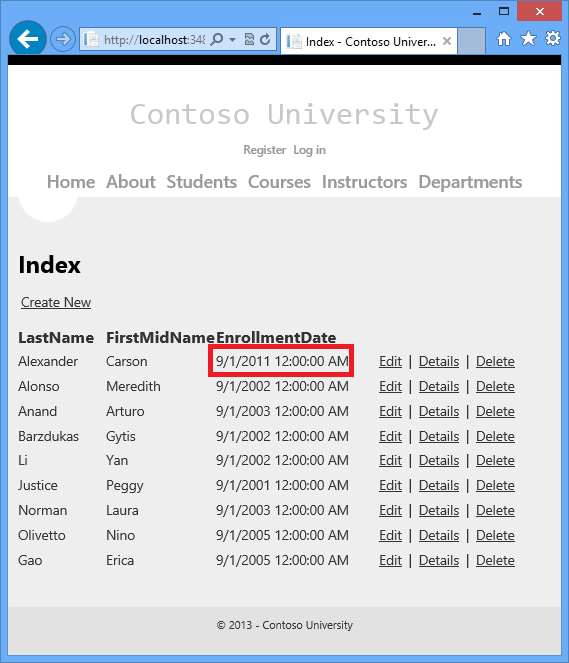
變更一部分的資料,然後按一下 [儲存]。 您可以在索引頁面中看到更改的資料。
更新刪除頁面
在 ControllersHttpGet\StudentController.csDelete 中,該方法的範本程式碼使用該方法來檢索所選實體,如您在 Find 和 Student 方法中看到的那樣DetailsEdit。 然而,若要在呼叫 SaveChanges 失敗時實作自訂錯誤訊息,您需要將一些功能新增至此方法及其對應的檢視。
如同您在更新及建立作業中所看到的,刪除作業需要兩個動作方法。 回應 GET 請求而呼叫的方法會顯示一個檢視,使用戶有機會批准或取消刪除操作。 若使用者核准,則便會建立 POST 要求。 當發生這種情況時,將呼叫 HttpPostDelete 方法,然後該方法實際上執行刪除操作。
您將向 try-catch 方法添加一個 HttpPostDelete 區塊來處理更新資料庫時可能發生的任何錯誤。 如果發生錯誤,HttpPostDeleteHttpGetDelete方法將呼叫該方法,並向其傳遞一個指示發生錯誤的參數。 方法 HttpGet Delete 接著會重新顯示確認頁面以及錯誤訊息,讓用戶有機會取消或再試一次。
將操作方法替換為以下程式碼,
HttpGetDelete程式碼管理錯誤報告:public ActionResult Delete(bool? saveChangesError=false, int id = 0) { if (saveChangesError.GetValueOrDefault()) { ViewBag.ErrorMessage = "Delete failed. Try again, and if the problem persists see your system administrator."; } Student student = db.Students.Find(id); if (student == null) { return HttpNotFound(); } return View(student); }此程式代碼接受 選擇性 的 Boolean 參數,指出是否在儲存變更失敗之後呼叫它。 此參數是
false當HttpGetDelete方法被呼叫而之前沒有失敗時的參數。 當HttpPostDelete方法呼叫它以回應資料庫更新錯誤時,參數為true,並且錯誤訊息將傳遞到檢視。將
HttpPostDelete操作方法 (名為DeleteConfirmed) 替換為以下程式碼,該程式碼執行實際的刪除操作並捕獲任何資料庫更新錯誤。[HttpPost] [ValidateAntiForgeryToken] public ActionResult Delete(int id) { try { Student student = db.Students.Find(id); db.Students.Remove(student); db.SaveChanges(); } catch (DataException/* dex */) { // uncomment dex and log error. return RedirectToAction("Delete", new { id = id, saveChangesError = true }); } return RedirectToAction("Index"); }此程式碼會擷取選取的實體,然後呼叫 Remove 方法將實體的狀態設為
Deleted。 當呼叫SaveChanges時,便會產生 SQLDELETE命令。 您也將動作方法的名稱從DeleteConfirmed變更為Delete。 支架程式碼命名HttpPostDelete方法以賦予DeleteConfirmedHttpPost方法唯一的簽名。 (CLR 要求重載方法具有不同的方法參數。) 既然簽名是唯一的,您可以堅持 MVC 約定並為HttpPost和HttpGet刪除方法使用相同的名稱。如果改善大量應用程式中的效能是優先順序,您可以藉由以下列程式代碼取代呼叫
Find和Remove方法的程式代碼行,以避免不必要的 SQL 查詢擷取數據列,如黃色醒目提示所示:Student studentToDelete = new Student() { StudentID = id }; db.Entry(studentToDelete).State = EntityState.Deleted;此程式碼僅使用主鍵值執行個體化
Student實體,然後將實體狀態設為Deleted。 這便是 Entity Framework 要刪除實體所需要的一切資訊。如前所述,
HttpGetDelete方法不會刪除資料。 回應 GET 請求而執行刪除操作 (或執行任何編輯操作、建立操作或任何其他變更資料的操作) 會產生安全風險。 有關詳細信息,請參閱 ASP.NET MVC 提示 #46 — 不要使用刪除鏈接,因為它們會在 Stephen Walther 的部落格 上建立安全漏洞。在 Views\Student\Delete.cshtml 中,在
h2標題和h3標題之間新增錯誤訊息,如下例所示:<h2>Delete</h2> <p class="error">@ViewBag.ErrorMessage</p> <h3>Are you sure you want to delete this?</h3>選取 [ 學生] 索引標籤並按下 [ 刪除 ] 超連結,以執行頁面:
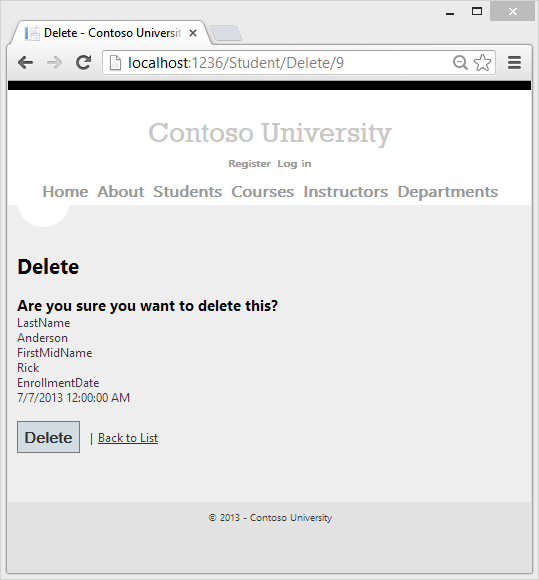
按一下刪除。 顯示的 [索引] 頁面將不會包含遭刪除的學生。 (您會看到 錯誤處理程式碼在 中運作的 範例處理本系列稍後的並行 教學課程。)
確保資料庫連接未保持開啟
若要確定資料庫連線已正確關閉,且其保留的資源已釋出,您應該會看到內容實例已處置。 這就是為什麼支架程式碼在 StudentController.cs 中的類別末尾提供 Dispose 方法的原因,如下範例所示:StudentController
protected override void Dispose(bool disposing)
{
    db.Dispose();
    base.Dispose(disposing);
}
基類 Controller 已經實現了該接口,因此此程式碼只需向該方法添加一個重寫即可明確處置上下文執行個體。IDisposableDispose(bool)
摘要
您現在擁有一組完整的頁面,可以對 Student 實體執行簡單的 CRUD 操作。 您使用 MVC 幫助程式為資料欄位產生 UI 元素。 如需MVC協助程式的詳細資訊,請參閱 使用HTML協助程式 轉譯窗體(頁面適用於MVC 3,但仍與MVC 4相關)。
在下一個教學課程中,您將藉由新增排序和分頁來擴充 [索引] 頁面的功能。
您可以在 ASP.NET 數據存取內容對應中找到其他 Entity Framework 資源的連結。