本教學課程說明如何建置 ASP.NET MVC 5 Web 應用程式,讓使用者能夠使用 OAuth 2.0 與來自外部驗證提供者的認證登入,例如 Facebook、Twitter、LinkedIn、Microsoft 或 Google。 為了簡單起見,本教學課程著重于使用 Facebook 和 Google 的認證。
在您的網站中啟用這些認證可提供顯著的優點,因為數百萬位使用者已經有這些外部提供者的帳戶。 如果使用者不需要建立並記住一組新的認證,這些使用者可能會更傾向于註冊您的網站。
另請參閱 使用 SMS 和電子郵件Two-Factor驗證 ASP.NET MVC 5 應用程式。
本教學課程也會示範如何新增使用者的設定檔資料,以及如何使用成員資格 API 來新增角色。 本教學課程是由 Rick Anderson 所撰寫, (請在 Twitter 上遵循我: @RickAndMSFT) 。
開始使用
從安裝並執行Visual Studio Express 2013 for Web或Visual Studio 2013開始。 安裝 Visual Studio 2013 Update 3 或更高版本。
注意
您必須安裝 Visual Studio 2013 Update 3 或更高版本,才能使用 Google OAuth 2 並在本機進行偵錯,而不會顯示 SSL 警告。
從 [開始] 頁面按一下 [新增專案],或者您可以使用功能表並選取 [檔案],然後選取 [新增專案]。
![顯示 Visual Studio [開始] 頁面的螢幕擷取畫面。](create-an-aspnet-mvc-5-app-with-facebook-and-google-oauth2-and-openid-sign-on/_static/image1.png)
建立您的第一個應用程式
按一下 [新增專案],然後選取左側的 [Visual C# ],然後選取 [ Web ],然後選取 [ASP.NET Web 應用程式]。 將專案命名為 「MvcAuth」,然後按一下 [ 確定]。
![顯示 Visual Studio 新增專案功能表頁面的螢幕擷取畫面。M v c 驗證會在 [名稱] 文字欄位中輸入。](create-an-aspnet-mvc-5-app-with-facebook-and-google-oauth2-and-openid-sign-on/_static/image2.png)
在 [ 新增 ASP.NET 專案 ] 對話方塊中,按一下 [MVC]。 如果驗證不是 個別使用者帳戶,請按一下 [變更驗證 ] 按鈕,然後選取 [個別使用者帳戶]。 藉由在 雲端中檢查主機,應用程式將很容易在 Azure 中裝載。
![顯示 [新增 S P 點 NET 專案] 對話方塊的螢幕擷取畫面。[變更驗證] 按鈕和 [雲端中的主機] 核取方塊會反白顯示。](create-an-aspnet-mvc-5-app-with-facebook-and-google-oauth2-and-openid-sign-on/_static/image3.png)
如果您在 雲端中選取 [主機],請完成 [設定] 對話方塊。
![顯示 [設定 Microsoft Azure 網站] 對話方塊的螢幕擷取畫面。輸入了範例資料庫密碼。](create-an-aspnet-mvc-5-app-with-facebook-and-google-oauth2-and-openid-sign-on/_static/image4.png)
使用 NuGet 更新至最新的 OWIN 中介軟體
使用 NuGet 套件管理員來更新 OWIN 中介軟體。 選取左側功能表中更新。 您可以按一下 [ 全部更新] 按鈕,或只搜尋下一個影像中顯示的 OWIN 套件 () :
![顯示 [管理 Nu GET 套件] 對話方塊的螢幕擷取畫面。更新列和 [全部更新] 按鈕會反白顯示。](create-an-aspnet-mvc-5-app-with-facebook-and-google-oauth2-and-openid-sign-on/_static/image5.png)
在下圖中,只會顯示 OWIN 套件:
![顯示 [管理 Nu GET 套件] 對話方塊的螢幕擷取畫面。其中已輸入 OWN 的更新列和搜尋列會反白顯示。](create-an-aspnet-mvc-5-app-with-facebook-and-google-oauth2-and-openid-sign-on/_static/image6.png)
從套件管理員主控台 (PMC) ,您可以輸入 Update-Package 命令,以更新所有套件。
按 F5 或 Ctrl+F5 以執行應用程式。 在下圖中,埠號碼為 1234。 當您執行應用程式時,您會看到不同的埠號碼。
視瀏覽器視窗的大小而定,您可能需要按一下流覽圖示,以查看 [首頁]、[ 關於]、[ 連絡人]、[ 註冊 ] 和 [ 登入 ] 連結。
![顯示 [我的 A S P 點 NET 首頁] 的螢幕擷取畫面。[流覽] 圖示會反白顯示。](create-an-aspnet-mvc-5-app-with-facebook-and-google-oauth2-and-openid-sign-on/_static/image7.png)
![顯示 [我的 A S P 點 NET 首頁] 的螢幕擷取畫面。導覽圖示會醒目提示並選取,其中顯示具有導覽連結的下拉式功能表。](create-an-aspnet-mvc-5-app-with-facebook-and-google-oauth2-and-openid-sign-on/_static/image8.png)
在專案中設定 SSL
若要連線到 Google 和 Facebook 之類的驗證提供者,您必須設定IIS-Express使用 SSL。 請務必在登入後繼續使用 SSL,而不會捨棄至 HTTP,您的登入 Cookie 就像您的使用者名稱和密碼一樣秘密,而且不使用 SSL,您會在網路以純文字傳送。 此外,您已花一些時間執行交握並保護通道安全 (這是在 MVC 管線執行之前,HTTPS 的速度比) HTTP 慢很多,因此在登入後重新導向回 HTTP 不會讓目前的要求或未來的要求更快。
在方案總管中,按一下MvcAuth專案。
按 F4 鍵以顯示專案屬性。 或者,從 [ 檢視] 功能表中,您可以選取 [ 屬性視窗]。
將 [已啟用 SSL] 變更為 True。
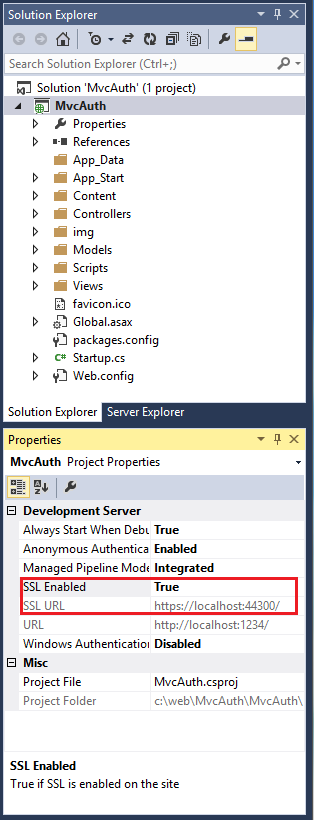
複製 SSL URL (,
https://localhost:44300/除非您已建立其他 SSL 專案) 。在方案總管中,以滑鼠右鍵按一下MvcAuth專案,然後選取 [屬性]。
選取 [Web] 索引標籤,然後將 [SSL URL] 貼到 [ 專案 URL ] 方塊中。 (Ctl+S) 儲存檔案。 您需要此 URL 來設定 Facebook 和 Google 驗證應用程式。
![顯示 M v c 驗證專案屬性頁面的螢幕擷取畫面。左側功能表上的 [Web] 索引標籤會反白顯示貼上 [專案 U R L] 方塊中的 S L U R L。](create-an-aspnet-mvc-5-app-with-facebook-and-google-oauth2-and-openid-sign-on/_static/image10.png)
將 RequireHttps 屬性新增至
Home控制器,以要求所有要求都必須使用 HTTPS。 更安全的方法是將 RequireHttps 篩選新增至應用程式。 See the section "Protect the Application with SSL and the Authorize Attribute" in my tutorial Create an ASP.NET MVC app with auth and SQL DB and deploy to Azure App Service. 首頁控制器的一部分如下所示。[RequireHttps] public class HomeController : Controller { public ActionResult Index() { return View(); }按 CTRL+F5 執行應用程式。 如果您過去已安裝憑證,您可以略過本節的其餘部分,並跳至建立適用于 OAuth 2 的 Google 應用程式,並將應用程式連線至專案,否則請遵循指示來信任IIS Express產生的自我簽署憑證。
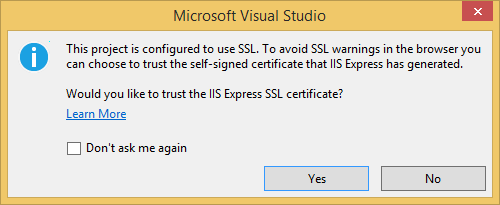
閱讀 [安全性警告] 對話方塊,如果您想要安裝代表 localhost 的憑證,請按一下 [ 是 ]。
![顯示 [Visual Studio 安全性警告] 對話方塊的螢幕擷取畫面,提示使用者選擇是否要安裝憑證。](create-an-aspnet-mvc-5-app-with-facebook-and-google-oauth2-and-openid-sign-on/_static/image12.png)
IE 顯示 首頁 ,沒有出現 SSL 警告。
![顯示 [我的 A S P 點 NET 首頁] 沒有 S S L 警告的螢幕擷取畫面。](create-an-aspnet-mvc-5-app-with-facebook-and-google-oauth2-and-openid-sign-on/_static/image13.png)
Google Chrome 也接受憑證,並會顯示 HTTPS 內容,而不會顯示警告。 Firefox 會使用自己的憑證存放區,因此會顯示警告。 針對我們的應用程式,您可以放心地按一下 [我瞭解風險]。
![顯示在 Firefox 上執行的 [我的 A S P 點 NET] 應用程式的螢幕擷取畫面。[不受信任的連線] 警告頁面會詢問使用者是否接受應用程式並繼續。](create-an-aspnet-mvc-5-app-with-facebook-and-google-oauth2-and-openid-sign-on/_static/image14.png)
建立適用于 OAuth 2 的 Google 應用程式,並將應用程式連線至專案
警告
如需目前的 Google OAuth 指示,請參閱在 ASP.NET Core 中設定 Google 驗證。
如果您之前尚未建立專案,請選取左側索引標籤中的 [ 認證 ],然後選取 [ 建立]。
在左側索引標籤中,按一下 [ 認證]。
按一下 [建立認證 ],然後按一下 [OAuth 用戶端識別碼]。
- 在 [ 建立用戶端識別碼 ] 對話方塊中,保留應用程式類型的預設 Web 應用程式 。
- 除非您已建立其他 SSL) 專案,否則請將授權 JavaScript來源設定為上述使用的 SSL URL (
https://localhost:44300/ - 將 授權的重新導向 URI 設定為:
https://localhost:44300/signin-google
按一下 [OAuth 同意] 畫面功能表項目,然後設定您的電子郵件地址和產品名稱。 當您完成表單時,請按一下 [ 儲存]。
按一下 [程式庫] 功能表項目,搜尋 Google+ API,按一下它,然後按 [啟用]。
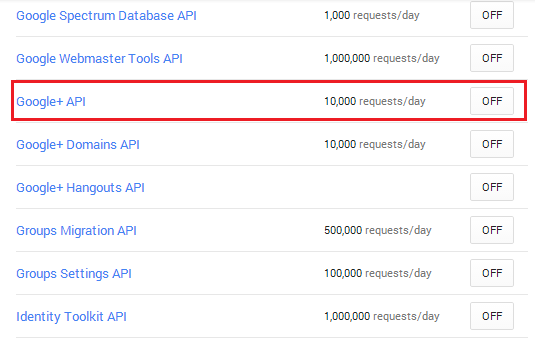
下圖顯示已啟用的 API。
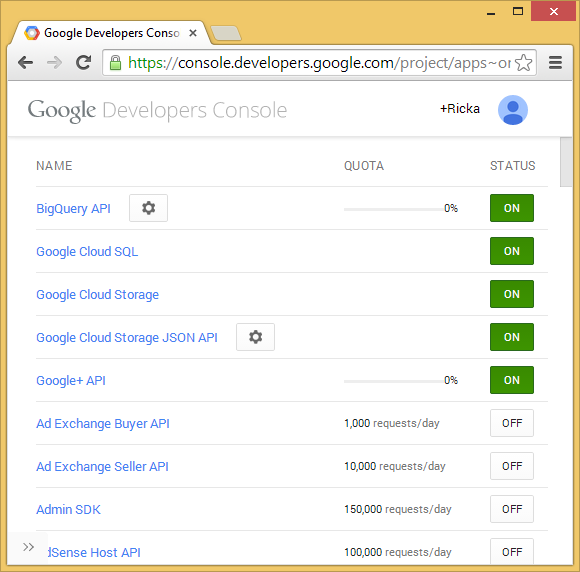
從 Google API API 管理員,流覽 [ 認證 ] 索引標籤以取得 用戶端識別碼。 下載以儲存具有應用程式秘密的 JSON 檔案。 將ClientId和ClientSecret複製並貼到
UseGoogleAuthenticationApp_Start資料夾中Startup.Auth.cs檔案中找到的方法。 如下所示的 ClientId 和 ClientSecret 值是範例,而且無法運作。public void ConfigureAuth(IAppBuilder app) { // Configure the db context and user manager to use a single instance per request app.CreatePerOwinContext(ApplicationDbContext.Create); app.CreatePerOwinContext<ApplicationUserManager>(ApplicationUserManager.Create); // Enable the application to use a cookie to store information for the signed in user // and to use a cookie to temporarily store information about a user logging in with a third party login provider // Configure the sign in cookie app.UseCookieAuthentication(new CookieAuthenticationOptions { AuthenticationType = DefaultAuthenticationTypes.ApplicationCookie, LoginPath = new PathString("/Account/Login"), Provider = new CookieAuthenticationProvider { OnValidateIdentity = SecurityStampValidator.OnValidateIdentity<ApplicationUserManager, ApplicationUser>( validateInterval: TimeSpan.FromMinutes(30), regenerateIdentity: (manager, user) => user.GenerateUserIdentityAsync(manager)) } }); app.UseExternalSignInCookie(DefaultAuthenticationTypes.ExternalCookie); // Uncomment the following lines to enable logging in with third party login providers //app.UseMicrosoftAccountAuthentication( // clientId: "", // clientSecret: ""); //app.UseTwitterAuthentication( // consumerKey: "", // consumerSecret: ""); //app.UseFacebookAuthentication( // appId: "", // appSecret: ""); app.UseGoogleAuthentication( clientId: "000-000.apps.googleusercontent.com", clientSecret: "00000000000"); }警告
安全性 - 永不將敏感性資料儲存在原始程式碼中。 帳戶和認證會新增至上述程式碼,讓範例保持簡單。 請參閱將密碼和其他敏感性資料部署至 ASP.NET 和Azure App 服務的最佳做法。
按 CTRL+F5 建置並執行應用程式。 按一下 [登入] 連結。
![顯示 [我的 A S P 點 NET 首頁] 的螢幕擷取畫面。[流覽] 按鈕和 [登入] 連結會反白顯示。](create-an-aspnet-mvc-5-app-with-facebook-and-google-oauth2-and-openid-sign-on/_static/image17.png)
在 [使用其他服務登入] 下,按一下 [Google]。
![顯示 [我的 A S P 點 NET 登入] 頁面的螢幕擷取畫面。醒目提示 [使用其他服務登入對話方塊] 和 [Google] 按鈕。](create-an-aspnet-mvc-5-app-with-facebook-and-google-oauth2-and-openid-sign-on/_static/image18.png)
注意
如果您錯過上述任何步驟,您會收到 HTTP 401 錯誤。 重新檢查上述步驟。 如果您遺漏必要的設定 (例如 產品名稱) ,請新增遺漏的專案並儲存;驗證可能需要幾分鐘的時間才能運作。
系統會將您重新導向至將輸入認證的 Google 網站。
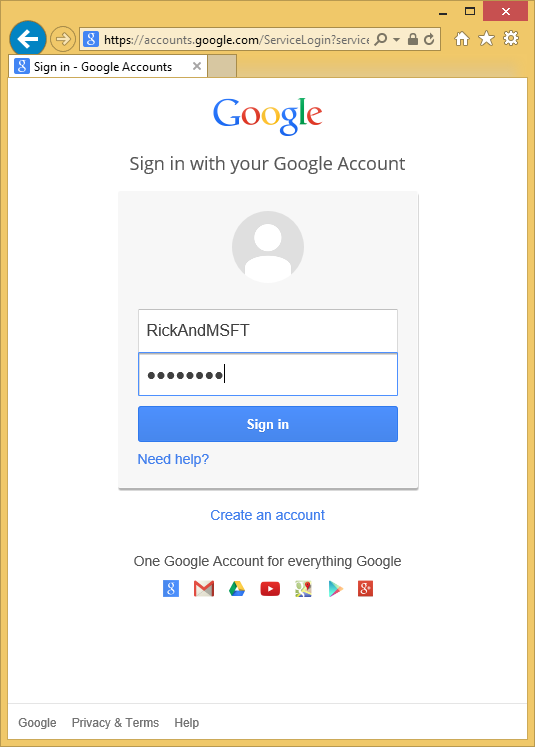
輸入認證後,系統便會提示您提供權限給剛建立的 Web 應用程式:
![顯示 [Google 帳戶要求許可權] 頁面的螢幕擷取畫面,提示使用者取消或接受 Web 應用程式的離線存取。](create-an-aspnet-mvc-5-app-with-facebook-and-google-oauth2-and-openid-sign-on/_static/image20.png)
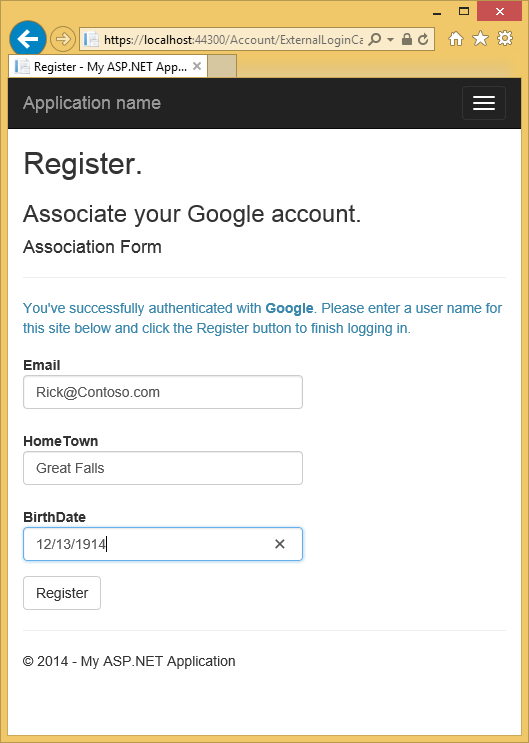
按一下 [接受]。 您現在會重新導向回 MvcAuth 應用程式的 [ 註冊 ] 頁面,您可以在其中註冊 Google 帳戶。 您可以選擇變更用於 Gmail 帳戶的本機電子郵件註冊名稱,但您通常會想保留預設電子郵件別名 (也就是,您用來驗證的名稱)。 按一下 [註冊] 。
![顯示 [我的 A S P 點 NET 註冊應用程式] 頁面的螢幕擷取畫面。系統會在電子郵件文字欄位中輸入範例 Google 帳戶。](create-an-aspnet-mvc-5-app-with-facebook-and-google-oauth2-and-openid-sign-on/_static/image21.png)
在 Facebook 中建立應用程式,並將應用程式連線至專案
警告
如需目前的 Facebook OAuth2 驗證指示,請參閱 設定 Facebook 驗證
使用伺服器總管檢查成員資格資料
在 [ 檢視] 功能表中,按一下 [伺服器總管]。
![顯示 Visual Studio [檢視] 下拉式功能表的螢幕擷取畫面,其中已醒目提示 [伺服器總管]。](create-an-aspnet-mvc-5-app-with-facebook-and-google-oauth2-and-openid-sign-on/_static/image32.png)
展開 [DefaultConnection (MvcAuth) ],展開 [ 資料表],以滑鼠右鍵按一下 [AspNetUsers ],然後按一下 [ 顯示資料表資料]。
![顯示 [服務總管] 功能表選項的螢幕擷取畫面。[資料連線]、[預設連接 M v c 驗證] 和 [資料表] 索引標籤會展開。](create-an-aspnet-mvc-5-app-with-facebook-and-google-oauth2-and-openid-sign-on/_static/image33.png)
將設定檔資料新增至使用者類別
在本節中,您會在註冊期間將生日和住家新增至使用者資料,如下圖所示。
開啟 Models\IdentityModels.cs 檔案,並新增生日和家庭城市屬性:
public class ApplicationUser : IdentityUser
{
    public string HomeTown { get; set; }
    public System.DateTime? BirthDate { get; set; }
    public async Task<ClaimsIdentity> GenerateUserIdentityAsync(UserManager<ApplicationUser> manager)
    {
        // Note the authenticationType must match the one defined in CookieAuthenticationOptions.AuthenticationType
        var userIdentity = await manager.CreateIdentityAsync(this, DefaultAuthenticationTypes.ApplicationCookie);
        // Add custom user claims here
        return userIdentity;
    }
}
開啟 Models\AccountViewModels.cs 檔案,並在 中 ExternalLoginConfirmationViewModel 開啟設定的生日和家庭城市屬性。
public class ExternalLoginConfirmationViewModel
{
    [Required]
    [EmailAddress]
    [Display(Name = "Email")]
    public string Email { get; set; }

    public string HomeTown { get; set; }
    public System.DateTime? BirthDate { get; set; }
}
開啟 Controllers\AccountController.cs 檔案,並在動作方法中 ExternalLoginConfirmation 為生日和住家新增程式碼,如下所示:
[HttpPost]
[AllowAnonymous]
[ValidateAntiForgeryToken]
public async Task<ActionResult> ExternalLoginConfirmation(ExternalLoginConfirmationViewModel model, string returnUrl)
{
    if (User.Identity.IsAuthenticated)
    {
        return RedirectToAction("Manage");
    }

    if (ModelState.IsValid)
    {
        // Get the information about the user from the external login provider
        var info = await AuthenticationManager.GetExternalLoginInfoAsync();
        if (info == null)
        {
            return View("ExternalLoginFailure");
        }
        var user = new ApplicationUser()
        {
            UserName = model.Email, Email = model.Email,
            BirthDate = model.BirthDate,
            HomeTown  = model.HomeTown

        };
        IdentityResult result = await UserManager.CreateAsync(user);
        if (result.Succeeded)
        {
            result = await UserManager.AddLoginAsync(user.Id, info.Login);
            if (result.Succeeded)
            {
                await SignInAsync(user, isPersistent: false);

                // For more information on how to enable account confirmation and password reset please visit https://go.microsoft.com/fwlink/?LinkID=320771
                // Send an email with this link
                // string code = await UserManager.GenerateEmailConfirmationTokenAsync(user.Id);
                // var callbackUrl = Url.Action("ConfirmEmail", "Account", new { userId = user.Id, code = code }, protocol: Request.Url.Scheme);
                // SendEmail(user.Email, callbackUrl, "Confirm your account", "Please confirm your account by clicking this link");

                return RedirectToLocal(returnUrl);
            }
        }
        AddErrors(result);
    }

    ViewBag.ReturnUrl = returnUrl;
    return View(model);
}
將生日和住家城市新增至 Views\Account\ExternalLoginConfirmation.cshtml 檔案:
@model MvcAuth.Models.ExternalLoginConfirmationViewModel
@{
    ViewBag.Title = "Register";
}
<h2>@ViewBag.Title.</h2>
<h3>Associate your @ViewBag.LoginProvider account.</h3>

@using (Html.BeginForm("ExternalLoginConfirmation", "Account", new { ReturnUrl = ViewBag.ReturnUrl }, FormMethod.Post, new { @class = "form-horizontal", role = "form" }))
{
    @Html.AntiForgeryToken()

    <h4>Association Form</h4>
    <hr />
    @Html.ValidationSummary(true, "", new { @class = "text-danger" })
    <p class="text-info">
        You've successfully authenticated with <strong>@ViewBag.LoginProvider</strong>.
            Please enter a user name for this site below and click the Register button to finish
            logging in.
    </p>
    <div class="form-group">
        @Html.LabelFor(m => m.Email, new { @class = "col-md-2 control-label" })
        <div class="col-md-10">
            @Html.TextBoxFor(m => m.Email, new { @class = "form-control" })
            @Html.ValidationMessageFor(m => m.Email, "", new { @class = "text-danger" })
        </div>
    </div>
    <div class="form-group">
        @Html.LabelFor(m => m.HomeTown, new { @class = "col-md-2 control-label" })
        <div class="col-md-10">
            @Html.TextBoxFor(m => m.HomeTown, new { @class = "form-control" })
            @Html.ValidationMessageFor(m => m.HomeTown)
        </div>
    </div>
    <div class="form-group">
        @Html.LabelFor(m => m.BirthDate, new { @class = "col-md-2 control-label" })
        <div class="col-md-10">
            @Html.TextBoxFor(m => m.BirthDate, new { @class = "form-control" })
            @Html.ValidationMessageFor(m => m.BirthDate)
        </div>
    </div>
    <div class="form-group">
        <div class="col-md-offset-2 col-md-10">
            <input type="submit" class="btn btn-default" value="Register" />
        </div>
    </div>
}

@section Scripts {
    @Scripts.Render("~/bundles/jqueryval")
}
刪除成員資格資料庫,讓您可以再次向您的應用程式註冊 Facebook 帳戶,並確認您可以新增生日和住家設定檔資訊。
從方案總管按一下 [顯示所有檔案]圖示,然後按一下滑鼠右鍵Add_Data\aspnet-MvcAuth-dateStamp.mdf <>,然後按一下 [刪除]。
![顯示 [方案總管] 頁面的螢幕擷取畫面。[顯示所有檔案] 圖示和 M v c 驗證成員資格資料庫會反白顯示。](create-an-aspnet-mvc-5-app-with-facebook-and-google-oauth2-and-openid-sign-on/_static/image36.png)
從 [ 工具 ] 功能表中,按一下 [NuGet 套件管理員],然後按一下 [ 套件管理員主控台 ] (PMC) 。 在 PMC 中輸入下列命令。
- Enable-Migrations
- Add-Migration Init
- Update-Database
執行應用程式,並使用 FaceBook 和 Google 登入並註冊一些使用者。
檢查成員資格資料
在 [ 檢視] 功能表中,按一下 [伺服器總管]。
![顯示 Visual Studio [檢視] 下拉式功能表的螢幕擷取畫面。[服務總管] 選項會反白顯示。](create-an-aspnet-mvc-5-app-with-facebook-and-google-oauth2-and-openid-sign-on/_static/image37.png)
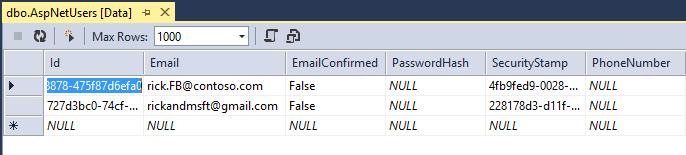
以滑鼠右鍵按一下 [AspNetUsers ],然後按一下 [ 顯示資料表資料]。
![顯示 [伺服器總管] 功能表選項的螢幕擷取畫面。A 的 p Net Users 和 [顯示資料表資料] 選項會反白顯示。](create-an-aspnet-mvc-5-app-with-facebook-and-google-oauth2-and-openid-sign-on/_static/image38.png)
HomeTown和 BirthDate 欄位如下所示。
![顯示 A p Net Users 資料表資料的螢幕擷取畫面。資料表資料會顯示 [識別碼]、[住家城市]、[生日]、[Email] 和 [確認] 欄位Email。](create-an-aspnet-mvc-5-app-with-facebook-and-google-oauth2-and-openid-sign-on/_static/image39.png)
登出您的應用程式,並使用另一個帳戶登入
如果您使用 Facebook 登入您的應用程式,然後登出並嘗試使用不同的 Facebook 帳戶再次登入, (使用相同的瀏覽器) ,您將會立即登入您先前使用的 Facebook 帳戶。 若要使用另一個帳戶,您必須流覽至 Facebook 並登出 Facebook。 相同的規則適用于任何其他協力廠商驗證提供者。 或者,您可以使用不同的瀏覽器,以另一個帳戶登入。
後續步驟
遵循教學課程:使用驗證和 SQL DB 建立 ASP.NET MVC 應用程式,並部署至Azure App 服務,這會繼續進行本教學課程,並顯示下列內容:
- 如何將應用程式部署至 Azure。
- 如何使用角色保護您的應用程式。
- 如何使用 RequireHttps 和 Authorize 篩選來保護您的應用程式。
- 如何使用成員資格 API 來新增使用者和角色。
如需 ASP.NET 外部驗證服務運作方式的良好說明,請參閱 Robert McMurray 的外部驗證服務。 Robert 的文章也會詳細說明如何啟用 Microsoft 和 Twitter 驗證。 Tom Dykstra 的絕佳 EF/MVC 教學 課程示範如何使用 Entity Framework。