在本教學課程中,我們將為 DataList 建立更豐富的編輯介面,其中包含 DropDownList 和 CheckBox。
簡介
DataList 中的 EditItemTemplate 標記和 Web 控制項會定義其可編輯的介面。 到目前為止,我們已檢查的所有可編輯 DataList 範例中,可編輯的介面是由 TextBox Web 控制項所組成。 在上一個教學課程中,我們藉由新增驗證控件來改善編輯時間用戶體驗。
EditItemTemplate可以進一步展開以包含 TextBox 以外的 Web 控件,例如 DropDownLists、RadioButtonLists、Calendars 等等。 如同 TextBoxes,自訂編輯介面以包含其他 Web 控件時,請使用下列步驟:
- 將 Web 控制項新增至
EditItemTemplate。 - 使用數據系結語法,將對應的數據域值指派給適當的屬性。
- 在事件處理程式中
UpdateCommand,以程式設計方式存取 Web 控件值,並將其傳遞至適當的 BLL 方法。
在本教學課程中,我們將為 DataList 建立更豐富的編輯介面,其中包含 DropDownList 和 CheckBox。 特別是,我們將建立一個 DataList 來列出產品資訊,並允許更新產品名稱、供應商、類別和已停止狀態(請參閱圖 1)。
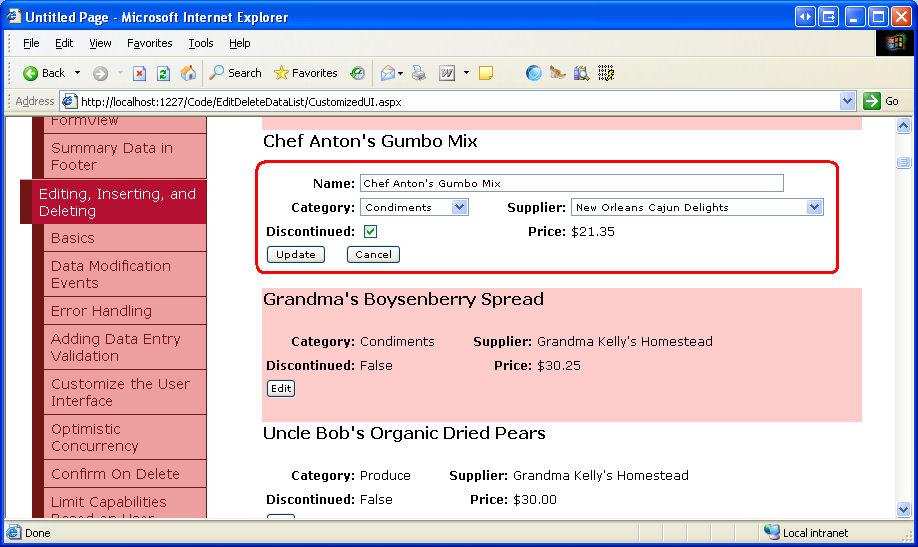
圖 1:編輯介面包含 TextBox、兩個 DropDownList 和 CheckBox(按兩擊以檢視完整大小的影像)
步驟 1:顯示產品資訊
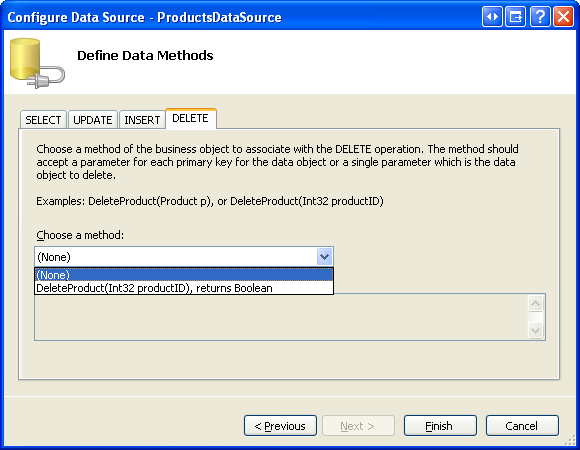
在我們可以建立 DataList 的可編輯介面之前,我們必須先建置只讀介面。 從開啟 CustomizedUI.aspx 資料夾的頁面 EditDeleteDataList 開始,然後從設計師將 DataList 新增至頁面,將其 ID 屬性設定為 Products。 從 DataList 的智慧標記中,建立新的 ObjectDataSource。 將這個新的 ObjectDataSource ProductsDataSource 命名為 ,並將其設定為從 類別 s ProductsBLL 方法擷GetProducts取數據。 如同先前可編輯的 DataList 教學課程,我們將直接前往商業規則層來更新已編輯的產品資訊。 因此,將 UPDATE、INSERT 和 DELETE 索引標籤中的下拉式清單設定為 [無]。
![將 [UPDATE]、[插入] 和 [刪除] 索引標籤下拉式清單設定為 [無]](customizing-the-datalist-s-editing-interface-cs/_static/image4.png)
圖 2:將 UPDATE、INSERT 和 DELETE 索引標籤下拉式清單設定為 [無] (按兩下以檢視完整大小的影像)
設定 ObjectDataSource 之後,Visual Studio 會為 DataList 建立預設值 ItemTemplate ,其中列出傳回之每個數據欄位的名稱和值。
ItemTemplate修改 ,讓範本列出元素中的<h4>產品名稱,以及類別名稱、供應商名稱、價格和已停止狀態。 此外,新增 [編輯] 按鈕,確定其 CommandName 屬性設定為 [編輯]。 我的 ItemTemplate 宣告式標記如下:
<ItemTemplate>
    <h4>
        <asp:Label ID="ProductNameLabel" runat="server"
            Text='<%# Eval("ProductName") %>' />
    </h4>
    <table border="0">
        <tr>
            <td class="ProductPropertyLabel">Category:</td>
            <td class="ProductPropertyValue">
                <asp:Label ID="CategoryNameLabel" runat="server"
                    Text='<%# Eval("CategoryName") %>' />
            </td>
            <td class="ProductPropertyLabel">Supplier:</td>
            <td class="ProductPropertyValue">
                <asp:Label ID="SupplierNameLabel" runat="server"
                    Text='<%# Eval("SupplierName") %>' />
            </td>
        </tr>
        <tr>
            <td class="ProductPropertyLabel">Discontinued:</td>
            <td class="ProductPropertyValue">
                <asp:Label ID="DiscontinuedLabel" runat="server"
                    Text='<%# Eval("Discontinued") %>' />
            </td>
            <td class="ProductPropertyLabel">Price:</td>
            <td class="ProductPropertyValue">
                <asp:Label ID="UnitPriceLabel" runat="server"
                    Text='<%# Eval("UnitPrice", "{0:C}") %>' />
            </td>
        </tr>
        <tr>
            <td colspan="4">
                <asp:Button runat="Server" ID="EditButton"
                    Text="Edit" CommandName="Edit" />
            </td>
        </tr>
    </table>
    <br />
</ItemTemplate>
上述標記會針對產品名稱使用 <h4> 標題和其餘欄位的四欄 <table> 來配置產品資訊。
ProductPropertyLabel在中ProductPropertyValue定義的和 Styles.css CSS 類別已在先前的教學課程中討論。 圖 3 顯示透過瀏覽器檢視時的進度。
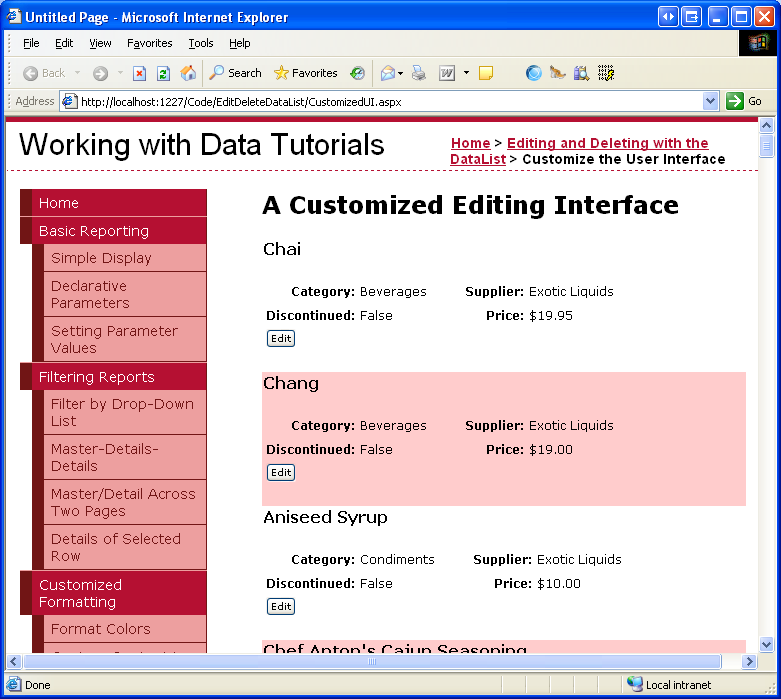
圖 3:顯示每個產品的名稱、供應商、類別、已停止狀態和價格(按兩下以檢視完整大小的影像)
步驟 2:將 Web 控制項新增至編輯介面
建置自訂 DataList 編輯介面的第一個步驟是將所需的 Web 控制項新增至 EditItemTemplate。 特別是,我們需要類別的DropDownList、供應商的另一個清單,以及已停止狀態的 CheckBox。 由於產品價格在此範例中無法編輯,因此我們可以使用標籤 Web 控件繼續顯示它。
若要自定義編輯介面,請按兩下 DataList 智慧標記中的 [編輯範本] 連結,然後從下拉式清單中選擇 EditItemTemplate 選項。 將 DropDownList 新增至 , EditItemTemplate 並將其設定 ID 為 Categories。
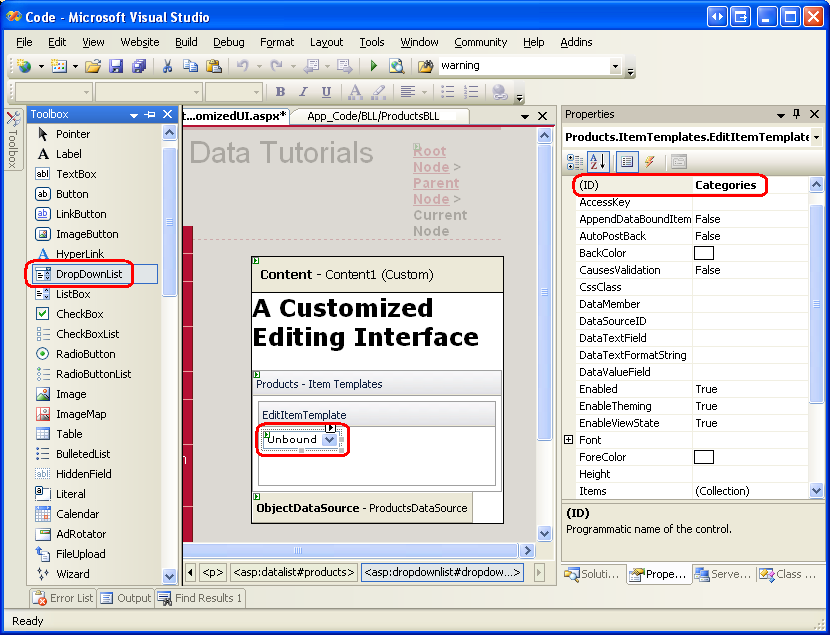
圖 4:新增類別的 DropDownList (按兩下以檢視完整大小的影像)
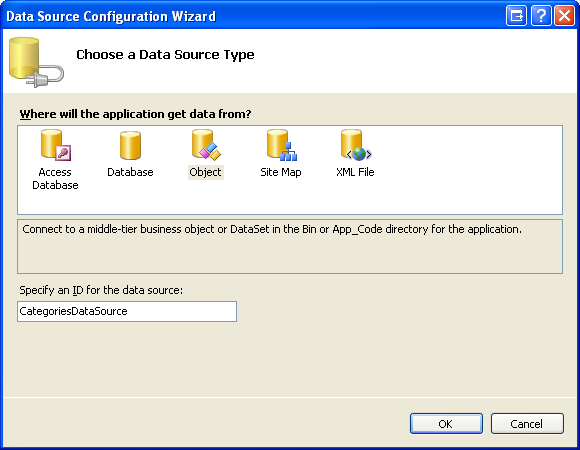
接下來,從DropDownList的智慧標記中,選取 [選擇數據源] 選項,然後建立名為 CategoriesDataSource的新 ObjectDataSource。 將此 ObjectDataSource 設定為使用 CategoriesBLL 類別 s GetCategories() 方法(請參閱圖 5)。 接下來,DropDownList s 數據源組態精靈會提示數據字段用於每個 ListItem s Text 和 Value 屬性。 讓DropDownList顯示資料欄位並使用 CategoryNameCategoryID 作為值,如圖 6 所示。

圖 5:建立一個名為的新 ObjectDataSource (CategoriesDataSource按一下檢視全尺寸影像)
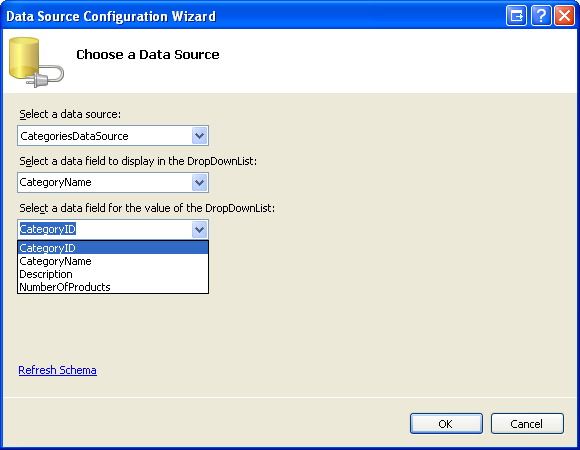
圖 6:設定 DropDownList 的顯示和值欄位 (按兩下以檢視完整大小的影像)
重複這一系列步驟,為供應商建立DropDownList。
ID將此 DropDownList 的 設定為 Suppliers ,並將其命名為其 ObjectDataSource SuppliersDataSource。
新增兩個DropDownList之後,請針對已停止的狀態新增 CheckBox,以及產品名稱的 TextBox。
ID將 CheckBox 和 TextBox 的 s 分別設定為 Discontinued 和 ProductName。 新增 RequiredFieldValidator 以確保使用者提供產品名稱的值。
最後,新增 [更新] 和 [取消] 按鈕。 請記住,針對這兩個按鈕,其 CommandName 屬性必須分別設定為 [更新] 和 [取消]。
您可以隨意配置編輯介面。 我已選擇從只讀介面使用相同的四欄 <table> 版面配置,如下列宣告式語法和螢幕快照所示:
<EditItemTemplate>
    <h4>
        <asp:Label ID="ProductNameLabel" runat="server"
            Text='<%# Eval("ProductName") %>' />
    </h4>
    <table border="0">
        <tr>
            <td class="ProductPropertyLabel">Name:</td>
            <td colspan="3" class="ProductPropertyValue">
                <asp:TextBox runat="server" ID="ProductName" Width="90%" />
                <asp:RequiredFieldValidator ID="RequiredFieldValidator1"
                    ControlToValidate="ProductName"
                    ErrorMessage="You must enter a name for the product."
                    runat="server">*</asp:RequiredFieldValidator>
            </td>
        </tr>
        <tr>
            <td class="ProductPropertyLabel">Category:</td>
            <td class="ProductPropertyValue">
                <asp:DropDownList ID="Categories" runat="server"
                    DataSourceID="CategoriesDataSource"
                    DataTextField="CategoryName" DataValueField="CategoryID" />
            </td>
            <td class="ProductPropertyLabel">Supplier:</td>
            <td class="ProductPropertyValue">
                <asp:DropDownList ID="Suppliers" DataTextField="CompanyName"
                    DataSourceID="SuppliersDataSource"
                    DataValueField="SupplierID" runat="server" />
            </td>
        </tr>
        <tr>
            <td class="ProductPropertyLabel">Discontinued:</td>
            <td class="ProductPropertyValue">
                <asp:CheckBox runat="server" id="Discontinued" />
            </td>
            <td class="ProductPropertyLabel">Price:</td>
            <td class="ProductPropertyValue">
                <asp:Label ID="UnitPriceLabel" runat="server"
                    Text='<%# Eval("UnitPrice", "{0:C}") %>' />
            </td>
        </tr>
        <tr>
            <td colspan="4">
                <asp:Button runat="Server" ID="UpdateButton" CommandName="Update"
                    Text="Update" />

                <asp:Button runat="Server" ID="CancelButton" CommandName="Cancel"
                    Text="Cancel" CausesValidation="False" />
            </td>
        </tr>
    </table>
    <br />
    <asp:ObjectDataSource ID="CategoriesDataSource" runat="server"
        OldValuesParameterFormatString="original_{0}" SelectMethod="GetCategories"
        TypeName="CategoriesBLL">
    </asp:ObjectDataSource>
    <asp:ObjectDataSource ID="SuppliersDataSource" runat="server"
        OldValuesParameterFormatString="original_{0}" SelectMethod="GetSuppliers"
        TypeName="SuppliersBLL">
    </asp:ObjectDataSource>
</EditItemTemplate>
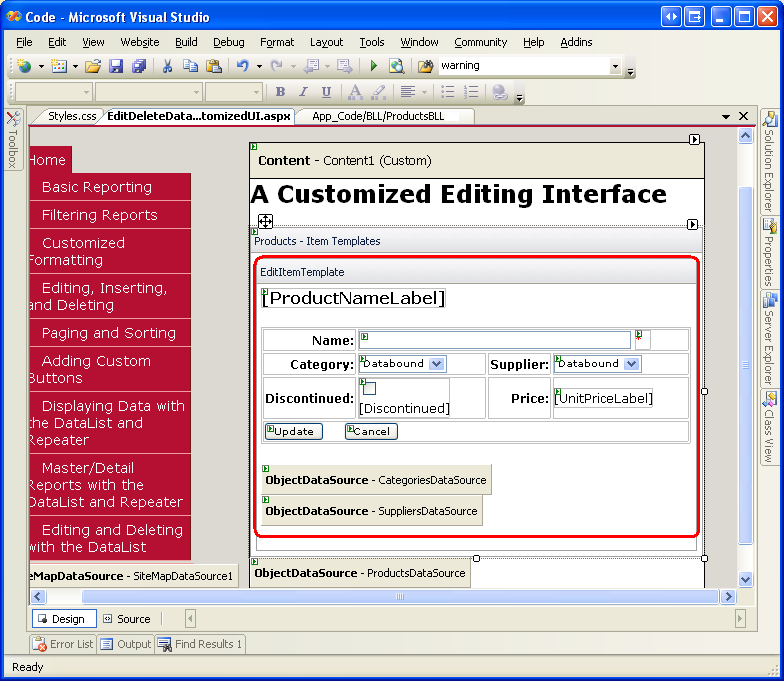
圖 7:編輯介面的配置就像只讀介面一樣(按兩下以檢視完整大小的影像)
步驟 3:建立 EditCommand 和 CancelCommand 事件處理程式
目前,中沒有資料系結語法 EditItemTemplate (除了 UnitPriceLabel從 逐字複製的 ItemTemplate。 我們會暫時新增數據系結語法,但首先讓我們建立 DataList 和EditCommandCancelCommand事件的事件處理程式。 回想一下,事件處理程式的責任 EditCommand 是轉譯已按下 [編輯] 按鈕之 DataList 專案的編輯介面,而 CancelCommand 作業則是將 DataList 傳回其預先編輯狀態。
建立這兩個事件處理程式,並讓它們使用下列程式代碼:
protected void Products_EditCommand(object source, DataListCommandEventArgs e)
{
    // Set the DataList's EditItemIndex property and rebind the data
    Products.EditItemIndex = e.Item.ItemIndex;
    Products.DataBind();
}
protected void Products_CancelCommand(object source, DataListCommandEventArgs e)
{
    // Return to DataList to its pre-editing state
    Products.EditItemIndex = -1;
    Products.DataBind();
}
有了這兩個事件處理程式,按兩下 [編輯] 按鈕會顯示編輯介面,然後按兩下 [取消] 按鈕會將編輯的項目傳回其只讀模式。 圖 8 顯示在 Chef Anton s Gumbo Mix 按兩下 [編輯] 按鈕之後的 DataList。 因為我們尚未將任何數據系結語法新增至編輯介面, ProductName 因此 TextBox 為空白、 Discontinued CheckBox 未核取,以及從 Categories 和 Suppliers DropDownLists 選取的第一個專案。
![此螢幕快照顯示已新增EditCommand和 CancelCommand事件處理程式並選取 [編輯] 按鈕之後的 DataList EditItemTemplate。](customizing-the-datalist-s-editing-interface-cs/_static/image22.png)
圖 8:按兩下 [編輯] 按鈕顯示編輯介面 (按兩下以檢視完整大小的影像)
步驟 4:將 DataBinding 語法新增至編輯介面
若要讓編輯介面顯示目前的產品值,我們需要使用數據系結語法將數據域值指派給適當的 Web 控件值。 您可以透過設計工具套用數據系結語法,方法是移至 [編輯範本] 畫面,然後從 Web 控件智慧標記選取 [編輯 DataBindings] 連結。 或者,可以將數據系結語法直接新增至宣告式標記。
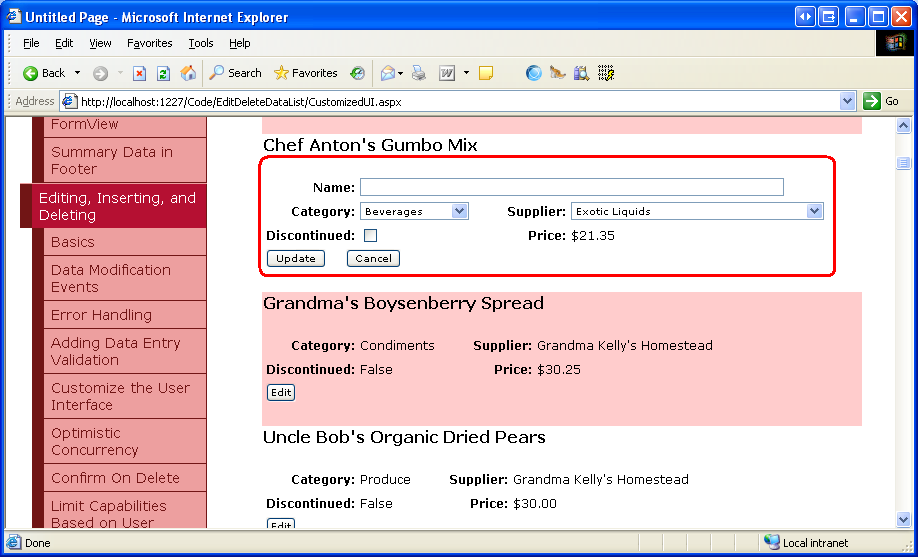
將數據 ProductName 域值指派給 ProductName TextBox s Text 屬性、 CategoryID 和 SupplierID 數據域值給 Categories 和 Suppliers DropDownLists SelectedValue 屬性,並將 Discontinued 數據域值指派給 Discontinued CheckBox s Checked 屬性。 進行這些變更之後,請透過設計師或直接透過宣告式標記重新瀏覽頁面,然後透過瀏覽器重新瀏覽頁面,然後按兩下 Chef Anton s Gumbo Mix 的 [編輯] 按鈕。 如圖 9 所示,數據系結語法已將目前的值新增至 TextBox、DropDownLists 和 CheckBox。
![此螢幕快照顯示新增 DataBinding 語法並選取 [編輯] 按鈕之後的 DataList EditItemTemplate。](customizing-the-datalist-s-editing-interface-cs/_static/image25.png)
圖 9:按兩下 [編輯] 按鈕顯示編輯介面(按兩下以檢視完整大小的影像)
步驟 5:儲存 UpdateCommand 事件處理程式中的用戶變更
當使用者編輯產品並按兩下 [更新] 按鈕時,就會發生回傳,並引發DataList事件 UpdateCommand 。 在事件處理程式中,我們需要從和 介面中的 EditItemTemplate Web 控件讀取值,以使用 BLL 更新資料庫中的產品。 如先前教學課程中所見, ProductID 更新產品的 可透過 DataKeys 集合存取。 使用 以程式設計方式參考 Web 控制項 FindControl("controlID")來存取使用者輸入的欄位,如下列程式代碼所示:
protected void Products_UpdateCommand(object source, DataListCommandEventArgs e)
{
    // Make sure the page is valid...
    if (!Page.IsValid)
        return;
    // Read in the ProductID from the DataKeys collection
    int productID = Convert.ToInt32(Products.DataKeys[e.Item.ItemIndex]);
    // Read in the product name and price values
    TextBox productName = (TextBox)e.Item.FindControl("ProductName");
    DropDownList categories = (DropDownList)e.Item.FindControl("Categories");
    DropDownList suppliers = (DropDownList)e.Item.FindControl("Suppliers");
    CheckBox discontinued = (CheckBox)e.Item.FindControl("Discontinued");
    string productNameValue = null;
    if (productName.Text.Trim().Length > 0)
        productNameValue = productName.Text.Trim();
    int categoryIDValue = Convert.ToInt32(categories.SelectedValue);
    int supplierIDValue = Convert.ToInt32(suppliers.SelectedValue);
    bool discontinuedValue = discontinued.Checked;
    // Call the ProductsBLL's UpdateProduct method...
    ProductsBLL productsAPI = new ProductsBLL();
    productsAPI.UpdateProduct(productNameValue, categoryIDValue, supplierIDValue,
                              discontinuedValue, productID);
    // Revert the DataList back to its pre-editing state
    Products.EditItemIndex = -1;
    Products.DataBind();
}
程式代碼會先諮詢 Page.IsValid 屬性,以確保頁面上的所有驗證控件都有效。 如果 Page.IsValid 為True,則會從ProductID集合讀取編輯的產品值DataKeys,而且 中的EditItemTemplate數據輸入 Web 控件會以程式設計方式參考。 接下來,這些 Web 控制件的值會讀入變數,然後傳遞至適當的 UpdateProduct 多載。 更新數據之後,DataList 會傳回其預先編輯狀態。
注意
我省略了處理 BLL 和 DAL 層級例外狀況教學課程中新增的例外狀況處理邏輯,以便讓程式代碼保持焦點和此範例。 作為練習,請在完成本教學課程之後新增這項功能。
步驟 6:處理 NULL CategoryID 和 SupplierID 值
Northwind 資料庫允許NULL數據表和ProductsCategoryID數據行的值SupplierID。 不過,我們的編輯介面目前無法容納 NULL 值。 如果我們嘗試編輯具有 NULL 其 CategoryID 或 SupplierID 數據行值的產品,我們會收到 ArgumentOutOfRangeException 類似:「 類別」的錯誤訊息,其 SelectedValue 無效,因為它不存在於專案清單中。 此外,目前沒有任何方法將產品類別或供應商值從非NULL 值變更為非 NULL 值。
若要支援 NULL 類別和供應商 DropDownLists 的值,我們需要新增額外的 ListItem。 我選擇使用 (None) 作為這個 Text的值,但如果您想要的話,您可以將它變更為ListItem其他專案(例如空字串)。 最後,請記得將DropDownLists AppendDataBoundItems 設定為 True;如果您忘記這麼做,系結至DropDownList 的類別和供貨商將會覆寫靜態新增 ListItem的 。
進行這些變更之後,DataList s EditItemTemplate 中的DropDownLists標記看起來應該如下所示:
<asp:DropDownList ID="Categories" DataSourceID="CategoriesDataSource"
    DataTextField="CategoryName" DataValueField="CategoryID" runat="server"
    SelectedValue='<%# Eval("CategoryID") %>' AppendDataBoundItems="True">
    <asp:ListItem Value=" Selected="True">(None)</asp:ListItem>
</asp:DropDownList>
...
<asp:DropDownList ID="Suppliers" DataSourceID="SuppliersDataSource"
    DataTextField="CompanyName" DataValueField="SupplierID" runat="server"
    SelectedValue='<%# Eval("SupplierID") %>' AppendDataBoundItems="True">
    <asp:ListItem Value=" Selected="True">(None)</asp:ListItem>
</asp:DropDownList>
注意
靜態 ListItem 可以透過設計工具或直接透過宣告式語法新增至DropDownList。 新增 DropDownList 專案來表示資料庫 NULL 值時,請務必透過宣告式語法新增 ListItem 。 如果您在設計工具中使用 ListItem 集合編輯器,產生的宣告式語法會在指派空白字串時完全省略 Value 設定,並建立宣告式標記,例如: <asp:ListItem>(None)</asp:ListItem>。 雖然這看起來可能無害,但遺漏 Value 會導致DropDownList在其位置使用 Text 屬性值。 這表示如果選取此選項NULLListItem,將會嘗試將值 (None) 指派給產品數據欄位 (CategoryID或 SupplierID,在本教學課程中為 ),這會導致例外狀況。 藉由明確設定 Value="",NULL當選取 時NULLListItem,值將會指派給產品數據欄位。
花點時間透過瀏覽器查看我們的進度。 編輯產品時,請注意 Categories ,和 Suppliers DropDownList 在DropDownList開頭都有 [無] 選項。
分類和供應商的下拉式選單包含一個(無)選項
若要將 [無] 選項儲存為資料庫 NULL 值,我們需要返回 UpdateCommand 事件處理程式。
categoryIDValue將和 supplierIDValue 變數變更為可為 Null 的整數,並只指派 DropDownList s Nothing 不是空字串時以外的SelectedValue值:
int? categoryIDValue = null;
if (!string.IsNullOrEmpty(categories.SelectedValue))
    categoryIDValue = Convert.ToInt32(categories.SelectedValue);
int? supplierIDValue = null;
if (!string.IsNullOrEmpty(suppliers.SelectedValue))
    supplierIDValue = Convert.ToInt32(suppliers.SelectedValue);
有了這項變更,如果使用者從其中一個下拉式清單中選取 [無] 選項,就會將 的值 Nothing 傳入 UpdateProduct BLL 方法,而該選項對應至 NULL 資料庫值。
摘要
在本教學課程中,我們瞭解如何建立更複雜的 DataList 編輯介面,其中包含三個不同的輸入 Web 控件 TextBox、兩個 DropDownList 和 CheckBox 以及驗證控件。 建置編輯介面時,不論使用的 Web 控件為何,步驟都相同:首先,將 Web 控件新增至 DataList s EditItemTemplate;使用數據系結語法,以適當的 Web 控件屬性來指派對應的數據功能變數值;而且,在事件處理程式中 UpdateCommand ,以程式設計方式存取 Web 控制件及其適當的屬性, 將其值傳遞至 BLL。
建立編輯介面時,無論是只由 TextBoxes 或不同 Web 控件的集合所組成,請務必正確地處理資料庫 NULL 值。 考慮 NULL s 時,您不僅必須正確地在編輯介面中顯示現有的 NULL 值,而且提供將值標示為 NULL的方法。 對於 DataLists 中的 DropDownLists,這通常表示新增靜態 ListItem ,其 Value 屬性明確設定為空字串 (Value=""),並將一些程式代碼新增至 UpdateCommand 事件處理程式,以判斷是否已 NULL``ListItem 選取 。
祝您程式設計愉快!
關於作者
斯科特·米切爾,七本 ASP/ASP.NET 書籍和 4GuysFromRolla.com 創始人的作者,自1998年以來一直與Microsoft Web 技術合作。 Scott 擔任獨立顧問、講師和作家。 他的新書是 Sams Teach Yourself ASP.NET 2.0 in 24 Hours。 可以透過 mitchell@4GuysFromRolla.com 聯絡他。
特別感謝
本教學課程系列已經過許多熱心的檢閱者檢閱。 本教學課程的主要檢閱者是鄧尼斯·派特森、大衛·蘇魯和蘭迪·施密特。 有興趣檢閱我即將推出的 MSDN 文章嗎? 如果是,請在 mitchell@4GuysFromRolla.com給我留言。