重新部署 ASDK
在本文中,您會了解如何在非生產環境中重新部署 Azure Stack 開發套件 (ASDK)。 因為不支援升級 ASDK,您需要將其完全重新部署到較新的版本。 您也可以在每次想要從頭開始時重新部署 ASDK。
重要
不支援將 ASDK 升級到新版本。 每當您想要評估更新的 Azure Stack 版本時,都必須在 ASDK 主機電腦上重新部署 ASDK。
移除 Azure 註冊
若您先前已向 Azure 註冊您的 ASDK 安裝,請先移除註冊資源,再重新部署 ASDK。 重新部署 ASDK 時,請重新註冊 ASDK 以啟用市集中的項目可用性。 若您先前未使用您的 Azure 訂用帳戶註冊過 ASDK,可略過本節。
若要移除註冊資源,請使用 Remove-AzsRegistration Cmdlet 來取消註冊 Azure Stack。 然後,使用 Remove-AzureRMResourceGroup Cmdlet,從您的 Azure 訂閱中刪除 Azure Stack 資源群組。
在可以存取特殊權限端點的電腦上,以系統管理員身分開啟 PowerShell 主控台。 對於 ASDK 而言,這就是 ASDK 主機電腦。
請執行下列 PowerShell 命令來取消註冊 ASDK 安裝,並從您的 Azure 訂用帳戶中刪除 azurestack 資源群組:
#Import the registration module that was downloaded with the GitHub tools
Import-Module C:\AzureStack-Tools-az\Registration\RegisterWithAzure.psm1

# Provide Azure subscription admin credentials
Connect-AzAccount

# Provide ASDK admin credentials
$CloudAdminCred = Get-Credential -UserName AZURESTACK\CloudAdmin -Message "Enter the cloud domain credentials to access the privileged endpoint"

# Unregister Azure Stack
Remove-AzsRegistration `
   -PrivilegedEndpointCredential $CloudAdminCred `
   -PrivilegedEndpoint AzS-ERCS01
   -RegistrationName $RegistrationName

# Remove the Azure Stack resource group
Remove-AzResourceGroup -Name azurestack -Force
指令碼執行時,系統會提示您登入您的 Azure 訂用帳戶和本機 ASDK 安裝。
指令碼完成時,您應該會看到類似下列範例的訊息:
De-Activating Azure Stack (this may take up to 10 minutes to complete).Your environment is now unable to syndicate items and is no longer reporting usage data.Remove registration resource from Azure..."Deleting the resource..." on target "/subscriptions/<subscription information>"********** End Log: Remove-AzsRegistration *********
現在系統應該已成功從您的 Azure 訂用帳戶中取消註冊了 Azure Stack。 也應該刪除 azurestack 資源群組。 當您第一次向 Azure 註冊 ASDK 時,就會建立此資源群組。
部署 ASDK
若要重新部署 Azure Stack,您必須從頭開始進行,如下所述。 您是否使用了 Azure Stack 安裝程式 (asdk-installer.ps1) 指令碼來安裝 ASDK,會讓接下來的步驟有所不同。
使用安裝程式指令碼重新部署 ASDK
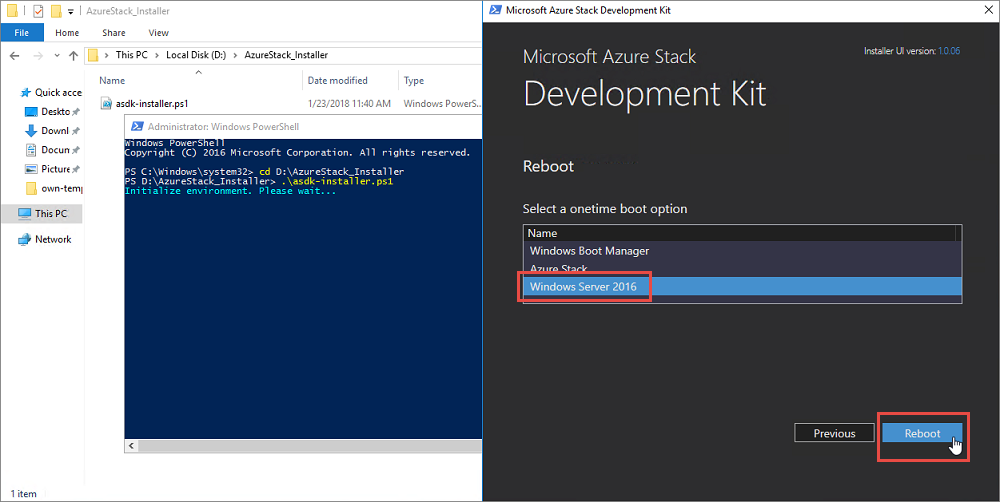
在 ASDK 電腦上,開啟提升權限的 PowerShell 主控台,並瀏覽到位於非系統磁碟機上 AzureStack_Installer 目錄中的 asdk installer.ps1 指令碼。 執行指令碼,然後按一下 [重新開機]。

選取基礎作業系統 (非 Azure Stack) 並按一下 [下一步]。

ASDK 主機重新開機進入基礎作業系統後,以本機系統管理員身分登入。找出並刪除先前部署中使用的 C:\CloudBuilder.vhdx 檔案。
重複第一次部署 ASDK 時的相同步驟。
不使用安裝程式重新部署 ASDK
若您未使用 asdk-installer.ps1 指令碼來安裝 ASDK,就必須先手動重新設定 ASDK 主機電腦,再重新部署 ASDK。
在 ASDK 電腦上執行 msconfig.exe,啟動 [系統設定] 公用程式。 在 [開機] 索引標籤上,選取主機電腦的作業系統 (而不是 Azure Stack)、按一下 [設為預設值],然後按一下 [確定]。 出現提示時,請按一下 [重新啟動]。

ASDK 主機重新開機進入基礎作業系統後,以 ASDK 主機電腦的本機系統管理員身分登入。 找出並刪除先前部署過程中所使用的 C:\CloudBuilder.vhdx 檔案。
重複第一次使用 PowerShell 部署 ASDK 時的相同步驟。