在 Azure Stack Hub 上部署 SQL Server 資源提供者
重要
從 Azure Stack Hub 組建 2108 開始,提供 SQL 和 MySQL 資源提供者授與存取權的訂用帳戶。 若要開始使用這項功能,或需要從舊版升級,請提交支援案例,我們的支援工程師會引導您完成部署或升級流程。
使用 Azure Stack Hub SQL Server 資源提供者將 SQL 資料庫公開成 Azure Stack Hub 服務。
SQL 資源提供者在 Windows Server 2016 Server Core 虛擬機器 (VM) 上會以服務的形式執行。
SQL 資源提供者在特殊附加元件 RP Windows Server 伺服器上會以服務的形式執行。
重要
僅資源提供者應在裝載 SQL 或 MySQL 的伺服器上建立項目。 在不是由資源提供者建立的主機伺服器上建立項目是不受支援的,且可能會導致不相符的狀態。
重要
V2.x SQL/MySQL 資源提供者會使用 ASDK 不支援的部署資源提供者 (DRP) 安裝機制。 因此,ASDK 不支援 V2.x SQL/MySQL 資源提供者。
必要條件
如果您已安裝資源提供者,則可能已完成下列必要條件,並可略過本節。 否則,請先完成這些步驟再繼續:
如果尚未進行,請向 Azure 註冊您的 Azure Stack Hub 執行個體。 由於您會連線至 Azure 並將項目下載至市集,因此必須進行此步驟。
如果您不熟悉 Azure Stack Hub 管理員入口網站的 Marketplace 管理功能,請檢閱從 Azure 下載市集項目並發佈至 Azure Stack Hub。 本文將逐步引導您完成從 Azure 將項目下載到 Azure Stack Hub 市集的流程。 內容涵蓋已連線和已中斷連線兩種情況。 如果您的 Azure Stack Hub 執行個體已中斷連線或僅有部分連線,則在準備安裝時需要完成其他必要條件。
更新 Microsoft Entra 主目錄。 從組建 1910 開始,必須在您的主目錄租用戶中註冊新的應用程式。 此應用程式可讓 Azure Stack Hub 成功建立及註冊較新的資源提供者, (例如事件中樞和其他) 與您的 Microsoft Entra 租使用者。 這是在升級至組建 1910 或更新版本之後,需要完成的一次性動作。 如果此步驟未完成,市集資源提供者的安裝將會失敗。
- 成功地將 Azure Stack Hub 執行個體更新為 1910 或更高版本後,請遵循複製/下載 Azure Stack Hub 工具存放庫的指示。
- 然後,遵循安裝更新或新的資源提供者之後,更新 Azure Stack Hub Microsoft Entra Home Directory (的指示) 。
SQL Sever 資源提供者必要條件
需要可存取以下項目的電腦和帳戶:
- Azure Stack Hub 系統管理員入口網站。
- 特殊權限端點 (只有在要部署 SQL Sever 資源提供者第 1 版,或從 SQL Sever 資源提供者第 1 版升級至 SQL Sever 資源提供者第 2 版時,才需要此項目)。
- Azure Resource Manager 管理員端點 (
https://adminmanagement.region.<fqdn>),其中<fqdn>是您的完整網域名稱。 - 如果您的 Azure Stack Hub 已部署為使用 Microsoft Entra ID 作為識別提供者,則為因特網。
根據下面的版本對應表,下載支援的 SQL 資源提供者二進位版本。 若為第 2 版 SQL 資源提供者,請將 Marketplace 項目下載到 Azure Stack Hub。
支援的 Azure Stack Hub 版本 SQL RP 版本 執行 RP 服務的 Windows Server 2206, 2301, 2306, 2311 SQL RP 2.0.13.x 版 MicMicrosoft AzureStack 附加元件 RP Windows Server 1.2009.0 2108, 2206 SQL RP 2.0.6.x 版 MicMicrosoft AzureStack 附加元件 RP Windows Server 1.2009.0 請確定已將所需的 Windows Server VM 下載至 Azure Stack Hub Marketplace。 視需要根據上面的版本對應表手動下載映像。
請確定已符合資料中心整合必要條件:
必要條件 參考 條件式 DNS 轉送已正確設定。 Azure Stack Hub 資料中心整合 - DNS 資源提供者的輸入連接埠已開啟。 Azure Stack Hub 資料中心整合 - 輸入連接埠和通訊協定 PKI 憑證主體和 SAN 已正確設定。 Azure Stack Hub 部署必要 PKI 必要條件
Azure Stack Hub 部署 PaaS 憑證必要條件準備憑證。 (僅適用於整合式系統安裝。)
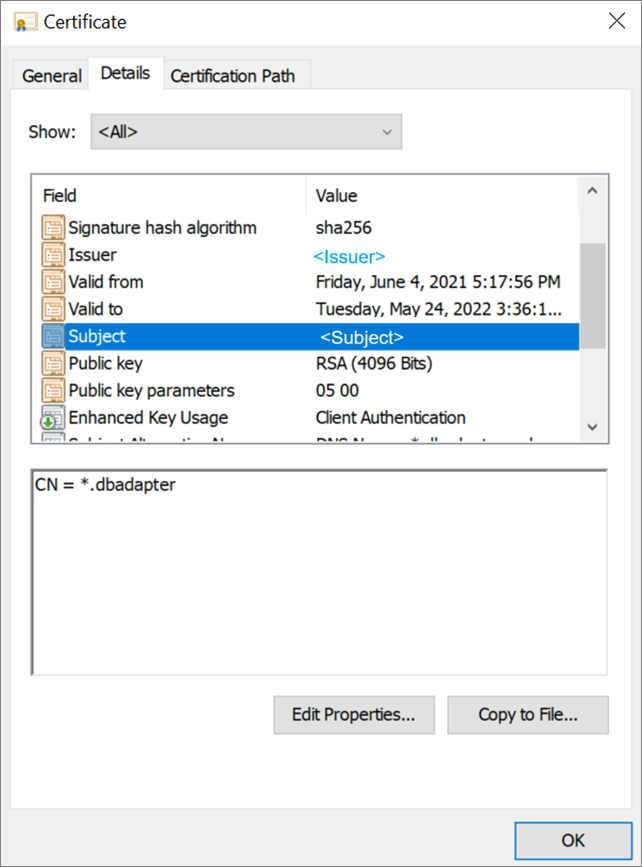
- 您必須提供 Azure Stack Hub 部署 PKI 需求中選擇性 PaaS 憑證一節所述的 SQL PaaS PKI 憑證。 主體別名 (SAN) 必須遵守下列命名模式:CN=*.dbadapter.<region>.<fqdn>,並受到密碼保護。

- 部署 SQL Sever 資源提供者第 1 版時,請將 .pfx 檔案放在 DependencyFilesLocalPath 參數所指定的位置。 不要提供 ASDK 系統的憑證。
- 部署 SQL Server 資源提供者第 2 版時,請準備憑證以供下列安裝步驟使用。
- 您必須提供 Azure Stack Hub 部署 PKI 需求中選擇性 PaaS 憑證一節所述的 SQL PaaS PKI 憑證。 主體別名 (SAN) 必須遵守下列命名模式:CN=*.dbadapter.<region>.<fqdn>,並受到密碼保護。
中斷連線的案例
在中斷連線的情況下部署 SQL Server 資源提供者第 2 版時,請遵循將 Marketplace 項目下載到 Azure Stack Hub 的指示,將 SQL Sever 資源提供者項目和附加元件 RP Windows Server 項目下載到 Azure Stack Hub 環境。
在中斷連線的情況下部署 SQL Sever 資源提供者第 1 版時,請完成下列步驟以下載必要的 PowerShell 模組,並手動註冊存放庫。
登入具有網際網路連線的電腦,並使用下列指令碼來下載 PowerShell 模組。
Import-Module -Name PowerShellGet -ErrorAction Stop
Import-Module -Name PackageManagement -ErrorAction Stop

# path to save the packages, c:\temp\azs1.6.0 as an example here
$Path = "c:\temp\azs1.6.0"
根據您要部署的資源提供者版本,執行其中一個指令碼。
# for resource provider version >= 1.1.93.0
Save-Package -ProviderName NuGet -Source https://www.powershellgallery.com/api/v2 -Name AzureRM -Path $Path -Force -RequiredVersion 2.5.0
Save-Package -ProviderName NuGet -Source https://www.powershellgallery.com/api/v2 -Name AzureStack -Path $Path -Force -RequiredVersion 1.8.2
# for resource provider version <= 1.1.47.0 Save-Package -ProviderName NuGet -Source https://www.powershellgallery.com/api/v2 -Name AzureRM -Path $Path -Force -RequiredVersion 2.3.0 Save-Package -ProviderName NuGet -Source https://www.powershellgallery.com/api/v2 -Name AzureStack -Path $Path -Force -RequiredVersion 1.6.0然後將下載的套件複製到 USB 裝置。
登入已中斷連線的工作站,並將套件從 USB 裝置複製到工作站上的位置。
將此位置註冊為本機存放庫。
# requires -Version 5
# requires -RunAsAdministrator
# requires -Module PowerShellGet
# requires -Module PackageManagement

$SourceLocation = "C:\temp\azs1.6.0"
$RepoName = "azs1.6.0"

Register-PSRepository -Name $RepoName -SourceLocation $SourceLocation -InstallationPolicy Trusted

New-Item -Path $env:ProgramFiles -name "SqlMySqlPsh" -ItemType "Directory"
部署 SQL 資源提供者第 2 版
如果您要從第 1 版升級,請參閱更新 SQL Server 資源提供者一文。
開始安裝
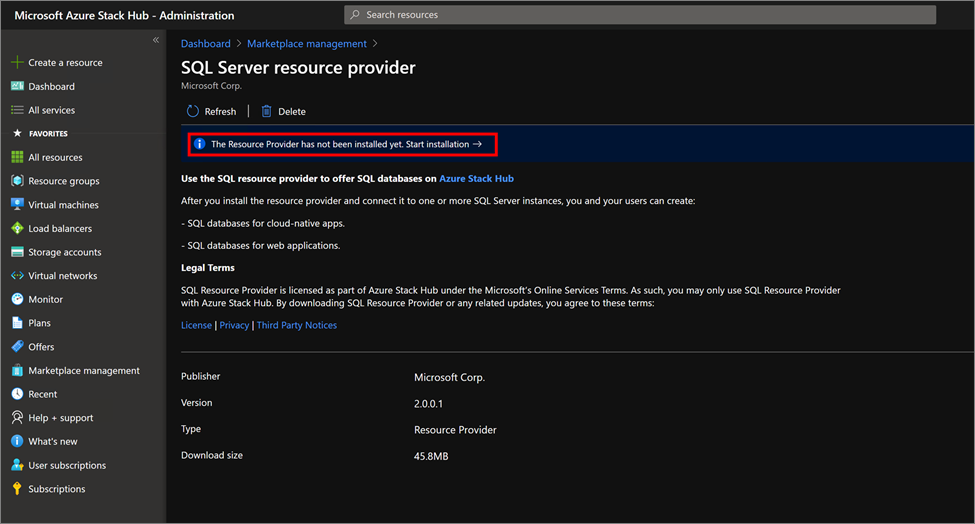
如果您尚未安裝,請登入 Azure Stack Hub 管理員入口網站、選取左側的 [Marketplace 管理] ,然後選取 [資源提供者] 。
下載 SQL 資源提供者和其他所需的軟體之後,[Marketplace 管理] 會顯示「SQL Server 資源提供者」套件,其狀態為「未安裝」。 可能有其他套件的狀態顯示為「已下載」。

選取您要安裝的該列。 [SQL Server 資源提供者安裝套件] 頁面頂端會顯示藍色橫幅。 選取橫幅即可開始安裝。

安裝先決條件
接下來,系統會將您轉移至安裝頁面。 選取 [安裝必要條件] 以開始安裝流程。

稍待片刻,直到成功安裝必要條件。 在繼續下一個步驟之前,您應該會看到安裝必要條件旁出現綠色核取記號。

準備祕密
在 2.準備秘密步驟中,選取 [新增憑證] ,然後將會出現 [新增憑證] 面板。

選取 [新增憑證] 上的瀏覽按鈕,位於憑證檔案名稱欄位右側。 選取您在完成必要條件時所取得的 .pfx 憑證檔案。
輸入您提供的密碼,為 SQL Server 資源提供者 SSL 憑證建立安全字串。 然後選取 [新增] 。

安裝資源提供者
當憑證安裝成功時,您應該會在繼續進行下一個步驟前,看到準備祕密旁出現綠色核取記號。 現在,選取 3 安裝資源提供者旁的 [安裝] 按鈕。

接下來會看到下列頁面,代表正在安裝 SQL 資源提供者。

等待安裝完成通知。 此流程通常需要一或多個小時,視您的 Azure Stack Hub 類型而定。

返回 [Marketplace 管理]、[資源提供者] 頁面,確認 SQL Server 資源提供者安裝成功。 SQL Server 資源提供者的狀態應該會顯示為「已安裝」。

部署 SQL 資源提供者第 1 版
當您完成所有必要條件之後,請執行自我擷取程式,以將下載的安裝套件擷取至臨時目錄。 從可存取 Azure Stack Hub Azure Resource Manager 管理員端點和特殊權限端點的電腦執行 DeploySqlProvider.ps1 指令碼,以部署 SQL 資源提供者。 DeploySqlProvider.ps1 指令碼是從您針對 Azure Stack Hub 版本下載的 SQL 資源提供者二進位檔中解壓縮而來。
重要
在部署資源提供者之前,請先檢閱版本資訊,以了解有哪些新功能、修正,以及任何可能對部署造成影響的已知問題。
若要部署 SQL 資源提供者,請開啟新的已提升權限 PowerShell 視窗 (不是 PowerShell ISE),然後變更至您解壓縮 SQL 資源提供者二進位檔的目錄。
重要
執行部署或更新指令碼前,強烈建議您使用 Clear-AzureRmContext -Scope CurrentUser 和 Clear-AzureRmContext -Scope Process 清除快取。
請執行 DeploySqlProvider.ps1 script 指令碼,這會完成下列工作:
- 將憑證和其他成品上傳到 Azure Stack Hub 上的儲存體帳戶。
- 發佈資源庫套件,以便使用資源庫來部署 SQL 資料庫。
- 發佈用於部署主控伺服器的資源庫套件。
- 使用您下載的 Windows Server 2016 核心映像或 Microsoft AzureStack 附加元件 RP Windows Server 映像來部署 VM,然後安裝 SQL 資源提供者。
- 註冊與您資源提供者 VM 對應的本機 DNS 記錄。
- 針對操作員帳戶,向本機 Azure Resource Manager 註冊您的資源提供者。
注意
當 SQL 資源提供者部署開始時,會建立 system.local.sqladapter 資源群組。 最多可能需要 75 分鐘的時間,才能完成對此資源群組的必要部署。 您不應該將任何其他資源放在 system.local.sqladapter 資源群組中。
DeploySqlProvider.ps1 參數
您可以從命令列指定下列參數。 如果未指定參數,或任何參數驗證失敗,系統就會提示您提供所需的參數。
| 參數名稱 | 描述 | 註解或預設值 |
|---|---|---|
| CloudAdminCredential | 雲端管理員的認證,這是存取具特殊權限端點所需的認證。 | 必要 |
| AzCredential | Azure Stack Hub 服務管理帳戶的認證。 使用與部署 Azure Stack Hub 時所用認證相同的認證。 如果您搭配 AzCredential 使用的帳戶需要多重要素驗證, (MFA) ,腳本將會失敗。 | 必要 |
| VMLocalCredential | SQL 資源提供者 VM 之本機系統管理員帳戶的認證。 | 必要 |
| PrivilegedEndpoint | 具特殊權限端點的 IP 位址或 DNS 名稱。 | 必要 |
| AzureEnvironment | 用來部署 Azure Stack Hub 的服務管理員帳戶所屬的 Azure 環境。 僅適用於 Microsoft Entra 部署。 支援的環境名稱包括 AzureCloud、AzureUSGovernment,或使用中國 Microsoft Entra ID、AzureChinaCloud。 | AzureCloud |
| DependencyFilesLocalPath | 您的憑證 .pfx 檔案必須放在這個目錄中 (僅適用於整合式系統)。 您可以在這裡選擇性地複製一個 Windows Update MSU 套件。 | 選擇性 (對於整合式系統為必要) |
| DefaultSSLCertificatePassword | .pfx 憑證的密碼。 | 必要 |
| MaxRetryCount | 當作業失敗時,您想要重試每個作業的次數。 | 2 |
| RetryDuration | 重試之間的逾時間隔 (秒)。 | 120 |
| 解除安裝 | 移除資源提供者和所有關聯的資源 (請參閱下面的附註)。 | 否 |
| DebugMode | 防止在失敗時自動清除。 | 否 |
使用自訂指令碼部署 SQL 資源提供者
如果您要部署 SQL 資源提供者 1.1.33.0 版或先前的版本,您必須在 PowerShell 中安裝特定版本的 AzureRm.BootStrapper 和 Azure Stack Hub 模組。
如果您要部署 SQL 資源提供者 1.1.47.0 版或後續版本,部署指令碼會自動下載必要的 PowerShell 模組,並將其安裝到 C:\Program Files\SqlMySqlPsh 的路徑下。
# Install the AzureRM.Bootstrapper module, set the profile, and install the AzureStack module
# Note that this might not be the most currently available version of Azure Stack Hub PowerShell
Install-Module -Name AzureRm.BootStrapper -RequiredVersion 0.5.0 -Force
Use-AzureRmProfile -Profile 2018-03-01-hybrid -Force
Install-Module -Name AzureStack -RequiredVersion 1.6.0
注意
在中斷連線的情況下,您必須下載必要的 PowerShell 模組,並手動註冊存放庫,因為這是必要條件。
若要在部署資源提供者時免除任何手動設定,您可以自訂下列指令碼。 請視需要針對您的 Azure Stack Hub 部署,變更預設帳戶資訊和密碼。
# Use the NetBIOS name for the Azure Stack Hub domain. On the Azure Stack Hub SDK, the default is AzureStack but could have been changed at install time.
$domain = "AzureStack"

# For integrated systems, use the IP address of one of the ERCS VMs
$privilegedEndpoint = "AzS-ERCS01"

# Provide the Azure environment used for deploying Azure Stack Hub. Required only for Azure AD deployments. Supported values for the <environment name> parameter are AzureCloud, AzureChinaCloud, or AzureUSGovernment depending which Azure subscription you're using.
$AzureEnvironment = "<EnvironmentName>"

# Point to the directory where the resource provider installation files were extracted.
$tempDir = 'C:\TEMP\SQLRP'

# The service admin account can be Azure Active Directory or Active Directory Federation Services.
$serviceAdmin = "admin@mydomain.onmicrosoft.com"
$AdminPass = ConvertTo-SecureString 'P@ssw0rd1' -AsPlainText -Force
$AdminCreds = New-Object System.Management.Automation.PSCredential ($serviceAdmin, $AdminPass)

# Set credentials for the new resource provider VM local admin account.
$vmLocalAdminPass = ConvertTo-SecureString 'P@ssw0rd1' -AsPlainText -Force
$vmLocalAdminCreds = New-Object System.Management.Automation.PSCredential ("sqlrpadmin", $vmLocalAdminPass)

# Add the cloudadmin credential that's required for privileged endpoint access.
$CloudAdminPass = ConvertTo-SecureString 'P@ssw0rd1' -AsPlainText -Force
$CloudAdminCreds = New-Object System.Management.Automation.PSCredential ("$domain\cloudadmin", $CloudAdminPass)

# Change the following as appropriate.
$PfxPass = ConvertTo-SecureString 'P@ssw0rd1' -AsPlainText -Force

# For version 1.1.47.0 or later, the PowerShell modules used by the RP deployment are placed in C:\Program Files\SqlMySqlPsh
# The deployment script adds this path to the system $env:PSModulePath to ensure correct modules are used.
$rpModulePath = Join-Path -Path $env:ProgramFiles -ChildPath 'SqlMySqlPsh'
$env:PSModulePath = $env:PSModulePath + ";" + $rpModulePath

# Change to the directory folder where you extracted the installation files. Don't provide a certificate on ASDK!
. $tempDir\DeploySQLProvider.ps1 `
    -AzCredential $AdminCreds `
    -VMLocalCredential $vmLocalAdminCreds `
    -CloudAdminCredential $cloudAdminCreds `
    -PrivilegedEndpoint $privilegedEndpoint `
    -AzureEnvironment $AzureEnvironment `
    -DefaultSSLCertificatePassword $PfxPass `
    -DependencyFilesLocalPath $tempDir\cert
當資源提供者安裝指令碼完成時,請重新整理您的瀏覽器,以確定可以看到最新的更新,然後關閉目前的 PowerShell 工作階段。
使用 Azure Stack Hub 入口網站來確認第 1 版部署是否成功
- 以服務管理員身分登入管理員入口網站。
- 選取 [資源群組]。
- 選取 [system.位置>.sqladapter] 資源群組。
- 在資源群組概觀的摘要頁面上,應該沒有失敗的部署。
- 最後,在管理員入口網站中選取 [虛擬機器],以驗證 SQL 資源提供者 VM 已成功建立並執行。
Microsoft Entra ID的重要設定
如果您的 Azure Stack Hub 使用 Microsoft Entra ID 作為識別提供者,請確定已安裝 SQL Server 資源提供者的 VM 具有輸出因特網連線能力。
如果需要取得已安裝 SQL Server 資源提供者的 VM IP (亦即將 IP 加入防火牆允許清單),您必須開立支援案例,並讓支援工程師將 SQL Server 資源提供者訂閱項目設為暫時可見。 然後,您可以在訂閱項目中找到 VM 並取得其 IP。