這很重要
自 2025 年 5 月 1 日起,Azure AD B2C 將不再可供新客戶購買。 在我們的常見問題中深入瞭解。
開始之前,請使用此頁面頂端的 [選擇原則類型] 選取器,選擇您要設定的原則類型。 Azure Active Directory B2C 提供兩種方法來定義使用者如何與您的應用程式互動:透過預先定義的使用者流程,或透過完全可設定的自訂原則。 此文章中所需的步驟隨各方法而異。
身為開發人員或 IT 系統管理員,您可以使用 API 連接器,將註冊使用者流程與 REST API 整合,以自定義註冊體驗,並與外部系統整合。 在本逐步解說結束時,您將能夠建立 Azure AD B2C 使用者流程,與 REST API 服務互動,以修改您的註冊過程。
您可以使用我們的其中一個 範例來建立 API 端點。
在此案例中,我們將讓用戶能夠在 Azure AD B2C 註冊頁面中輸入忠誠度號碼。 REST API 會驗證電子郵件和忠誠度號碼的組合是否對應至促銷碼。 如果 REST API 找到此使用者的促銷碼,則會傳回至 Azure AD B2C。 最後,促銷碼會插入應用程式可取用的令牌宣告中。
您也可以將互動設計為協調流程步驟。 當 REST API 不會在畫面上驗證數據,且一律會傳回宣告時,這很適合。 如需詳細資訊,請參閱 操作指南:在 Azure AD B2C 使用者旅程中整合 REST API 宣告交換作為協調步驟。
先決條件
- 建立使用者流程,讓使用者能夠註冊並登入您的應用程式。
- 註冊 Web 應用程式。
- 完成開始使用 Active Directory B2C 中的自定義原則中的步驟。 本教學課程會引導您更新自定義原則檔案,以使用您的 Azure AD B2C 租用戶設定。
- 註冊 Web 應用程式。
建立 API 連接器
若要使用 API 連接器,請先建立 API 連接器,然後在使用者流程中加以啟用。
登入 Azure 入口網站。
在 [Azure 服務] 底下,選取 [Azure AD B2C]。
選取 [API 連接器],然後選取 [ 新增 API 連接器]。
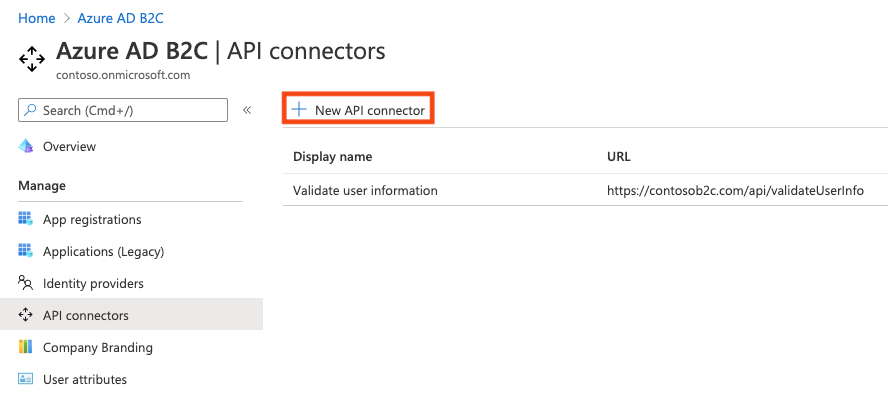
提供呼叫的顯示名稱。 例如, 驗證用戶資訊。
提供 API 呼叫的端點 URL。
選擇 [驗證類型],並設定用於呼叫 API 的驗證資訊。 了解如何保護 API 連接器的安全。
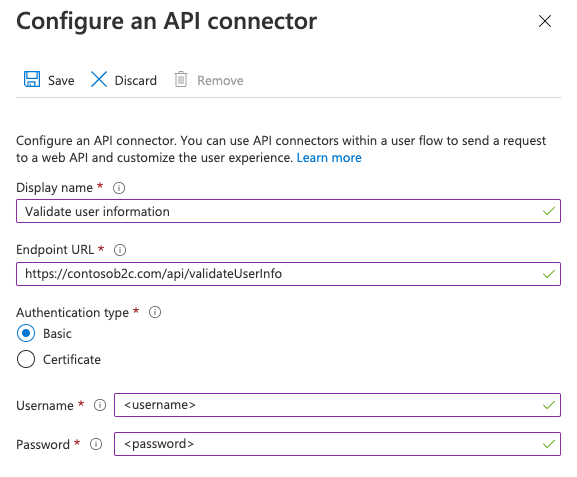
選取 [儲存]。
傳送至 API 的要求
API 連接器會具體化為 HTTP POST 要求,並將使用者屬性 (「宣告」) 作為 JSON 主體中的金鑰/值組傳送。 屬性的序列化方式類似於 Microsoft Graph 使用者屬性。
範例要求
POST <API-endpoint>
Content-type: application/json

{
 "email": "johnsmith@fabrikam.onmicrosoft.com",
 "identities": [
     {
     "signInType":"federated",
     "issuer":"facebook.com",
     "issuerAssignedId":"0123456789"
     }
 ],
 "displayName": "John Smith",
 "objectId": "aaaaaaaa-0000-1111-2222-bbbbbbbbbbbb",
 "givenName":"John",
 "surname":"Smith",
 "jobTitle":"Supplier",
 "streetAddress":"1000 Microsoft Way",
 "city":"Seattle",
 "postalCode": "12345",
 "state":"Washington",
 "country":"United States",
 "extension_<extensions-app-id>_CustomAttribute1": "custom attribute value",
 "extension_<extensions-app-id>_CustomAttribute2": "custom attribute value",
 "step": "<step-name>",
 "client_id":"00001111-aaaa-2222-bbbb-3333cccc4444",
 "ui_locales":"en-US"
}
只有 Azure AD B2C>使用者屬性體驗中列出的使用者屬性和自定義屬性,才能在要求中傳送。
自定義屬性存在於目錄中 的 extension_<extensions-app-id>_CustomAttribute 格式中。 您的 API 預期會收到此相同序列化格式的宣告。 如需自定義屬性的詳細資訊,請參閱 在 Azure AD B2C 中定義自定義屬性。
此外,這些聲明通常會在所有要求中傳送:
- UI 地區設定 ('ui_locales') - 終端使用者的地區設定,如其裝置上所設定。 這可供您的 API 用來傳回國際化回應。
-
步驟('step') - 用於觸發 API 連接器的使用者流程中的步驟或節點。 值包括:
-
PostFederationSignup- 對應至「註冊時與身份提供者完成整合之後」 -
PostAttributeCollection- 對應至「建立使用者之前」 -
PreTokenIssuance- 對應至「傳送令牌之前」(預覽版)。 深入瞭解此步驟
-
-
用戶端識別碼 ('client_id') -
appId終端使用者在使用者流程中驗證的應用程式值。 這不是資源應用程式在存取權杖中的內容。 - 電子郵件地址 ('email') 或身分識別 ('identities') - 這些宣告可供您的 API 用來識別驗證應用程式的終端使用者身分。
這很重要
如果宣告在呼叫 API 端點時沒有值,則不會將宣告傳送至 API。 您的 API 應該設計成明確檢查並處理要求中沒有宣告的情況。
在使用者流程中啟用 API 連接器
請遵循下列步驟,將 API 連接器新增至註冊使用者流程。
登入 Azure 入口網站。
在 [Azure 服務] 底下,選取 [Azure AD B2C]。
選取 [使用者流程],然後選取您要新增 API 連接器的使用者流程。
選取 [API 連接器],然後選取您想要在使用者流程中的下列步驟叫用的 API 端點:
- 在註冊期間與識別提供者建立同盟之後
- 在建立使用者之前
- 傳送權杖之前 (預覽)

選取 [儲存]。
這些步驟僅適用於 註冊和登入(建議) 和 註冊(建議), 但僅適用於體驗的註冊部分。
在註冊期間與識別提供者建立同盟之後
註冊程式中此步驟中的 API 連接器會在使用者向身分識別提供者進行驗證之後立即叫用(例如 Google、Facebook 和 Microsoft Entra ID)。 此步驟會在屬性集合頁面之前進行,該頁面是向使用者顯示以收集使用者屬性的表單。 如果使用者註冊本機帳戶,則不會叫用此步驟。
此步驟中傳送至 API 的範例要求
POST <API-endpoint>
Content-type: application/json

{
 "email": "johnsmith@fabrikam.onmicrosoft.com",
 "identities": [
     {
     "signInType":"federated",
     "issuer":"facebook.com",
     "issuerAssignedId":"0123456789"
     }
 ],
 "displayName": "John Smith",
 "givenName":"John",
 "surname":"Smith",
 "step": "PostFederationSignup",
 "client_id":"<guid>",
 "ui_locales":"en-US"
}
傳送至 API 的確切宣告取決於識別提供者所提供的資訊。 一律會傳送 'email'。
此步驟中 Web API 的預期回應類型
在使用者流程期間,當 Web API 從 Microsoft Entra ID 收到 HTTP 要求時,可能會傳回下列回應:
- 接續回應
- 封鎖回應
接續回應
接續回應表示使用者流程應該繼續進行下一個步驟:屬性收集頁面。
在接續回應中,API 可能會傳回宣告。 如果 API 傳回宣告,宣告會執行下列動作:
- 在屬性集合頁面中預先填入輸入欄位。
請參閱接續回應範例。
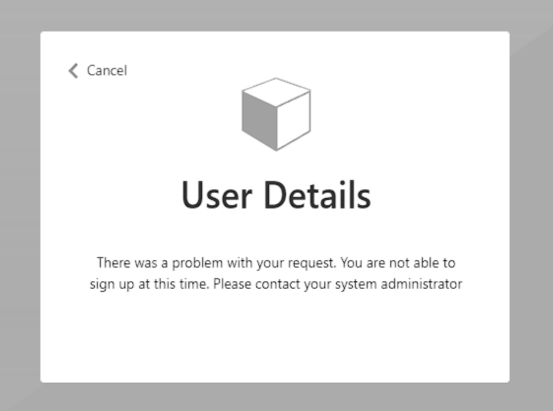
封鎖回應
封鎖回應會結束使用者流程。 API 可以刻意發出此回應,藉由向使用者顯示封鎖頁面來停止使用者流程的接續。 封鎖頁面會顯示 API 提供的 userMessage。
請參閱封鎖回應範例。
建立使用者之前
在屬性集合頁面 (若有) 之後,系統會在註冊流程的這個步驟叫用 API 連接器。 建立用戶帳戶之前,一律會叫用此步驟。
此步驟中傳送至 API 的範例要求
POST <API-endpoint>
Content-type: application/json

{
 "email": "johnsmith@fabrikam.onmicrosoft.com",
 "identities": [
     {
     "signInType":"federated",
     "issuer":"facebook.com",
     "issuerAssignedId":"0123456789"
     }
 ],
 "displayName": "John Smith",
 "givenName":"John",
 "surname":"Smith",
 "jobTitle":"Supplier",
 "streetAddress":"1000 Microsoft Way",
 "city":"Seattle",
 "postalCode": "12345",
 "state":"Washington",
 "country":"United States",
 "extension_<extensions-app-id>_CustomAttribute1": "custom attribute value",
 "extension_<extensions-app-id>_CustomAttribute2": "custom attribute value",
 "step": "PostAttributeCollection",
 "client_id":"00001111-aaaa-2222-bbbb-3333cccc4444",
 "ui_locales":"en-US"
}
傳送至 API 的請求取決於從使用者收集的資訊,或由識別提供者提供的資訊。
此步驟中 Web API 的預期回應類型
在使用者流程期間,當 Web API 從 Microsoft Entra ID 收到 HTTP 要求時,可能會傳回下列回應:
- 接續回應
- 封鎖回應
- 驗證回應
接續回應
接續回應表示使用者流程應該繼續進行下一個步驟:在目錄中建立使用者。
在接續回應中,API 可能會傳回宣告。 如果 API 傳回宣告,宣告會執行下列動作:
- 覆寫屬性集合頁面中使用者已提供的任何值。
若要將不應從使用者收集的宣告寫入目錄,您仍然應在使用者流程的 User 屬性 中選取這些宣告,預設情況下系統會要求使用者輸入值,但您可以使用 自定義 JavaScript 或 CSS 來隱藏輸入欄位不被使用者看到。
請參閱接續回應範例。
封鎖回應
封鎖回應會結束使用者流程。 API 可以刻意發出此回應,藉由向使用者顯示封鎖頁面來停止使用者流程的接續。 封鎖頁面會顯示 API 提供的 userMessage。
請參閱封鎖回應範例。
驗證錯誤回應
當 API 回應驗證錯誤時,使用者流程會留在屬性收集頁面上,並向使用者顯示 userMessage 。 然後,使用者可以編輯並重新提交表單。 這種類型的回應可用於輸入驗證。
請參閱驗證錯誤回應範例。
傳送權杖之前 (預覽)
這很重要
此步驟中使用的 API 連接器處於預覽狀態。 如需預覽的詳細資訊,請參閱 在線服務的產品條款。
當登入和註冊期間即將頒發令牌時,會在此步驟中調用 API 連接器。 此步驟的 API 連接器可用來使用來自外部來源的宣告值來擴充令牌。
此步驟中傳送至 API 的範例要求
POST <API-endpoint>
Content-type: application/json

{
 "clientId": "11112222-bbbb-3333-cccc-4444dddd5555",
 "step": "PreTokenApplicationClaims",
 "ui_locales":"en-US",
 "email": "johnsmith@fabrikam.onmicrosoft.com",
 "identities": [
     {
     "signInType":"federated",
     "issuer":"facebook.com",
     "issuerAssignedId":"0123456789"
     }
 ],
 "displayName": "John Smith",
 "extension_<extensions-app-id>_CustomAttribute1": "custom attribute value",
 "extension_<extensions-app-id>_CustomAttribute2": "custom attribute value",
}
傳送至 API 的宣告取決於使用者定義的資訊。
此步驟中 Web API 的預期回應類型
在使用者流程期間,當 Web API 從 Microsoft Entra ID 收到 HTTP 要求時,可能會傳回下列回應:
- 接續回應
接續回應
接續回應表示使用者流程應該繼續下一個步驟:發出令牌。
在接續回應中,API 可以傳回其他宣告。 在 API 所傳回的宣告中,您想要在令牌中傳回的宣告必須是內建宣告或 定義為自定義屬性 ,並且必須在使用者流程的 應用程式宣告 組態中選取。
令牌中的宣告值會是 API 傳回的值,而不是目錄中的值。 API 回應無法覆寫某些宣告值。 API 可以傳回的宣告對應於 User 屬性 下找到的集合,僅 email 除外。
請參閱接續回應範例。
備註
API 只會在初始驗證期間叫用。 使用更新令牌以靜默方式獲取新的存取或識別令牌時,令牌將包含在初始驗證期間評估的值。
範例回應
接續回應範例
HTTP/1.1 200 OK
Content-type: application/json

{
    "version": "1.0.0",
    "action": "Continue",
    "postalCode": "12349", // return claim
    "extension_<extensions-app-id>_CustomAttribute": "value" // return claim
}
| 參數 | 類型 | 為必填項目 | 說明 |
|---|---|---|---|
| 版本 | 繩子 | 是的 | 您的 API 版本。 |
| 行為 | 繩子 | 是的 | 值必須為 Continue。 |
| <內建使用者屬性> | <屬性類型> | 否 | 傳回的值可以覆寫從使用者收集的值。 |
| <擴展_{extensions-app-id}_自訂屬性> | <屬性類型> | 否 | 宣告不需要包含 _<extensions-app-id>_,這是 選擇性的。 傳回的值可以覆寫從使用者收集的值。 |
封鎖回應範例
HTTP/1.1 200 OK
Content-type: application/json

{
    "version": "1.0.0",
    "action": "ShowBlockPage",
    "userMessage": "There was a problem with your request. You are not able to sign up at this time. Please contact your system administrator",
}
| 參數 | 類型 | 為必填項目 | 說明 |
|---|---|---|---|
| 版本 | 繩子 | 是的 | 您的 API 版本。 |
| 行為 | 繩子 | 是的 | 值必須是 ShowBlockPage |
| 使用者訊息 | 繩子 | 是的 | 要向使用者顯示的訊息。 |
封鎖回應的終端使用者體驗
驗證錯誤回應範例
HTTP/1.1 400 Bad Request
Content-type: application/json

{
    "version": "1.0.0",
    "status": 400,
    "action": "ValidationError",
    "userMessage": "Please enter a valid Postal Code."
}
| 參數 | 類型 | 為必填項目 | 說明 |
|---|---|---|---|
| 版本 | 繩子 | 是的 | 您的 API 版本。 |
| 行為 | 繩子 | 是的 | 值必須為 ValidationError。 |
| 地位 | 整數/字串 | 是的 | 必須是值 400,或是 "400" (適用於 ValidationError 回應)。 |
| 使用者訊息 | 繩子 | 是的 | 要向使用者顯示的訊息。 |
備註
HTTP 狀態碼必須是 "400",並在回應主體中顯示「狀態」值。
驗證錯誤回應的終端使用者體驗

準備 REST API 端點
在本逐步解說中,您需要有一個 REST API,以檢查您的後端系統中是否已註冊具有忠誠度ID的電子郵件位址。 如果已註冊,REST API 應該會傳回註冊促銷碼,客戶可以在您的應用程式內用來購買商品。 否則,REST API 應該會傳回 HTTP 409 錯誤訊息:「忠誠標識符 』{loyalty ID}' 未與 '{email}' 電子郵件地址相關聯。」
下列 JSON 程式代碼說明 Azure AD B2C 將傳送至 REST API 端點的數據。
{
    "email": "User email address",
    "language": "Current UI language",
    "loyaltyId": "User loyalty ID"
}
一旦 REST API 驗證數據,它必須傳回 HTTP 200 (確定),並具有下列 JSON 數據:
{
    "promoCode": "24534"
}
如果驗證失敗,REST API 必須使用 JSON 元素傳回 HTTP 409 (衝突 userMessage )。 IEF 預期 REST API 傳回的userMessage宣告內容。 如果驗證失敗,此宣告會以字串形式呈現給使用者。
{
    "version": "1.0.1",
    "status": 409,
    "userMessage": "LoyaltyId ID '1234' is not associated with 'david@contoso.com' email address."
}
REST API 端點的設定超出本文的範圍。 我們已建立 Azure Functions 範例。 您可以在 GitHub 存取完整的 Azure 函式程式代碼。
定義要求
宣告會在 Azure AD B2C 原則執行期間提供數據的暫時存儲。 您可以在 宣告架構 區段中宣告宣告。
- 開啟您政策的延伸檔案。 例如:
SocialAndLocalAccounts/TrustFrameworkExtensions.xml。 - 搜尋 BuildingBlocks 元素。 如果元素不存在,加以新增。
- 找出 ClaimsSchema 元素。 如果元素不存在,加以新增。
- 將下列宣告新增至 ClaimsSchema 元素。
<ClaimType Id="loyaltyId">
  <DisplayName>Your loyalty ID</DisplayName>
  <DataType>string</DataType>
  <UserInputType>TextBox</UserInputType>
</ClaimType>
<ClaimType Id="promoCode">
  <DisplayName>Your promo code</DisplayName>
  <DataType>string</DataType>
  <UserInputType>Paragraph</UserInputType>
</ClaimType>
  <ClaimType Id="userLanguage">
  <DisplayName>User UI language (used by REST API to return localized error messages)</DisplayName>
  <DataType>string</DataType>
</ClaimType>
新增 RESTful API 技術配置檔
RESTful 技術配置檔提供與您自己的 RESTful 服務互動的支援。 Azure AD B2C 會將數據傳送至 InputClaims 集合中的 RESTful 服務,並接收 OutputClaims 集合中的數據。 尋找 ClaimsProviders 元素,並新增新的宣告提供者,如下所示:
<ClaimsProvider>
  <DisplayName>REST APIs</DisplayName>
  <TechnicalProfiles>
    <TechnicalProfile Id="REST-ValidateProfile">
      <DisplayName>Check loyaltyId Azure Function web hook</DisplayName>
      <Protocol Name="Proprietary" Handler="Web.TPEngine.Providers.RestfulProvider, Web.TPEngine, Version=1.0.0.0, Culture=neutral, PublicKeyToken=null" />
      <Metadata>
        <!-- Set the ServiceUrl with your own REST API endpoint -->
        <Item Key="ServiceUrl">https://your-account.azurewebsites.net/api/ValidateProfile?code=your-code</Item>
        <Item Key="SendClaimsIn">Body</Item>
        <!-- Set AuthenticationType to Basic or ClientCertificate in production environments -->
        <Item Key="AuthenticationType">None</Item>
        <!-- REMOVE the following line in production environments -->
        <Item Key="AllowInsecureAuthInProduction">true</Item>
      </Metadata>
      <InputClaims>
        <!-- Claims sent to your REST API -->
        <InputClaim ClaimTypeReferenceId="loyaltyId" />
        <InputClaim ClaimTypeReferenceId="email" />
        <InputClaim ClaimTypeReferenceId="userLanguage" PartnerClaimType="lang" DefaultValue="{Culture:LCID}" AlwaysUseDefaultValue="true" />
      </InputClaims>
      <OutputClaims>
        <!-- Claims parsed from your REST API -->
        <OutputClaim ClaimTypeReferenceId="promoCode" />
      </OutputClaims>
      <UseTechnicalProfileForSessionManagement ReferenceId="SM-Noop" />
    </TechnicalProfile>
  </TechnicalProfiles>
</ClaimsProvider>
在此範例中,userLanguage 將作為 lang 在 JSON 承載中傳送至 REST 服務。 宣告 userLanguage 的值包含目前使用者的語言識別碼。 如需詳細資訊,請參閱 宣告解析程式。
設定 RESTful API 技術描述檔
部署 REST API 之後,請設定技術設定檔的 REST-ValidateProfile 元數據以反映您自己的 REST API,包括:
- ServiceUrl。 設定 REST API 端點的 URL。
- SendClaimsIn。 指定如何將輸入宣告傳送至 RESTful 宣告提供者。
- AuthenticationType。 設定 RESTful 宣告提供者所執行的驗證類型。
-
AllowInsecureAuthInProduction。 在生產環境中,請務必將此元數據設定為
true
如需更多設定,請參閱 RESTful 技術配置檔元數據 。
在AuthenticationType和AllowInsecureAuthInProduction之上的批注中,指定了移至生產環境時應進行的變更。 若要瞭解如何保護生產環境的 RESTful API,請參閱 保護 RESTful API。
驗證用戶輸入
若要在註冊期間取得用戶的忠誠度號碼,您必須允許使用者在畫面上輸入此數據。 將 loyaltyId 輸出宣告新增至註冊頁面,方法是將它新增至現有的註冊技術配置檔區段的 OutputClaims 元素。 指定輸出宣告的完整清單,以控制在畫面上呈現宣告的順序。
將驗證設定檔引用新增到註冊設定檔,該設定檔會呼叫REST-ValidateProfile。 新的驗證技術設定檔將會新增至基底原則中定義的集合的開頭 <ValidationTechnicalProfiles> 。 此行為表示只有在成功驗證之後,Azure AD B2C 才會繼續在目錄中建立帳戶。
尋找 ClaimsProviders 元素。 新增宣告提供者,如下所示:
<ClaimsProvider>
  <DisplayName>Local Account</DisplayName>
  <TechnicalProfiles>
    <TechnicalProfile Id="LocalAccountSignUpWithLogonEmail">
      <OutputClaims>
        <OutputClaim ClaimTypeReferenceId="email" PartnerClaimType="Verified.Email" Required="true"/>
        <OutputClaim ClaimTypeReferenceId="newPassword" Required="true"/>
        <OutputClaim ClaimTypeReferenceId="reenterPassword" Required="true"/>
        <OutputClaim ClaimTypeReferenceId="displayName"/>
        <OutputClaim ClaimTypeReferenceId="givenName"/>
        <OutputClaim ClaimTypeReferenceId="surName"/>
        <!-- Required to present the text box to collect the data from the user -->
        <OutputClaim ClaimTypeReferenceId="loyaltyId"/>
        <!-- Required to pass the promoCode returned from "REST-ValidateProfile"
        to subsequent orchestration steps and token issuance-->
        <OutputClaim ClaimTypeReferenceId="promoCode" />
      </OutputClaims>
      <ValidationTechnicalProfiles>
        <ValidationTechnicalProfile ReferenceId="REST-ValidateProfile" />
      </ValidationTechnicalProfiles>
    </TechnicalProfile>
  </TechnicalProfiles>
</ClaimsProvider>
<ClaimsProvider>
  <DisplayName>Self Asserted</DisplayName>
  <TechnicalProfiles>
    <TechnicalProfile Id="SelfAsserted-Social">
      <InputClaims>
        <InputClaim ClaimTypeReferenceId="email" />
      </InputClaims>
        <OutputClaims>
        <OutputClaim ClaimTypeReferenceId="email" />
        <OutputClaim ClaimTypeReferenceId="displayName"/>
        <OutputClaim ClaimTypeReferenceId="givenName"/>
        <OutputClaim ClaimTypeReferenceId="surname"/>
        <!-- Required to present the text box to collect the data from the user -->
        <OutputClaim ClaimTypeReferenceId="loyaltyId"/>
        <!-- Required to pass the promoCode returned from "REST-ValidateProfile"
        to subsequent orchestration steps and token issuance-->
        <OutputClaim ClaimTypeReferenceId="promoCode" />
      </OutputClaims>
      <ValidationTechnicalProfiles>
        <ValidationTechnicalProfile ReferenceId="REST-ValidateProfile"/>
      </ValidationTechnicalProfiles>
    </TechnicalProfile>
  </TechnicalProfiles>
</ClaimsProvider>
在令牌中包含主張
若要將促銷碼宣告傳回到用戶端應用程式,請將輸出宣告新增至 SocialAndLocalAccounts/SignUpOrSignIn.xml 檔案。 輸出宣告會允許在成功的使用者旅程之後將宣告新增至令牌中,並將傳送至應用程式。 修改信賴方區段中的技術配置元素,以新增 promoCode 作為輸出宣告。
<RelyingParty>
  <DefaultUserJourney ReferenceId="SignUpOrSignIn" />
  <TechnicalProfile Id="PolicyProfile">
    <DisplayName>PolicyProfile</DisplayName>
    <Protocol Name="OpenIdConnect" />
    <OutputClaims>
      <OutputClaim ClaimTypeReferenceId="displayName" />
      <OutputClaim ClaimTypeReferenceId="givenName" />
      <OutputClaim ClaimTypeReferenceId="surname" />
      <OutputClaim ClaimTypeReferenceId="email" />
      <OutputClaim ClaimTypeReferenceId="objectId" PartnerClaimType="sub"/>
      <OutputClaim ClaimTypeReferenceId="identityProvider" />
      <OutputClaim ClaimTypeReferenceId="tenantId" AlwaysUseDefaultValue="true" DefaultValue="{Policy:TenantObjectId}" />
      <OutputClaim ClaimTypeReferenceId="promoCode" DefaultValue="" />
    </OutputClaims>
    <SubjectNamingInfo ClaimType="sub" />
  </TechnicalProfile>
</RelyingParty>
測試自定義原則
- 登入 Azure 入口網站。
- 如果您有多個租戶的存取權,請選取頂端功能表中的設定圖示,從目錄 + 訂用帳戶功能表切換至Microsoft Entra ID 租戶。
- 選擇 Azure 入口網站左上角 的 [所有服務 ],然後搜尋並選取 [ 應用程式註冊]。
- 選取 [ 身分識別體驗架構]。
- 選取 [上傳自定義原則],然後上傳您變更的原則檔案: TrustFrameworkExtensions.xml和 SignUpOrSignin.xml。
- 選取您上傳的註冊或登入原則,然後按兩下 [ 立即執行 ] 按鈕。
- 您應該能夠使用電子郵件地址註冊。
- 按兩下 [ 立即註冊] 連結。
- 在 [ 您的忠誠標識符] 中,輸入 1234,然後按兩下 [ 繼續]。 此時,您應該會收到驗證錯誤訊息。
- 變更為另一個值,然後按兩下 [ 繼續]。
- 傳回至應用程式的令牌包含
promoCode宣告。
{
  "typ": "JWT",
  "alg": "RS256",
  "kid": "X5eXk4xyojNFum1kl2Ytv8dlNP4-c57dO6QGTVBwaNk"
}.{
  "exp": 1584295703,
  "nbf": 1584292103,
  "ver": "1.0",
  "iss": "https://contoso.b2clogin.com/aaaabbbb-0000-cccc-1111-dddd2222eeee/v2.0/",
  "aud": "22223333-cccc-4444-dddd-5555eeee6666",
  "acr": "b2c_1a_signup_signin",
  "nonce": "defaultNonce",
  "iat": 1584292103,
  "auth_time": 1584292103,
  "name": "Emily Smith",
  "email": "emily@outlook.com",
  "given_name": "Emily",
  "family_name": "Smith",
  "promoCode": "84362"
  ...
}
最佳作法及如何進行疑難排解
使用無伺服器雲端函式
無伺服器函式 (例如 Azure Functions 中的 HTTP 觸發程序) 提供一個方式來建立 API 端點以搭配 API 連接器使用。 例如,您可以使用無伺服器雲端函式來執行驗證邏輯,並限制特定電子郵件網域的註冊。 無伺服器雲端函式也可以呼叫和叫用其他 Web API、資料存放區及其他雲端服務來進行複雜的案例。
最佳做法
請確定:
- 您的 API 遵循 API 要求和回應合約,如上所述。
- API 連接器的端點 URL 會指向正確的 API 端點。
- 您的 API 會明確檢查所收到的相依宣告是否有 Null 值。
- 您的 API 會實作保護 API 連接器的安全中所述的驗證方法。
- 您的 API 會儘快回應,以確保流暢的使用者體驗。
- Azure AD B2C 將等候最多 10 秒 以接收回應。 如果未收到任何訊息,則會在呼叫您的 API 時再嘗試一次(重試)。
- 如果使用無伺服器函式或可調整的 Web 服務,請在生產環境中使用主控方案來確保 API 處於「喚醒」或「暖」狀態。 針對 Azure Functions,建議至少在生產環境中使用 Premium 方案 。
- 確保 API 的高可用性。
- 監視下游 API、資料庫或 API 其他相依性的效能,並將其最佳化。
這很重要
您的端點必須符合 Azure AD B2C 安全性需求規範。 已淘汰舊版 TLS 和加密。 如需詳細資訊,請參閱 Azure AD B2C TLS 和加密套件需求。
使用記錄
一般而言,您可以使用透過 Web API 服務啟用的記錄工具 (例如 Application insights),來協助監視您的 API 是否有未預期的錯誤碼、例外狀況和效能不佳的情況。
- 監視非 HTTP 200 或 400 的 HTTP 狀態碼。
- 401 或 403 HTTP 狀態碼通常表示您的驗證發生問題。 請再次檢查您 API 的驗證層,以及 API 連接器中的對應設定。
- 如有需要,請在開發中使用更主動的記錄層級 (例如「追蹤」或「偵錯」)。
- 監視您的 API 是否有過長的回應時間。
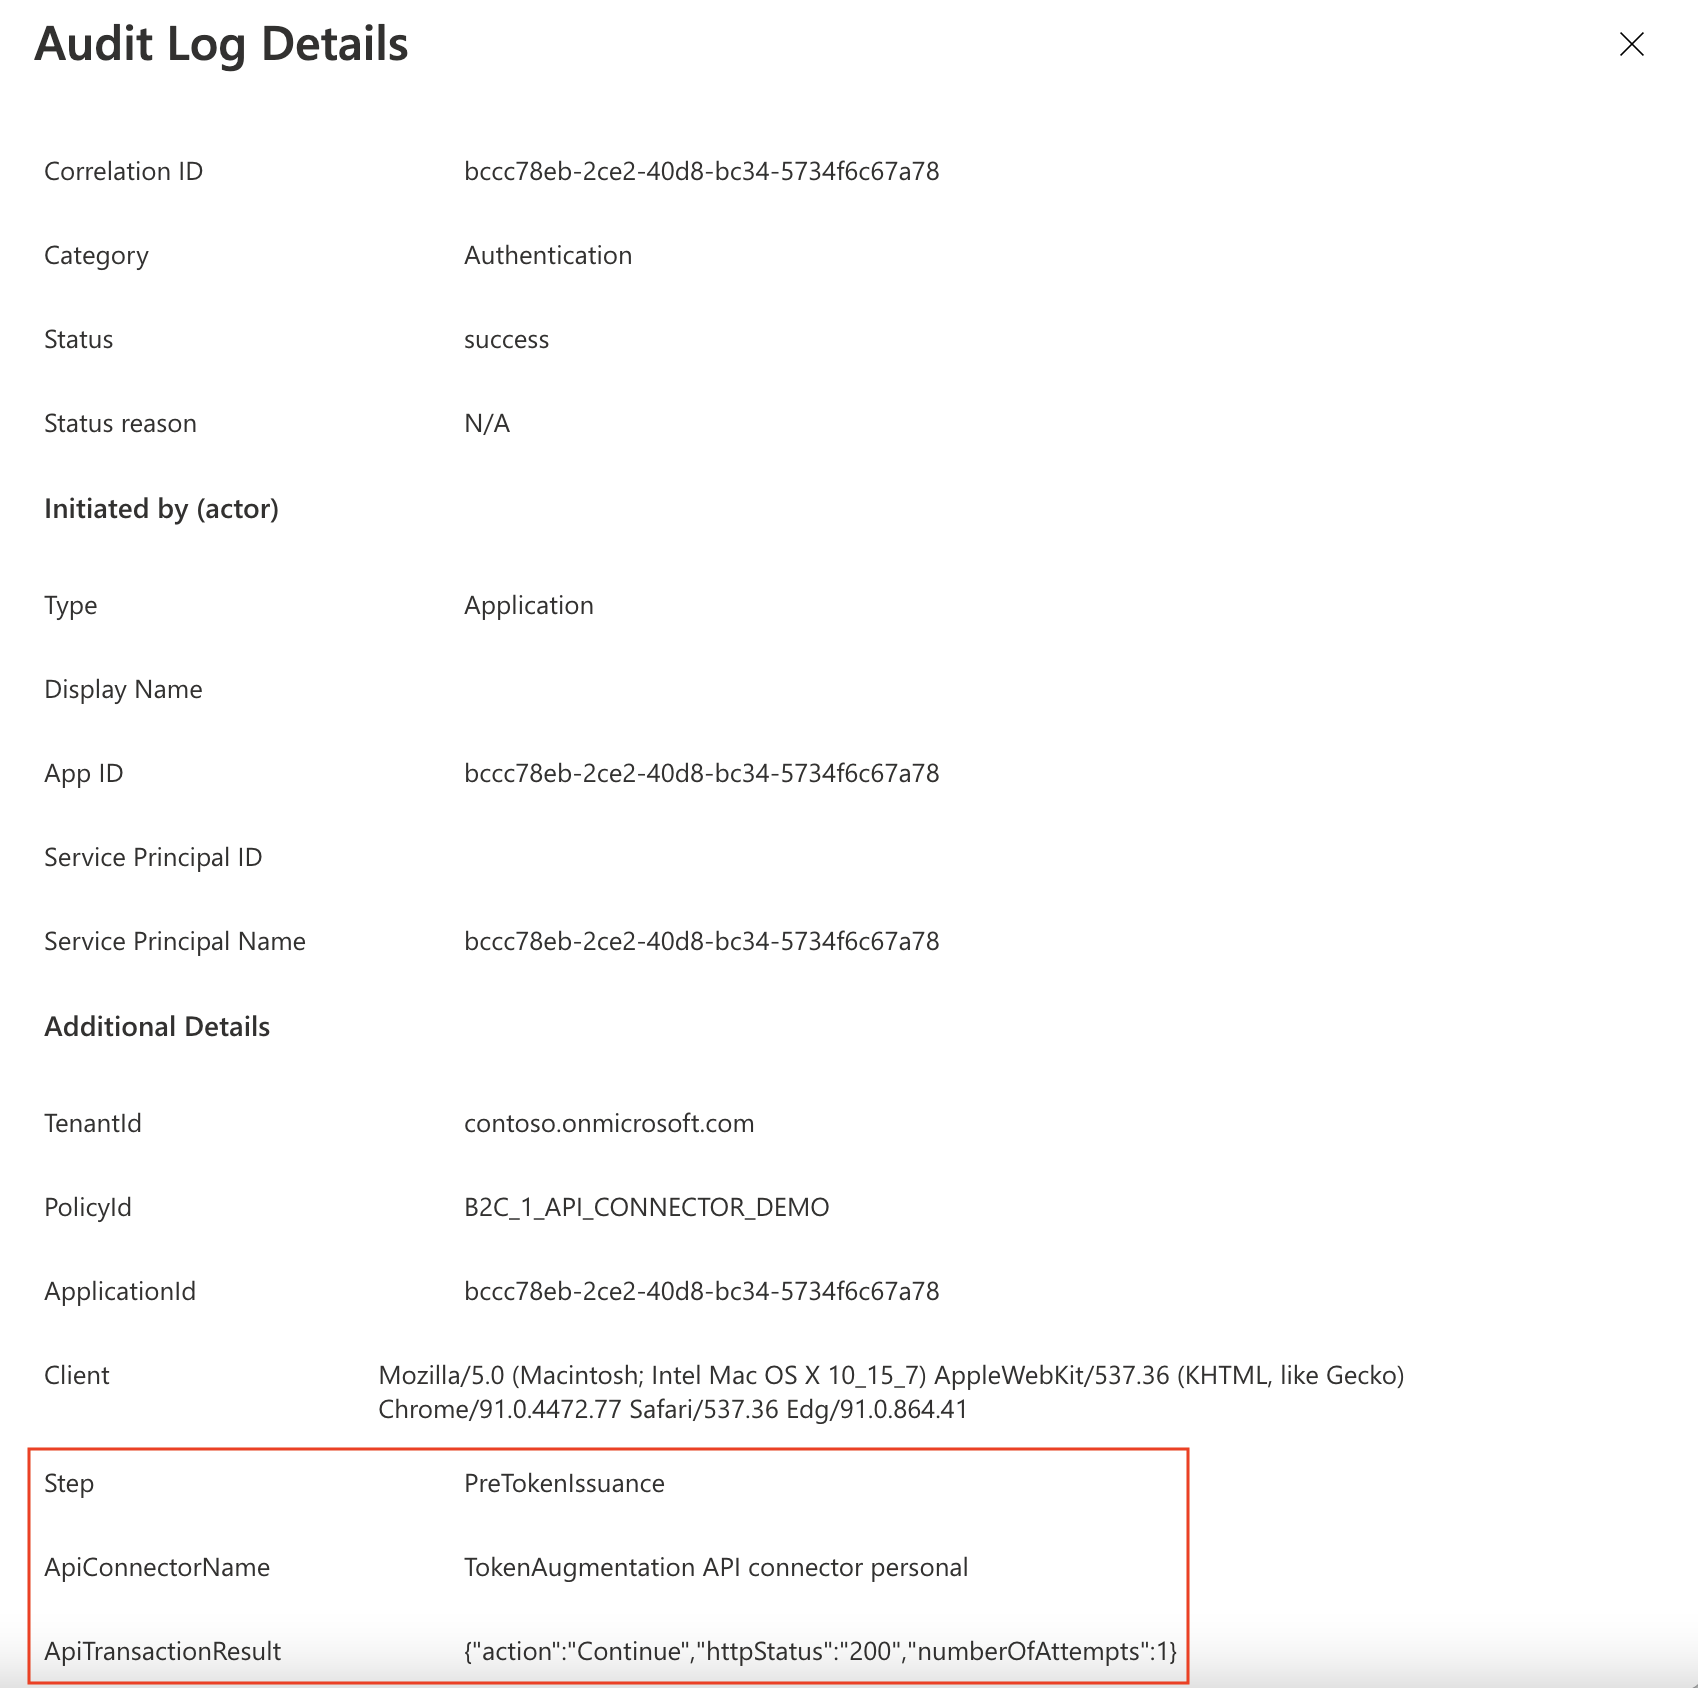
此外,Azure AD B2C 會記錄透過使用者流程在使用者驗證期間發生的 API 交易元數據。 若要找到這些項目:
- 移至 Azure AD B2C。
- 在 [活動] 底下,選取 [ 稽核記錄]。
- 篩選清單檢視:針對 [日期],選取您想要的時間間隔,針對 [ 活動],選取 [ API 已呼叫為使用者流程的一部分]。
- 檢查個別記錄。 每個數據列都代表在使用者流程期間嘗試呼叫的 API 連接器。 如果 API 呼叫失敗,而且發生重試,它仍會以單一數據列表示。
numberOfAttempts表示呼叫 API 的次數。 這個值可以是1或2。 關於 API 呼叫的其他資訊會在記錄中詳述。
使用無伺服器雲端函式
無伺服器雲端函式,例如 Azure Functions 中的 HTTP 觸發程式,提供簡單、高可用性、高效能的方式,以建立 API 端點以作為 API 連接器使用。
最佳做法
請確定:
- 您的 API 會明確檢查所收到的相依宣告是否有 Null 值。
- 您的 API 會實作保護 API 連接器的安全中所述的驗證方法。
- 您的 API 會儘快回應,以確保流暢的使用者體驗。
- 如果使用無伺服器函式或可調整的 Web 服務,請在生產環境中使用主控方案來確保 API 處於「喚醒」或「暖」狀態。 針對 Azure Functions,建議至少使用 進階方案
- 確保 API 的高可用性。
- 監視下游 API、資料庫或 API 其他相依性的效能,並將其最佳化。
這很重要
您的端點必須符合 Azure AD B2C 安全性需求規範。 已淘汰舊版 TLS 和加密。 如需詳細資訊,請參閱 Azure AD B2C TLS 和加密套件需求。
使用記錄
一般而言,您可以使用透過 Web API 服務啟用的記錄工具 (例如 Application insights),來協助監視您的 API 是否有未預期的錯誤碼、例外狀況和效能不佳的情況。
- 監視非 HTTP 200 或 400 的 HTTP 狀態碼。
- 401 或 403 HTTP 狀態碼通常表示您的驗證發生問題。 請再次檢查您 API 的驗證層,以及 API 連接器中的對應設定。
- 如有需要,請在開發中使用更主動的記錄層級 (例如「追蹤」或「偵錯」)。
- 監視您的 API 是否有過長的回應時間。
後續步驟
- 開始使用我們的 範例。
- 保護您的 API 連接器