這很重要
自 2025 年 5 月 1 日起,Azure AD B2C 將不再可供新客戶購買。 在我們的常見問題中深入瞭解。
開始之前,請使用此頁面頂端的 [選擇原則類型] 選取器,選擇您要設定的原則類型。 Azure Active Directory B2C 提供兩種方法來定義使用者如何與您的應用程式互動:透過預先定義的使用者流程,或透過完全可設定的自訂原則。 此文章中所需的步驟隨各方法而異。
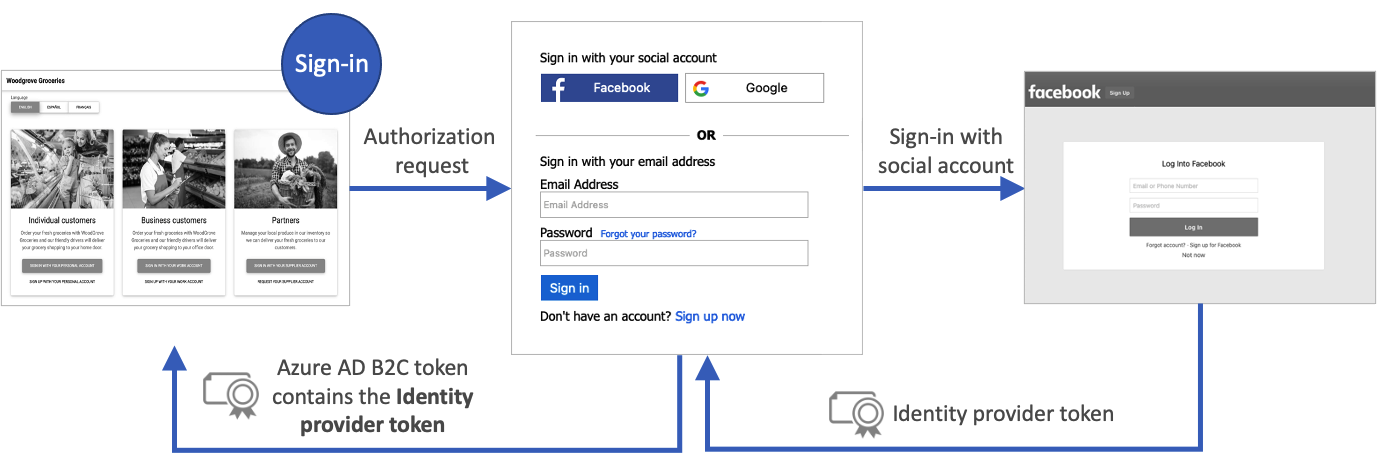
Azure Active Directory B2C (Azure AD B2C) 中的 使用者流程 可讓使用者利用身分識別提供者註冊或登入應用程式。 當旅程開始時,Azure AD B2C 會從識別提供者接收 存取令牌 。 Azure AD B2C 使用該令牌來擷取使用者的相關信息。 您可以在使用者流程中啟用宣告,以將令牌傳遞至您在 Azure AD B2C 中註冊的應用程式。
Azure AD B2C 支援傳遞 OAuth 2.0 和 OpenID Connect 識別提供者的存取令牌。 針對所有其他識別提供者,宣告會傳回空白。 如需詳細資訊,請參閱身分識別提供者同盟 Live 示範。
下圖顯示識別提供者令牌如何傳回您的應用程式:
先決條件
- 建立使用者流程,讓使用者能夠註冊並登入您的應用程式。
- 註冊 Web 應用程式。
- 完成開始使用 Active Directory B2C 中的自定義原則中的步驟。 本教學課程會引導您更新自定義原則檔案,以使用您的 Azure AD B2C 租用戶設定。
- 註冊 Web 應用程式。
啟用認領
以 Azure AD B2C 租用戶的外部 ID 使用者流程系統管理員登入 Azure 入口網站。
如果您有多個租用戶的存取權,請使用頂端功能表中的 [設定] 圖示,從 [目錄 + 訂用帳戶] 功能表切換至您的 Azure AD B2C 租用戶。
選擇 Azure 入口網站左上角 的 [所有服務 ],搜尋並選取 [Azure AD B2C]。
選取 [使用者流程][原則],然後選取您的使用者流程。 例如, B2C_1_signupsignin1。
選取 應用程式宣告。
啟用 識別提供者存取令牌 宣告。
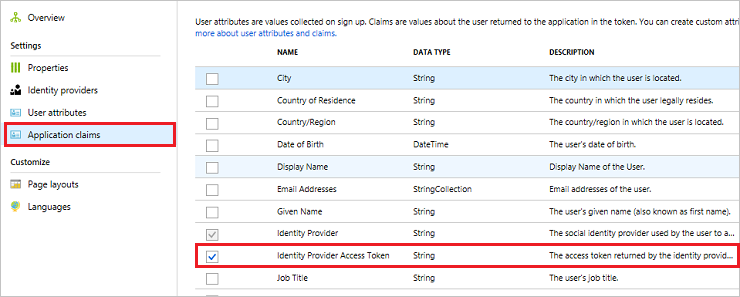
按兩下 [儲存 ] 以儲存使用者流程。
測試使用者流程
在 Azure AD B2C 中測試您的應用程式時,若能將 Azure AD B2C 令牌傳回到 https://jwt.ms,以檢閱其中的宣告,將會非常有用。
在使用者流程的 [概觀] 頁面上,選取 [ 執行使用者流程]。
針對 [應用程式],選取您先前註冊的應用程式。 若要檢視下列範例中的權杖, 回覆 URL 應該會顯示
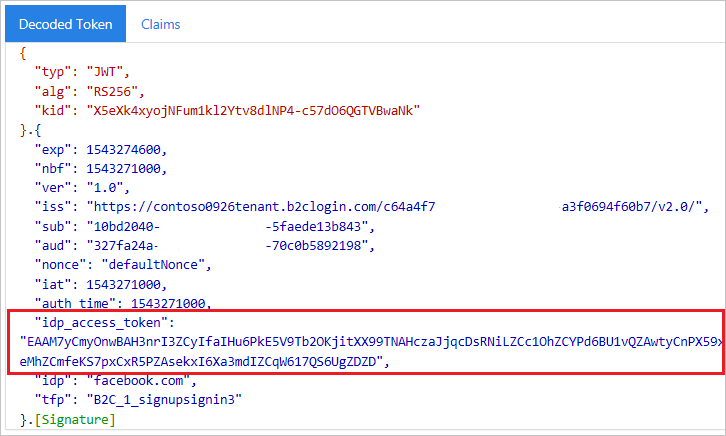
https://jwt.ms。按兩下 [執行使用者流程],然後使用您的帳戶認證登入。 您應該會在 idp_access_token 宣告中看到識別提供者的存取令牌。
您應該會看到類似下列範例的內容:
新增權利要求項目
開啟您的TrustframeworkExtensions.xml 檔案,並將具有 標識符的下列
identityProviderAccessToken元素新增至 ClaimsSchema 元素:<BuildingBlocks> <ClaimsSchema> <ClaimType Id="identityProviderAccessToken"> <DisplayName>Identity Provider Access Token</DisplayName> <DataType>string</DataType> <AdminHelpText>Stores the access token of the identity provider.</AdminHelpText> </ClaimType> ... </ClaimsSchema> </BuildingBlocks>針對您想要存取令牌的每個 OAuth 2.0 識別提供者,將 OutputClaim 元素新增至 TechnicalProfile 元素。 下列範例顯示新增至 Facebook 技術設定檔的 元素:
<ClaimsProvider>
  <DisplayName>Facebook</DisplayName>
  <TechnicalProfiles>
    <TechnicalProfile Id="Facebook-OAUTH">
      <OutputClaims>
        <OutputClaim ClaimTypeReferenceId="identityProviderAccessToken" PartnerClaimType="{oauth2:access_token}" />
      </OutputClaims>
      ...
    </TechnicalProfile>
  </TechnicalProfiles>
</ClaimsProvider>
儲存 TrustframeworkExtensions.xml 檔案。
開啟依賴方原則檔案,例如 SignUpOrSignIn.xml,並將 OutputClaim 元素加入 TechnicalProfile:
<RelyingParty>
  <DefaultUserJourney ReferenceId="SignUpOrSignIn" />
  <TechnicalProfile Id="PolicyProfile">
    <OutputClaims>
      <OutputClaim ClaimTypeReferenceId="identityProviderAccessToken" PartnerClaimType="idp_access_token"/>
    </OutputClaims>
    ...
  </TechnicalProfile>
</RelyingParty>
儲存原則檔案。
測試您的原則
在 Azure AD B2C 中測試您的應用程式時,讓 Azure AD B2C 令牌傳回到 https://jwt.ms,以便能夠檢閱其中的宣告,會很有用。
上傳檔案
- 登入 Azure 入口網站。
- 如果您有多個租用戶的存取權,請使用頂端功能表中的 [設定] 圖示,從 [目錄 + 訂用帳戶] 功能表切換至您的 Azure AD B2C 租用戶。
- 選擇 Azure 入口網站左上角 的 [所有服務 ],然後搜尋並選取 [Azure AD B2C]。
- 選取 [ 身分識別體驗架構]。
- 在 [自定義原則] 頁面上,按兩下 [ 上傳原則]。
- 如果原則存在,請選取 [覆寫原則],然後搜尋並選取 TrustframeworkExtensions.xml 檔案。
- 選取 上傳。
- 針對受信方檔案重複步驟 5 到 7,例如 SignUpOrSignIn.xml。
執行政策
開啟您修改的政策。 例如, B2C_1A_signup_signin。
針對 [應用程式],選取您先前註冊的應用程式。 若要檢視下列範例中的權杖, 回覆 URL 應該會顯示
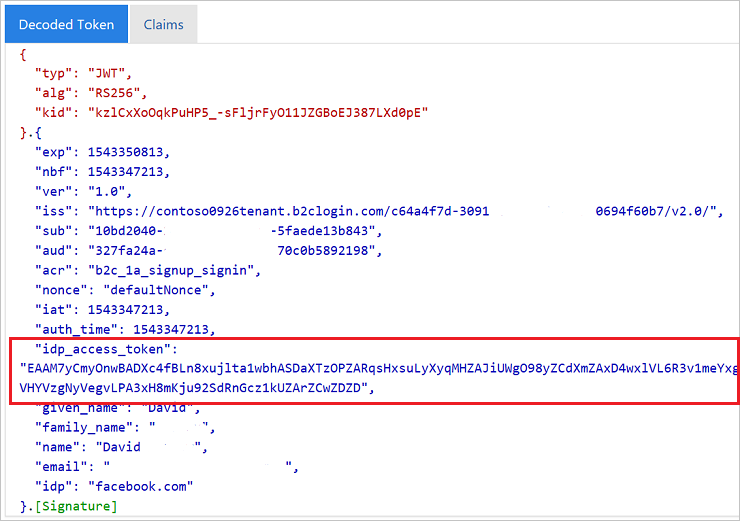
https://jwt.ms。選取 [立即執行]。
您應該會看到類似下列範例的內容:
傳遞 IDP 重新整理權杖 (可選的)
識別提供者傳回的存取令牌在短時間內有效。 某些識別提供者也會發出重新整理令牌以及存取令牌。 然後,用戶端應用程式可以在需要時,將身份提供者的刷新令牌交換為新的存取令牌。
Azure AD B2C 自定義原則支持傳遞 OAuth 2.0 識別提供者的重新整理令牌,其中包括 Facebook、 Google 和 GitHub。
若要傳遞識別提供者的重新整理令牌,請遵循下列步驟:
開啟您的TrustframeworkExtensions.xml 檔案,並將具有 標識符的下列
identityProviderRefreshToken元素新增至 ClaimsSchema 元素。<ClaimType Id="identityProviderRefreshToken"> <DisplayName>Identity provider refresh token</DisplayName> <DataType>string</DataType> </ClaimType>針對您想要重新整理令牌的每個 OAuth 2.0 識別提供者,將 OutputClaim 元素新增至 TechnicalProfile 元素。 下列範例顯示新增至 Facebook 技術設定檔的 元素:
<ClaimsProvider>
  <DisplayName>Facebook</DisplayName>
  <TechnicalProfiles>
    <TechnicalProfile Id="Facebook-OAUTH">
      <OutputClaims>
        <OutputClaim ClaimTypeReferenceId="identityProviderRefreshToken" PartnerClaimType="{oauth2:refresh_token}" />
      </OutputClaims>
      ...
    </TechnicalProfile>
  </TechnicalProfiles>
</ClaimsProvider>
某些身分識別提供者要求您在技術配置檔中包含元數據或作用範圍。
針對 Google 身分識別提供者,新增
access_type和prompt兩個宣告類型。 然後將下列輸入宣告新增至識別提供者的技術配置檔:<InputClaims> <InputClaim ClaimTypeReferenceId="access_type" PartnerClaimType="access_type" DefaultValue="offline" AlwaysUseDefaultValue="true" /> <!-- The refresh_token is return only on the first authorization for a given user. Subsequent authorization request doesn't return the refresh_token. To fix this issue we add the prompt=consent query string parameter to the authorization request--> <InputClaim ClaimTypeReferenceId="prompt" PartnerClaimType="prompt" DefaultValue="consent" AlwaysUseDefaultValue="true" /> </InputClaims>其他身份提供者可能會使用不同的方法來發出刷新令牌。 請遵循識別提供者的受眾,並將必要的元素新增至識別提供者的技術資料表。
儲存您在 TrustframeworkExtensions.xml 檔案中所做的變更。
開啟依賴方原則檔案,例如 SignUpOrSignIn.xml,並將 OutputClaim 元素加入 TechnicalProfile:
<RelyingParty>
  <DefaultUserJourney ReferenceId="SignUpOrSignIn" />
  <TechnicalProfile Id="PolicyProfile">
    <OutputClaims>
      <OutputClaim ClaimTypeReferenceId="identityProviderRefreshToken" PartnerClaimType="idp_refresh_token"/>
    </OutputClaims>
    ...
  </TechnicalProfile>
</RelyingParty>
儲存您在信賴方政策檔案中所做的變更。
上傳 TrustframeworkExtensions.xml 檔案,然後上傳信賴方政策檔案。
後續步驟
在 Azure AD B2C 令牌概觀中深入瞭解。