這很重要
自 2025 年 5 月 1 日起,Azure AD B2C 將不再可供新客戶購買。 在我們的常見問題中深入瞭解。
在此示例教程中,瞭解如何將 Azure Active Directory B2C (Azure AD B2C) 身份驗證與 Akamai Enterprise Application Access 集成。 Akamai Enterprise Application Access 是一種 Zero Trust 網路訪問 (ZTNA) 解決方案,支援對駐留在私有數據中心的現代和傳統應用程式進行安全遠端訪問。 Akamai Enterprise Application Access 與身份供應商 (IdP) Azure AD B2C 聯合以對使用者進行身份驗證,然後使用其授權策略對身份、設備、應用程式和請求上下文執行持續評估,然後再允許訪問私有應用程式。
此功能僅適用於自訂原則。 如需設定步驟,請在前述選取器中選取 [自訂原則]。
先決條件
若要開始,您需要:
Akamai Enterprise Access 合同。 如果您沒有,請免費試用。
Azure 訂用帳戶。 如果您沒有訂用帳戶,可以取得免費帳戶。
連結到 Azure 訂閱的 Azure AD B2C 租戶 。
部署在數據中心或混合雲環境中防火牆後面的虛擬設備,用於部署 Akamai Enterprise Application Access 連接器
使用標頭進行身份驗證的應用程式。 在此示例中,我們將使用顯示標頭 docker header-demo-app 的應用程式。
或 OpenID Connect (OIDC) 應用程式。 在此示例中,我們將使用一個 ASP.NET MVC Web 應用程式 ,該應用程式通過使用 Open Web Interface for .NET (OWIN) 中間件和 Microsoft 標識平臺來登錄使用者。
案例描述
在此方案中,你將為最終使用者啟用 Azure AD B2C 身份驗證,同時他們嘗試訪問受 Akamai Enterprise Application Access 保護的私有應用程式。
此整合中涉及的元件包括:
Azure AD B2C:負責對最終用戶進行身份驗證的 SAML 標識提供者。
Akamai Enterprise Application Access:ZTNA 雲服務,負責通過持續的 ZTNA 策略實施來保護對私有應用程式的訪問。
Akamai Enterprise Application Access Connector:部署在私有數據中心的虛擬設備。 它支援與私有應用程式的安全連接,而無需打開任何數據中心入站防火牆埠。
應用程式:部署在私有數據中心中,最終使用者需要訪問的服務或應用程式。
使用者向 Azure AD B2C(作為 SAML IdP)進行身份驗證,後者將使用 SAML 斷言回應 Akamai Enterprise Application Access(服務提供者)。 Akamai Enterprise Application Access 映射來自 SAML 斷言的資訊,並構建 OpenID 聲明或注入包含使用者相關信息的 HTTP 標頭。 然後,Akamai Enterprise Application Access 會將此數據傳遞給可通過 Akamai Enterprise Application Access 連接器訪問的應用程式。 在我們的範例中,應用程式將顯示這些標頭的內容。 在 OIDC 應用程式的案例中,它將顯示使用者的聲明。
下圖顯示了 Akamai Enterprise Application Access (EAA) 如何與 Azure AD B2C 集成。
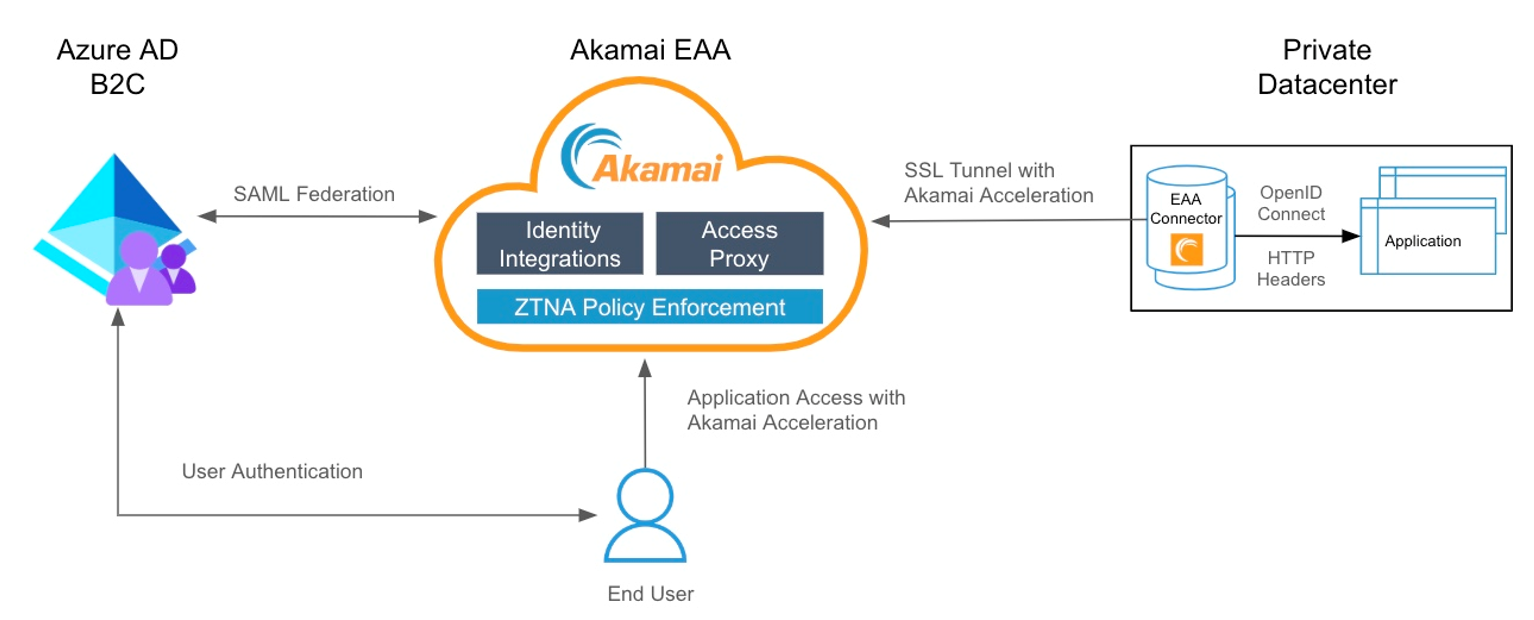
最終用戶嘗試使用在 Akamai Enterprise Application Access 中註冊的應用程式外部 URL 訪問託管在私有數據中心的應用程式。
Akamai Enterprise Application Access 將未經身份驗證的最終使用者重定向到 Azure AD B2C 進行身份驗證。
身份驗證成功后,Azure AD B2C 使用 SAML 斷言將使用者重定向回 Akamai Enterprise Application Access。
Akamai Enterprise Application Access 使用 SAML 斷言中的身份資訊來識別使用者並確定是否允許使用者訪問請求的應用程式。
Akamai Enterprise Application Access 構建 OIDC 聲明或注入 HTTP 標頭,這些標頭將發送到應用程式。
應用程式使用此資訊來識別經過身份驗證的使用者,併為最終使用者創建應用程式會話。
加入 Akamai Enterprise Application Access
要開始使用 Akamai Enterprise Application Access,請參閱 Akamai Enterprise Application Access 入門指南。
步驟 1 - 在 Akamai Enterprise Application Access 中將 Azure AD B2C 添加為 SAML IdP
Akamai Enterprise Application Access 支援與 Azure AD B2C 等雲 IdP 的 SAML 聯合。 在 Akamai Enterprise Application Access 中將 Azure AD B2C 添加為 第三方 SAML IdP 。
登錄 Enterprise Center https://control.akamai.com/
在企業中心導航功能表中,選擇 應用程式訪問 > 身份和使用者 > 身份供應商。
選擇 添加身份供應商 (+)。
輸入名稱、描述,然後選擇供應商類型作為 第三方 SAML。
選取繼續。 此時將顯示 Identity Provider configuration (身份提供程式設定) 頁面。
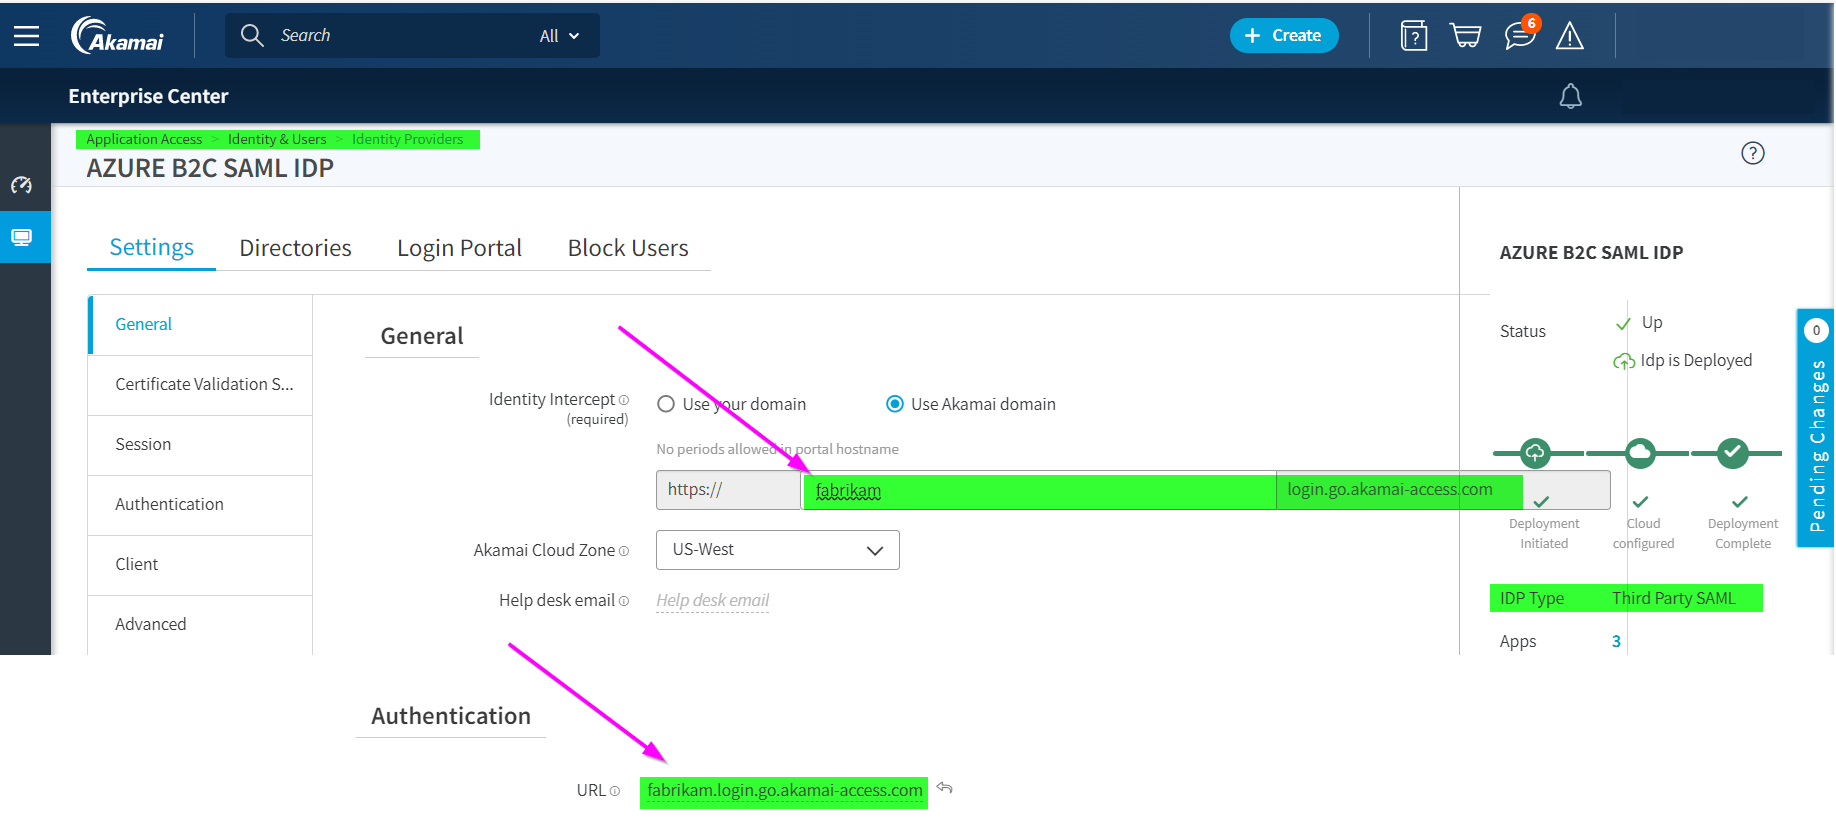
在 SettingsGeneral(設置>常規)中,輸入 Identity Server 的 URL。 您可以選擇 Use Akamai domain (使用 Akamai 域 ) 或 Use your domain(使用您的域)。 如果您使用自己的域,請使用自簽名證書,或使用上傳的自定義證書。
在 Authentication (身份驗證 ) 中,輸入與上一步中定義的 URL 相同的 General (常規),然後選擇 Save (保存)。

步驟 2 - 在 Azure AD B2C 中註冊 SAML 應用程式
從 GitHub 取得自定義原則入門套件,然後使用您的 Azure AD B2C 租使用者名稱更新 LocalAccounts 入門套件中的 XML 檔案:
下載 .zip 檔案 或複製存放庫:
git clone https://github.com/Azure-Samples/active-directory-b2c-custom-policy-starterpack在 LocalAccounts 目錄中的所有檔案中,以 Azure AD B2C 租使用者的名稱取代字串
yourtenant。 例如,如果 B2C 租使用者的名稱是fabrikam,則所有yourtenant.onmicrosoft.com的實例都會變成fabrikam.onmicrosoft.com。
為 Azure AD B2C 建立簽名證書,以對發送到 Akamai Enterprise Application Access 的 SAML 回應進行簽名:
一。 獲取證書。 如果您還沒有憑證,可以使用自我簽署憑證。
b。 在 Azure AD B2C 租戶中上傳證書。 記下該名稱,因為在後續步驟中提到的內容中
TechnicalProfile將需要它。啟用您的策略以與 SAML 應用程式連接。
一。 在自定義策略初學者包中打開
LocalAccounts\TrustFrameworkExtensions.xml。 尋找 ClaimsProviders 元素。 如果不存在,請將其添加到根元素下,TrustFrameworkPolicy並添加以下 XML 代碼片段以實現 SAML 回應產生器:<ClaimsProvider> <DisplayName>Akamai</DisplayName> <TechnicalProfiles> <!-- SAML Token Issuer technical profile --> <TechnicalProfile Id="AkamaiSaml2AssertionIssuer"> <DisplayName>Token Issuer</DisplayName> <Protocol Name="SAML2" /> <OutputTokenFormat>SAML2</OutputTokenFormat> <Metadata> <Item Key="IssuerUri">https://<REPLACE>.login.go.akamai-access.com/saml/sp/response</Item> </Metadata> <CryptographicKeys> <Key Id="SamlAssertionSigning" StorageReferenceId="B2C_1A_AkamaiSAMLSigningCert" /> <Key Id="SamlMessageSigning" StorageReferenceId="B2C_1A_AkamaiSAMLSigningCert" /> </CryptographicKeys> <InputClaims /> <OutputClaims /> <UseTechnicalProfileForSessionManagement ReferenceId="SM-Saml-issuerAkamai" /> </TechnicalProfile> <!-- Session management technical profile for SAML-based tokens --> <TechnicalProfile Id="SM-Saml-issuerAkamai"> <DisplayName>Session Management Provider</DisplayName> <Protocol Name="Proprietary" Handler="Web.TPEngine.SSO.SamlSSOSessionProvider, Web.TPEngine, Version=1.0.0.0, Culture=neutral, PublicKeyToken=null" /> <Metadata> <Item Key="IncludeSessionIndex">false</Item> <Item Key="RegisterServiceProviders">false</Item> </Metadata> </TechnicalProfile> </TechnicalProfiles> </ClaimsProvider>b。 將 替換為
issuerUri> 中 Akamai Enterprise Application Access 設置常規中定義的 Akamai URL例
<Item Key="IssuerUri">https://fabrikam.login.go.akamai-access.com/saml/sp/response</Item>將 B2C_1A_AkamaiSAMLSigningCert 替換為上傳的策略金鑰的名稱。
步驟 3 - 建立為 SAML 配置的註冊或登錄策略
在 Starter Pack 的工作目錄中創建檔的副本
SignUpOrSignin.xml,並使用新名稱保存它。 本文以SignUpOrSigninSAML.xml此為例。 此檔案是信賴憑證者的原則檔。 預設將其設定為發出 JWT 回應。SignUpOrSigninSAML.xml在首選編輯器中打開檔。使用 Azure AD B2C 租戶的名稱進行更新
tenant-name,將策略的 andPolicyId值更改為PublicPolicyUriB2C_1A_signup_signin_saml和http://<tenant-name>.onmicrosoft.com/B2C_1A_signup_signin_saml。<TrustFrameworkPolicy xmlns:xsi="http://www.w3.org/2001/XMLSchema-instance" xmlns:xsd="http://www.w3.org/2001/XMLSchema" xmlns="http://schemas.microsoft.com/online/cpim/schemas/2013/06" PolicySchemaVersion="0.3.0.0" TenantId="tenant-name.onmicrosoft.com" PolicyId="B2C_1A_signup_signin_saml" PublicPolicyUri="http://<tenant-name>.onmicrosoft.com/B2C_1A_signup_signin_saml">在使用者旅程圖結束時,Azure AD B2C 包含一個
SendClaims步驟。 此步驟會參考權杖簽發者技術設定檔。 若要發出 SAML 回應而不是預設的 JWT 回應,請修改SendClaims步驟,以參考新的 SAML 權杖簽發者技術設定檔Saml2AssertionIssuer。在
<RelyingParty>元素正前方加入下列 XML 程式碼片段。 此 XML 將覆蓋使用者旅程中的SignUpOrSignIn編排步驟 4,假設您使用的是LocalAccount自定義策略初學者包。如果您從入門套件中的不同資料夾啟動,或透過新增或移除協調流程步驟來自訂使用者旅程圖,請確定
order元素中的數字會對應到使用者旅程圖中針對權杖簽發者步驟所指定的號碼。 例如,在其他初學者包資料夾中,相應的步驟編號為 7SocialAndLocalAccounts表示 、 6 表示SocialAccounts和 9SocialAndLocalAccountsWithMfa表示 。<UserJourneys> <UserJourney Id="SignUpOrSignIn"> <OrchestrationSteps> <OrchestrationStep Order="4" Type="SendClaims" CpimIssuerTechnicalProfileReferenceId="AkamaiSaml2AssertionIssuer"/> </OrchestrationSteps> </UserJourney> </UserJourneys>信賴憑證者元素會判斷應用程式所使用的通訊協定。 預設值為
OpenId。Protocol元素必須變更為SAML。 輸出宣告將建立 SAML 判斷提示的宣告對應。使用下列技術設定檔 XML 來取代
<TechnicalProfile>元素中的整個<RelyingParty>元素。<TechnicalProfile Id="PolicyProfile"> <DisplayName>PolicyProfile</DisplayName> <Protocol Name="SAML2"/> <OutputClaims> <OutputClaim ClaimTypeReferenceId="displayName" /> <OutputClaim ClaimTypeReferenceId="givenName" /> <OutputClaim ClaimTypeReferenceId="surname" /> <OutputClaim ClaimTypeReferenceId="email" DefaultValue="" /> <OutputClaim ClaimTypeReferenceId="identityProvider" DefaultValue="" /> <OutputClaim ClaimTypeReferenceId="objectId" PartnerClaimType="objectId"/> </OutputClaims> <SubjectNamingInfo ClaimType="objectId" ExcludeAsClaim="true"/> </TechnicalProfile>信賴憑證者的最終原則檔看起來應該類似下列 XML 程式碼:
<?xml version="1.0" encoding="UTF-8" standalone="yes"?>
<TrustFrameworkPolicy
  xmlns:xsi="http://www.w3.org/2001/XMLSchema-instance"
  xmlns:xsd="http://www.w3.org/2001/XMLSchema"
  xmlns="http://schemas.microsoft.com/online/cpim/schemas/2013/06"
  PolicySchemaVersion="0.3.0.0"
  TenantId="fabrikam.onmicrosoft.com"
  PolicyId="B2C_1A_signup_signin_saml"
  PublicPolicyUri="http://fabrikam.onmicrosoft.com/B2C_1A_signup_signin_saml">
  <BasePolicy>
    <TenantId>fabrikam.onmicrosoft.com</TenantId>
    <PolicyId>B2C_1A_TrustFrameworkExtensions</PolicyId>
  </BasePolicy>

  <UserJourneys>
    <UserJourney Id="SignUpOrSignIn">
      <OrchestrationSteps>
        <OrchestrationStep Order="7" Type="SendClaims" CpimIssuerTechnicalProfileReferenceId="AkamaiSaml2AssertionIssuer"/>
      </OrchestrationSteps>
    </UserJourney>
  </UserJourneys>
  <RelyingParty>
    <DefaultUserJourney ReferenceId="SignUpOrSignIn" />
    <TechnicalProfile Id="PolicyProfile">
      <DisplayName>PolicyProfile</DisplayName>
      <Protocol Name="SAML2"/>
      <OutputClaims>
        <OutputClaim ClaimTypeReferenceId="displayName" />
        <OutputClaim ClaimTypeReferenceId="givenName" />
        <OutputClaim ClaimTypeReferenceId="surname" />
        <OutputClaim ClaimTypeReferenceId="email" DefaultValue="" />
        <OutputClaim ClaimTypeReferenceId="identityProvider" DefaultValue="" />
        <OutputClaim ClaimTypeReferenceId="objectId" PartnerClaimType="objectId"/>
      </OutputClaims>
      <SubjectNamingInfo ClaimType="objectId" ExcludeAsClaim="true"/>
    </TechnicalProfile>
  </RelyingParty>
</TrustFrameworkPolicy>
備註
您可以按照相同的過程實施其他類型的流程,例如登錄、密碼重置或配置檔編輯流程。
步驟 4 - 上傳策略
保存更改並將、 new TrustFrameworkBase.xml 和 TrustFrameworkExtensions.xml policy 檔上傳到 SignUpOrSigninSAML.xmlAzure 門戶。
登入 Azure 入口網站。
如果您有多個租用戶的存取權,請使用頂端功能表中的 [設定] 圖示,從 [目錄 + 訂用帳戶] 功能表切換至您的 Azure AD B2C 租用戶。
在 Azure 入口網站中,搜尋並選取 [Azure AD B2C]。
在 [原則] 底下,選取 [ 身分識別體驗架構]。 選擇 Upload Custom Policy(上傳自定義策略),然後按以下順序上傳您更改的兩個策略檔:
- 例如,base 檔
TrustFrameworkBase.xml - 擴充原則,例如
TrustFrameworkExtensions.xml - 然後是依賴方策略,例如
SignUpOrSigninSAML.xml.
- 例如,base 檔
步驟 5 - 下載 Azure AD B2C IdP SAML 元數據
上傳原則檔案之後,Azure AD B2C 會使用設定資訊,來產生應用程式將使用的識別提供者 SAML 中繼資料文件。 SAML 中繼資料文件包含服務的位置,例如,登入方法、登出方法及憑證。
Azure AD B2C 策略元數據在以下 URL 中提供:
https://<tenant-name>.b2clogin.com/<tenant-name>.onmicrosoft.com/<policy-name>/samlp/metadata將
<tenant-name>取代為您的 Azure AD B2C 租用戶名稱。 將<policy-name>取代為原則的名稱 (識別碼)。 以下是範例:https://fabrikam.b2clogin.com/fabrikam.onmicrosoft.com/B2C_1A_signup_signin_saml/samlp/metadata
下載 SAML 元數據並將其保存在本地裝置上。 以下步驟需要完成 Akamai Enterprise Application Access 中的配置。
步驟 6 - 在 Azure AD B2C 中註冊 Akamai Enterprise Application Access 應用程式
要使 Azure AD B2C 信任 Akamai Enterprise Application Access,請創建 Azure AD B2C 應用程式註冊。 註冊會包含設定資訊,例如,應用程式的中繼資料端點。
登入 Azure 入口網站。
如果您有多個租用戶的存取權,請使用頂端功能表中的 [設定] 圖示,從 [目錄 + 訂用帳戶] 功能表切換至您的 Azure AD B2C 租用戶。
在左側功能表上,選取 [Azure AD B2C]。 或者,選取 [所有服務],然後搜尋並選取 [Azure AD B2C]。
選取 [應用程式註冊],然後選取 [[新增註冊]。
輸入應用程式的 [名稱]。 例如,輸入 Akamai B2C Enterprise Application Access。
在 「支援的帳戶類型」 下,選擇 「僅此組織目錄中的帳戶 (僅限 B2C - 單租戶)」。。
在“重定向 URI”下,選擇“Web”,然後輸入在步驟 1 的“Akamai Enterprise Application Access Setting\General”中定義的 Akamai URL。 例如:
https://fabrikam.login.go.akamai-access.com/saml/sp/response。選取 註冊。
步驟 7 - 在 Azure AD B2C 中配置 Akamai Enterprise Application Access 應用程式
對於 SAML,您需要在應用程式註冊的清單中設定多個屬性。
新增識別碼
當 Akamai Enterprise Application Access SAML 應用程式向 Azure AD B2C 發出請求時,SAML 身份驗證請求包含一個 Issuer 屬性。 此屬性的值通常會與應用程式的中繼資料 entityID 值相同。 Azure AD B2C 會使用此值來查閱目錄中的應用程式註冊,並讀取設定。 要使此查找成功, identifierUri 必須在應用程式註冊清單中填充與屬性匹配的 Issuer 值。

在註冊清單中,找到identifierURIs參數並添加步驟 2 Azure AD B2C ClaimsProvider 中定義的 IssuerURI 值。
範例:
"identifierUris": [
		"https://fabrikam.login.go.akamai-access.com/saml/sp/response"
	],
此值將會與在應用程式上適用於 EntityId 的 SAML AuthN 要求中所設定的值,以及應用程式中繼資料中的 entityID 值相同。 您也需要尋找 accessTokenAcceptedVersion 參數,並將值設定為 2。
這很重要
如果不更新 accessTokenAcceptedVersion to 2 ,您將收到一條錯誤消息,要求驗證域。
步驟 8 - 在 Akamai Enterprise Application Access 中為 Azure AD B2C IdP 配置身份驗證設置
使用信賴方 URL 等身份驗證資訊更新 Akamai Enterprise Application Access Azure AD B2C IdP。
登錄 Enterprise Center https://control.akamai.com/
在企業中心導航功能表中,選擇 應用程式訪問 > 身份和使用者 > 身份供應商。
選擇在 步驟 1 中建立的身份供應商名稱。
上傳您在 步驟 5 中下載的 Azure AD B2C SAML 元數據檔。
要上傳 metadata.xml 檔,請選擇 Choose file (選擇檔)。
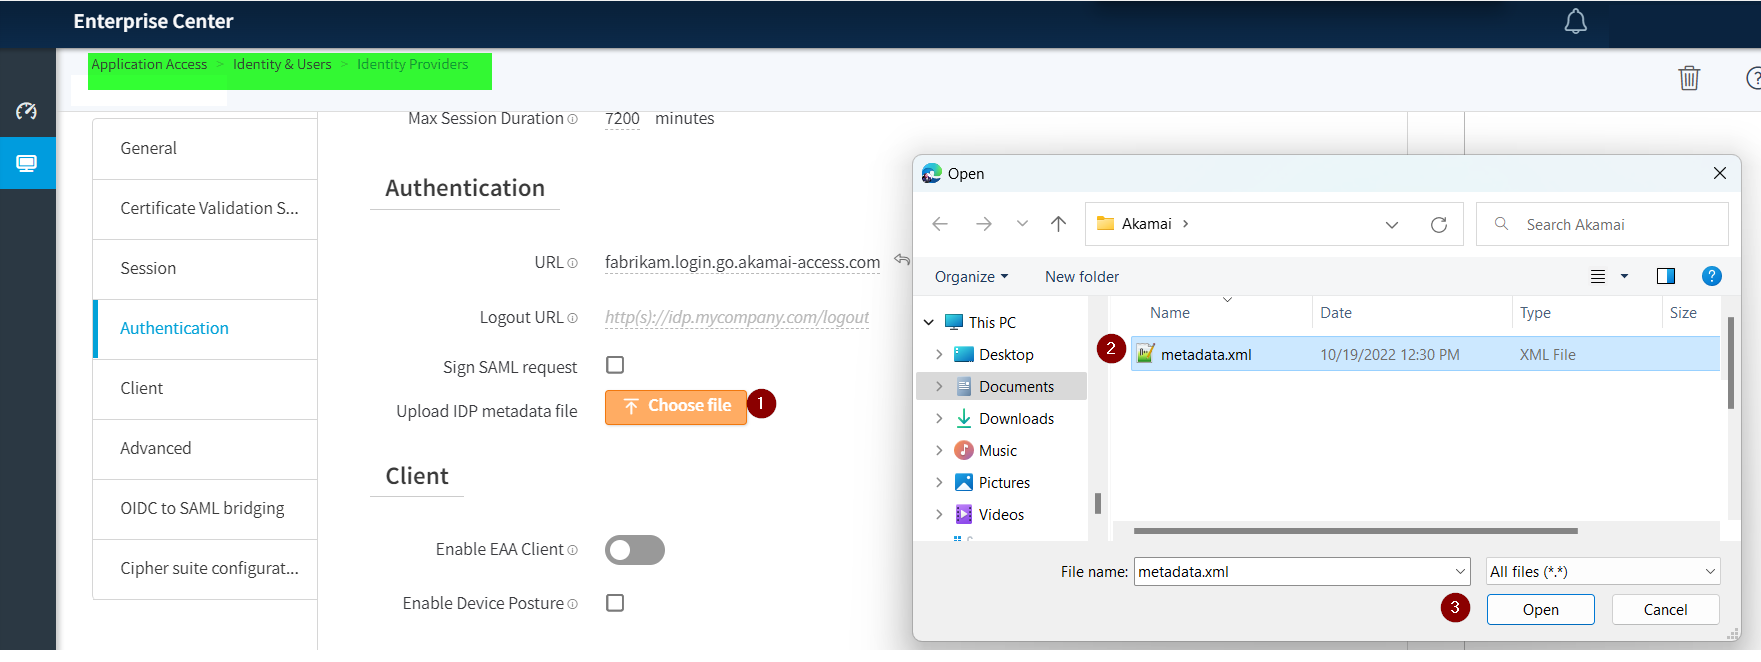
選擇 Save and Deploy (保存並部署)。

第 9 步 - 在您的私有數據中心部署 Akamai Enterprise Application Access Connector
要啟用對私有應用程式的訪問,請在應用程式所在的私有數據中心部署一個或多個 Akamai Enterprise Application Access 連接器 。 確保連接器可以訪問您的私有應用程式,並擁有對 Akamai Cloud 的出站訪問許可權。
第 10 步 - 在 Akamai Enterprise Application Access 中為私有應用程式定義 Access 應用程式
在 Akamai Enterprise Application Access 中定義和部署 Access 應用程式。
定義 Access 應用程式
將其關聯到您在前面的步驟中創建的 Enterprise Application Access Azure AD B2C IdP 定義。
設定應用程式的身分驗證以啟用私有應用程式的 SSO:
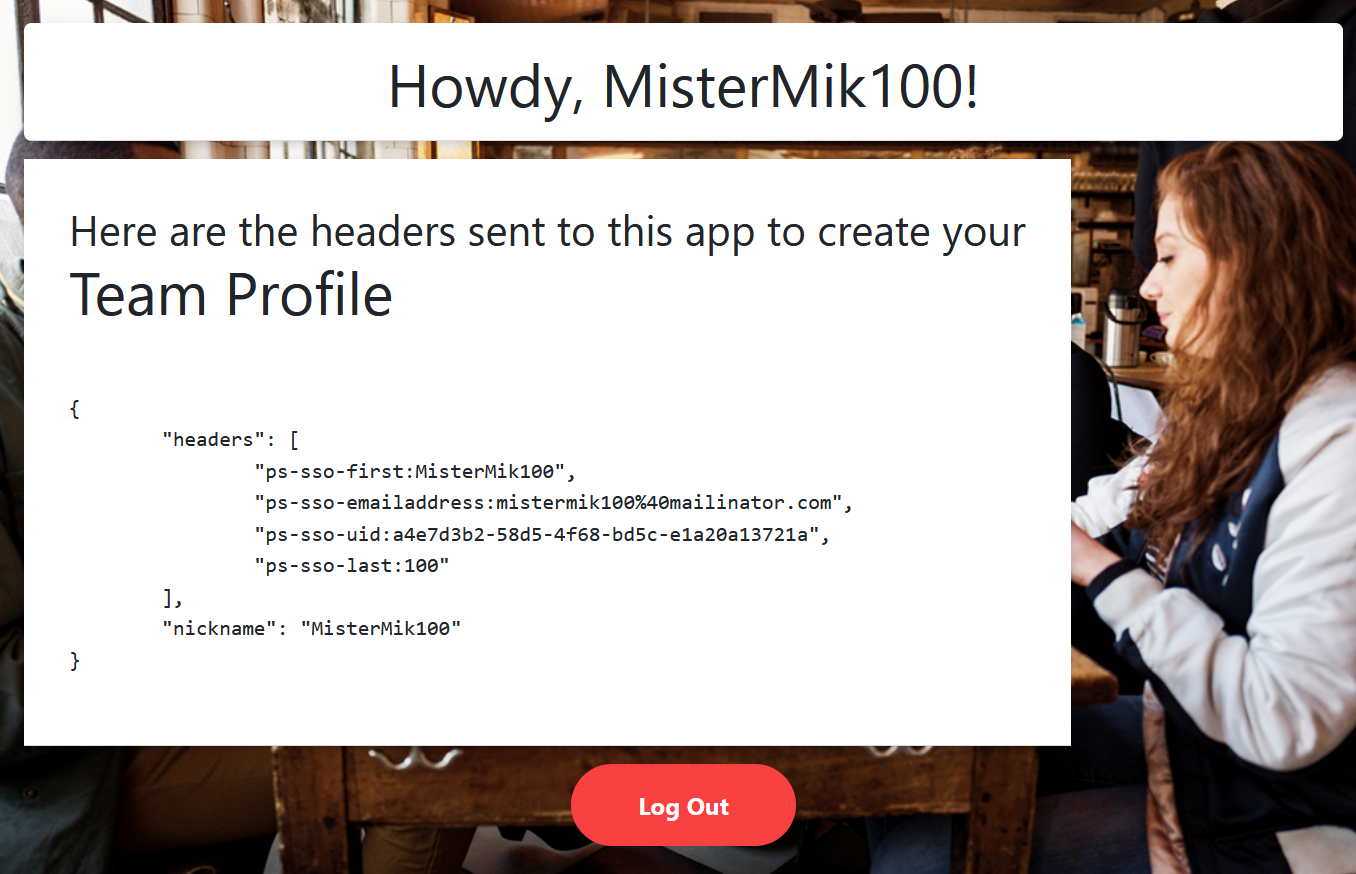
選項 1:HTTP 標頭
在此示例中,我們將使用顯示標頭 docker header-demo-app 的應用程式。 在私有環境中部署應用程式並且連接器能夠存取應用程式後,請按照 Akamai 文件 為存取應用程式設定自訂 HTTP 標頭創建自訂 HTTP 類型應用程式。
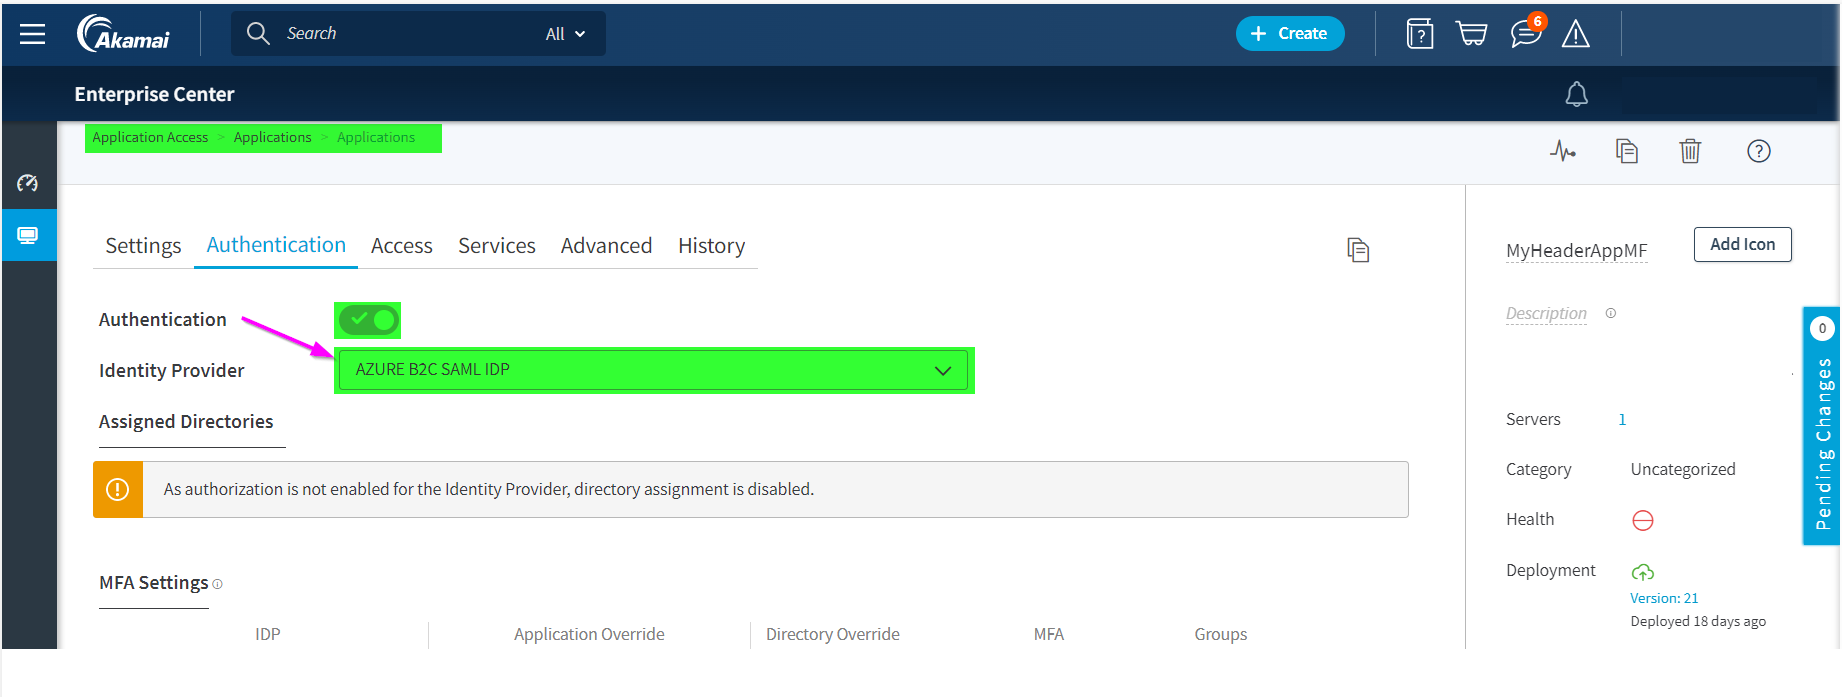
- 在“身份驗證”中,選擇在前面的步驟中創建的 Azure AD B2C SAML IdP。

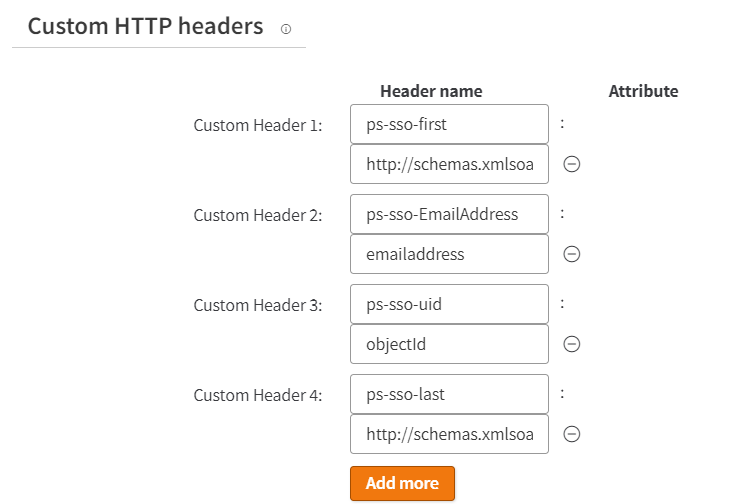
- 在應用程式的 「高級 」部分中,在身份驗證成功后,將 HTTP 標頭映射到 SAML 回應中 Azure AD B2C 頒發的 SAML 屬性。
範例:
| 標頭名稱 | 屬性 |
|---|---|
| ps-SSO-優先 | http://schemas.xmlsoap.org/ws/2005/05/identity/claims/name |
| ps-sso-last | http://schemas.xmlsoap.org/ws/2005/05/identity/claims/surname |
| ps-sso-電子郵件位址 | 電子郵件地址 |
| ps-sso-uid | 物件ID |
通過為您創建的自訂 HTTP 類型 Web 應用程式選擇 Akamai URL 來測試應用程式。
選項 2:OpenID Connect
在此示例中,我們將使用 ASP.NET MVC Web 應用程式 ,該應用程式通過使用 Open Web Interface for .NET (OWIN) 中間件和 Microsoft 標識平臺來登錄使用者。
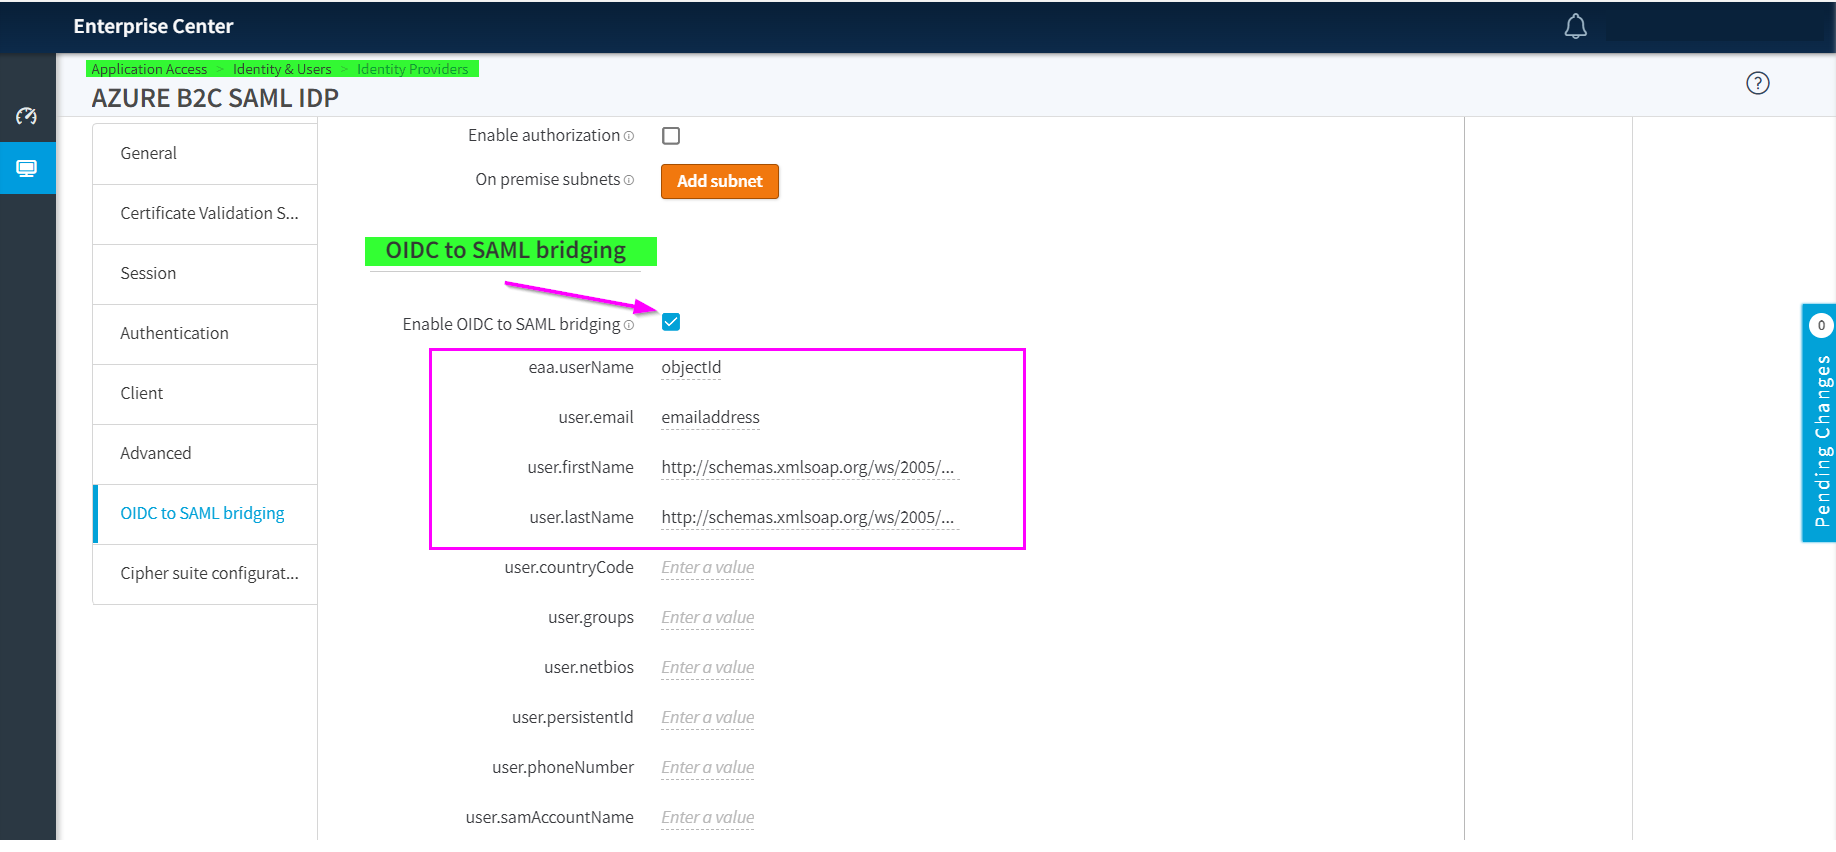
在通過上述步驟創建的 Azure AD B2C SAML IdP 中配置 OIDC 到 SAML 橋接。
按照為 Access 應用程式設定 OpenID Connect 建立自訂 HTTP 類型應用程式。
在“身份驗證”中,選擇根據 HTTP 標頭應用程式在前面的步驟中創建的 Azure AD B2C SAML IdP。
在 「高級 」中,選擇「 OpenID Connect 1.0 」作為身份驗證機制,然後選擇 “保存”。
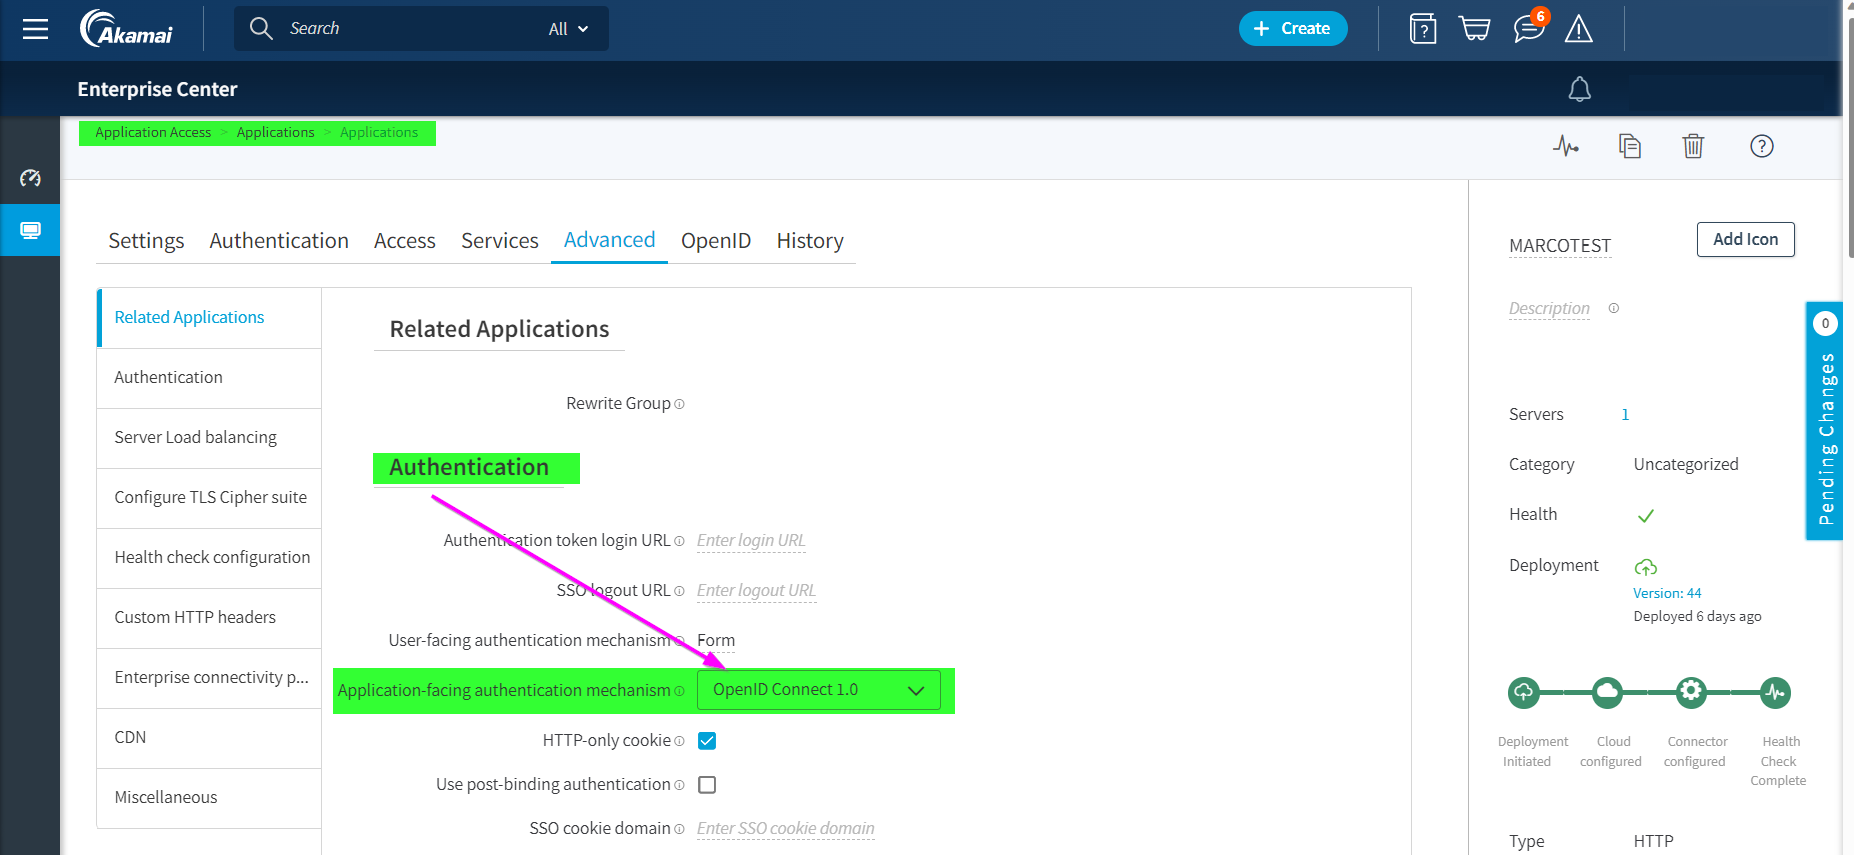
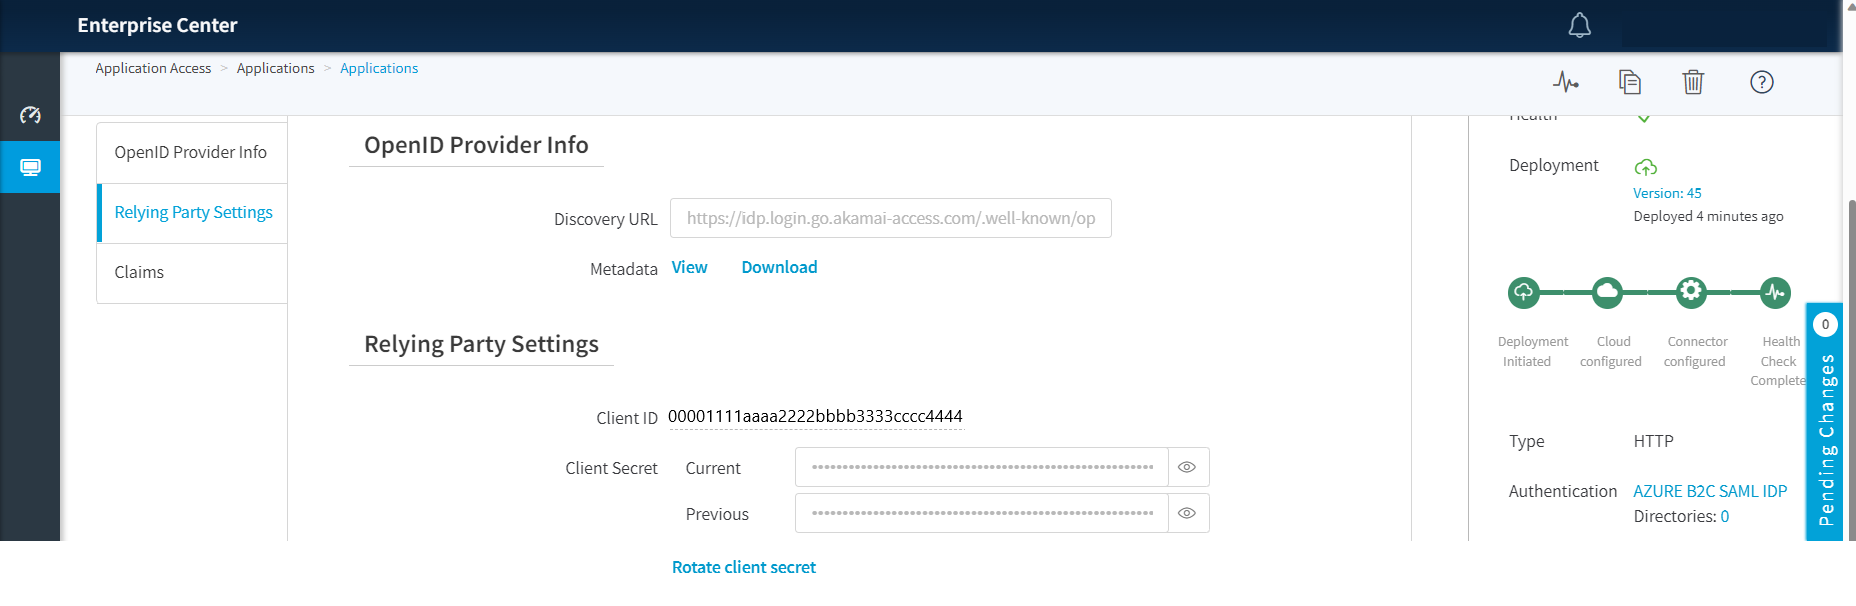
此時會顯示一個新的 OpenID 選項卡,複製稍後在配置 OWIN 元件以測試應用程式時步驟中所需的發現 URL。
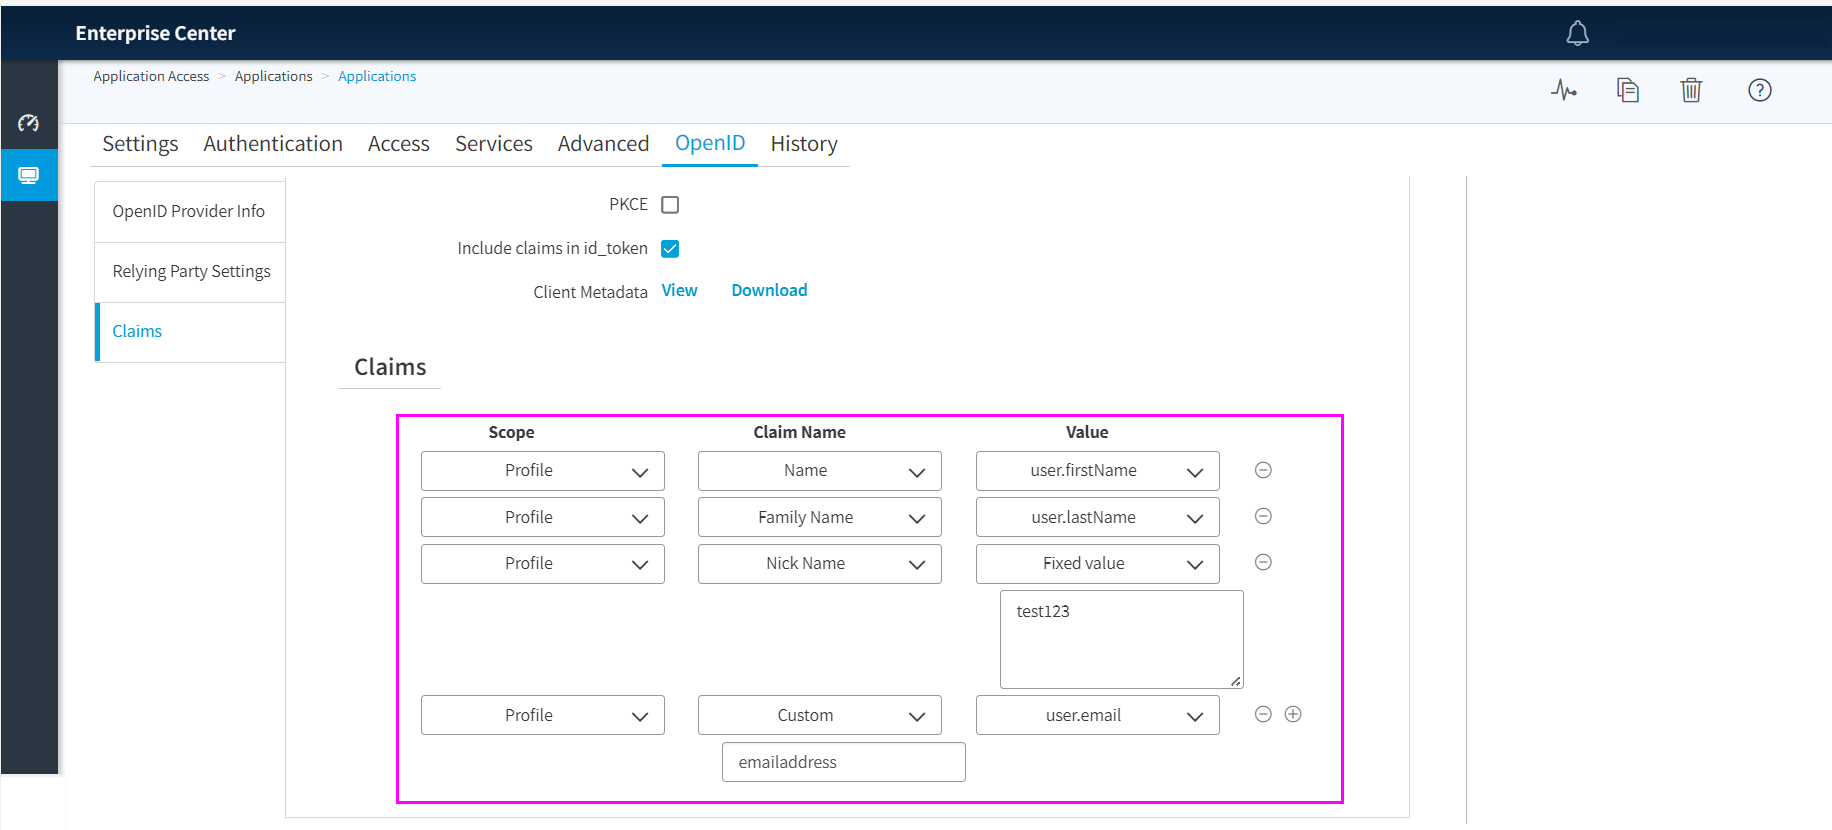
在 「聲明」 部分中,定義 Akamai 將為 OIDC 應用程式頒發的聲明,在身份驗證成功後,將其值映射到 Azure AD B2C 在 SAML 回應中提供的 SAML 屬性。 在 Azure AD B2C SAML IdP 中將 OIDC 配置為 SAML 橋接時,這些聲明必須映射您在上一步中定義的內容。
在 ASP.NET MVC Web 應用程式中將 startup 類替換為以下代碼。
這幾項更改配置了授權代碼流授予,授權代碼將在應用程式的令牌端點兌換為令牌,並引入了元數據位址來設置用於從Akamai 獲取元數據的發現端點。
public class Startup
{
     // The Client ID is used by the application to uniquely identify itself to Azure AD.
     string clientId = System.Configuration.ConfigurationManager.AppSettings["ClientId"];

     //App Client Secret to redeem the code for an access token
     string ClientSecret = System.Configuration.ConfigurationManager.AppSettings["ClientSecret"];

     // RedirectUri is the URL where the user will be redirected to after they sign in.
     string redirectUri = System.Configuration.ConfigurationManager.AppSettings["RedirectUri"];

     // PostLogoutRedirectUri is the URL where the user will be redirected to after they sign out
     string PostLogoutRedirectUri = System.Configuration.ConfigurationManager.AppSettings["PostLogoutRedirectUri"];

     //Authority is the URL for authority
     string authority = System.Configuration.ConfigurationManager.AppSettings["Authority"];

     //discovery endpoint for obtaining metadata
     string MetadataAddress = System.Configuration.ConfigurationManager.AppSettings["MetadataAddress"];


     /// <summary>
     /// Configure OWIN to use OpenIdConnect
     /// </summary>
     /// <param name="app"></param>
     public void Configuration(IAppBuilder app)
   {
     app.SetDefaultSignInAsAuthenticationType(CookieAuthenticationDefaults.AuthenticationType);

     app.UseCookieAuthentication(new CookieAuthenticationOptions());
     app.UseOpenIdConnectAuthentication(
         new OpenIdConnectAuthenticationOptions
         {
             // Sets the ClientId, authority, RedirectUri as obtained from web.config
             ClientId = clientId,
             Authority = authority,
             RedirectUri = redirectUri,
             MetadataAddress = MetadataAddress,
             // PostLogoutRedirectUri is the page that users will be redirected to after sign-out. In this case, it is using the home page
             PostLogoutRedirectUri = redirectUri,
             RedeemCode = true,
             Scope = OpenIdConnectScope.OpenIdProfile,
             // ResponseType is set to request the code id_token - which contains basic information about the signed-in user
             ResponseType = OpenIdConnectResponseType.Code,
              // OpenIdConnectAuthenticationNotifications configures OWIN to send notification of failed authentications to OnAuthenticationFailed method
             Notifications = new OpenIdConnectAuthenticationNotifications
             {
                 AuthenticationFailed = OnAuthenticationFailed
             }
         }
     );
 }

 /// <summary>
 /// Handle failed authentication requests by redirecting the user to the home page with an error in the query string
 /// </summary>
 /// <param name="context"></param>
 /// <returns></returns>
 private Task OnAuthenticationFailed(AuthenticationFailedNotification<OpenIdConnectMessage, OpenIdConnectAuthenticationOptions> context)
 {
     context.HandleResponse();
     context.Response.Redirect("/?errormessage=" + context.Exception.Message);
     return Task.FromResult(0);
    }
}
在
web.config檔中添加元數據位址,將 clientId、clientsecret、authority、redirectUri 和 PostLogoutRedirectUri 替換為 中 Akamai 應用程式appSettings的值。您可以在上一步 5 中 HTTP Akamai 應用程式的 OpenID 選項卡中找到這些值,您在其中建立了
Discovery URL=MetadataAddress.redirectUri是 Akamai 連接器解析為本地 OIDC 應用程式的本地位址。Authority是您可以從.well-known/openid-configuration中找到的authorization_endpoint。發現 URL:
https://fabrikam.login.go.akamai-access.com/.well-known/openid-configuration<appSettings> <add key="ClientId" value="xxxxxxxxxxxxxxxxxx" /> <add key="ClientSecret" value="xxxxxxxxxxxxxxxxxx" /> <add key="Authority" value="https://fabrikam.login.go.akamai-access.com/oidc/oauth" /> <add key="redirectUri" value="http://oidcapp.identity.mistermik.com/" /> <add key="PostLogoutRedirectUri" value="https://oidc-test.go.akamai-access.com/" /> <add key="MetadataAddress" value="https://fabrikam.login.go.akamai-access.com/.well-known/openid-configuration" /> </appSettings>通過為創建的自定義 HTTP 類型 Web 應用程式選擇 Akamai URL 來測試應用程式。


測試解決方案
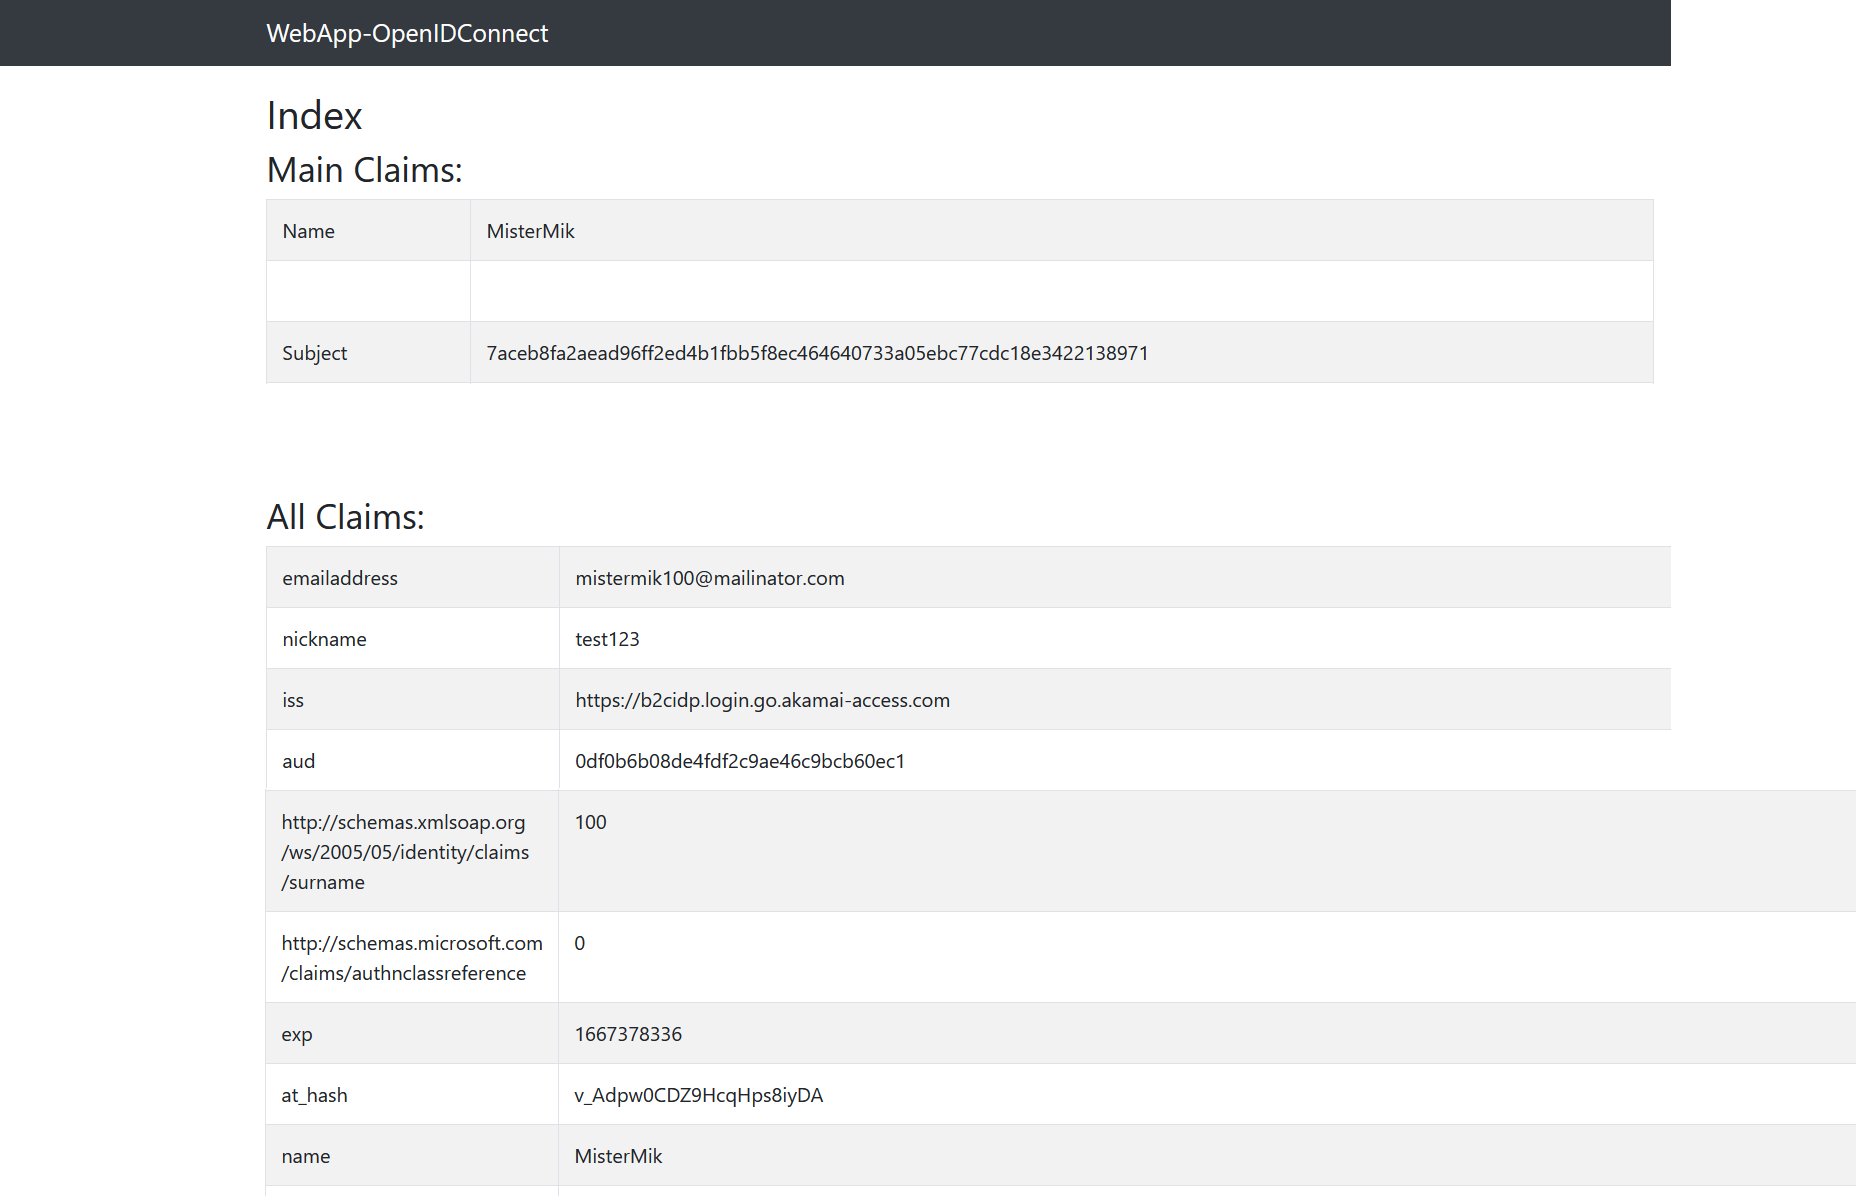
使用 Akamai Enterprise Application Access 中指定的外部 URL 導航到應用程式 URL。
未經身份驗證的使用者將重定向到 Azure AD B2C 登錄頁。
從頁面上的清單中選擇IdP。
使用連結到 Azure AD B2C 的憑據以最終使用者身份登錄。
身份驗證成功后,最終使用者將被重定向回應用程式,並以最終使用者身份登錄應用程式。