這很重要
自 2025 年 5 月 1 日起,Azure AD B2C 將不再可供新客戶購買。 在我們的常見問題中深入瞭解。
開始之前
Azure Active Directory B2C (Azure AD B2C) 有兩種方法可定義使用者與應用程式的互動:預先定義的使用者流程或可設定的自定義原則。 自定義原則可解決複雜的案例。 在大多數情況下,我們建議採用使用者流程。 請參閱 使用者流程和自定義原則概觀
整合 Azure AD B2C 與 eID-Me 進行驗證
瞭解如何整合 Azure AD B2C 驗證與 Bluink eID-Me,這是適用於加拿大公民的身分識別驗證和分散式數位身分識別解決方案。 使用 eID-Me 時,Azure AD B2C 租用戶會驗證使用者身分識別、取得已驗證的註冊和登入身分識別宣告。 整合支援使用安全數位身分識別的多重要素驗證和無密碼登入。 組織可以符合身分識別保證層級 (IAL) 2 和瞭解您的客戶 (KYC) 需求。
若要深入瞭解,請移至 bluink.ca: Bluink Ltd
先決條件
若要開始使用,您需要:
- eID-Me 服務的信賴方帳戶
- 移至 bluink.ca 以 深入瞭解 並要求示範
- Azure 訂用帳戶
- 如果您沒有帳戶,請取得 Azure 免費帳戶
- 連結至 Azure 訂用帳戶的 Azure AD B2C 租戶
- eID-Me 數位識別碼應用程式的試用版或生產版本
- 移至 bluink.ca 下載 eID-Me 數位識別符應用程式
另請參閱 教學課程:在 Azure AD B2C 中建立使用者流程和自定義原則。
案例描述
eID-Me 與 Azure AD B2C 整合為 OpenID Connect (OIDC) 識別提供者。 下列元件包含具有 Azure AD B2C 的 eID-Me 解決方案:
- Azure AD B2C 租戶 - 設定為 eID-Me 中的受信任憑證者,使得 eID-Me 能夠信任 Azure AD B2C 租戶以進行註冊和登入
-
Azure AD B2C 租使用者應用程式 - 假設租使用者需要 Azure AD B2C 租使用者應用程式
- 應用程式會在交易期間接收 Azure AD B2C 收到的身分識別宣告
- eID-Me 智慧型手機應用程式 - Azure AD B2C 租戶使用者需要適用於 iOS 或 Android 的應用程式
-
已發行 eID-Me 數位身份 - 來自 eID-Me 身份驗證
- 使用者會向應用程式中的數位錢包發出數位身分識別。 需要有效的身分識別檔。
eID-Me 應用程式會在交易期間驗證使用者。 X509 公鑰驗證會使用 eID-Me 數位身分識別中的私鑰,提供無密碼 MFA。
下圖說明在 Azure AD B2C 流程外部發生的 eID-Me 身分識別校訂。
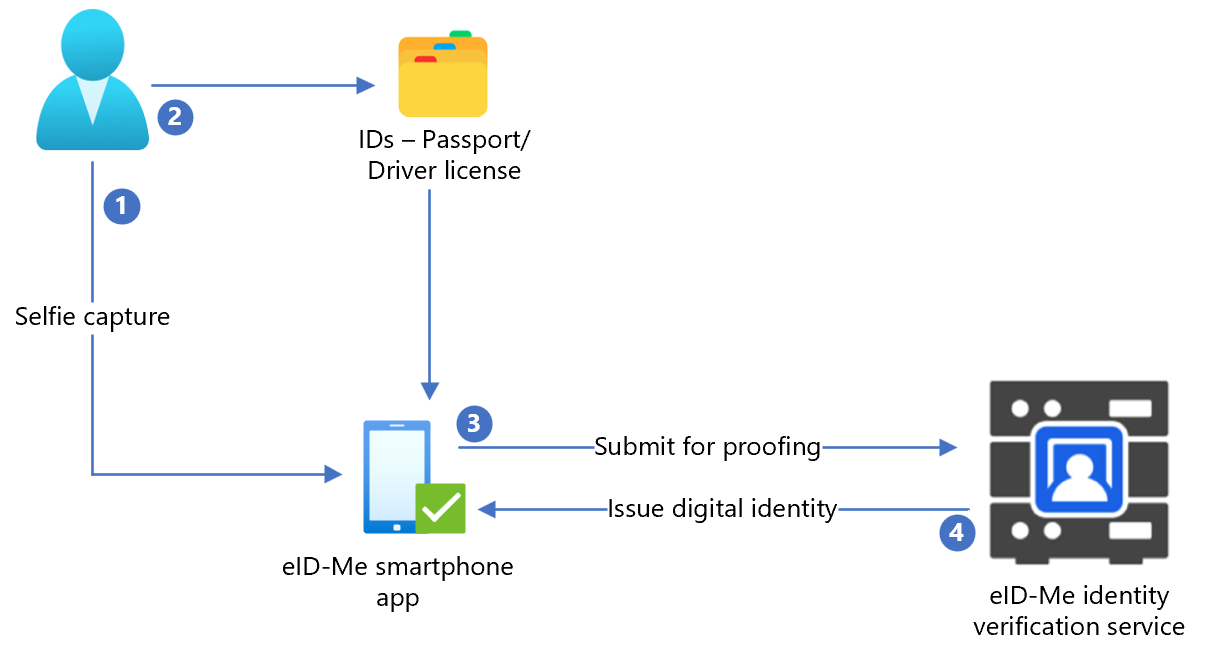
- 使用者將自拍上傳至 eID-Me 智慧手機應用程式。
- 用戶掃描並上傳政府簽發的身份證,例如護照或駕駛執照,到 eID-Me 智慧手機應用程式。
- eID-Me 會將數據提交至身分識別服務以進行驗證。
- 用戶會發出數位身分識別,該身分識別會儲存在應用程式中。
下圖說明 Azure AD B2C 與 eID-Me 的整合。
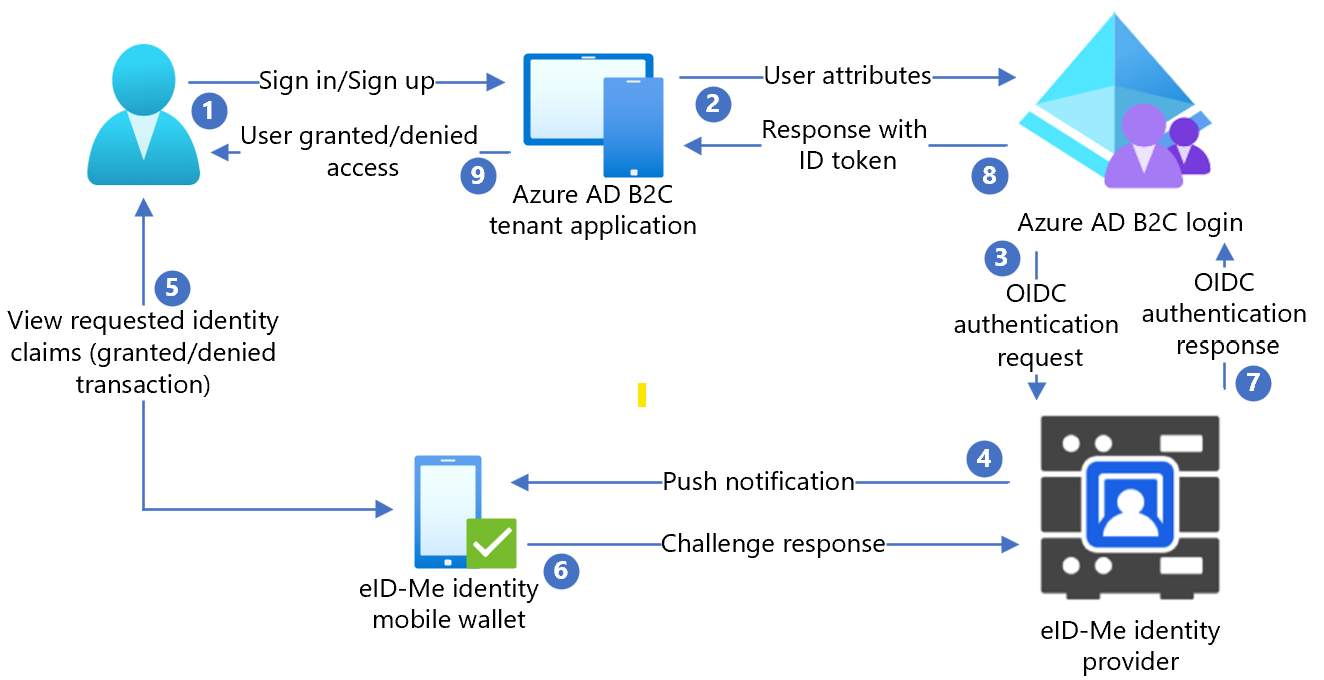
- 用戶開啟 Azure AD B2C 登入頁面,並使用使用者名稱登入或註冊。
- 用戶被轉送至 Azure AD B2C 登入和註冊策略。
- Azure AD B2C 會使用 OIDC 授權碼流程,將使用者重新導向至 eID-Me 身分識別路由器。
- 路由器會將帶有驗證和授權請求詳細信息的推送通知傳送給用戶手機應用程式。
- 使用者驗證挑戰隨即出現,然後會出現身分識別宣告的提示。
- 挑戰回應會傳送至路由器。
- 路由器回傳驗證結果給 Azure AD B2C。
- Azure AD B2C ID 令牌回應會傳送到應用程式。
- 使用者會被授與或拒絕存取。
開始使用 eID-Me
移至 [bluink.ca 連絡我們 ] 頁面,申請示範,目的是設定測試或生產環境,以將 Azure AD B2C 租用戶設定為信賴方。 租用戶會決定向 eID-Me 註冊的取用者所需的身分識別宣告。
在 eID-Me 中設定應用程式
若要在 eID-Me 中將租使用者應用程式設定為 eID-ME 信賴憑證者,請提供下列資訊:
| 房產 | 說明 |
|---|---|
| 名稱 | Azure AD B2C 或其他應用程式名稱 |
| 網域 | name.onmicrosoft.com |
| 重新導向 URL | https://jwt.ms |
| 重新導向 URL | https://your-B2C-tenant-name.b2clogin.com/your-B2C-tenant-name.onmicrosoft.com/oauth2/authresp例如: https://fabrikam.b2clogin.com/fabrikam.onmicrosoft.com/oauth2/authresp針對自訂網域,輸入 https://your-domain-name/your-tenant-name.onmicrosoft.com/oauth2/authresp. |
| 應用程式首頁 URL | 向用戶顯示 |
| 應用程式隱私策略URL | 向用戶顯示 |
備註
設定受信方時,ID-Me 提供客戶端 ID 和客戶端密碼。 請記下客戶端 ID 和客戶端密鑰,以便在 Azure AD B2C 中配置識別提供者 (IdP)。
在 Azure AD B2C 中新增識別提供者
在以下指示中,請使用包含 Azure AD B2C 租用戶的目錄。
- 至少以 Azure AD B2C 租戶的 B2C IEF 原則管理員身分登入 Azure 入口網站。
- 在頂部功能表中,選擇 Directory + subscription(目錄 + 訂閱)。
- 選擇包含租戶的目錄。
- 在 Azure 入口網站的左上角,選取 [所有服務]。
- 搜尋並選取 Azure AD B2C。
- 導航至 儀錶板>Azure Active Directory B2C>識別提供者。
- 選取 新增 OpenID Connect 提供者。
- 選取 ,然後新增。
設定識別提供者
要設定身份供應商,請執行以下作:
- 選取 [識別提供者類型>OpenID Connect]。
- 在識別提供者表單的 [名稱] 中,輸入 eID-Me 無密碼 或其他名稱。
- 針對 [用戶端識別符],輸入 eID-Me 中的 [用戶端標識符]。
- 針對 [客戶端密碼],輸入 eID-Me 的客戶端密碼。
- 針對 範圍,選取 openid email profile。
- 針對 回應類型,選取 代碼。
- 針對 回應模式,選取 表單提交。
- 請選擇 [確定]。
- 選取 [對應此識別提供者的宣告]。
- 針對 [用戶標識符],請使用 sub。
- 針對 [顯示名稱],請使用 name。
- 針對 [指定名稱],請使用 given_name。
- 針對 Surname,請使用 family_name。
- 針對 [電子郵件],請使用 電子郵件。
- 選取 [儲存]。
設定多重要素驗證
eID-Me 是多重要素驗證器,因此不需要使用者流程多重要素驗證設定。
建立使用者流程原則
針對下列指示,eID-Me 會顯示為 B2C 識別提供者中的新 OIDC 識別提供者。
- 在 Azure AD B2C 租戶的 “策略”下,選擇 “使用者流”。
- 選取 新使用者流程。
- 選取 [註冊並登入]>[版本]>[建立]。
- 輸入原則 名稱。
- 在 [識別提供者] 中,選取已建立的 eID-Me 識別提供者。
- 針對 [ 本機帳戶],選取 [ 無]。 選擇該選項後會停用電子郵件和密碼驗證。
- 選取執行使用者流程。
- 輸入 回覆 URL,例如
https://jwt.ms。 - 瀏覽器會重新導向至 eID-Me 登入頁面。
- 輸入用戶註冊中的帳戶名稱。
- 使用者使用 eID-Me 在行動裝置上收到推播通知。
- 驗證挑戰隨即出現。
- 已接受挑戰,且瀏覽器會重新導向至回復 URL。
備註
Azure Active Directory B2C (Azure AD B2C) 有兩種方法可定義使用者與應用程式的互動:預先定義的使用者流程或可設定的自定義原則。 自定義原則可解決複雜的案例。 在大多數情況下,我們建議採用使用者流程。 請參閱 使用者流程和自定義原則概觀
建立原則金鑰
儲存您在 Azure AD B2C 租用戶中記錄的客戶端密碼。 在以下指示中,請使用包含 Azure AD B2C 租用戶的目錄。
- 登入 Azure 入口網站。
- 在入口網站工具列中,選取 [目錄 + 訂用帳戶]。
- 在 [ 入口網站設定] 的 [目錄 + 訂 用帳戶] 頁面上,於 [ 目錄名稱] 清單中,找出您的 Azure AD B2C 目錄。
- 選取 [切換]。
- 在 Azure 入口網站的左上角,選取 [所有服務]。
- 搜尋並選取 Azure AD B2C。
- 在 [概觀] 頁面上,選取 [ 身分識別體驗架構]。
- 選取 [原則金鑰]。
- 選取 ,然後新增。
- 針對 [選項],選擇 [ 手動]。
- 輸入政策金鑰的名稱。 例如:
eIDMeClientSecret。 前置詞B2C_1A_會新增至金鑰名稱。 - 在 [ 秘密] 中,輸入您注意到的客戶端密碼。
- 針對 [ 金鑰使用方式],選取 [ 簽章]。
- 選取 ,創建。
將 eID-Me 設定為識別提供者
將 eID-Me 定義為身份認證供應者,使用戶能夠使用 eID-Me 進行登入。 Azure AD B2C 會透過端點與其通訊。 端點提供的宣告會由 Azure AD B2C 用來驗證使用者在其裝置上的數位身份識別碼,以進行身份驗證。
若要將 eID-Me 定義為宣告提供者,請將它新增至原則延伸檔案中的 ClaimsProvider 元素。
開啟
TrustFrameworkExtensions.xml。尋找 ClaimsProviders 元素。 如果沒有出現,請在根元素底下新增它。
新增 ClaimsProvider:
   <ClaimsProvider>
   <Domain>eID-Me</Domain>
   <DisplayName>eID-Me</DisplayName>
   <TechnicalProfiles>
     <TechnicalProfile Id="eID-Me-OIDC">
       <!-- The text in the following DisplayName element is shown to the user on the claims provider
selection screen. -->
       <DisplayName>eID-Me for Sign In</DisplayName>
       <Protocol Name="OpenIdConnect" />
       <Metadata>
         <Item Key="ProviderName">https://eid-me.bluink.ca</Item>
         <Item Key="METADATA">https://demoeid.bluink.ca/.well-known/openid-configuration</Item>
         <Item Key="response_types">code</Item>
         <Item Key="scope">openid email profile</Item>
         <Item Key="response_mode">form_post</Item>
         <Item Key="HttpBinding">POST</Item>
         <Item Key="token_endpoint_auth_method">client_secret_post</Item>
         <Item Key="client_id">eid_me_rp_client_id</Item>
         <Item Key="UsePolicyInRedirectUri">false</Item>
       </Metadata>
       <CryptographicKeys>
         <Key Id="client_secret" StorageReferenceId="B2C_1A_eIDMeClientSecret" />
       </CryptographicKeys>
       <InputClaims />
       <OutputClaims>
         <OutputClaim ClaimTypeReferenceId="issuerUserId" PartnerClaimType="sub" />
         <OutputClaim ClaimTypeReferenceId="tenantId" PartnerClaimType="tid" />
         <OutputClaim ClaimTypeReferenceId="givenName" PartnerClaimType="given_name" />
         <OutputClaim ClaimTypeReferenceId="surName" PartnerClaimType="family_name" />
         <OutputClaim ClaimTypeReferenceId="displayName" PartnerClaimType="name" />
         <OutputClaim ClaimTypeReferenceId="email" PartnerClaimType="email" />
         <OutputClaim ClaimTypeReferenceId="IAL" PartnerClaimType="identity_assurance_level_achieved" DefaultValue="unknown IAL" />
         <OutputClaim ClaimTypeReferenceId="authenticationSource" DefaultValue="socialIdpAuthentication" AlwaysUseDefaultValue="true" />
         <OutputClaim ClaimTypeReferenceId="identityProvider" PartnerClaimType="iss" />
         <OutputClaim ClaimTypeReferenceId="locality" PartnerClaimType="locality" DefaultValue="unknown locality" />
         <OutputClaim ClaimTypeReferenceId="region" PartnerClaimType="region" DefaultValue="unknown region" />
       </OutputClaims>
       <OutputClaimsTransformations>
         <OutputClaimsTransformation ReferenceId="CreateRandomUPNUserName" />
         <OutputClaimsTransformation ReferenceId="CreateUserPrincipalName" />
         <OutputClaimsTransformation ReferenceId="CreateAlternativeSecurityId" />
         <OutputClaimsTransformation ReferenceId="CreateSubjectClaimFromAlternativeSecurityId" />
       </OutputClaimsTransformations>
       <UseTechnicalProfileForSessionManagement ReferenceId="SM-SocialLogin" />
     </TechnicalProfile>
   </TechnicalProfiles>
 </ClaimsProvider>
針對 eid_me_rp_client_id,輸入 eID-Me 依賴方客戶端 ID。
選取 [儲存]。
支援的身分認證主張
您可以新增 eID-Me 支援的更多身分識別宣告。
- 開啟
TrustFrameworksExtension.xml。 - 尋找
BuildingBlocks元素。
備註
在 OID 存放庫 上尋找支援的 eID-Me 身分識別宣告清單,並在 已知/openid-configuration 上尋找 OIDC 標識符。
<BuildingBlocks>
<ClaimsSchema>
 <ClaimType Id="IAL">
     <DisplayName>Identity Assurance Level</DisplayName>
     <DataType>string</DataType>
     <DefaultPartnerClaimTypes>
       <Protocol Name="OpenIdConnect" PartnerClaimType="identity_assurance_level_achieved" />
     </DefaultPartnerClaimTypes>
     <AdminHelpText>The Identity Assurance Level Achieved during proofing of the digital identity.</AdminHelpText>
     <UserHelpText>The Identity Assurance Level Achieved during proofing of the digital identity.</UserHelpText>
     <UserInputType>Readonly</UserInputType>
   </ClaimType>

<ClaimType Id="picture">
     <DisplayName>Portrait Photo</DisplayName>
     <DataType>string</DataType>
     <DefaultPartnerClaimTypes>
       <Protocol Name="OpenIdConnect" PartnerClaimType="thumbnail_portrait" />
     </DefaultPartnerClaimTypes>
     <AdminHelpText>The portrait photo of the user.</AdminHelpText>
     <UserHelpText>Your portrait photo.</UserHelpText>
     <UserInputType>Readonly</UserInputType>
   </ClaimType>

 <ClaimType Id="middle_name">
     <DisplayName>Portrait Photo</DisplayName>
     <DataType>string</DataType>
     <DefaultPartnerClaimTypes>
       <Protocol Name="OpenIdConnect" PartnerClaimType="middle_name" />
     </DefaultPartnerClaimTypes>
     <UserHelpText>Your middle name.</UserHelpText>
     <UserInputType>TextBox</UserInputType>
   </ClaimType>

<ClaimType Id="birthdate">
     <DisplayName>Date of Birth</DisplayName>
     <DataType>string</DataType>
     <DefaultPartnerClaimTypes>
       <Protocol Name="OpenIdConnect" PartnerClaimType="birthdate" />
     </DefaultPartnerClaimTypes>
     <AdminHelpText>The user's date of birth.</AdminHelpText>
     <UserHelpText>Your date of birth.</UserHelpText>
     <UserInputType>TextBox</UserInputType>
   </ClaimType>

 <ClaimType Id="gender">
     <DisplayName>Gender</DisplayName>
     <DataType>string</DataType>
     <DefaultPartnerClaimTypes>
       <Protocol Name="OpenIdConnect" PartnerClaimType="gender" />
     </DefaultPartnerClaimTypes>
     <AdminHelpText>The user's gender.</AdminHelpText>
     <UserHelpText>Your gender.</UserHelpText>
     <UserInputType>TextBox</UserInputType>
   </ClaimType>

 <ClaimType Id="street_address">
     <DisplayName>Locality/City</DisplayName>
     <DataType>string</DataType>
     <DefaultPartnerClaimTypes>
       <Protocol Name="OpenIdConnect" PartnerClaimType="street_address" />
     </DefaultPartnerClaimTypes>
     <AdminHelpText>The user's full street address, which MAY include house number, street name, post office box.</AdminHelpText>
     <UserHelpText>Your street address of residence.</UserHelpText>
     <UserInputType>TextBox</UserInputType>
   </ClaimType>

<ClaimType Id="locality">
     <DisplayName>Locality/City</DisplayName>
     <DataType>string</DataType>
     <DefaultPartnerClaimTypes>
       <Protocol Name="OpenIdConnect" PartnerClaimType="locality" />
     </DefaultPartnerClaimTypes>
     <AdminHelpText>The user's current city or locality of residence.</AdminHelpText>
     <UserHelpText>Your current city or locality of residence.</UserHelpText>
     <UserInputType>TextBox</UserInputType>
   </ClaimType>

   <ClaimType Id="region">
     <DisplayName>Province or Territory</DisplayName>
     <DataType>string</DataType>
     <DefaultPartnerClaimTypes>
       <Protocol Name="OpenIdConnect" PartnerClaimType="region" />
     </DefaultPartnerClaimTypes>
     <AdminHelpText>The user's current province or territory of residence.</AdminHelpText>
     <UserHelpText>Your current province or territory of residence.</UserHelpText>
     <UserInputType>TextBox</UserInputType>
   </ClaimType>

   <ClaimType Id="country">
     <DisplayName>Country</DisplayName>
     <DataType>string</DataType>
     <DefaultPartnerClaimTypes>
       <Protocol Name="OpenIdConnect" PartnerClaimType="country" />
     </DefaultPartnerClaimTypes>
     <AdminHelpText>The user's current country of residence.</AdminHelpText>
     <UserHelpText>Your current country of residence.</UserHelpText>
     <UserInputType>TextBox</UserInputType>
   </ClaimType>

   <ClaimType Id="dl_number">
     <DisplayName>Driver's Licence Number</DisplayName>
     <DataType>string</DataType>
     <DefaultPartnerClaimTypes>
       <Protocol Name="OpenIdConnect" PartnerClaimType="dl_number" />
     </DefaultPartnerClaimTypes>
     <AdminHelpText>The user's driver's licence number.</AdminHelpText>
     <UserHelpText>Your driver's licence number.</UserHelpText>
     <UserInputType>TextBox</UserInputType>
   </ClaimType>

   <ClaimType Id="dl_class">
     <DisplayName>Driver's Licence Class</DisplayName>
     <DataType>string</DataType>
     <DefaultPartnerClaimTypes>
       <Protocol Name="OpenIdConnect" PartnerClaimType="dl_class" />
     </DefaultPartnerClaimTypes>
     <AdminHelpText>The user's driver's licence class.</AdminHelpText>
     <UserHelpText>Your driver's licence class.</UserHelpText>
     <UserInputType>TextBox</UserInputType>
   </ClaimType>
 </ClaimsSchema>
新增使用者旅程圖
針對下列指示,會設定識別提供者,但不在任何登入頁面中。 如果您沒有自定義使用者旅程圖,請複製範本使用者旅程圖。
- 從入門套件開啟
TrustFrameworkBase.xml檔案。 - 找出並複製包含ID=的
SignUpOrSignIn元素內容。 - 開啟
TrustFrameworkExtensions.xml。 - 找出 UserJourneys 元素。 如果元素未出現,請新增一個。
- 將 UserJourney 元素的內容貼上為 UserJourneys 元素的子系。
- 重新命名使用者旅程識別碼,例如ID=
CustomSignUpSignIn。
將識別提供者新增至使用者旅程圖
將新的識別提供者新增至使用者旅程圖。
- 在使用者旅程中,找出具有 Type=
CombinedSignInAndSignUp或 Type=ClaimsProviderSelection的編排步驟元素。 通常是第一個編排流程步驟。 ClaimsProviderSelections 元素具有使用者登入的識別提供者清單。 元素的順序會控制使用者所看到的登入按鈕順序。 - 新增 ClaimsProviderSelection XML 元素。
- 將 TargetClaimsExchangeId 值設定為易記名稱。
- 在下一個協調流程步驟中,新增 ClaimsExchange 元素。
- 將Id設定為目標理賠交換ID值。
- 將 vTechnicalProfileReferenceId 值更新為您建立的技術配置文件識別碼。
下列 XML 示範身分識別提供者的七個使用者旅程流程步驟:
 <UserJourney Id="eIDME-SignUpOrSignIn">
   <OrchestrationSteps>
     <OrchestrationStep Order="1" Type="CombinedSignInAndSignUp" ContentDefinitionReferenceId="api.signuporsignin">
       <ClaimsProviderSelections>
         <ClaimsProviderSelection TargetClaimsExchangeId="eIDMeExchange" />
        </ClaimsProviderSelections>
   </OrchestrationStep>
     <!-- Check if the user has selected to sign in using one of the social providers -->
     <OrchestrationStep Order="2" Type="ClaimsExchange">
       <Preconditions>
         <Precondition Type="ClaimsExist" ExecuteActionsIf="true">
           <Value>objectId</Value>
           <Action>SkipThisOrchestrationStep</Action>
         </Precondition>
       </Preconditions>
       <ClaimsExchanges>
         <ClaimsExchange Id="eIDMeExchange" TechnicalProfileReferenceId="eID-Me-OIDC" />
       </ClaimsExchanges>
     </OrchestrationStep>
     <!-- For social IDP authentication, attempt to find the user account in the directory. -->
     <OrchestrationStep Order="3" Type="ClaimsExchange">
       <Preconditions>
         <Precondition Type="ClaimEquals" ExecuteActionsIf="true">
           <Value>authenticationSource</Value>
           <Value>localAccountAuthentication</Value>
           <Action>SkipThisOrchestrationStep</Action>
         </Precondition>
       </Preconditions>
       <ClaimsExchanges>
         <ClaimsExchange Id="AADUserReadUsingAlternativeSecurityId" TechnicalProfileReferenceId="AAD-UserReadUsingAlternativeSecurityId-NoError" />
       </ClaimsExchanges>
     </OrchestrationStep>
     <!-- Show self-asserted page only if the directory does not have the user account already (i.e. we do not have an objectId).  -->
     <OrchestrationStep Order="4" Type="ClaimsExchange">
       <Preconditions>
         <Precondition Type="ClaimsExist" ExecuteActionsIf="true">
           <Value>objectId</Value>
           <Action>SkipThisOrchestrationStep</Action>
         </Precondition>
       </Preconditions>
       <ClaimsExchanges>
         <ClaimsExchange Id="SelfAsserted-Social" TechnicalProfileReferenceId="SelfAsserted-Social" />
       </ClaimsExchanges>
     </OrchestrationStep>
     <!-- This step reads any user attributes that we may not have received when authenticating using ESTS so they can be sent in the token. -->
     <OrchestrationStep Order="5" Type="ClaimsExchange">
       <Preconditions>
         <Precondition Type="ClaimEquals" ExecuteActionsIf="true">
           <Value>authenticationSource</Value>
           <Value>socialIdpAuthentication</Value>
           <Action>SkipThisOrchestrationStep</Action>
         </Precondition>
       </Preconditions>
       <ClaimsExchanges>
         <ClaimsExchange Id="AADUserReadWithObjectId" TechnicalProfileReferenceId="AAD-UserReadUsingObjectId" />
       </ClaimsExchanges>
     </OrchestrationStep>
     <!-- The previous step (SelfAsserted-Social) could have been skipped if there were no attributes to collect
          from the user. So, in that case, create the user in the directory if one does not already exist
          (verified using objectId which would be set from the last step if account was created in the directory. -->
     <OrchestrationStep Order="6" Type="ClaimsExchange">
       <Preconditions>
         <Precondition Type="ClaimsExist" ExecuteActionsIf="true">
           <Value>objectId</Value>
           <Action>SkipThisOrchestrationStep</Action>
         </Precondition>
       </Preconditions>
       <ClaimsExchanges>
         <ClaimsExchange Id="AADUserWrite" TechnicalProfileReferenceId="AAD-UserWriteUsingAlternativeSecurityId" />
       </ClaimsExchanges>
     </OrchestrationStep>
     <OrchestrationStep Order="7" Type="SendClaims" CpimIssuerTechnicalProfileReferenceId="JwtIssuer" />
   </OrchestrationSteps>
   <ClientDefinition ReferenceId="DefaultWeb" />
 </UserJourney>
設定信賴憑證者原則
信賴方策略指定 Azure AD B2C 執行的使用者旅程。 您可以控制傳遞至應用程式的宣告。 調整 eID-Me-OIDC-Signup TechnicalProfile 元素的 OutputClaims 元素。 在下列範例中,應用程式會收到使用者的郵遞區號、所在地、省份、IAL、肖像、中間名和出生日期。 它會收到 boolean signupConditionsSatisfied 宣告,指出是否已建立帳戶。
 <RelyingParty>
     <DefaultUserJourney ReferenceId="eIDMe-SignUpOrSignIn" />
     <TechnicalProfile Id="PolicyProfile">
       <DisplayName>PolicyProfile</DisplayName>
       <Protocol Name="OpenIdConnect" />
       <OutputClaims>
         <OutputClaim ClaimTypeReferenceId="displayName" />
         <OutputClaim ClaimTypeReferenceId="givenName" />
         <OutputClaim ClaimTypeReferenceId="surname" />
         <OutputClaim ClaimTypeReferenceId="email" />
         <OutputClaim ClaimTypeReferenceId="objectId" PartnerClaimType="sub"/>
         <OutputClaim ClaimTypeReferenceId="identityProvider" />
         <OutputClaim ClaimTypeReferenceId="tenantId" AlwaysUseDefaultValue="true" DefaultValue="{Policy:TenantObjectId}" />
         <OutputClaim ClaimTypeReferenceId="postalCode" PartnerClaimType="postal_code" DefaultValue="unknown postal_code" />
         <OutputClaim ClaimTypeReferenceId="locality" PartnerClaimType="locality" DefaultValue="unknown locality" />
         <OutputClaim ClaimTypeReferenceId="region" PartnerClaimType="region" DefaultValue="unknown region" />
         <OutputClaim ClaimTypeReferenceId="IAL" PartnerClaimType="identity_assurance_level_achieved" DefaultValue="unknown IAL" />
         <OutputClaim ClaimTypeReferenceId="picture" PartnerClaimType="thumbnail_portrait" DefaultValue="unknown portrait" />
         <OutputClaim ClaimTypeReferenceId="middle_name" PartnerClaimType="middle_name" DefaultValue="unknown middle name" />
         <OutputClaim ClaimTypeReferenceId="birthdate" PartnerClaimType="birthdate" DefaultValue="unknown DOB" />
         <OutputClaim ClaimTypeReferenceId="newUser" PartnerClaimType="signupConditionsSatisfied" DefaultValue="false" />
       </OutputClaims>
       <SubjectNamingInfo ClaimType="sub" />
     </TechnicalProfile>
   </RelyingParty>
上傳自定義原則
在以下指示中,請使用包含 Azure AD B2C 租用戶的目錄。
- 登入 Azure 入口網站。
- 在入口網站工具列中,選取 [目錄 + 訂用帳戶]。
- 在 [ 入口網站設定] 的 [目錄 + 訂 用帳戶] 頁面上,於 [ 目錄名稱] 清單中,找出 Azure AD B2C 目錄。
- 選取 [切換]。
- 在 Azure 入口網站中,搜尋並選取 [Azure AD B2C]。
- 在 [ 原則] 底下,選取 [ 身分識別體驗架構]。
- 選取上傳客製化政策。
- 上傳您依下列順序變更的兩個原則檔案:
- 擴充原則,例如
TrustFrameworkBase.xml - 信賴方策略,例如
SignUp.xml
測試自定義原則
- 選取受託方政策,例如
B2C_1A_signup。 - 針對 [應用程式],選取您註冊的 Web 應用程式。
-
回覆 URL 為
https://jwt.ms。 - 選取 [立即執行]。
- 註冊政策會叫用 eID-Me。
- 登入時,選取 eID-Me。
- 瀏覽器會重新導向至
https://jwt.ms。 - Azure AD B2C 傳回的令牌內容隨即出現。
深入瞭解: 教學課程:在 Azure AD B2C 中註冊 Web 應用程式