Azure AI 代理程式支援使用程式程式碼解釋器工具,其可讓代理程式在安全、沙盒化執行環境中撰寫和執行程式碼。 這可讓代理程式根據使用者要求執行數據分析、數學計算或檔案作等工作。 本文提供逐步指示和程式代碼範例,讓您搭配 Azure AI 代理程式啟用和使用程式代碼解釋器工具。
搭配代理程式使用程式代碼解釋器工具
您可以使用本文頂端所列的程式代碼範例或 Azure AI Foundry 入口網站,以程式設計方式將程式代碼解釋器工具新增至代理程式。 如果您要使用入口網站:
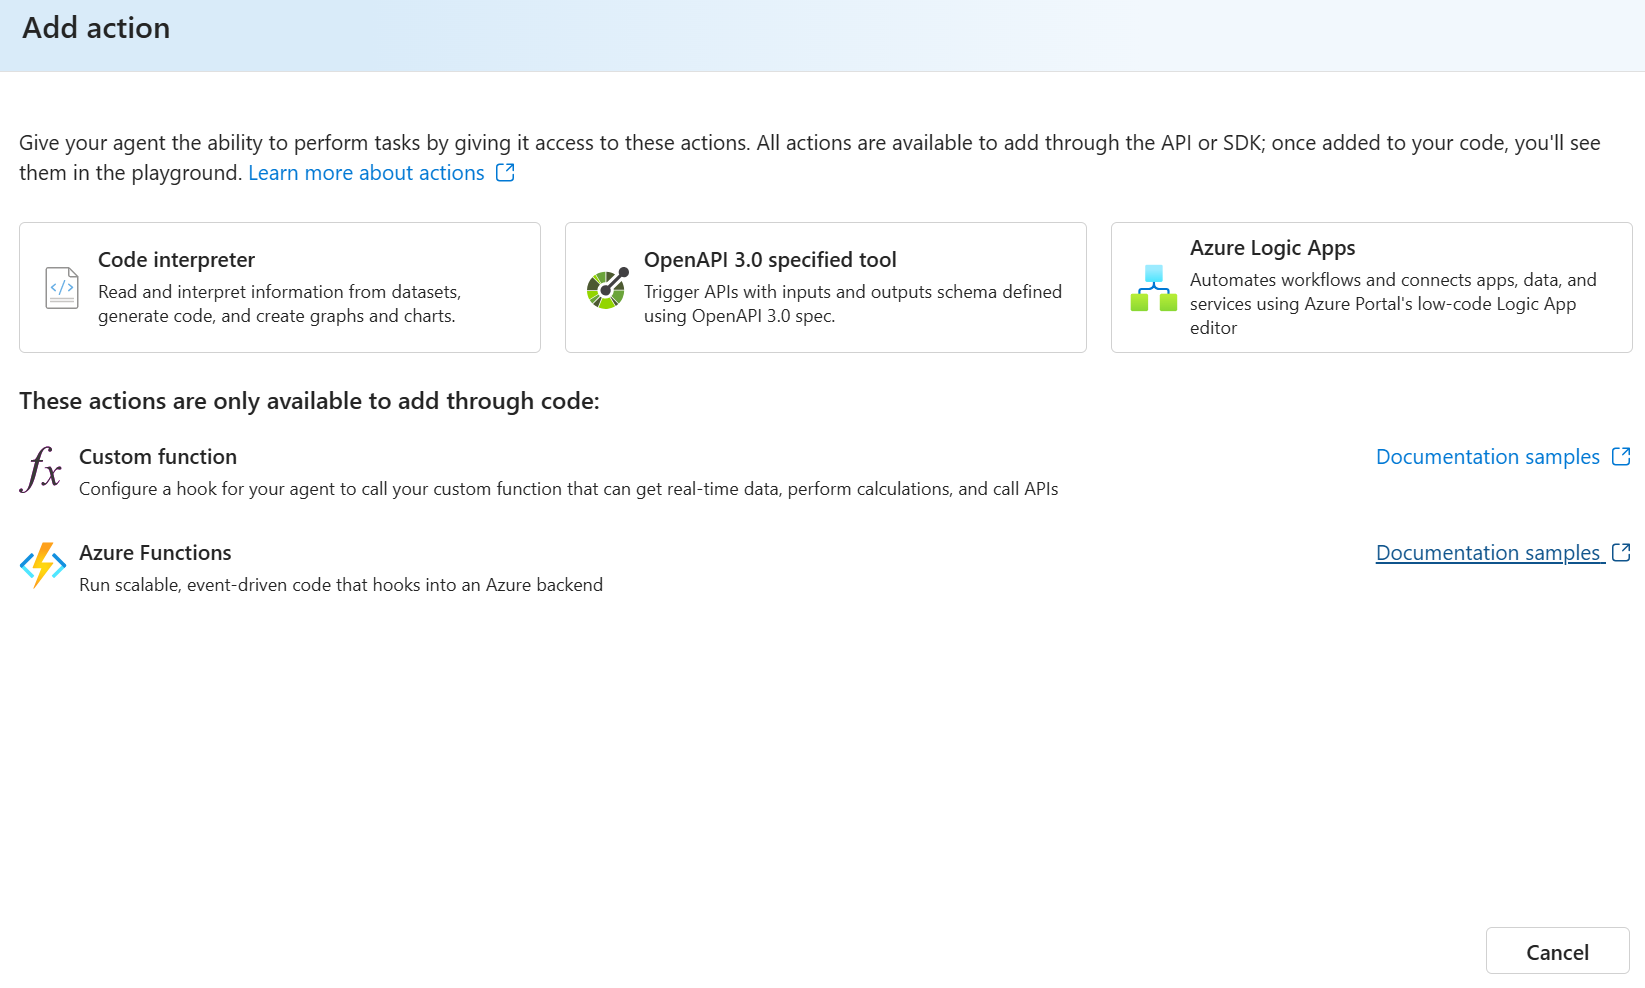
在您的代理程式的 代理程式 畫面中,向下捲動右側的 設定 窗格到 動作。 然後選取 新增。

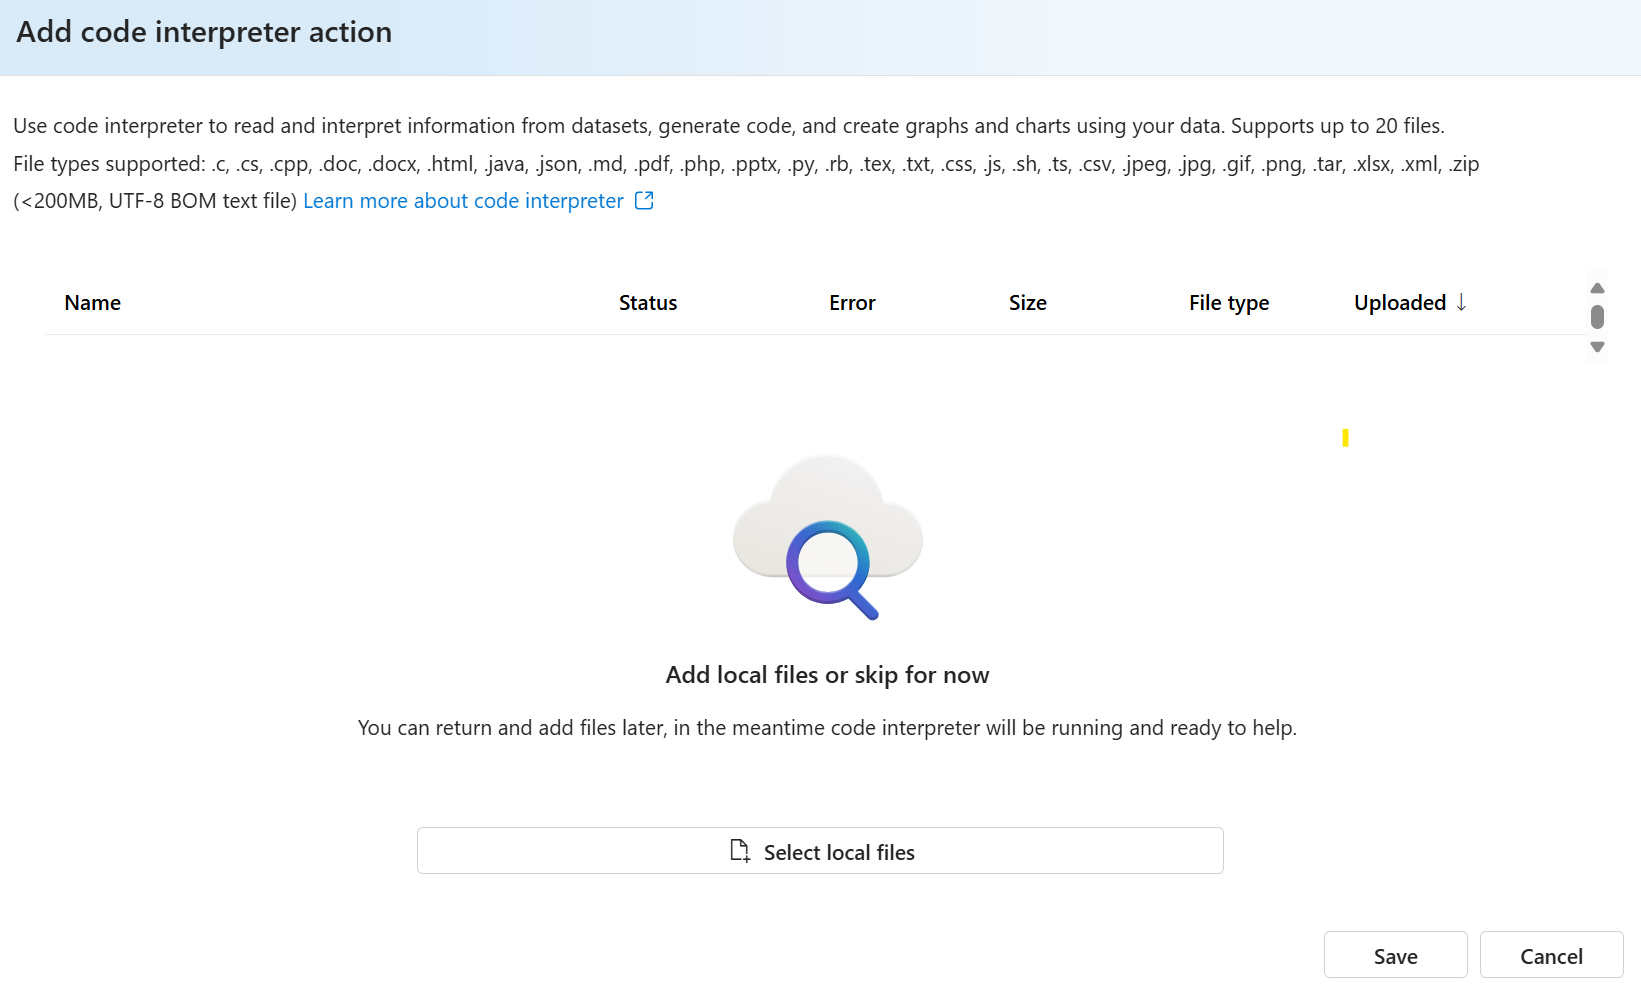
選取 [ 程序代碼解釋器 ],然後遵循提示來新增工具。
您可以選擇性地上傳代理程式的檔案,以從數據集讀取和解譯資訊、產生程式代碼,以及使用您的數據建立圖表和圖表。


初始化
程式代碼的開頭是設定必要的匯入和初始化 AI Project 用戶端:
import os
from azure.ai.projects import AIProjectClient
from azure.identity import DefaultAzureCredential
from azure.ai.agents.models import CodeInterpreterTool


# Create an Azure AI Client from an endpoint, copied from your Azure AI Foundry project.
# You need to login to Azure subscription via Azure CLI and set the environment variables
project_endpoint = os.environ["PROJECT_ENDPOINT"]  # Ensure the PROJECT_ENDPOINT environment variable is set

# Create an AIProjectClient instance
project_client = AIProjectClient(
    endpoint=project_endpoint,
    credential=DefaultAzureCredential(),  # Use Azure Default Credential for authentication
)
檔案上傳
此範例會上傳資料檔進行分析:
file = project_client.agents.upload_file_and_poll(
    file_path="nifty_500_quarterly_results.csv",
    purpose=FilePurpose.AGENTS
)
程式代碼解釋器設定
程式代碼解釋器工具會使用上傳的檔案初始化:
code_interpreter = CodeInterpreterTool(file_ids=[file.id])
代理程式建立
使用程式代碼解釋器功能建立代理程式:
agent = project_client.agents.create_agent(
    model=os.environ["MODEL_DEPLOYMENT_NAME"],
    name="my-agent",
    instructions="You are helpful agent",
    tools=code_interpreter.definitions,
    tool_resources=code_interpreter.resources,
)
線程管理
程式代碼會建立對話線程和初始訊息:
thread = project_client.agents.threads.create()
message = project_client.agents.messages.create(
    thread_id=thread.id,
    role=MessageRole.USER,
    content="Could you please create bar chart in TRANSPORTATION sector for the operating profit from the uploaded csv file and provide file to me?",
)
訊息處理
系統會建立執行以處理訊息並執行程式碼:
run = project_client.agents.runs.create_and_process(thread_id=thread.id, agent_id=agent.id)
檔案處理
程式代碼會處理輸出檔案和批註:
messages = project_client.agents.messages.list(thread_id=thread.id)

# Save generated image files
for image_content in messages.image_contents:
    file_id = image_content.image_file.file_id
    file_name = f"{file_id}_image_file.png"
    project_client.agents.save_file(file_id=file_id, file_name=file_name)

# Process file path annotations
for file_path_annotation in messages.file_path_annotations:
    print(f"File Paths:")
    print(f"Type: {file_path_annotation.type}")
    print(f"Text: {file_path_annotation.text}")
    print(f"File ID: {file_path_annotation.file_path.file_id}")
清理
完成互動之後,程式代碼會正確清除資源:
project_client.agents.delete_file(file.id)
project_client.agents.delete_agent(agent.id)
這可確保適當的資源管理,並防止不必要的資源耗用量。
建立用戶端和代理程式
首先,使用 appsettings.json來設定組態、建立 PersistentAgentsClient,然後使用啟用程式代碼解釋器工具建立 PersistentAgent 。
using Azure;
using Azure.AI.Agents.Persistent;
using Azure.Identity;
using Microsoft.Extensions.Configuration;
using System.Diagnostics;

IConfigurationRoot configuration = new ConfigurationBuilder()
    .SetBasePath(AppContext.BaseDirectory)
    .AddJsonFile("appsettings.json", optional: false, reloadOnChange: true)
    .Build();

var projectEndpoint = configuration["ProjectEndpoint"];
var modelDeploymentName = configuration["ModelDeploymentName"];

PersistentAgentsClient client = new(projectEndpoint, new DefaultAzureCredential());

PersistentAgent agent = client.Administration.CreateAgent(
    model: modelDeploymentName,
    name: "My Friendly Test Agent",
    instructions: "You politely help with math questions. Use the code interpreter tool when asked to visualize numbers.",
    tools: [new CodeInterpreterToolDefinition()]
);
建立線程並新增訊息
接下來,為交談建立 PersistentAgentThread,並新增初始用戶訊息。
PersistentAgentThread thread = client.Threads.CreateThread();

client.Messages.CreateMessage(
    thread.Id,
    MessageRole.User,
    "Hi, Agent! Draw a graph for a line with a slope of 4 and y-intercept of 9.");
建立和監控運行
然後,為線程和代理程式建立 ThreadRun 。 輪詢執行的狀態,直到執行完成或需要動作為止。
ThreadRun run = client.Runs.CreateRun(
    thread.Id,
    agent.Id,
    additionalInstructions: "Please address the user as Jane Doe. The user has a premium account.");

do
{
    Thread.Sleep(TimeSpan.FromMilliseconds(500));
    run = client.Runs.GetRun(thread.Id, run.Id);
}
while (run.Status == RunStatus.Queued
    || run.Status == RunStatus.InProgress
    || run.Status == RunStatus.RequiresAction);
處理結果並處理檔案
執行完成後,從線程擷取所有訊息。 逐一查看訊息以顯示文字內容,並藉由在本機儲存並開啟它們,來處理任何產生的圖像檔。
Pageable<PersistentThreadMessage> messages = client.Messages.GetMessages(
    threadId: thread.Id,
    order: ListSortOrder.Ascending);

foreach (PersistentThreadMessage threadMessage in messages)
{
    foreach (MessageContent content in threadMessage.ContentItems)
    {
        switch (content)
        {
            case MessageTextContent textItem:
                Console.WriteLine($"[{threadMessage.Role}]: {textItem.Text}");
                break;
            case MessageImageFileContent imageFileContent:
                Console.WriteLine($"[{threadMessage.Role}]: Image content file ID = {imageFileContent.FileId}");
                BinaryData imageContent = client.Files.GetFileContent(imageFileContent.FileId);
                string tempFilePath = Path.Combine(AppContext.BaseDirectory, $"{Guid.NewGuid()}.png");
                File.WriteAllBytes(tempFilePath, imageContent.ToArray());
                client.Files.DeleteFile(imageFileContent.FileId);

                ProcessStartInfo psi = new()
                {
                    FileName = tempFilePath,
                    UseShellExecute = true
                };
                Process.Start(psi);
                break;
        }
    }
}
清理資源
最後,刪除線程和代理程式,以清除此範例中建立的資源。
    client.Threads.DeleteThread(threadId: thread.Id);
    client.Administration.DeleteAgent(agentId: agent.Id);
建立專案用戶端
若要使用程式代碼解釋器,首先您需要建立專案用戶端,其中包含 AI 專案的端點,並用來驗證 API 呼叫。
const { AgentsClient, isOutputOfType, ToolUtility } = require("@azure/ai-agents");
const { delay } = require("@azure/core-util");
const { DefaultAzureCredential } = require("@azure/identity");
const fs = require("fs");
const path = require("node:path");
require("dotenv/config");

const projectEndpoint = process.env["PROJECT_ENDPOINT"];

// Create an Azure AI Client
const client = new AgentsClient(projectEndpoint, new DefaultAzureCredential());
上傳檔案
檔案可以上傳,然後由代理程式或訊息參考。 上傳之後,即可將它新增至工具公用程式以供參考。
// Upload file and wait for it to be processed
const filePath = "./data/nifty500QuarterlyResults.csv";
const localFileStream = fs.createReadStream(filePath);
const localFile = await client.files.upload(localFileStream, "assistants", {
  fileName: "localFile",
});

console.log(`Uploaded local file, file ID : ${localFile.id}`);
使用程式代碼解釋器工具建立代理程式
// Create code interpreter tool
const codeInterpreterTool = ToolUtility.createCodeInterpreterTool([localFile.id]);

// Notice that CodeInterpreter must be enabled in the agent creation, otherwise the agent will not be able to see the file attachment
const agent = await client.createAgent("gpt-4o", {
  name: "my-agent",
  instructions: "You are a helpful agent",
  tools: [codeInterpreterTool.definition],
  toolResources: codeInterpreterTool.resources,
});
console.log(`Created agent, agent ID: ${agent.id}`);
建立線程、訊息,並取得代理程序回應
// Create a thread
const thread = await client.threads.create();
console.log(`Created thread, thread ID: ${thread.id}`);

// Create a message
const message = await client.messages.create(
  thread.id,
  "user",
  "Could you please create a bar chart in the TRANSPORTATION sector for the operating profit from the uploaded CSV file and provide the file to me?",
  {
    attachments: [
      {
        fileId: localFile.id,
        tools: [codeInterpreterTool.definition],
      },
    ],
  },
);

console.log(`Created message, message ID: ${message.id}`);

// Create and execute a run
let run = await client.runs.create(thread.id, agent.id);
while (run.status === "queued" || run.status === "in_progress") {
  await delay(1000);
  run = await client.runs.get(thread.id, run.id);
}
if (run.status === "failed") {
  // Check if you got "Rate limit is exceeded.", then you want to get more quota
  console.log(`Run failed: ${run.lastError}`);
}
console.log(`Run finished with status: ${run.status}`);

// Delete the original file from the agent to free up space (note: this does not delete your version of the file)
await client.files.delete(localFile.id);
console.log(`Deleted file, file ID: ${localFile.id}`);

// Print the messages from the agent
const messagesIterator = client.messages.list(thread.id);
const allMessages = [];
for await (const m of messagesIterator) {
  allMessages.push(m);
}
console.log("Messages:", allMessages);

// Get most recent message from the assistant
const assistantMessage = allMessages.find((msg) => msg.role === "assistant");
if (assistantMessage) {
  const textContent = assistantMessage.content.find((content) => isOutputOfType(content, "text"));
  if (textContent) {
    console.log(`Last message: ${textContent.text.value}`);
  }
}

// Save the newly created file
console.log(`Saving new files...`);
const imageFile = allMessages[0].content[0].imageFile;
console.log(`Image file ID : ${imageFile.fileId}`);
const imageFileName = path.resolve(
  "./data/" + (await client.files.get(imageFile.fileId)).filename + "ImageFile.png",
);

const fileContent = await (await client.files.getContent(imageFile.fileId).asNodeStream()).body;
if (fileContent) {
  const chunks = [];
  for await (const chunk of fileContent) {
    chunks.push(Buffer.isBuffer(chunk) ? chunk : Buffer.from(chunk));
  }
  const buffer = Buffer.concat(chunks);
  fs.writeFileSync(imageFileName, buffer);
} else {
  console.error("Failed to retrieve file content: fileContent is undefined");
}
console.log(`Saved image file to: ${imageFileName}`);

// Iterate through messages and print details for each annotation
console.log(`Message Details:`);
allMessages.forEach((m) => {
  console.log(`File Paths:`);
  console.log(`Type: ${m.content[0].type}`);
  if (isOutputOfType(m.content[0], "text")) {
    const textContent = m.content[0];
    console.log(`Text: ${textContent.text.value}`);
  }
  console.log(`File ID: ${m.id}`);
});

// Delete the agent once done
await client.deleteAgent(agent.id);
console.log(`Deleted agent, agent ID: ${agent.id}`);
請遵循 REST API 快速入門 ,為環境變數 AGENT_TOKEN和 AZURE_AI_FOUNDRY_PROJECT_ENDPOINTAPI_VERSION設定正確的值。
上傳檔案
curl --request POST \
  --url $AZURE_AI_FOUNDRY_PROJECT_ENDPOINT/files?api-version=$API_VERSION \
  -H "Authorization: Bearer $AGENT_TOKEN" \
  -F purpose="assistants" \
  -F file="@c:\\path_to_file\\file.csv"
使用程式代碼解釋器工具建立代理程式
curl --request POST \
  --url $AZURE_AI_FOUNDRY_PROJECT_ENDPOINT/assistants?api-version=$API_VERSION \
  -H "Authorization: Bearer $AGENT_TOKEN" \
  -H "Content-Type: application/json" \
  -d '{
    "instructions": "You are an AI assistant that can write code to help answer math questions.",
    "tools": [
      { "type": "code_interpreter" }
    ],
    "model": "gpt-4o-mini",
    "tool_resources"{
      "code interpreter": {
          "file_ids": ["assistant-1234"]
      }
    }
  }'
建立討論串
curl --request POST \
  --url $AZURE_AI_FOUNDRY_PROJECT_ENDPOINT/threads?api-version=$API_VERSION \
  -H "Authorization: Bearer $AGENT_TOKEN" \
  -H "Content-Type: application/json" \
  -d ''
新增使用者問題至討論串
curl --request POST \
  --url $AZURE_AI_FOUNDRY_PROJECT_ENDPOINT/threads/thread_abc123/messages?api-version=$API_VERSION \
  -H "Authorization: Bearer $AGENT_TOKEN" \
  -H "Content-Type: application/json" \
  -d '{
      "role": "user",
      "content": "I need to solve the equation `3x + 11 = 14`. Can you help me?"
    }'
執行執行緒
curl --request POST \
  --url $AZURE_AI_FOUNDRY_PROJECT_ENDPOINT/threads/thread_abc123/runs?api-version=$API_VERSION \
  -H "Authorization: Bearer $AGENT_TOKEN" \
  -H "Content-Type: application/json" \
  -d '{
    "assistant_id": "asst_abc123",
  }'
擷取執行狀態
curl --request GET \
  --url $AZURE_AI_FOUNDRY_PROJECT_ENDPOINT/threads/thread_abc123/runs/run_abc123?api-version=$API_VERSION \
  -H "Authorization: Bearer $AGENT_TOKEN"
擷取代理回應
curl --request GET \
  --url $AZURE_AI_FOUNDRY_PROJECT_ENDPOINT/threads/thread_abc123/messages?api-version=$API_VERSION \
  -H "Authorization: Bearer $AGENT_TOKEN"