適用於:✔️ AKS Automatic
Azure Kubernetes Service (AKS) Automatic 為開發者、DevOps 工程師及平台工程師提供最簡便的託管 Kubernetes 體驗。 AKS 自動自動將 AKS 叢集設定和作業自動化,並內嵌最佳做法組態,非常適合新式和 AI 應用程式。 任何技能等級的使用者都可以受益於其應用程式 AKS Automatic 的安全性、效能和可靠性。 AKS Automatic 也包含 pod 準備 SLA ,保證 99.9% 合格的 pod 準備作業在 5 分鐘內完成,確保你的應用擁有可靠且自我修復的基礎設施。 本快速入門假設您已有 Kubernetes 概念的基本知識。 欲了解更多資訊,請參閱 Kubernetes Azure Kubernetes Service (AKS) 核心概念。
在本快速入門中,您將了解如何:
- 建立虛擬網路。
- 建立具有虛擬網路許可權的受控識別。
- 在虛擬網路中部署 AKS 自動叢集。
- 執行一個由多個容器組成的應用程式範例,其中包含微服務和網頁前端,模擬零售情境。
如果你沒有Azure帳號,請建立一個free帳號。
先決條件
- Azure CLI 版本 2.86.0 或更後版本。 要找到版本,請執行
az --version指令。 如果你需要安裝或升級,請參考 安裝 Azure CLI。
備註
此範例會建立 AKS 自動叢集,使用 AzureRM 提供者的 azurerm_kubernetes_automatic_cluster 資源,該叢集需要 AzureRM 提供者版本 v4.81 或更新版本。 若要查看使用 AzAPI 提供者的對應範例,請參閱 101-aks-automatic-custom-network-azapi 範例。
- 在 API 伺服器子網路上,對叢集身分識別授予一個
Network Contributor內建角色指派。 - 叢集身分識別,在虛擬網路上擁有
Network Contributor內建角色指派,以支援節點自動佈建。 - 使用者身分識別使用
Azure Kubernetes Service Cluster User Role和Azure Kubernetes Service RBAC Writer存取叢集。 - 一個虛擬網路,擁有至少
*/28大小的專用 API 伺服器子網路,並委派給Microsoft.ContainerService/managedClusters。- 如果網路安全性群組 (NSG) 連結至子網路,請確定 NSG 安全性規則允許叢集元件之間必要的通訊類型。 如需詳細需求,請參閱 自訂虛擬網路需求。
- 如果有Azure 防火牆或其他外接限制方法或設備,請確保允許使用必須的外接網路規則和FQDNS。
- AKS Automatic 會在你的 AKS 叢集上啟用 Azure 原則,但你應該在訂閱中預先註冊資源提供者,以便更順利地使用。 欲了解更多資訊,請參閱 Azure 資源提供者與類型 。
- 使用
az extension remove -n aks-preview解除安裝 AKS-preview 擴充功能。
這很重要
從 AKS 1.36 開始,新的 AKS Automatic 叢集預設將啟用 透過應用程式路由附加元件提供的 Kubernetes Gateway API,而非 使用應用程式路由附加元件的受控 NGINX 輸入,這是因為上游的 Ingress NGINX 退場。
現有的自動叢集不會受影響,但應該會開始透過 應用程式路由外掛開始遷移到 Kubernetes Gateway API。
局限性
AKS 自動叢集適用以下限制:
- AKS Automatic 已在下列區域正式推出:
australiacentral、australiaeast、northcentralus、centralus、westus2、northeurope、chilecentral、westus、newzealandnorth、centralindia、westeurope、norwayeast、canadaeast、westcentralus、mexicocentral、canadacentral、ukwest、uksouth、uaenorth、swedencentral、switzerlandnorth、spaincentral、southeastasia、southindia、southcentralus、polandcentral、southafricanorth、malaysiawest、koreacentral、koreasouth、japanwest、italynorth、japaneast、israelcentral、indonesiacentral、australiasoutheast、germanywestcentral、francecentral、austriaeast、eastus2、eastus、brazilsouth、belgiumcentral、denmarkeast、eastasia、westus3。 - 新的 AKS 自動叢集預設啟用管理系統節點池與 LocalDNS。 你無法在任何區域建立 AKS 自動叢集,除非有管理系統的節點池。
- AKS 自動叢集預先設定了 node resource group lockdown,這不允許更改
MC_資源群,導致預設 私用 DNS 區域無法建立虛擬網路連結。 對於跨 VNet 或自訂 DNS 情境,請依照在自訂虛擬網路中建立私有 Azure Kubernetes 服務 (AKS) 自動叢集的步驟,使用自訂網路和私人 DNS。 - Azure CLI 版本 2.86.0 或更新版本是必須的。 要找到版本,請執行
az --version指令。 如果你需要安裝或升級,請參考 安裝 Azure CLI。 - 以下擴充功能不被支援:
- Windows 節點不被支援。
- 不支援從 AKS 基礎 SKU 遷移到自動 SKU。
- 在有管理系統節點池的地區,預覽版中支援從現有 AKS Automatic 叢集(不含管理系統節點池)遷移到 AKS Automatic 並管理系統節點池的遷移。 不支援從具有受控系統節點集區的 AKS Automatic 遷移回不具有受控系統節點集區的 AKS Automatic。
定義變數
請定義以下步驟中使用的變數。
RG_NAME=automatic-rg
VNET_NAME=automatic-vnet
CLUSTER_NAME=automatic
IDENTITY_NAME=automatic-uami
LOCATION=eastus
SUBSCRIPTION_ID=$(az account show --query id -o tsv)
建立資源群組
Azure資源群組是一個邏輯群組,Azure資源在此中部署和管理。
使用 az group create 命令來建立資源群組。
az group create -n ${RG_NAME} -l ${LOCATION}
下列範例輸出類似於成功建立資源群組:
{
  "id": "/subscriptions/<guid>/resourceGroups/automatic-rg",
  "location": "canadacentral",
  "managedBy": null,
  "name": "automatic-rg",
  "properties": {
    "provisioningState": "Succeeded"
  },
  "tags": null
}
建立虛擬網路
使用 az network vnet create 命令來建立虛擬網路。 使用指令 az network vnet subnet create 建立 API 伺服器子網路、使用者節點子網路及系統節點子網路。
當你使用自訂虛擬網路搭配 AKS Automatic 時,必須建立一個 API 伺服器子網路。 AKS 會代表您將子網路委派給 Microsoft.ContainerService/managedClusters,讓 AKS 服務具有權限將 API 伺服器 Pod 和內部負載平衡器部署到該子網路中。 你不能用這個子網路來處理其他工作負載,但你可以用它來管理同一虛擬網路中多個 AKS 叢集的 API 伺服器子網路。 支援單一叢集的最小 API 伺服器子網大小為 /28。
警告
一個 AKS 叢集在子網位址空間中保留至少九(9)個 IP。 IP 位址不足可能會阻礙 API 伺服器擴展,導致 API 伺服器中斷。
az network vnet create --name ${VNET_NAME} \
--resource-group ${RG_NAME} \
--location ${LOCATION} \
--address-prefixes 172.19.0.0/16

az network vnet subnet create --resource-group ${RG_NAME} \
--vnet-name ${VNET_NAME} \
--name apiServerSubnet \
--delegations Microsoft.ContainerService/managedClusters \
--address-prefixes 172.19.0.0/28

az network vnet subnet create --resource-group ${RG_NAME} \
--vnet-name ${VNET_NAME} \
--name userNodeSubnet \
--address-prefixes 172.19.1.0/24

az network vnet subnet create --resource-group ${RG_NAME} \
--vnet-name ${VNET_NAME} \
--name managedSystemNodeSubnet \
--address-prefixes 172.19.0.64/26
網路安全群組需求
如果你新增了網路安全群組(NSG)規則來限制自訂虛擬網路中不同子網之間的流量,請確保 NSG 安全規則允許叢集元件間所需的通訊類型。
如需搭配 AKS 叢集使用自訂虛擬網路時的詳細 NSG 需求,請參閱 自訂虛擬網路需求。
建立受控識別,並在虛擬網路上將權限授與該識別
使用 az identity create 命令建立受控識別,並擷取主體標識碼。 使用 命令將虛擬網路上的az role assignment create角色指派給受控識別。
az identity create \
--resource-group ${RG_NAME} \
 --name ${IDENTITY_NAME} \
 --location ${LOCATION}

IDENTITY_PRINCIPAL_ID=$(az identity show --resource-group ${RG_NAME} --name ${IDENTITY_NAME} --query principalId -o tsv)

az role assignment create \
--scope "/subscriptions/${SUBSCRIPTION_ID}/resourceGroups/${RG_NAME}/providers/Microsoft.Network/virtualNetworks/${VNET_NAME}" \
--role "Network Contributor" \
--assignee-object-id "${IDENTITY_PRINCIPAL_ID}" \
--assignee-principal-type ServicePrincipal
在自定義虛擬網路中建立 AKS 自動叢集
若要建立 AKS 自動叢集,請使用 az aks create 命令。
az aks create \
--resource-group ${RG_NAME} \
--name ${CLUSTER_NAME} \
--location ${LOCATION} \
--apiserver-subnet-id "/subscriptions/${SUBSCRIPTION_ID}/resourceGroups/${RG_NAME}/providers/Microsoft.Network/virtualNetworks/${VNET_NAME}/subnets/apiServerSubnet" \
--node-subnet-id "/subscriptions/${SUBSCRIPTION_ID}/resourceGroups/${RG_NAME}/providers/Microsoft.Network/virtualNetworks/${VNET_NAME}/subnets/userNodeSubnet" \
--system-node-subnet-id "/subscriptions/${SUBSCRIPTION_ID}/resourceGroups/${RG_NAME}/providers/Microsoft.Network/virtualNetworks/${VNET_NAME}/subnets/managedSystemNodeSubnet"
--assign-identity "/subscriptions/${SUBSCRIPTION_ID}/resourcegroups/${RG_NAME}/providers/Microsoft.ManagedIdentity/userAssignedIdentities/${IDENTITY_NAME}" \
--sku automatic \
--no-ssh-key
幾分鐘後,命令會完成並傳回關於叢集的 JSON 格式資訊。
連接至叢集
若要管理 Kubernetes 叢集,請使用 Kubernetes 命令列用戶端 kubectl。 如果你用Azure Cloud Shell,kubectl 已經安裝好了。 若要在本機安裝 kubectl ,請執行 az aks install-cli 命令。 AKS Automatic 叢集是使用適用於 Kubernetes 角色型存取控制 (RBAC) 的 Microsoft Entra ID 進行設定。
當你使用 Azure CLI 建立叢集時,使用者會被 指派內建角色 用於 Azure Kubernetes Service RBAC Cluster Admin。
使用 kubectl 命令,設定 連線到 Kubernetes 叢集。 此命令會下載認證,並設定 Kubernetes CLI 來使用這些認證。
az aks get-credentials --resource-group ${RG_NAME} --name ${CLUSTER_NAME}
使用 kubectl get 命令來確認與叢集的連線。 此命令會傳回叢集節點的清單。
kubectl get nodes
以下範例輸出顯示你如何被要求登入。
To sign in, use a web browser to open the page https://microsoft.com/devicelogin and enter the code AAAAAAAAA to authenticate.
登入後,以下範例輸出會顯示受管理系統的節點池。 確定節點的狀態為就緒。
NAME                           STATUS   ROLES    AGE   VERSION
aks-hostedpool-16652789-vms1   Ready    <none>   19m   v1.34.7
aks-hostedpool-16652789-vms2   Ready    <none>   19m   v1.34.7
aks-hostedpool-16652789-vms3   Ready    <none>   19m   v1.34.7
aks-system-surge-zq4d2         Ready    <none>   19m   v1.34.7
建立虛擬網路
這個 Bicep 檔案定義了一個虛擬網路。
@description('The location of the managed cluster resource.')
param location string = resourceGroup().location

@description('The name of the virtual network.')
param vnetName string = 'aksAutomaticVnet'

@description('The address prefix of the virtual network.')
param addressPrefix string = '172.19.0.0/16'

@description('The name of the API server subnet.')
param apiServerSubnetName string = 'apiServerSubnet'

@description('The subnet prefix of the API server subnet.')
param apiServerSubnetPrefix string = '172.19.0.0/28'

@description('The name of the user node subnet.')
param userNodeSubnetName string = 'userNodeSubnet'

@description('The subnet prefix of the user node subnet.')
param userNodeSubnetPrefix string = '172.19.1.0/24'

@description('The name of the system node subnet.')
param systemNodeSubnetName string = 'systemNodeSubnet'

@description('The subnet prefix of the system node subnet.')
param systemNodeSubnetPrefix string = '172.19.0.64/26'

// Virtual network with an API server subnet, a user node subnet, and a system node subnet
resource virtualNetwork 'Microsoft.Network/virtualNetworks@2023-09-01' = {
    name: vnetName
    location: location
    properties: {
        addressSpace: {
            addressPrefixes: [ addressPrefix ]
        }
        subnets: [
            {
                name: apiServerSubnetName
                properties: {
                    addressPrefix: apiServerSubnetPrefix
                }
            }
            {
                name: userNodeSubnetName
                properties: {
                    addressPrefix: userNodeSubnetPrefix
                }
            }
            {
                name: systemNodeSubnetName
                properties: {
                    addressPrefix: systemNodeSubnetPrefix
                }
            }
        ]
    }
}

output apiServerSubnetId string = resourceId('Microsoft.Network/virtualNetworks/subnets', vnetName, apiServerSubnetName)
output userNodeSubnetId string = resourceId('Microsoft.Network/virtualNetworks/subnets', vnetName, userNodeSubnetName)
output systemNodeSubnetId string = resourceId('Microsoft.Network/virtualNetworks/subnets', vnetName, systemNodeSubnetName)
儲存Bicep檔案 virtualNetwork.bicep 到你本地的電腦。
這很重要
Bicep 檔案將 vnetName 參數設為 aksAutomaticVnet,addressPrefix 參數設為 172.19.0.0/16,apiServerSubnetPrefix 參數設為 172.19.0.0/28,apiServerSubnetPrefix 參數設為 172.19.1.0/24。 如果您想要使用不同的值,請務必將字串更新為您慣用的值。
使用 Azure CLI 部署 Bicep 檔案。
az deployment group create --resource-group <resource-group> --template-file virtualNetwork.bicep
虛擬網路內的所有流量預設都被允許。 如果你新增了網路安全群組(NSG)規則來限制自訂虛擬網路中不同子網之間的流量,請確保 NSG 安全規則允許叢集元件間所需的通訊類型。
如需搭配 AKS 叢集使用自訂虛擬網路時的詳細 NSG 需求,請參閱 自訂虛擬網路需求。
建立受控識別
這個 Bicep 檔案定義了使用者指派的管理身份。
param location string = resourceGroup().location
param uamiName string = 'aksAutomaticUAMI'

resource userAssignedManagedIdentity 'Microsoft.ManagedIdentity/userAssignedIdentities@2023-01-31' = {
  name: uamiName
  location: location
}

output uamiId string = userAssignedManagedIdentity.id
output uamiPrincipalId string = userAssignedManagedIdentity.properties.principalId
output uamiClientId string = userAssignedManagedIdentity.properties.clientId
儲存Bicep檔案 uami.bicep 到你本地的電腦。
這很重要
Bicep 檔案將 uamiName 參數設為 aksAutomaticUAMI。 如果您想要使用不同的身分識別名稱,請務必將字串更新為慣用的名稱。
使用 Azure CLI 部署 Bicep 檔案。
az deployment group create --resource-group <resource-group> --template-file uami.bicep
將網路參與者角色指派至該虛擬網路
此 Bicep 檔案定義了虛擬網路上的角色分配。
@description('The name of the virtual network.')
param vnetName string = 'aksAutomaticVnet'

@description('The principal ID of the user assigned managed identity.')
param uamiPrincipalId string

// Get a reference to the virtual network
resource virtualNetwork 'Microsoft.Network/virtualNetworks@2023-09-01' existing ={
  name: vnetName
}

// Assign the Network Contributor role to the user assigned managed identity on the virtual network
// '4d97b98b-1d4f-4787-a291-c67834d212e7' is the built-in Network Contributor role definition
// See: https://learn.microsoft.com/en-us/azure/role-based-access-control/built-in-roles/networking#network-contributor
resource networkContributorRoleAssignmentToVirtualNetwork 'Microsoft.Authorization/roleAssignments@2022-04-01' = {
  name: guid(uamiPrincipalId, '4d97b98b-1d4f-4787-a291-c67834d212e7', resourceGroup().id, virtualNetwork.name)
  scope: virtualNetwork
  properties: {
      roleDefinitionId: resourceId('Microsoft.Authorization/roleDefinitions', '4d97b98b-1d4f-4787-a291-c67834d212e7')
      principalId: uamiPrincipalId
  }
}
儲存Bicep檔案 roleAssignments.bicep 到你本地的電腦。
這很重要
Bicep 檔案將 vnetName 參數設為 aksAutomaticVnet。 如果您使用不同的虛擬網路名稱,請務必將字串更新為您慣用的虛擬網路名稱。
使用 Azure CLI 部署 Bicep 檔案。 您必須提供使用者指派的身分識別主體標識碼。
az deployment group create --resource-group <resource-group> --template-file roleAssignments.bicep \
--parameters uamiPrincipalId=<user assigned identity prinicipal id>
在自定義虛擬網路中建立 AKS 自動叢集
這個 Bicep 檔案定義了 AKS 自動叢集。
@description('The name of the managed cluster resource.')
param clusterName string = 'aksAutomaticCluster'

@description('The location of the managed cluster resource.')
param location string = resourceGroup().location

@description('The resource ID of the API server subnet.')
param apiServerSubnetId string

@description('The resource ID of the user node subnet.')
param userNodeSubnetId string

@description('The resource ID of the system node subnet.')
param systemNodeSubnetId string

@description('The resource ID of the user assigned managed identity.')
param uamiId string

/// Create the AKS Automatic cluster using the custom virtual network and user assigned managed identity
resource aks 'Microsoft.ContainerService/managedClusters@2024-03-02-preview' = {
  name: clusterName
  location: location
  sku: {
    name: 'Automatic'
  }
  properties: {
    apiServerAccessProfile: {
      subnetId: apiServerSubnetId
    }
    networkProfile: {
      outboundType: 'loadBalancer'
    }
    hostedSystemProfile: {
      systemNodeSubnetID: systemNodeSubnetId
      nodeSubnetID: userNodeSubnetId
    }
  }
  identity: {
    type: 'UserAssigned'
    userAssignedIdentities: {
      '${uamiId}': {}
    }
  }
}
儲存Bicep檔案 aks.bicep 到你本地的電腦。
這很重要
Bicep 檔案將 clusterName 參數設為 aksAutomaticCluster。 如果您想要不同的叢集名稱,請務必將字串更新為您慣用的叢集名稱。
使用 Azure CLI 部署 Bicep 檔案。 你需要提供 API 伺服器子網資源 ID、使用者節點子網資源 ID、系統節點子網資源 ID 以及使用者指派的管理身份資源 ID。
az deployment group create --resource-group <resource-group> --template-file aks.bicep \
--parameters apiServerSubnetId=<API server subnet resource id> \
--parameters nodeSubnetId=<user node subnet resource id> \
--parameters systemNodeSubnetId=<system node subnet resource id> \
--parameters uamiId=<user assigned identity id>
連接至叢集
若要管理 Kubernetes 叢集,請使用 Kubernetes 命令列用戶端 kubectl。 如果你用Azure Cloud Shell,kubectl 已經安裝好了。 若要在本機安裝 kubectl ,請執行 az aks install-cli 命令。 AKS Automatic 叢集是使用適用於 Kubernetes 角色型存取控制 (RBAC) 的 Microsoft Entra ID 進行設定。
這很重要
當你使用 Bicep 建立叢集時,你需要將內建角色之一 指派給使用者,例如 ,例如 Azure Kubernetes Service RBAC Reader、Azure Kubernetes Service RBAC Writer、Azure Kubernetes Service RBAC Admin 或 Azure Kubernetes Service RBAC Cluster Admin,這些角色對應叢集或特定命名空間,例如使用 az role assignment create --role "Azure Kubernetes Service RBAC Cluster Admin" --scope <AKS cluster resource id> --assignee user@contoso.com。 另外,確保使用者具有內建的 Azure Kubernetes Service Cluster User 角色,以便能夠執行 az aks get-credentials,然後用 az aks get-credentials 指令取得 AKS 叢集的 kubeconfig。
使用 kubectl 命令,設定 連線到 Kubernetes 叢集。 此命令會下載認證,並設定 Kubernetes CLI 來使用這些認證。
az aks get-credentials --resource-group <resource-group> --name <cluster-name>
使用 kubectl get 命令來確認與叢集的連線。 此命令會傳回叢集節點的清單。
kubectl get nodes
以下範例輸出顯示你如何被要求登入。
To sign in, use a web browser to open the page https://microsoft.com/devicelogin and enter the code AAAAAAAAA to authenticate.
登入後,以下範例輸出會顯示受管理系統的節點池。 確定節點的狀態為就緒。
NAME                           STATUS   ROLES    AGE   VERSION
aks-hostedpool-16652789-vms1   Ready    <none>   19m   v1.34.7
aks-hostedpool-16652789-vms2   Ready    <none>   19m   v1.34.7
aks-hostedpool-16652789-vms3   Ready    <none>   19m   v1.34.7
aks-system-surge-zq4d2         Ready    <none>   19m   v1.34.7
檢視 Terraform 程式碼
備註
本文的範例程式代碼位於 Azure Terraform GitHub 存放庫中。 您可以查看包含目前及先前版本的 Terraform 測試結果的日誌檔。
建立目錄,然後在目錄中測試範例 Terraform 程式碼,並將其設為目前的目錄。
建立名為
providers.tf的檔案,並插入下列程式碼:terraform { required_version = ">= 1.0" required_providers { azurerm = { source = "hashicorp/azurerm" version = "~>5.0" } random = { source = "hashicorp/random" version = "~>3.0" } } } provider "azurerm" { features {} }建立名為
main.tf的檔案,並插入下列程式碼:# Create a random name for the resource group using random_pet resource "random_pet" "rg_name" { prefix = var.resource_group_name_prefix } # Create a resource group using the generated random name resource "azurerm_resource_group" "rg" { location = var.resource_group_location name = random_pet.rg_name.id } # Create the custom virtual network that hosts the cluster resource "azurerm_virtual_network" "vnet" { name = var.virtual_network_name location = azurerm_resource_group.rg.location resource_group_name = azurerm_resource_group.rg.name address_space = var.virtual_network_address_space } # Create the subnet delegated to AKS for API Server VNet Integration resource "azurerm_subnet" "api_server" { name = "apiServerSubnet" resource_group_name = azurerm_resource_group.rg.name virtual_network_name = azurerm_virtual_network.vnet.name address_prefixes = var.api_server_subnet_address_prefixes delegation { name = "aks-delegation" service_delegation { name = "Microsoft.ContainerService/managedClusters" actions = ["Microsoft.Network/virtualNetworks/subnets/join/action"] } } } # Create the subnet that hosts the user node pools resource "azurerm_subnet" "user_nodes" { name = "userNodeSubnet" resource_group_name = azurerm_resource_group.rg.name virtual_network_name = azurerm_virtual_network.vnet.name address_prefixes = var.user_node_subnet_address_prefixes } # Create the subnet that hosts the managed system node pool resource "azurerm_subnet" "system_nodes" { name = "managedSystemNodeSubnet" resource_group_name = azurerm_resource_group.rg.name virtual_network_name = azurerm_virtual_network.vnet.name address_prefixes = var.system_node_subnet_address_prefixes lifecycle { # AKS adds its own managed cluster delegation to this subnet after the # cluster is created. ignore_changes = [delegation] } } # Create the user-assigned managed identity used by the cluster resource "azurerm_user_assigned_identity" "aks" { name = var.identity_name location = azurerm_resource_group.rg.location resource_group_name = azurerm_resource_group.rg.name } # Grant the cluster identity Network Contributor on the virtual network resource "azurerm_role_assignment" "network_contributor" { scope = azurerm_virtual_network.vnet.id role_definition_name = "Network Contributor" principal_id = azurerm_user_assigned_identity.aks.principal_id principal_type = "ServicePrincipal" } # Create a random name for the AKS Automatic cluster resource "random_pet" "cluster_name" { prefix = var.cluster_name_prefix } # Create the AKS Automatic cluster in the custom virtual network resource "azurerm_kubernetes_automatic_cluster" "aks_automatic" { name = random_pet.cluster_name.id location = azurerm_resource_group.rg.location resource_group_name = azurerm_resource_group.rg.name identity { type = "UserAssigned" identity_ids = [azurerm_user_assigned_identity.aks.id] } api_server_access { subnet_id = azurerm_subnet.api_server.id } hosted_system { node_subnet_id = azurerm_subnet.user_nodes.id system_node_subnet_id = azurerm_subnet.system_nodes.id } depends_on = [azurerm_role_assignment.network_contributor] }建立名為
variables.tf的檔案,並插入下列程式碼:variable "resource_group_location" { type = string default = "westus2" description = "Location of the resource group." } variable "resource_group_name_prefix" { type = string default = "rg" description = "Prefix of the resource group name that's combined with a random ID so name is unique in your Azure subscription." } variable "cluster_name_prefix" { type = string default = "aks-automatic" description = "Prefix of the AKS Automatic cluster name that's combined with a random ID so the name is unique in your Azure subscription." } variable "virtual_network_name" { type = string default = "aks-automatic-vnet" description = "Name of the custom virtual network that hosts the cluster." } variable "identity_name" { type = string default = "aks-automatic-identity" description = "Name of the user-assigned managed identity that the cluster uses." } variable "virtual_network_address_space" { type = list(string) default = ["172.19.0.0/16"] description = "Address space of the custom virtual network." } variable "api_server_subnet_address_prefixes" { type = list(string) default = ["172.19.0.0/28"] description = "Address prefixes of the subnet delegated to the cluster API server." } variable "user_node_subnet_address_prefixes" { type = list(string) default = ["172.19.1.0/24"] description = "Address prefixes of the subnet that hosts the user node pools." } variable "system_node_subnet_address_prefixes" { type = list(string) default = ["172.19.0.64/26"] description = "Address prefixes of the subnet that hosts the managed system node pool." }建立名為
outputs.tf的檔案,並插入下列程式碼:output "resource_group_name" { value = azurerm_resource_group.rg.name } output "cluster_name" { value = azurerm_kubernetes_automatic_cluster.aks_automatic.name } output "cluster_id" { value = azurerm_kubernetes_automatic_cluster.aks_automatic.id } output "node_resource_group_id" { value = azurerm_kubernetes_automatic_cluster.aks_automatic.node_resource_group_id } output "virtual_network_name" { value = azurerm_virtual_network.vnet.name } output "fully_qualified_domain_name" { value = azurerm_kubernetes_automatic_cluster.aks_automatic.fully_qualified_domain_name }
初始化 Terraform
執行 terraform init 來初始化 Terraform 部署。 此指令會下載管理 Azure 資源所需的 Azure 提供者。
terraform init -upgrade
建立 Terraform 執行計畫
執行 terraform plan 以建立執行計畫。
terraform plan -out main.tfplan
套用 Terraform 的執行計畫
執行terraform apply指令將執行計劃套用至您的雲端基礎設施。
terraform apply main.tfplan
建立 AKS 自動叢集需要數分鐘完成。
驗證叢集
取得 Azure 資源群組名稱和叢集名稱。
resource_group_name=$(terraform output -raw resource_group_name)
cluster_name=$(terraform output -raw cluster_name)
執行 az aks show 以顯示叢集資訊,並確認其使用
AutomaticSKU 和您自訂的子網路。az aks show --resource-group $resource_group_name --name $cluster_name --query "{name:name, sku:sku, provisioningState:provisioningState, apiServerSubnet:apiServerAccessProfile.subnetId}"
連接至叢集
若要管理 Kubernetes 叢集,請使用 Kubernetes 命令列用戶端 kubectl。 你可以用 az aks install-CLI 指令在本地安裝kubectl。 AKS Automatic 叢集是使用適用於 Kubernetes 角色型存取控制 (RBAC) 的 Microsoft Entra ID 進行設定。
使用 kubectl 命令,設定 連線到 Kubernetes 叢集。
az aks get-credentials --resource-group $resource_group_name --name $cluster_name
使用 kubectl get 命令來確認與叢集的連線。
kubectl get nodes
部署應用程式
要部署應用程式,你使用清單檔案建立執行 AKS Store 應用程式所需的所有物件。 Kubernetes 資訊清單檔會定義叢集所需的狀態,例如要執行哪些容器映像。 清單包含下列 Kubernetes 部署和服務:
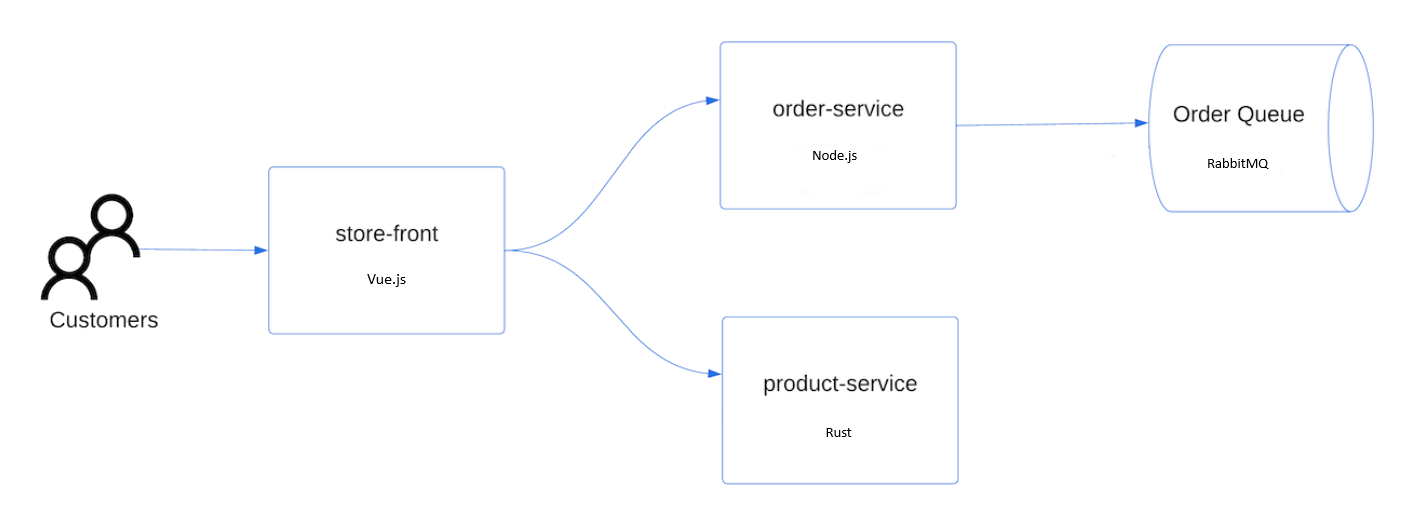
- 市集前端:供客戶檢視產品和下單的 Web 應用程式。
- 產品服務:顯示產品資訊。
- 訂單服務:下單。
- Rabbit MQ:用於處理訂單佇列的訊息佇列。
備註
除非是針對生產環境的永續性儲存體,否則不建議執行具狀態容器,例如 Rabbit MQ。 這裡使用這些容器以簡化流程,但我們建議使用管理服務,例如 Azure Cosmos DB 或 Azure 服務匯流排。
建立命名空間
aks-store-demo以部署 Kubernetes 資源。kubectl create ns aks-store-demo使用 kubectl apply 命令將應用程式部署至
aks-store-demo命名空間。 定義部署的 YAML 檔案位於 GitHub。kubectl apply -n aks-store-demo -f https://raw.githubusercontent.com/Azure-Samples/aks-store-demo/main/aks-store-ingress-quickstart.yaml下列範例輸出顯示部署和服務:
statefulset.apps/rabbitmq created
configmap/rabbitmq-enabled-plugins created
service/rabbitmq created
deployment.apps/order-service created
service/order-service created
deployment.apps/product-service created
service/product-service created
deployment.apps/store-front created
service/store-front created
ingress/store-front created
測試應用程式
當應用程式執行時,Kubernetes 服務會將應用程式前端公開至網際網路。 此程序可能需要幾分鐘才能完成。
使用 kubectl get pods 命令署檢視已部署 Pod 的狀態。 請先確認全部 Pod 都是
Running後再繼續進行。 如果這是您第一個部署的工作負載,節點自動佈建可能需要幾分鐘才能建立節點集區,以執行這些 Pod。kubectl get pods -n aks-store-demo檢查市集前端應用程式的公用 IP 位址。 使用 kubectl get service 命令搭配
--watch引數來監視進度。kubectl get ingress store-front -n aks-store-demo --watch服務的
store-front輸出一開始會顯示空白:NAME CLASS HOSTS ADDRESS PORTS AGE store-front webapprouting.kubernetes.azure.com * 80 12m當 ADDRESS 從空白變更為實際的公用 IP 地址之後,請使用
CTRL-C來停止kubectl監看程式。下列範例輸出會顯示已指派給服務的有效公用 IP 位址:
NAME          CLASS                                HOSTS   ADDRESS        PORTS   AGE
store-front   webapprouting.kubernetes.azure.com   *       4.255.22.196   80      12m
打開瀏覽器到你入口的外部 IP 位址,就能看到 Azure Store 應用程式的運作。


刪除叢集
如果你不打算做AKS教學,請清理不必要的資源以避免Azure費用。 執行 az group delete 命令來移除資源群組、容器服務和所有相關資源。
az group delete --name <resource-group> --yes --no-wait
備註
AKS 叢集是使用使用者指派的受控識別所建立。 如果您不再需要該身分識別,您可以手動移除該身分識別。
當你不再需要透過 Terraform 建立的資源時,執行 terraform 計畫 並指定該 destroy 標記。
terraform plan -destroy -out main.destroy.tfplan
執行 terraform apply 來應用執行計劃。
terraform apply main.destroy.tfplan
後續步驟
在本快速入門中,您已使用 AKS 自動 在自定義虛擬網路內部署 Kubernetes 叢集,然後將簡單的多容器應用程式部署至該叢集。 這個範例應用程式僅供示範之用,並不代表 Kubernetes 應用程式的所有最佳做法。 如需針對生產使用 AKS 建立完整解決方案的指引,請參閱 AKS 解決方案指引。
若要深入瞭解 AKS 自動,請繼續進行簡介。