適用於:✔️ AKS 自動化
Azure Kubernetes Service (AKS) Automatic 是一種受管式 Kubernetes 體驗,能自動化 AKS 叢集的設置與操作,並嵌入最佳實務設定。 AKS Automatic 也包含 [莢艙準備服務標準協議][azure-sla],保證 99.9% 合格莢艙準備作業在 5 分鐘內完成,確保您的應用程式擁有可靠且具自我修復能力的基礎設施。 在此快速入門中,您可了解如何:
- 部署 AKS Automatic 叢集。
- 使用一組微服務和 Web 前端模擬零售情節,執行多容器應用程式範例。
開始之前
- 本快速入門假設您已有 Kubernetes 概念的基本知識。 欲了解更多資訊,請參閱 Kubernetes Azure Kubernetes Service (AKS) 核心概念。
- AKS 自動化功能 能在你的 AKS 叢集上 啟用 Azure 原則,但你應該在訂閱中預先註冊
Microsoft.PolicyInsights資源提供者。 欲了解更多資訊,請參閱 Azure 資源提供者與類型 類型 。
請使用 Azure Cloud Shell 的 Bash 環境。 欲了解更多資訊,請參見開始使用 Azure Cloud Shell。

如果你喜歡在本地執行 CLI 參考指令,install Azure CLI。 如果你是在 Windows 或 macOS 上運行,可以考慮在 Docker 容器中執行 Azure CLI。 更多資訊請參見 如何在 Docker 容器中執行Azure CLI。
如果你使用本地安裝,請使用
az login 指令登入 Azure CLI。 請遵循您終端機上顯示的步驟,完成驗證程序。 如需其他登入選項,請參見使用 Azure CLI 驗證 Azure。 當系統提示時,首次使用時安裝 Azure CLI 擴充功能。 欲了解更多擴充功能的資訊,請參閱
使用 Azure CLI 。執行 az version 以尋找已安裝的版本和相依程式庫。 若要升級至最新版本,請執行 az upgrade。
- Azure CLI 版本 2.86.0 或更後版本。 要找到版本,請執行
az --version指令。 如果您需要安裝或升級,請參閱 安裝 Azure CLI。 - 如果你有多個Azure訂閱,請選擇適當的訂閱 ID,使用
az account set指令向資源收費。
- 要部署 Bicep 檔案,你需要對所建立的資源擁有寫入權限,並且能存取
Microsoft.Resources/deployments資源類型上的所有操作。 例如,要建立虛擬機(VM),你需要Microsoft.Compute/virtualMachines/write和Microsoft.Resources/deployments/*權限。 關於角色與權限列表,請參見 Azure 內建角色 。
備註
此範例會建立 AKS 自動叢集,使用 AzureRM 提供者的 azurerm_kubernetes_automatic_cluster 資源,該叢集需要 AzureRM 提供者版本 v4.81 或更新版本。 若要查看改用 AzAPI 提供者 的對應範例,請參閱 101-aks-automatic-azapi。 當您需要直接控制受控叢集 API 的承載資料,或需要使用 AzureRM 提供者尚未提供的 API 版本或屬性時,請使用 AzAPI。
這很重要
從 AKS 1.36 開始,新的 AKS Automatic 叢集預設將啟用 透過應用程式路由附加元件提供的 Kubernetes Gateway API,而非 使用應用程式路由附加元件的受控 NGINX 輸入,這是因為上游的 Ingress NGINX 退場。
現有的自動叢集不會受影響,但應該會開始透過 應用程式路由外掛開始遷移到 Kubernetes Gateway API。
局限性
AKS 自動叢集適用以下限制:
- AKS Automatic 已在下列區域正式推出:
australiacentral、australiaeast、northcentralus、centralus、westus2、northeurope、chilecentral、westus、newzealandnorth、centralindia、westeurope、norwayeast、canadaeast、westcentralus、mexicocentral、canadacentral、ukwest、uksouth、uaenorth、swedencentral、switzerlandnorth、spaincentral、southeastasia、southindia、southcentralus、polandcentral、southafricanorth、malaysiawest、koreacentral、koreasouth、japanwest、italynorth、japaneast、israelcentral、indonesiacentral、australiasoutheast、germanywestcentral、francecentral、austriaeast、eastus2、eastus、brazilsouth、belgiumcentral、denmarkeast、eastasia、westus3。 - 新的 AKS 自動叢集預設啟用管理系統節點池與 LocalDNS。 你無法在任何區域建立 AKS 自動叢集,除非有管理系統的節點池。
- AKS 自動叢集預先設定了 node resource group lockdown,這不允許更改
MC_資源群,導致預設 私用 DNS 區域無法建立虛擬網路連結。 對於跨 VNet 或自訂 DNS 情境,請依照在自訂虛擬網路中建立私有 Azure Kubernetes 服務 (AKS) 自動叢集的步驟,使用自訂網路和私人 DNS。 - Azure CLI 版本 2.86.0 或更新版本是必須的。 要找到版本,請執行
az --version指令。 如果您需要安裝或升級,請參閱 安裝 Azure CLI。 - 以下擴充功能不被支援:
- Windows 節點不被支援。
- 不支援從 AKS 基礎 SKU 遷移到自動 SKU。
- 在有管理系統節點池的地區,預覽版中支援從現有 AKS Automatic 叢集(不含管理系統節點池)遷移到 AKS Automatic 並管理系統節點池的遷移。 不支援從具有受控系統節點集區的 AKS Automatic 遷移回不具有受控系統節點集區的 AKS Automatic。
建立資源群組
Azure資源群組是一個邏輯群組,Azure資源在此中部署和管理。
使用 az group create 命令建立資源群組。 以下範例在 canadacentral 位置建立一個名為 myResourceGroup 的資源群組:
az group create --name myResourceGroup --location canadacentral
下列輸出範例類似於成功建立資源群組:
{
  "id": "/subscriptions/<guid>/resourceGroups/myResourceGroup",
  "location": "canadacentral",
  "managedBy": null,
  "name": "myResourceGroup",
  "properties": {
    "provisioningState": "Succeeded"
  },
  "tags": null
}
建立 AKS Automatic 叢集
使用 az aks create 參數 --sku 設為 automatic的指令建立 AKS 自動叢集。 以下範例建立一個名為 myAKSAutomaticCluster 的叢集,並啟用 Managed Prometheus 及 Container Insights 整合:
az aks create \
    --resource-group myResourceGroup \
    --name myAKSAutomaticCluster \
    --sku automatic
    --enable-hosted-system
部署結束後,輸出會顯示一個 hostedSystemProfile 屬性,屬性 enabled 設定為 true。 你也可以執行以下指令來顯示屬性:hostedSystemProfile
az aks show \
  --resource-group myResourceGroup \
  --name myAKSAutomaticCluster \
  --query hostedSystemProfile
{
  "enabled": true,
  "nodeSubnetId": null,
  "systemNodeSubnetId": null
}
建立 Automatic Kube 叢集
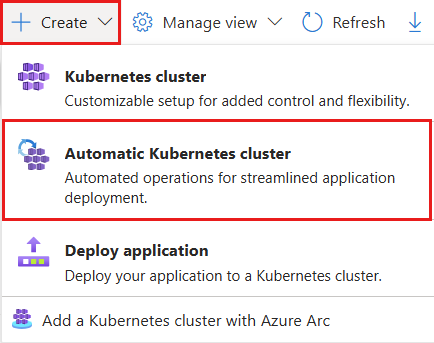
要建立 AKS 自動叢集,請搜尋並選擇 Kubernetes 服務。 這會帶你到 Kubernetes 中心(預覽) 頁面。
在 Kubernetes 中心(預覽) 頁面,選擇 建立>自動 Kubernetes 叢集。
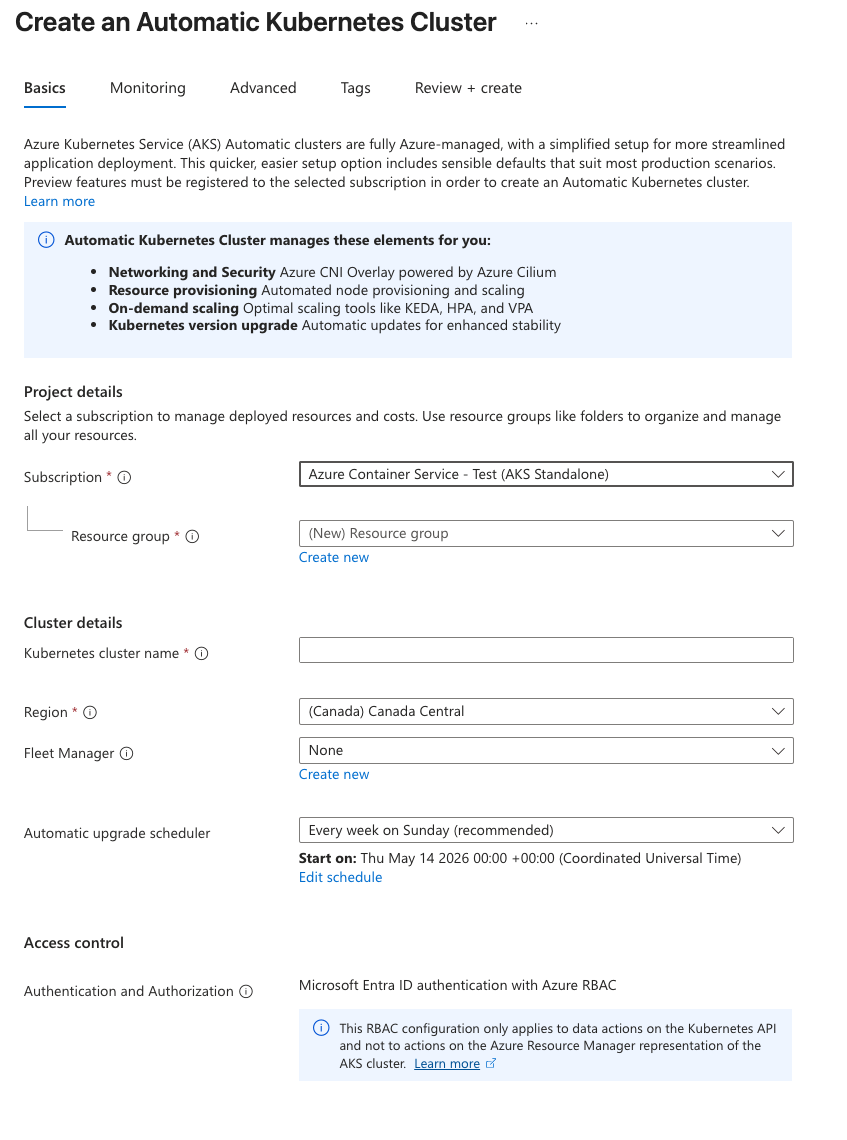
在 基礎 標籤中,填寫所有必填欄位(訂閱、資源群組、Kubernetes 叢集名稱和區域),然後選擇 「下一步」。
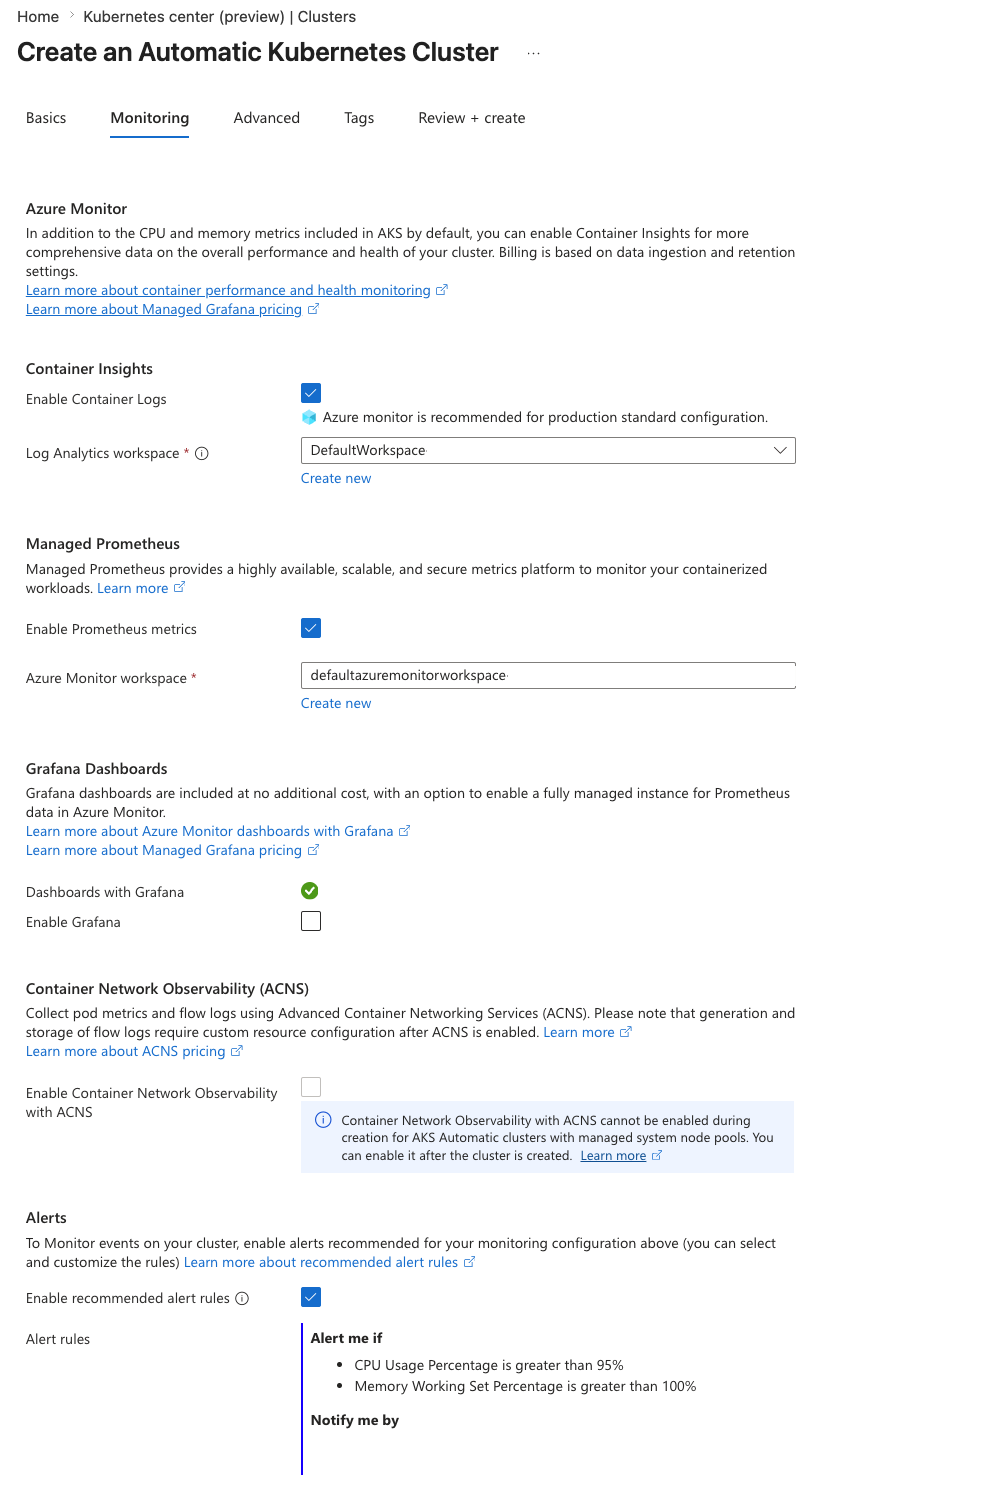
在 Monitoring 標籤中,從 Azure 監視器(容器洞察)、管理 Prometheus、Grafana 儀表板和警報中選擇你想要的監控設定,然後選擇 Next。
在
Advanced 標籤中,選擇你想要的進階配置:私有存取、Azure虛擬網路、管理身份、容器網路安全(ACNS)和託管 Kubernetes 命名空間,然後選擇 Review + 創建 。 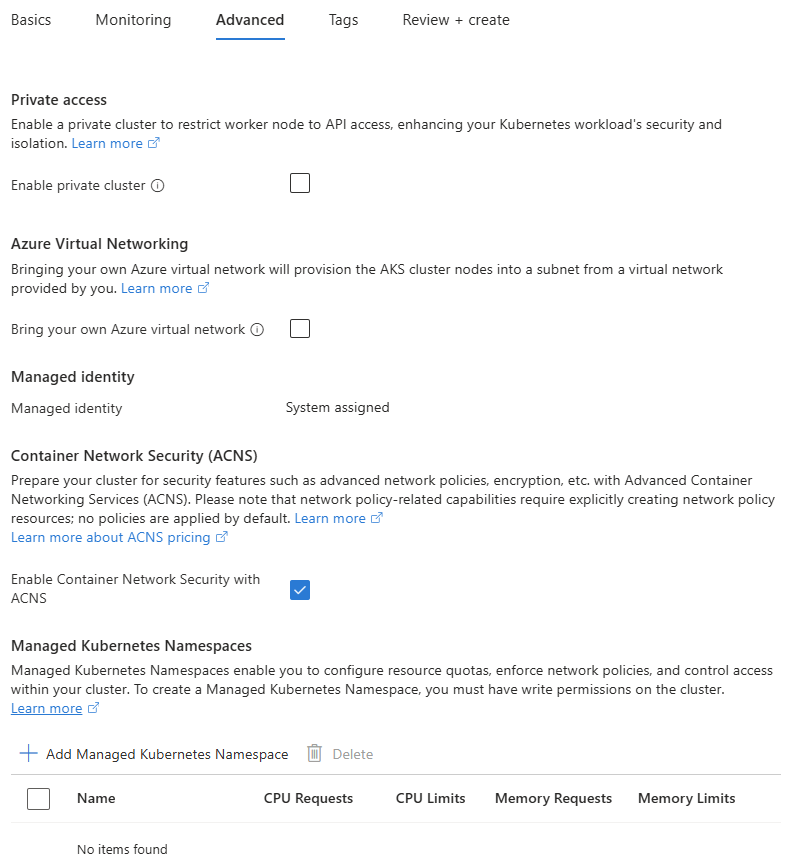
請在 「檢視 + 建立 」標籤中檢視設定,然後選擇 「建立 」來部署 AKS 自動叢集。
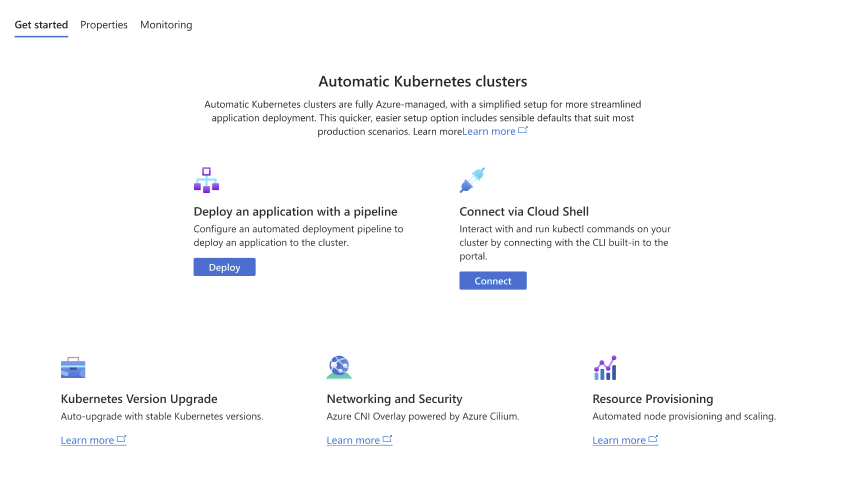
從 GitHub 開始設定你的第一個應用程式,並設定自動化部署流程。
檢閱 Bicep 檔案
以下 Bicep 檔案定義了 AKS 自動叢集:
@description('The name of the managed cluster resource.')
param clusterName string = 'myAKSAutomaticCluster'

@description('The location of the managed cluster resource.')
param location string = resourceGroup().location

resource aks 'Microsoft.ContainerService/managedClusters@2026-02-01' ' = {
  name: clusterName
  location: location
  sku: {
    name: 'Automatic'
  }
  identity: {
    type: 'SystemAssigned'
  }
}
欲了解更多關於 Bicep 檔案中定義的資源資訊,請參閱 Microsoft.ContainerService/managedClusters 參考資料。
部署 Bicep 檔案
將Bicep檔案儲存為 main.bicep 到你本地的電腦。
這很重要
Bicep 檔案將
clusterName參數設為字串 myAKSAutomaticCluster。 如果您想要使用不同的叢集名稱,請務必先將字串更新為您慣用的叢集名稱,再將檔案儲存到您的電腦。使用 [
az deployment group create][az-deployment-group-create] 指令部署 Bicep 檔案。az deployment group create --resource-group myResourceGroup --template-file main.bicep建立 AKS 叢集需要幾分鐘的時間。 請等到叢集成功部署後,再移至下一個步驟。
檢視 Terraform 程式碼
備註
本文的範例程式代碼位於 Azure Terraform GitHub 存放庫中。 您可以查看包含目前及先前版本的 Terraform 測試結果的日誌檔。
建立一個目錄來測試範例 Terraform 程式碼,並將其設為目前的目錄。
建立名為
providers.tf的檔案,並插入下列程式碼:terraform { required_version = ">= 1.0" required_providers { azurerm = { source = "hashicorp/azurerm" version = "~>5.0" } random = { source = "hashicorp/random" version = "~>3.0" } } } provider "azurerm" { features {} }建立一個名為
main.tf檔案的檔案,並加入以下程式碼:# Create a random name for the resource group using random_pet resource "random_pet" "rg_name" { prefix = var.resource_group_name_prefix } # Create a resource group using the generated random name resource "azurerm_resource_group" "rg" { location = var.resource_group_location name = random_pet.rg_name.id } # Create a random name for the AKS Automatic cluster resource "random_pet" "cluster_name" { prefix = var.cluster_name_prefix } # Create the AKS Automatic cluster resource "azurerm_kubernetes_automatic_cluster" "aks_automatic" { name = random_pet.cluster_name.id location = azurerm_resource_group.rg.location resource_group_name = azurerm_resource_group.rg.name identity { type = "SystemAssigned" } }建立一個名為
variables.tf檔案的檔案,並加入以下程式碼:variable "resource_group_location" { type = string default = "westus2" description = "Location of the resource group." } variable "resource_group_name_prefix" { type = string default = "rg" description = "Prefix of the resource group name that's combined with a random ID so name is unique in your Azure subscription." } variable "cluster_name_prefix" { type = string default = "aks-automatic" description = "Prefix of the AKS Automatic cluster name that's combined with a random ID so the name is unique in your Azure subscription." }建立名為
outputs.tf的檔案,並插入下列程式碼:output "resource_group_name" { value = azurerm_resource_group.rg.name } output "cluster_name" { value = azurerm_kubernetes_automatic_cluster.aks_automatic.name } output "cluster_id" { value = azurerm_kubernetes_automatic_cluster.aks_automatic.id } output "node_resource_group_id" { value = azurerm_kubernetes_automatic_cluster.aks_automatic.node_resource_group_id } output "fully_qualified_domain_name" { value = azurerm_kubernetes_automatic_cluster.aks_automatic.fully_qualified_domain_name }
初始化 Terraform
執行 terraform init 來初始化 Terraform 部署。 此指令會下載管理 Azure 資源所需的 Azure 提供者。
terraform init -upgrade
建立 Terraform 執行計畫
執行 terraform plan 以建立執行計畫。
terraform plan -out main.tfplan
套用 Terraform 的執行計畫
執行terraform apply指令將執行計劃套用至您的雲端基礎設施。
terraform apply main.tfplan
建立 AKS 自動叢集需要數分鐘完成。
驗證叢集
取得 Azure 資源群組名稱和叢集名稱。
resource_group_name=$(terraform output -raw resource_group_name)
cluster_name=$(terraform output -raw cluster_name)
執行 az aks show 顯示叢集並確認它使用
AutomaticSKU。az aks show --resource-group $resource_group_name --name $cluster_name --query "{name:name, sku:sku, provisioningState:provisioningState}"
連接至叢集
若要管理 Kubernetes 叢集,請使用 Kubernetes 命令列用戶端 kubectl。 如果你用Azure Cloud Shell,kubectl 已經安裝好了。 你可以用這個kubectl指令在本地安裝az aks install-cli。 AKS Automatic 叢集是使用適用於 Kubernetes 角色型存取控制 (RBAC) 的 Microsoft Entra ID 進行設定。
備註
當你使用 Azure CLI 建立叢集時,使用者會被 指派內建角色 用於 Azure Kubernetes Service RBAC Cluster Admin。
使用
kubectl命令,設定az aks get-credentials連線到 Kubernetes 叢集。 此命令會下載認證,並設定 Kubernetes CLI 來使用這些認證。az aks get-credentials --resource-group myResourceGroup --name myAKSAutomaticCluster
使用
kubectl指令設定az aks get-credentials,使其連線到你的 Kubernetes 叢集。 此命令會下載認證,並設定 Kubernetes CLI 來使用這些認證。az aks get-credentials --resource-group $resource_group_name --name $cluster_name
使用
kubectl get命令確認叢集的連線。 此命令會傳回叢集節點的清單。kubectl get nodes以下範例輸出展示了你如何被要求登入:
To sign in, use a web browser to open the page https://microsoft.com/devicelogin and enter the code AAAAAAAAA to authenticate.登入後,以下範例輸出會顯示受管理系統的節點池。 確定節點的狀態為就緒。
NAME                           STATUS   ROLES    AGE   VERSION
aks-hostedpool-16652789-vms1   Ready    <none>   19m   v1.34.7
aks-hostedpool-16652789-vms2   Ready    <none>   19m   v1.34.7
aks-hostedpool-16652789-vms3   Ready    <none>   19m   v1.34.7
aks-system-surge-zq4d2         Ready    <none>   19m   v1.34.7
部署應用程式
要部署應用程式,你使用清單檔案建立執行 AKS Store 應用程式所需的所有物件。 Kubernetes 資訊清單檔會定義叢集所需的狀態,例如要執行哪些容器映像。 資訊清單包含下列 Kube 部署和服務:
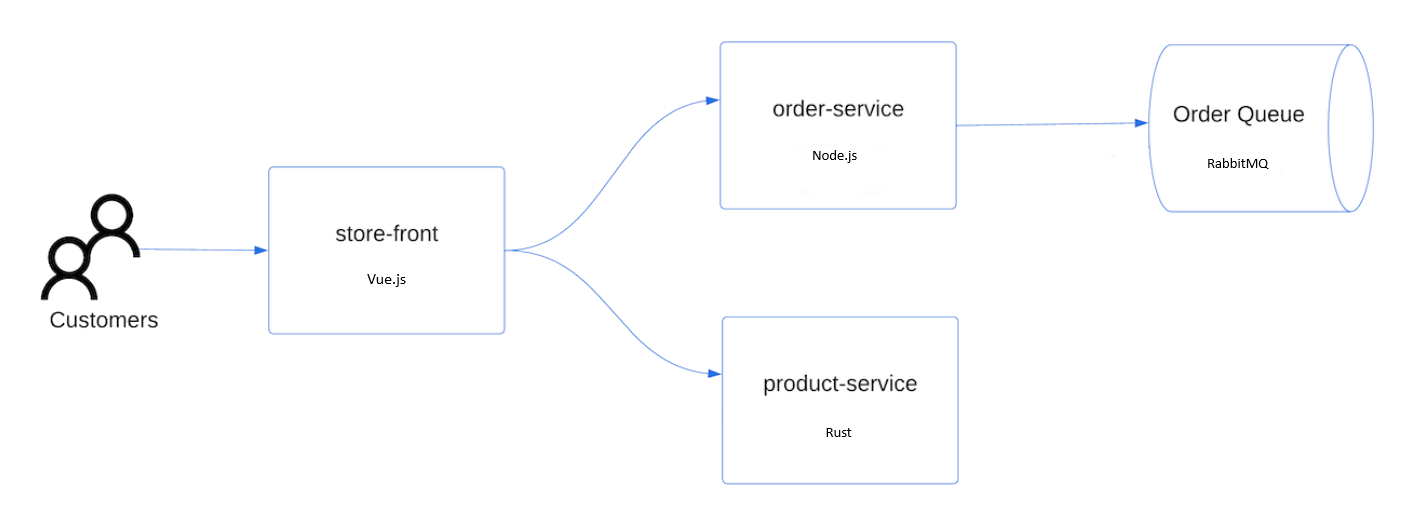
- 市集前端:供客戶檢視產品和下單的 Web 應用程式。
- 產品服務:顯示產品資訊。
- 訂單服務:下單。
- Rabbit MQ:訂單佇列的訊息佇列。
備註
除非是針對生產環境的永續性儲存體,否則不建議執行具狀態容器,例如 Rabbit MQ。 這裡為了簡化使用這些服務,但我們建議使用管理服務,例如 Azure Cosmos DB 或 Azure 服務匯流排。
建立命名空間
aks-store-demo以部署 Kube 資源。kubectl create ns aks-store-demo使用
kubectl apply命令將應用程式部署至aks-store-demo命名空間。 定義部署的 YAML 檔案位於 GitHub。kubectl apply -n aks-store-demo -f https://raw.githubusercontent.com/Azure-Samples/aks-store-demo/main/aks-store-ingress-quickstart.yaml下列輸出範例會顯示部署和服務:
statefulset.apps/rabbitmq created
configmap/rabbitmq-enabled-plugins created
service/rabbitmq created
deployment.apps/order-service created
service/order-service created
deployment.apps/product-service created
service/product-service created
deployment.apps/store-front created
service/store-front created
ingress/store-front created
測試應用程式
執行應用程式時,Kubernetes 服務會向網際網路公開前端應用程式。 此程序需要數分鐘的時間完成。
使用 kubectl get pods 命令檢視已部署 Pod 的狀態。 請先確認全部 Pod 都是
Running後再繼續進行。 如果這是您第一個部署的工作負載,節點自動佈建可能需要幾分鐘才能建立節點集區,以執行這些 Pod。kubectl get pods -n aks-store-demo檢查市集前端應用程式的公用 IP 位址。 使用 kubectl get service 命令搭配
--watch引數來監視進度。kubectl get ingress store-front -n aks-store-demo --watch服務的
store-front輸出一開始會顯示空白:NAME CLASS HOSTS ADDRESS PORTS AGE store-front webapprouting.kubernetes.azure.com * 80 12m當 ADDRESS 位址從空白變成實際的公用 IP 位址時,請使用
CTRL-C停止kubectl監看式流程。下列輸出範例會顯示已指派給服務的有效公用 IP 位址:
NAME          CLASS                                HOSTS   ADDRESS        PORTS   AGE
store-front   webapprouting.kubernetes.azure.com   *       4.255.22.196   80      12m
打開瀏覽器到你入口的外部 IP 位址,就能看到 Azure Store 應用程式的運作。


刪除叢集
如果你不打算做AKS教學,請清理不必要的資源以避免Azure費用。
使用 az group delete 命令移除資源群組、容器服務和所有相關資源。
az group delete --name myResourceGroup --yes --no-wait
備註
在本快速入門中,是以系統指派的受控識別 (預設身分識別選項) 來建立 AKS 叢集。 平台會管理這個身分識別,您不需要手動移除它。
當你不再需要用 Terraform 建立的資源時,執行 Terraform 計畫並指定該標記。destroy
terraform plan -destroy -out main.destroy.tfplan
執行 terraform apply 來應用執行計劃。
terraform apply main.destroy.tfplan
相關內容
在本快速入門中,您已使用 AKS Automatic 部署 Kubernetes 叢集,接著將簡單多容器應用程式部署到此叢集。 這個範例應用程式僅供示範之用,並不代表 Kube 應用程式的全部最佳做法。 如需針對生產使用 AKS 建立完整解決方案的指引,請參閱 AKS 解決方案指引。
欲了解更多 AKS Automatic 的資訊,請參閱 Azure Kubernetes Service (AKS) Automatic 簡介