使用 GitHub Actions 在 API 中心註冊 API
本文說明如何在將 API 規格檔案新增至 GitHub 存放庫時,設定基本的 GitHub Actions 工作流程,以在組織的 API 中心註冊 API。
使用 GitHub Actions 工作流程在 API 中心註冊 API,可為每個新的或更新的 API 提供一致且可重複的 CI/CD 流程。 您可以擴充工作流程,以包含將中繼資料新增至 API 註冊等步驟。
下圖顯示如何使用 GitHub Actions 工作流程自動化 API 中心的 API 註冊。
- 在您的存放庫中設定 GitHub Actions 工作流程,以在合併新增 API 定義檔案的提取要求時觸發。
- 從 GitHub 存放庫中的主分支建立分支。
- 新增 API 定義檔案、認可變更,並將其推送至新的分支。
- 建立提取要求,以將新分支合併至主分支。
- 合併提取要求。
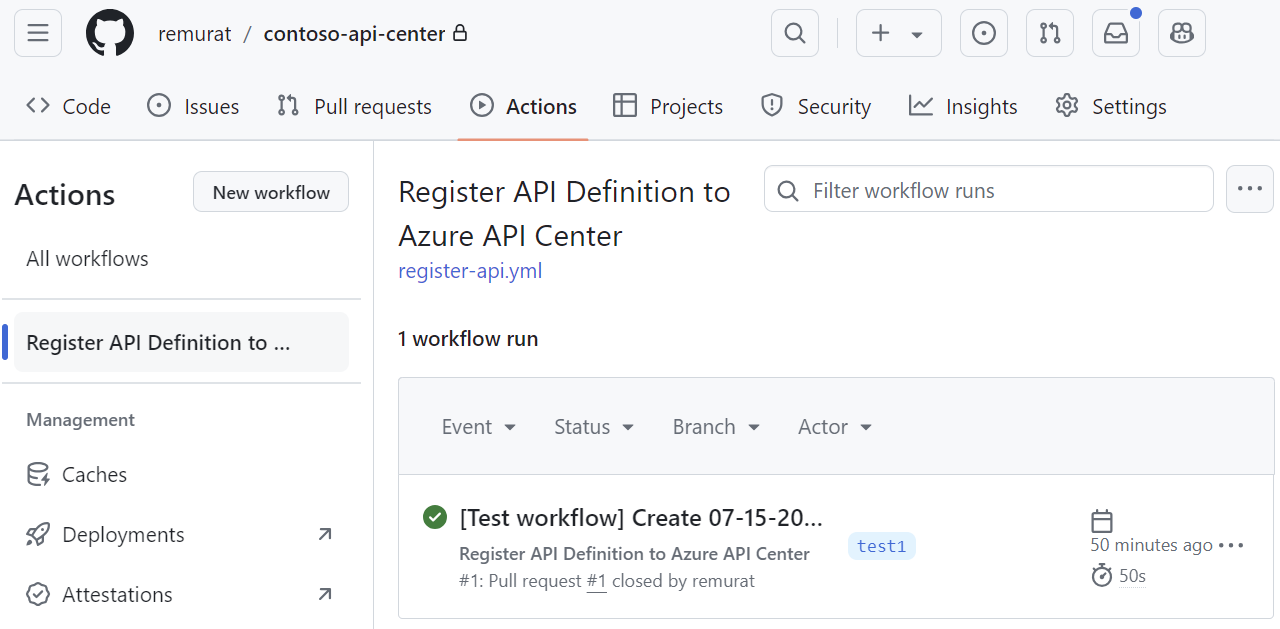
- 合併會觸發 GitHub Actions 工作流程,以在您的 API 中心註冊 API。
必要條件
Azure 訂用帳戶中的 API 中心。 如果您尚未建立,請參閱快速入門:建立您的 API 中心。
在 Microsoft Entra ID 租用戶中建立服務主體的權限
GitHub 帳戶和 GitHub 存放庫,您可以在其中設定祕密和 GitHub Actions 工作流程
對於 Azure CLI:
在 Azure Cloud Shell 中使用 Bash 環境。 如需詳細資訊,請參閱 Azure Cloud Shell 中的 Bash 快速入門。
若要在本地執行 CLI 參考命令,請安裝 Azure CLI。 若您在 Windows 或 macOS 上執行,請考慮在 Docker 容器中執行 Azure CLI。 如需詳細資訊,請參閱〈如何在 Docker 容器中執行 Azure CLI〉。
如果您使用的是本機安裝,請使用 az login 命令,透過 Azure CLI 來登入。 請遵循您終端機上顯示的步驟,完成驗證程序。 如需其他登入選項,請參閱使用 Azure CLI 登入。
出現提示時,請在第一次使用時安裝 Azure CLI 延伸模組。 如需擴充功能詳細資訊,請參閱使用 Azure CLI 擴充功能。
執行 az version 以尋找已安裝的版本和相依程式庫。 若要升級至最新版本,請執行 az upgrade。
注意
az apic命令需要apic-extensionAzure CLI 延伸模組。 如果您尚未使用az apic命令,則可以在執行第一個az apic命令時動態安裝延伸模組,也可以手動安裝延伸模組。 深入了解 Azure CLI 延伸模組。如需
apic-extension中的最新變更和更新,請參閱版本資訊。注意
本文中的 Azure CLI 命令範例可在 PowerShell 或 Bash 殼層中執行。 若因變數語法不同而有需要,可參考為兩個殼層提供的個別命令範例。
建立 GitHub Actions 工作流程
在本節中,您會為此案例設定 GitHub Actions 工作流程:
- 建立服務主體以用於工作流程中的 Azure 認證。
- 將認證新增為 GitHub 存放庫中的祕密。
- 設定 GitHub Actions 工作流程,以在合併新增 API 定義檔案的提取要求時觸發。 工作流程 YAML 檔案包含使用 Azure CLI 從定義檔案在您的 API 中心註冊 API 的步驟。
設定服務主體祕密
在下列步驟中,建立 Microsoft Entra ID 服務主體,這會用來將認證新增至工作流程,以向 Azure 進行驗證。
注意
設定服務主體是基於示範目的而顯示。 使用 Azure 進行 GitHub Actions 驗證的建議方式是使用 OpenID Connect,這是使用短期權杖的驗證方法。 使用 GitHub Actions 設定 OpenID Connect 是更複雜的作法,但安全性更高。 深入了解
使用 az ad sp create-for-rbac 命令建立服務主體。 下列範例會先使用 az apic show 命令來擷取 API 中心的資源識別碼。 接著會使用 API 中心的參與者角色來建立服務主體。
#! /bin/bash
apiCenter=<api-center-name>
resourceGroup=<resource-group-name>
spName=<service-principal-name>

apicResourceId=$(az apic show --name $apiCenter --resource-group $resourceGroup --query "id" --output tsv)

az ad sp create-for-rbac --name $spName --role Contributor --scopes $apicResourceId --json-auth
複製 JSON 輸出,它看起來應類似下列項目:
{
  "clientId": "<GUID>",
  "clientSecret": "<GUID>",
  "subscriptionId": "<GUID>",
  "tenantId": "<GUID>",
  "activeDirectoryEndpointUrl": "https://login.microsoftonline.com",
  "resourceManagerEndpointUrl": "https://management.azure.com/",
  [...other endpoints...]
}
將服務主體新增為 GitHub 祕密
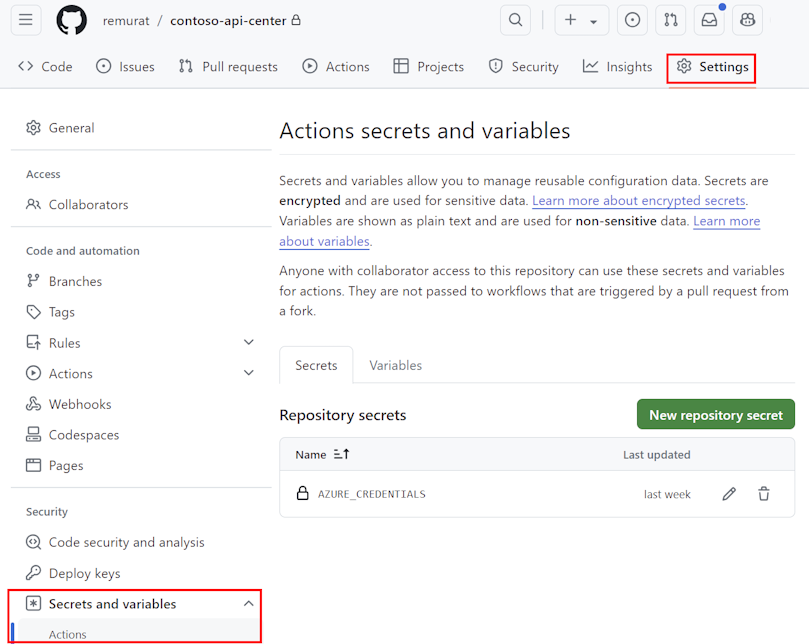
在 GitHub 中,瀏覽您的存放庫。 選取設定。
在 [安全性] 底下 ,選取 [祕密和變數]>[動作]
選取 [新增存放庫祕密]。
將得自 Azure CLI 命令的整個 JSON 輸出貼到祕密的 [值] 欄位中。 將祕密命名為
AZURE_CREDENTIALS。 選取 [新增祕密]。祕密會列在 [存放庫祕密] 底下。
當您稍後設定 GitHub 工作流程檔案時,會將祕密用於 Azure/登入動作的輸入 creds。 例如:
- uses: azure/login@v1
  with:
    creds: ${{ secrets.AZURE_CREDENTIALS }}
將工作流程檔案新增至 GitHub 存放庫
GitHub Actions 工作流程是由 YAML (.yml) 定義檔案來表示。 此定義包含組成工作流程的各種步驟與參數。 深入了解
以下是此範例的基本工作流程檔案,可供您使用或修改。
在此範例中:
- 當在主分支上關閉在
APIs路徑中新增 JSON 定義的提取要求時,就會觸發工作流程。 - 定義的位置會使用 GitHub 指令碼從提取要求擷取,此指令碼會使用預設 GitHub 權杖進行驗證。
- 儲存在存放庫中的 Azure 認證可用來登入 Azure。
- az apic register 命令會在環境變數中指定的 API 中心註冊 API。
若要設定工作流程檔案:
- 複製檔案並以
register-api.yml等名稱儲存。 - 更新環境變數的值,以符合您在 Azure 中的 API 中心。
- 確認或更新您要在其中新增 API 定義檔案的存放庫資料夾 (
APIs) 名稱。 - 在 GitHub 存放庫的
/.github/workflows/路徑中新增此工作流程檔案。
提示
使用適用於 Azure API 中心的 Visual Studio Code 延伸模組,您可以執行延伸模組命令來產生起始的工作流程檔案。 在 [命令選擇區] 中,選取 [Azure API 中心:註冊 API]。 選取 [CI/CD]>[GitHub]。 然後,您可以修改案例的檔案。
name: Register API Definition to Azure API Center
on:
  pull_request:
    types: [closed]
    branches:
      - main
    paths:
      - "APIs/**/*.json"
permissions:
  contents: read
  pull-requests: read
env:
  # set this to your Azure API Center resource group name
  RESOURCE_GROUP: <YOUR_RESOURCE_GROUP>
  # set this to your Azure API Center service name
  SERVICE_NAME: <YOUR_API_CENTER>
jobs:
  register:
    runs-on: ubuntu-latest
    environment: production
    steps:
      - uses: actions/checkout@v2

      - name: Get specification file path in the PR
        id: get-file-location
        uses: actions/github-script@v5
        with:
          github-token: ${{ secrets.GITHUB_TOKEN }}
          script: |
            const pull_number = context.payload.pull_request.number;
            const owner = context.repo.owner;
            const repo = context.repo.repo;
            const files = await github.rest.pulls.listFiles({
              owner,
              repo,
              pull_number
            });
            if (files.data.length === 1) {
              const filename = files.data[0].filename;
              core.exportVariable('API_FILE_LOCATION', hfilename);
              console.log(`API_FILE_LOCATION: ${{ env.API_FILE_LOCATION }}`);
            }
            else {
              console.log('The PR does not add exactly one specification file.');
            }
      - name: Azure login
        uses: azure/login@v1
        with:
          creds: ${{ secrets.AZURE_CREDENTIALS }}

      - name: Register to API Center
        uses: azure/CLI@v2
        with:
          azcliversion: latest
          inlineScript: |
            az apic api register -g ${{ env.RESOURCE_GROUP }} -n ${{ env.SERVICE_NAME }} --api-location ${{ env.API_FILE_LOCATION }}
將 API 定義檔案新增至存放庫
將 API 定義檔案新增至存放庫,以測試工作流程。 請遵循這些開發工作流程的典型概略步驟。 如需使用 GitHub 分支的詳細資料,請參閱 GitHub 文件。
從存放庫中的主分支建立新的工作分支。
將 API 定義檔案新增至
APIs路徑中的存放庫。 例如:APIs/catfacts-api/07-15-2024.json。認可變更,並將其推送至工作分支。
建立提取要求,將工作分支合併到主分支。
檢閱之後,請合併提取要求。 合併會觸發 GitHub Actions 工作流程,以在您的 API 中心註冊 API。

確認 API 註冊
確認 API 已在您的 API 中心註冊。
- 在 Azure 入口網站中,瀏覽至您的 API 中心。
- 在左側功能表中的 [資產] 底下,選取 [API]。
- 確認新註冊的 API 出現在 API 的清單中。

新增 API 版本
若要在 API 中心將新版本新增至現有的 API,請遵循上述步驟,並稍微修改:
- 變更為存放庫中的相同工作分支,或建立新的工作分支。
- 將新的 API 定義檔案新增至
APIs路徑下現有 API 資料夾中的存放庫。 例如,如果您先前已新增 Cat Facts API 定義,請新增新的版本,例如APIs/catfacts-api/07-22-2024.json。 - 認可變更,並將其推送至工作分支。
- 建立提取要求,將工作分支合併到主分支。
- 檢閱之後,請合併提取要求。 合併會觸發 GitHub Actions 工作流程,以在您的 API 中心註冊新的 API 版本。
- 在 Azure 入口網站中,瀏覽至您的 API 中心,並確認已註冊新版本。
擴充案例
您可以擴充 GitHub Actions 工作流程以包含其他步驟,例如新增 API 註冊的中繼資料。 例如:
在 API 中心使用中繼資料結構描述,建立中繼資料 JSON 檔案,以將中繼資料值套用至 API 註冊。
例如,如果中繼資料結構描述包含如
approver、team和cost center的屬性,則中繼資料 JSON 檔案看起來可能會像這樣:{ "approver": "diego@contoso.com", "team": "Store API dev team", "costCenter": "12345" }在存放庫中每個 API 的資料夾中上傳中繼資料 JSON 檔案。
新增工作流程步驟,以使用 az apic api update 命令將中繼資料套用至 API 註冊。 在下列範例中,API 識別碼和中繼資料檔案會以環境變數傳遞,而環境變數會在工作流程檔案中的其他位置設定。
[...]
- name: Apply metadata to API in API Center
    uses: azure/CLI@v2
    with:
      azcliversion: latest
      inlineScript: |
        az apic api update -g ${{ env.RESOURCE_GROUP }} -n ${{ env.SERVICE_NAME }} --api-id {{ env.API_ID }} --custom-properties {{ env.METADATA_FILE }}

