針對 Azure 自動化帳戶使用系統指派的受控識別
本文說明如何為 Azure 自動化帳戶啟用系統指派的受控識別,以及如何將其用來存取其他資源。 如需受控識別如何搭配 Azure 自動化使用的詳細資訊,請參閱受控識別。
如果您沒有 Azure 訂用帳戶,請在開始前建立免費帳戶。
必要條件
Azure 自動化帳戶。 如需相關指示,請參閱建立 Azure 自動化帳戶。
最新版 Az PowerShell 模組 Az.Accounts、Az.Resources、Az.Automation、Az.KeyVault。
您想要從自動化 Runbook 存取的 Azure 資源。 此資源必須針對受控識別定義角色,以協助自動化 Runbook 驗證資源的存取權限。 若要新增角色,您必須是對應 Microsoft Entra 租用戶中資源的擁有者。
如果您想要使用受控識別執行混合式作業,請將代理程式型混合式 Runbook 背景工作角色更新為最新版本。 擴充型混合式 Runbook 背景工作角色沒有最低版本要求,所有版本都可以運行。 代理程式型混合式背景工作角色要求最低版本為:
- Windows 混合式 Runbook 背景工作角色:7.3.1125.0 版
- Linux 混合式 Runbook 背景工作角色:1.7.4.0 版
若要檢查版本:
- Windows 混合式 Runbook 背景工作角色:移至安裝路徑 -
C:\ProgramFiles\Microsoft Monitoring Agent\Agent\AzureAutomation\.,而資料夾 Azure 自動化包含版本號碼作為子資料夾名稱的子資料夾。 - Linux 混合式 Runbook 背景工作角色:移至路徑 -
vi/opt/microsoft/omsconfig/modules/nxOMSAutomationWorker/VERSION.,而檔案 VERSION 具有混合式背景工作角色的版本號碼。
若要指派 Azure 角色,您必須擁有
Microsoft.Authorization/roleAssignments/write權限,例如使用者存取系統管理員或擁有者。
針對 Azure 自動化帳戶啟用系統指派的受控識別
啟用之後,下列屬性會指派給系統指派的受控識別。
| Property (JSON) | 值 | Description |
|---|---|---|
| principalid | <principal-ID> | 系統指派的受控識別之服務主體物件的全域唯一識別碼 (GUID),代表 Microsoft Entra 租用戶中的自動化帳戶。 此 GUID 有時候會顯示為「物件識別碼」或 objectID。 |
| tenantid | <Azure-AD-tenant-ID> | 全域唯一識別碼 (GUID),代表自動化帳戶現在已是其成員的 Microsoft Entra 租用戶。 在 Microsoft Entra 租用戶中,服務主體會有與自動化帳戶相同的名稱。 |
您可以使用 Azure 入口網站、PowerShell、Azure REST API 或 ARM 範本,為 Azure 自動化帳戶啟用系統指派的受控識別。 如需涉及 PowerShell 的範例,請先使用 Connect-AzAccount Cmdlet 以互動方式登入 Azure,並遵循指示。
# Sign in to your Azure subscription
$sub = Get-AzSubscription -ErrorAction SilentlyContinue
if(-not($sub))
{
    Connect-AzAccount
}

# If you have multiple subscriptions, set the one to use
# Select-AzSubscription -SubscriptionId "<SUBSCRIPTIONID>"
然後初始化將在整個範例中使用的一組變數。 修改下方的值,然後執行。
$subscriptionID = "subscriptionID"
$resourceGroup = "resourceGroupName"
$automationAccount = "automationAccountName"
重要
新的自動化帳戶層級身分識別會覆寫任何先前 VM 層級系統指派的身分識別,如搭配受控識別使用 Runbook 驗證中所述。 如果您在使用 VM 系統指派的身分識別來存取 Runbook 資源的 Azure VM 上執行混合式工作,則自動化帳戶身分識別將用於混合式工作。 這表示如果您已使用自動化帳戶的客戶自控金鑰 (CMK) 功能,則現有的工作執行可能會受到影響。
如果您想要繼續使用 VM 的受控識別,則不應該啟用自動化帳戶層級身分識別。 如果您已經啟用,則可以停用自動化帳戶系統指派的受控識別。 請參閱停用Azure 自動化帳戶受控識別。
使用 Azure 入口網站啟用
執行下列步驟:
登入 Azure 入口網站。
在 Azure 入口網站中,瀏覽至您的自動化帳戶。
在 [帳戶設定] 底下,選取 [身分識別]。
將 [系統指派] 選項設定為 [開啟],然後按 [儲存]。 系統提示您確認時,選取 [是]。
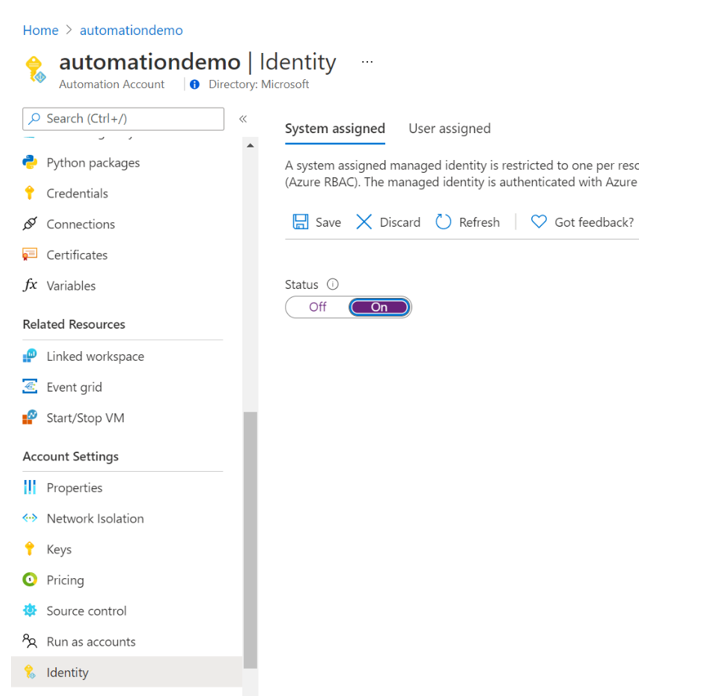
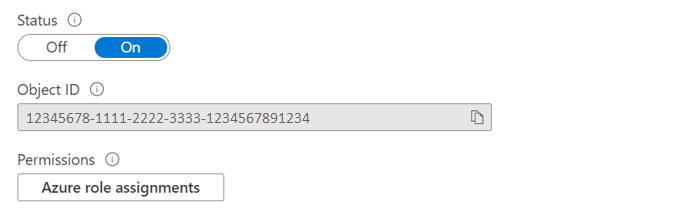
您的自動化帳戶現在可以使用系統指派的身分識別,其會使用 Microsoft Entra ID 註冊,並以物件識別碼表示。
使用 PowerShell 啟用
使用 PowerShell Cmdlet Set-AzAutomationAccount 來啟用系統指派的受控識別。
$output = Set-AzAutomationAccount `
    -ResourceGroupName $resourceGroup `
    -Name $automationAccount `
    -AssignSystemIdentity

$output
輸出應如下所示:
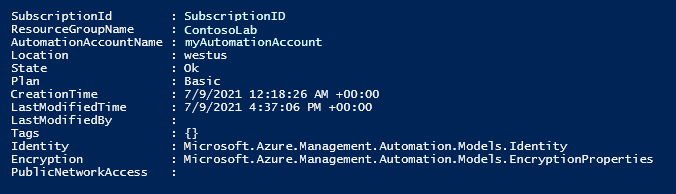
如需其他輸出,請修改範例以指定:$output.identity | ConvertTo-Json。
使用 REST API 啟用
以下提供語法和範例步驟。
語法
下方本文語法會使用 HTTP PATCH 方法,將系統指派的受控識別啟用至現有的自動化帳戶。 不過,此語法將會移除任何與自動化帳戶相關聯的現有使用者指派的受控識別。
{
 "identity": {
   "type": "SystemAssigned"
  }
}
如果已定義多個使用者指派的身分識別,若要保留這些身分識別,而只移除系統指派的身分識別,必須使用逗號分隔清單來指定每個使用者指派的身分識別。 下方範例使用 HTTP PATCH 方法。
{
  "identity" : {
    "type": "SystemAssigned, UserAssigned",
    "userAssignedIdentities": {
        "/subscriptions/00000000-0000-0000-0000-000000000000/resourceGroups/resourceGroupName/providers/Microsoft.ManagedIdentity/userAssignedIdentities/cmkID": {},
        "/subscriptions/00000000-0000-0000-0000-000000000000/resourceGroups/resourceGroupName/providers/Microsoft.ManagedIdentity/userAssignedIdentities/cmkID2": {}
    }
  }
}
API 的語法如下:
PATCH https://management.azure.com/subscriptions/00000000-0000-0000-0000-000000000000/resourceGroups/resource-group-name/providers/Microsoft.Automation/automationAccounts/automation-account-name?api-version=2020-01-13-preview
範例
執行下列步驟。
將本文語法複製並貼到名為 的
body_sa.json檔案中。 將檔案儲存在本機電腦或 Azure 儲存體帳戶中。更新下方的變數值,然後執行。
$file = "path\body_sa.json"此範例會使用 PowerShell Cmdlet Invoke-RestMethod 將 PATCH 要求傳送至您的自動化帳戶。
# build URI
$URI = "https://management.azure.com/subscriptions/$subscriptionID/resourceGroups/$resourceGroup/providers/Microsoft.Automation/automationAccounts/$automationAccount`?api-version=2020-01-13-preview"

# build body
$body = Get-Content $file

# obtain access token
$azContext = Get-AzContext
$azProfile = [Microsoft.Azure.Commands.Common.Authentication.Abstractions.AzureRmProfileProvider]::Instance.Profile
$profileClient = New-Object -TypeName Microsoft.Azure.Commands.ResourceManager.Common.RMProfileClient -ArgumentList ($azProfile)
$token = $profileClient.AcquireAccessToken($azContext.Subscription.TenantId)
$authHeader = @{
    'Content-Type'='application/json'
    'Authorization'='Bearer ' + $token.AccessToken
}

# Invoke the REST API
$response = Invoke-RestMethod -Uri $URI -Method PATCH -Headers $authHeader -Body $body

# Review output
$response.identity | ConvertTo-Json
輸出應如下所示:
{
    "PrincipalId":  "aaaaaaaa-aaaa-aaaa-aaaa-aaaaaaaaaaaa",
    "TenantId":  "bbbbbbbb-bbbb-bbbb-bbbb-bbbbbbbbbbbb",
    "Type":  0,
    "UserAssignedIdentities":  null
}
使用 ARM 範本啟用
以下提供語法和範例步驟。
範本語法
下方範例範本語法會將系統指派的受控識別啟用至現有的自動化帳戶。 不過,此語法將會移除任何與自動化帳戶相關聯的現有使用者指派的受控識別。
{
  "$schema": "https://schema.management.azure.com/schemas/2019-04-01/deploymentTemplate.json#",
  "contentVersion": "1.0.0.0",
  "resources": [
    {
      "type": "Microsoft.Automation/automationAccounts",
      "apiVersion": "2020-01-13-preview",
      "name": "yourAutomationAccount",
      "location": "[resourceGroup().location]",
      "identity": {
        "type": "SystemAssigned"
        },
      "properties": {
        "sku": {
          "name": "Basic"
        }
      }
    }
  ]
}
範例
執行下列步驟。
修改上方範本的語法以使用您的自動化帳戶,並將其儲存至名為
template_sa.json的檔案。更新下方的變數值,然後執行。
$templateFile = "path\template_sa.json"使用 PowerShell Cmdlet New-AzResourceGroupDeployment 來部署範本。
New-AzResourceGroupDeployment `
    -Name "SystemAssignedDeployment" `
    -ResourceGroupName $resourceGroup `
    -TemplateFile $templateFile
此命令不會產生輸出;不過,您可以使用下方程式碼來確認:
(Get-AzAutomationAccount `
-ResourceGroupName $resourceGroup `
-Name $automationAccount).Identity | ConvertTo-Json
輸出看起來會類似於上方 REST API 範例所顯示的輸出。
將角色指派給系統指派的受控識別
自動化帳戶可以使用本身系統指派的受控識別來取得權杖,以存取其他受 Microsoft Entra ID 保護的資源 (如 Azure Key Vault)。 這些權杖並不代表任何應用程式的特定使用者。 相反地,這些權杖代表正在存取資源的應用程式。 例如在此情況中,權杖代表自動化帳戶。
在您可以使用系統指派的受控識別進行驗證之前,請先在您打算使用該身分識別的 Azure 資源上,設定該身分識別的存取權。 若要完成這項工作,請在目標 Azure 資源上將適當的角色指派給該身分識別。
請遵循最低權限的原則,並小心地僅指派執行 Runbook 所需的權限。 例如,如果只需要自動化帳戶才能啟動或停止 Azure VM,則指派給執行身分帳戶或受控識別的權限必須僅用於啟動或停止 VM。 同樣地,如果 Runbook 正在從 Blob 儲存體讀取,請指派唯讀權限。
下列範例使用 Azure PowerShell 來示範如何將訂用帳戶中的參與者角色指派給目標 Azure 資源。 參與者角色會作為範例使用,而且在您的案例中可能需要,也可能不需要。
New-AzRoleAssignment `
    -ObjectId <automation-Identity-object-id> `
    -Scope "/subscriptions/<subscription-id>" `
    -RoleDefinitionName "Contributor"
確認角色指派給系統管理的身分識別
若要向自動化帳戶的系統指派受控識別驗證角色,請遵循下列步驟:
登入 Azure 入口網站。
移至自動化帳戶。
在 [帳戶設定] 底下,選取 [身分識別]。
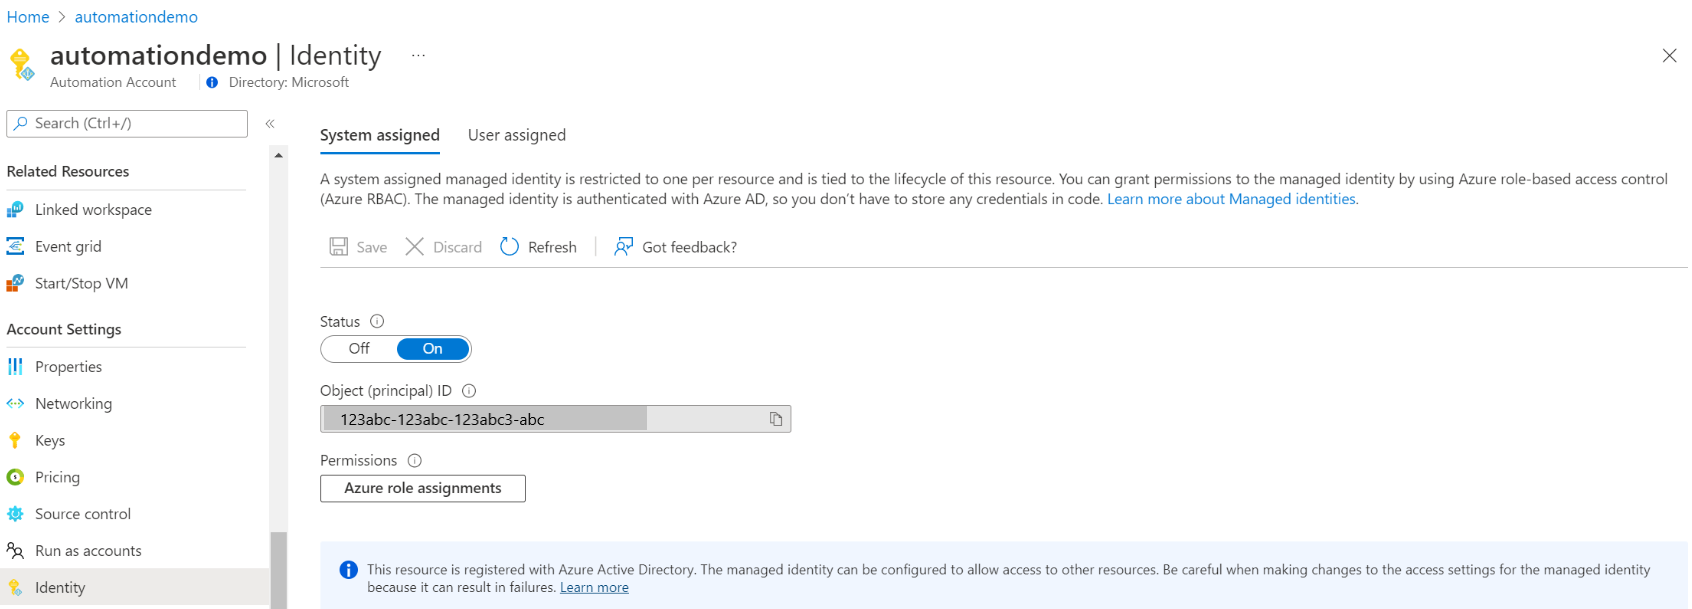
在 [權限] 下,按下 [Azure 角色指派]。
如果角色已指派給選取的系統指派的受控識別,您可以看到角色指派的清單。 此清單包含您擁有讀取權限的所有角色指派。
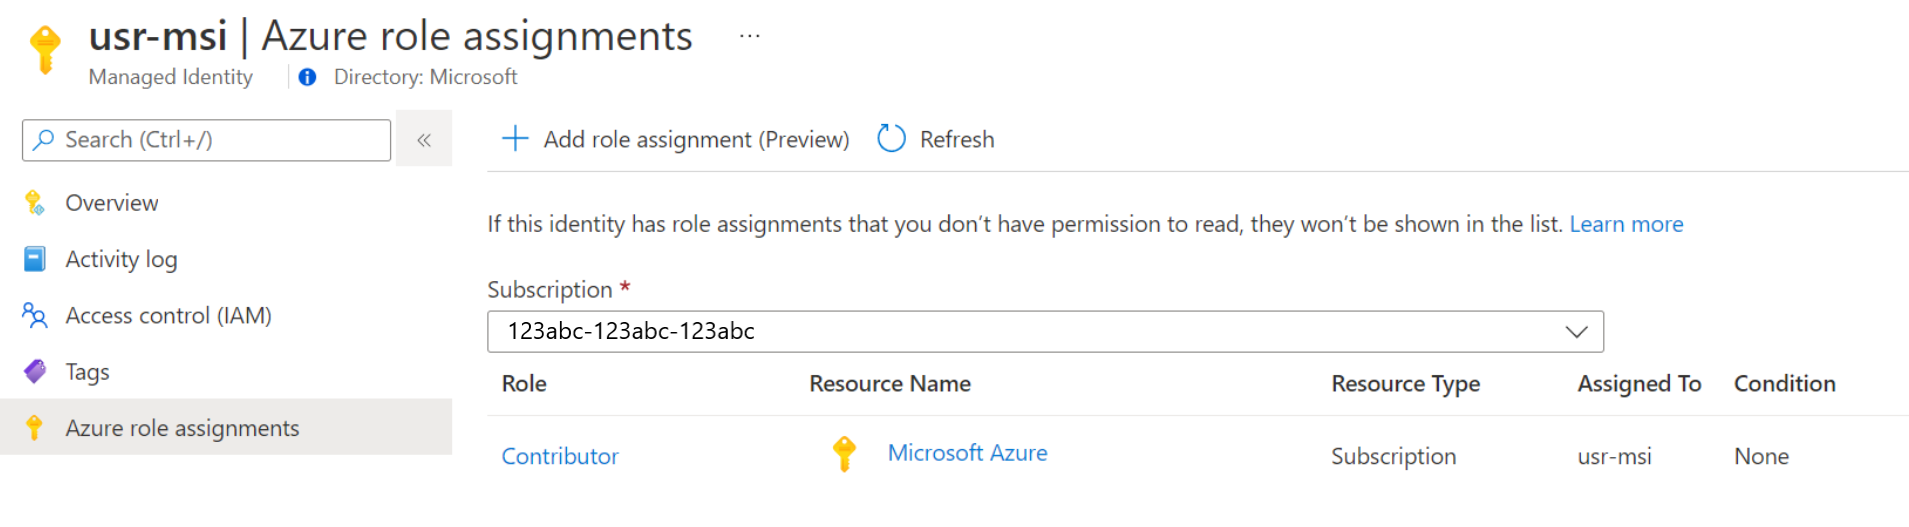
若要變更訂用帳戶,請按一下 [訂用帳戶] 下拉式清單,然後選取適當的訂用帳戶。
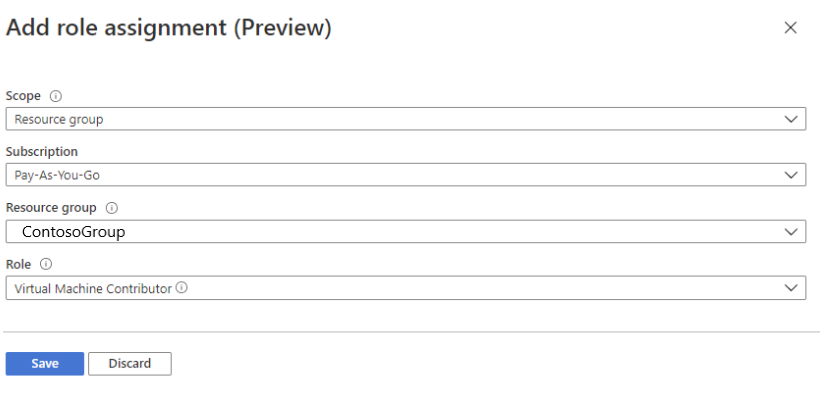
按一下 [新增角色指派 (預覽)]
在下拉式清單中,選取角色指派所套用的資源集 - [訂用帳戶]、[資源群組]、[角色] 和 [範圍]。 如果您沒有角色指派,則可以將所選範圍的寫入權限以內嵌訊息方式檢視。
在 [角色] 下拉式清單中選取角色作為 [虛擬機器參與者]。
按一下 [檔案] 。


幾分鐘後,受控識別將獲指派選取範圍中的角色。
使用系統指派的受控識別來驗證存取權
啟用自動化帳戶的受控識別,並提供目標資源的身分識別存取權之後,您可以針對支援受控識別的資源,在 Runbook 中指定該身分識別。 如需身分識別支援,請使用 Az Cmdlet Connect-AzAccount Cmdlet。 請參閱 PowerShell 參考中的 Connect-AzAccount。
# Ensures you do not inherit an AzContext in your runbook
Disable-AzContextAutosave -Scope Process

# Connect to Azure with system-assigned managed identity
$AzureContext = (Connect-AzAccount -Identity).context

# Set and store context
$AzureContext = Set-AzContext -SubscriptionName $AzureContext.Subscription -DefaultProfile $AzureContext
注意
如果您的組織仍在使用已被取代的 AzureRM Cmdlet,您可以使用 Connect-AzureRMAccount -Identity。
不使用 Azure Cmdlet 來產生存取權杖
針對 HTTP 端點,請確定下列各項。
- 中繼資料標頭必須存在,且應該設定為「true」。
- 資源必須連同要求一起傳遞,作為 GET 要求的查詢參數,以及 POST 要求的表單資料。
- 將環境變數 IDENTITY_HEADER 的值設定為 X-IDENTITY-HEADER。
- Post 要求的內容類型必須是 'application/x-www-form-urlencoded'。
使用 HTTP Get 取得系統指派的受控識別的存取權杖
$resource= "?resource=https://management.azure.com/"
$url = $env:IDENTITY_ENDPOINT + $resource
$Headers = New-Object "System.Collections.Generic.Dictionary[[String],[String]]"
$Headers.Add("X-IDENTITY-HEADER", $env:IDENTITY_HEADER)
$Headers.Add("Metadata", "True")
$accessToken = Invoke-RestMethod -Uri $url -Method 'GET' -Headers $Headers
Write-Output $accessToken.access_token
使用 HTTP Post 取得系統指派的身分識別的存取權杖
$url = $env:IDENTITY_ENDPOINT
$headers = New-Object "System.Collections.Generic.Dictionary[[String],[String]]"
$headers.Add("X-IDENTITY-HEADER", $env:IDENTITY_HEADER)
$headers.Add("Metadata", "True")
$body = @{resource='https://management.azure.com/' }
$accessToken = Invoke-RestMethod $url -Method 'POST' -Headers $headers -ContentType 'application/x-www-form-urlencoded' -Body $body
Write-Output $accessToken.access_token
在 Azure PowerShell 中使用系統指派的受控識別來存取 Azure Key Vault
如需詳細資訊,請參閱 Get-AzKeyVaultSecret。
Write-Output "Connecting to azure via  Connect-AzAccount -Identity"
Connect-AzAccount -Identity
Write-Output "Successfully connected with Automation account's Managed Identity"
Write-Output "Trying to fetch value from key vault using MI. Make sure you have given correct access to Managed Identity"
$secret = Get-AzKeyVaultSecret -VaultName '<KVname>' -Name '<KeyName>'

$ssPtr = [System.Runtime.InteropServices.Marshal]::SecureStringToBSTR($secret.SecretValue)
try {
  $secretValueText = [System.Runtime.InteropServices.Marshal]::PtrToStringBSTR($ssPtr)
    Write-Output $secretValueText
} finally {
    [System.Runtime.InteropServices.Marshal]::ZeroFreeBSTR($ssPtr)
}
在 Python Runbook 中使用系統指派的受控識別
#!/usr/bin/env python3
import os
import requests
# printing environment variables
endPoint = os.getenv('IDENTITY_ENDPOINT')+"?resource=https://management.azure.com/"
identityHeader = os.getenv('IDENTITY_HEADER')
payload={}
headers = {
  'X-IDENTITY-HEADER': identityHeader,
  'Metadata': 'True'
}
response = requests.request("GET", endPoint, headers=headers, data=payload)
print(response.text)
使用系統指派的受控識別來存取 SQL Database
如需佈建 Azure SQL 資料庫存取權的詳細資訊,請參閱佈建 Microsoft Entra 管理員 (SQL Database)。
$queryParameter = "?resource=https://database.windows.net/"
$url = $env:IDENTITY_ENDPOINT + $queryParameter
$Headers = New-Object "System.Collections.Generic.Dictionary[[String],[String]]"
$Headers.Add("X-IDENTITY-HEADER", $env:IDENTITY_HEADER)
$Headers.Add("Metadata", "True")
$content =[System.Text.Encoding]::Default.GetString((Invoke-WebRequest -UseBasicParsing -Uri $url -Method 'GET' -Headers $Headers).RawContentStream.ToArray()) | ConvertFrom-Json
$Token = $content.access_token
echo "The managed identities for Azure resources access token is $Token"
$SQLServerName = "<ServerName>"    # Azure SQL logical server name
$DatabaseName = "<DBname>"     # Azure SQL database name
Write-Host "Create SQL connection string"
$conn = New-Object System.Data.SqlClient.SQLConnection
$conn.ConnectionString = "Data Source=$SQLServerName.database.windows.net;Initial Catalog=$DatabaseName;Connect Timeout=30"
$conn.AccessToken = $Token
Write-host "Connect to database and execute SQL script"
$conn.Open()
$ddlstmt = "CREATE TABLE Person( PersonId INT IDENTITY PRIMARY KEY, FirstName NVARCHAR(128) NOT NULL)"
Write-host " "
Write-host "SQL DDL command"
$ddlstmt
$command = New-Object -TypeName System.Data.SqlClient.SqlCommand($ddlstmt, $conn)
Write-host "results"
$command.ExecuteNonQuery()
$conn.Close()
從現有的執行身分帳戶移轉至受控識別
Azure 自動化提供驗證,以使用執行身分帳戶管理在傳統部署模型上部署的 Azure Resource Manager 資源。 若要從執行身分帳戶切換至 Runbook 驗證的受控識別,請遵循下列步驟。
啟用 system-assigned、user-assigned,或這兩種類型的受控識別。
授與受控識別對符合指派執行身分帳戶之 Azure 資源的相同權限。
使用受控識別更新您的 Runbook 以進行驗證。
修改 Runbook 以使用受控識別。 如需身分識別支援,請使用 Az Cmdlet
Connect-AzAccountCmdlet。 請參閱 PowerShell 參考中的 Connect-AzAccount。- 如果您使用的是 AzureRM 模組,請將
AzureRM.Profile更新為最新版本,並使用Add-AzureRMAccountCmdlet 搭配Connect-AzureRMAccount –Identity加以取代。 - 如果您使用的是 Az 模組,請遵循更新 Azure PowerShell 模組一文中的步驟,更新為最新版本。
- 如果您使用的是 AzureRM 模組,請將
下一步
如果您的 Runbook 未成功完成,請檢閱針對Azure 自動化受控識別問題進行疑難排解。
如果您需要停用受控識別,請參閱停用Azure 自動化帳戶受控識別。
如需 Azure 自動化帳戶安全性的概觀,請參閱自動化帳戶驗證概觀。