管理 Azure 自動化中的憑證
Azure 自動化使用 Azure Resource Manager 資源的 Get-AzAutomationCertificate Cmdlet,安全地儲存憑證以供 Runbook 和 DSC 設定存取。 安全憑證存放區可供建立使用憑證進行驗證的 Runbook 和 DSC 設定,或將其新增至 Azure 或協力廠商資源。
注意
Azure 自動化中的安全資產包括認證、憑證、連接和加密的變數。 這些資產都會使用為每個自動化帳戶產生的唯一金鑰來進行加密並儲存在自動化中。 自動化會將金鑰儲存在系統管理的 Key Vault 服務中。 在儲存安全資產之前,自動化會從 Key Vault 載入金鑰,然後將其用來加密資產。
用來存取憑證的 PowerShell Cmdlet
下表中的 Cmdlet 會使用 PowerShell 來建立及管理自動化憑證。 其會隨附於 Az 模組。
| 指令程式 | 描述 |
|---|---|
| Get-AzAutomationCertificate | 擷取要在 Runbook 或 DSC 組態中使用的憑證相關資訊。 您只能使用內部 Get-AutomationCertificate Cmdlet 來擷取憑證本身。 |
| New-AzAutomationCertificate | 在自動化中建立新的憑證。 |
| Remove-AzAutomationCertificate | 從自動化中移除憑證。 |
| Set-AzAutomationCertificate | 設定現有憑證的屬性,包括上傳憑證檔案和設定 .pfx 檔案的密碼。 |
您也可以使用 Add-AzureCertificate Cmdlet 來上傳指定雲端服務的服務憑證。
用來存取憑證的內部 Cmdlet
下表中內部 Cmdlet 可用來存取 Runbook 中的憑證。 此 Cmdlet 隨附於全域模組 Orchestrator.AssetManagement.Cmdlets。 如需詳細資訊,請參閱內部 Cmdlet。
| 內部 Cmdlet | 描述 |
|---|---|
Get-AutomationCertificate |
取得要在 Runbook 或 DSC 組態中使用的憑證。 傳回 System.Security.Cryptography.X509Certificates.X509Certificate2 物件。 |
注意
您應該避免在 Runbook 或 DSC 設定中 Get-AutomationCertificate 的 Name 參數內使用變數。 這類變數可能會在設計階段將 Runbook 或 DSC 設定與自動化變數之間的相依性探索複雜化。
用來存取憑證的 Python 函式
使用下表中的函式來存取 Python 2 和 3 Runbook 中的憑證。 Python 3 Runbook 目前為預覽狀態。
| 函式 | 描述 |
|---|---|
automationassets.get_automation_certificate |
擷取憑證資產的相關資訊。 |
注意
您必須在 Python Runbook 的開頭匯入 automationassets 模組,才能存取資產函式。
建立新的憑證
當建立新的憑證時,您會將 .cer 或 .pfx 檔案上傳到自動化。 如果您將憑證標示為可匯出,則可將其傳送到自動化憑證存放區外部。 如果不可匯出,則只能將其用於 Runbook 或 DSC 設定內的簽署。 自動化要求憑證具有提供者:Microsoft 增強的 RSA 與 AES 密碼編譯提供者。
使用 Azure 入口網站建立新的憑證
- 從您的自動化帳戶中,於左側窗格上,選取 [共用資源] 下的 [憑證]。
- 在 [憑證] 頁面上,選取 [新增憑證]。
- 在 [名稱] 欄位中,鍵入憑證的名稱。
- 若要瀏覽 .cer 或 .pfx 檔案,請在 [上傳憑證檔案] 下,選擇 [選取檔案]。 如果您選取 .pfx 檔案,請指定密碼並指出其是否可匯出。 如果您使用 Azure 自動化入口網站上傳憑證,合作夥伴 (CSP) 帳戶可能無法使用。 我們建議您使用 PowerShell Cmdlet 作為因應措施,以克服此問題。
- 選取 [建立] 以儲存新的憑證資產。
使用 PowerShell 建立新的憑證
下列範例示範如何建立新的自動化憑證,並將其標示為可匯出。 此範例會匯入現有的 .pfx 檔案。
$certificateName = 'MyCertificate'
$PfxCertPath = '.\MyCert.pfx'
$CertificatePassword = ConvertTo-SecureString -String 'P@$$w0rd' -AsPlainText -Force
$ResourceGroup = "ResourceGroup01"

New-AzAutomationCertificate -AutomationAccountName "MyAutomationAccount" -Name $certificateName -Path $PfxCertPath -Password $CertificatePassword -Exportable -ResourceGroupName $ResourceGroup
使用 Resource Manager 範本建立新的憑證
下列範例示範如何使用 Resource Manager 範本,以透過 PowerShell 將憑證部署到自動化帳戶:
$AutomationAccountName = "<automation account name>"
$PfxCertPath = '<PFX cert path and filename>'
$CertificatePassword = '<password>'
$certificateName = '<certificate name>' #A name of your choosing
$ResourceGroupName = '<resource group name>' #The one that holds your automation account
$flags = [System.Security.Cryptography.X509Certificates.X509KeyStorageFlags]::Exportable `
    -bor [System.Security.Cryptography.X509Certificates.X509KeyStorageFlags]::PersistKeySet `
    -bor [System.Security.Cryptography.X509Certificates.X509KeyStorageFlags]::MachineKeySet
# Load the certificate into memory
$PfxCert = New-Object -TypeName System.Security.Cryptography.X509Certificates.X509Certificate2 -ArgumentList @($PfxCertPath, $CertificatePassword, $flags)
# Export the certificate and convert into base 64 string
$Base64Value = [System.Convert]::ToBase64String($PfxCert.Export([System.Security.Cryptography.X509Certificates.X509ContentType]::Pkcs12))
$Thumbprint = $PfxCert.Thumbprint


$json = @"
{
    '`$schema': 'https://schema.management.azure.com/schemas/2015-01-01/deploymentTemplate.json#',
    'contentVersion': '1.0.0.0',
    'resources': [
        {
            'name': '$AutomationAccountName/$certificateName',
            'type': 'Microsoft.Automation/automationAccounts/certificates',
            'apiVersion': '2015-10-31',
            'properties': {
                'base64Value': '$Base64Value',
                'thumbprint': '$Thumbprint',
                'isExportable': true
            }
        }
    ]
}
"@

$json | out-file .\template.json
New-AzResourceGroupDeployment -Name NewCert -ResourceGroupName $ResourceGroupName -TemplateFile .\template.json
取得憑證
若要擷取憑證,請使用內部 Get-AutomationCertificate Cmdlet。 您無法使用 Get-AzAutomationCertificate Cmdlet,因為這會傳回憑證資產的資訊,而不是憑證本身。
文字式 Runbook 範例
- PowerShell
- Python 2
- Python 3 \(英文\)
下列範例示範如何將憑證新增至 Runbook 中的雲端服務。 在此範例中,密碼是擷取自加密的自動化變數。
$serviceName = 'MyCloudService'
$cert = Get-AutomationCertificate -Name 'MyCertificate'
$certPwd = Get-AzAutomationVariable -ResourceGroupName "ResourceGroup01" `
-AutomationAccountName "MyAutomationAccount" -Name 'MyCertPassword'
Add-AzureCertificate -ServiceName $serviceName -CertToDeploy $cert
圖形化 Runbook 範例
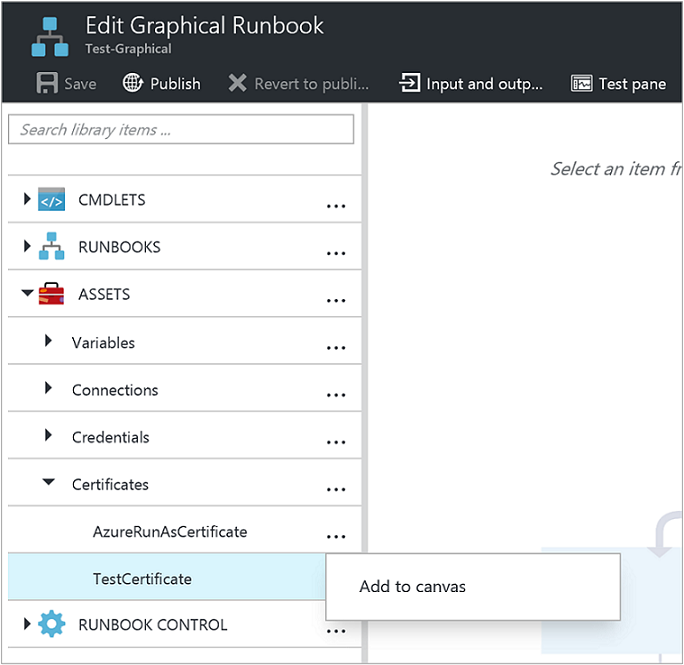
將一個代表內部 Get-AutomationCertificate Cmdlet 的活動新增至圖形化 Runbook,方法是以滑鼠右鍵按一下 [程式庫] 窗格中的 [憑證],然後選取 [新增至畫布]。
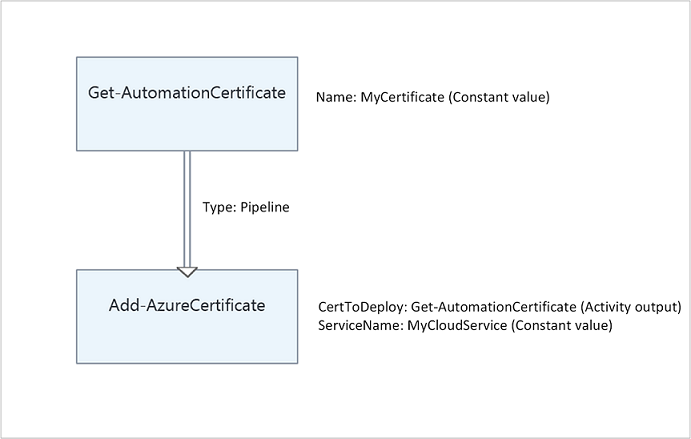
下圖顯示在圖形化 Runbook 中使用憑證的範例。
下一步
- 若要深入了解用來存取憑證的 Cmdlet,請參閱管理 Azure 自動化中的模組。
- 如需 Runbook 的一般資訊,請參閱 Azure 自動化中的 Runbook 執行。
- 如需 DSC 設定的詳細資料,請參閱 Azure 自動化狀態設定概觀。