在已啟用 Azure Arc 的 Kubernetes 叢集上使用 Azure RBAC
Kubernetes ClusterRoleBinding 和 RoleBinding 物件類型有助於原生定義 Kubernetes 中的授權。 使用這項功能,您可以使用 Microsoft Entra ID 和 Azure 中的角色指派來控制叢集上的授權檢查。 Azure 角色指派可讓您精準控制哪位使用者可以讀取、寫入和刪除 Kubernetes 物件 (例如部署、Pod 和服務)。
若需此功能的概念性概觀,請參閱已啟用 Azure Arc 的 Kubernetes 上的 Azure RBAC。
必要條件
安裝 Azure CLI 或升級至最新版本。
安裝最新版的
connectedk8sAzure CLI 延伸模組:az extension add --name connectedk8s如果已安裝
connectedk8s延伸模組,您可以使用下列命令,將其更新至最新版本:az extension update --name connectedk8s連接已啟用 Azure Arc 的現有 Kubernetes 叢集:
注意
您無法為 Red Hat OpenShift 或雲端提供者的受控 Kubernetes 供應項目設定這項功能 (例如,Elastic Kubernetes Service 或 Google Kubernetes Engine),因為使用者無法存取叢集的 API 伺服器。 對於 Azure Kubernetes Service (AKS) 叢集,此功能是原本就提供的,且不需要 AKS 叢集連線至 Azure Arc。
在叢集上啟用 Azure RBAC
執行下列命令以取得叢集 MSI 身分識別:
az connectedk8s show -g <resource-group> -n <connected-cluster-name>從輸出取得標識碼 (
identity.principalId),然後執行下列命令,將 連線 叢集受控識別 CheckAccess 讀取者角色指派給叢集 MSI:az role assignment create --role "Connected Cluster Managed Identity CheckAccess Reader" --assignee "<Cluster MSI ID>" --scope <cluster ARM ID>執行下列命令,在已啟用 Azure Arc 的 Kubernetes 叢集上啟用 Azure 角色型存取控制 (RBAC):
az connectedk8s enable-features -n <clusterName> -g <resourceGroupName> --features azure-rbac注意
執行上述命令之前,請確定機器上的
kubeconfig檔案指向您將啟用 Azure RBAC 功能的叢集。將
--skip-azure-rbac-list用於上述命令,可取得使用 Kubernetes 原生ClusterRoleBinding和RoleBinding物件 (而非 Azure RBAC) 來進行授權檢查的使用者名稱、電子郵件和 OpenID 連線的逗號分隔清單。
未以 apiserver 規格執行協調器的一般叢集
透過 SSH 連線至叢集的每個主要節點,並執行下列步驟:
如果您的
kube-apiserver是靜態 Pod:kube-system命名空間中的azure-arc-guard-manifests秘密包含兩個檔案:guard-authn-webhook.yaml和guard-authz-webhook.yaml。 將這些檔案複製到節點的/etc/guard目錄。sudo mkdir -p /etc/guard kubectl get secrets azure-arc-guard-manifests -n kube-system -o json | jq -r '.data."guard-authn-webhook.yaml"' | base64 -d > /etc/guard/guard-authn-webhook.yaml kubectl get secrets azure-arc-guard-manifests -n kube-system -o json | jq -r '.data."guard-authz-webhook.yaml"' | base64 -d > /etc/guard/guard-authz-webhook.yaml以編輯模式開啟
apiserver資訊清單:sudo vi /etc/kubernetes/manifests/kube-apiserver.yaml在
volumes底下新增下列規格:- name: azure-rbac hostPath: path: /etc/guard type: Directory在
volumeMounts底下新增下列規格:- mountPath: /etc/guard name: azure-rbac readOnly: true
如果您的
kube-apiserver不是靜態 Pod:以編輯模式開啟
apiserver資訊清單:sudo vi /etc/kubernetes/manifests/kube-apiserver.yaml在
volumes底下新增下列規格:- name: azure-rbac secret: secretName: azure-arc-guard-manifests在
volumeMounts底下新增下列規格:- mountPath: /etc/guard name: azure-rbac readOnly: true
新增下列
apiserver引數:- --authentication-token-webhook-config-file=/etc/guard/guard-authn-webhook.yaml - --authentication-token-webhook-cache-ttl=5m0s - --authorization-webhook-cache-authorized-ttl=5m0s - --authorization-webhook-config-file=/etc/guard/guard-authz-webhook.yaml - --authorization-webhook-version=v1 - --authorization-mode=Node,RBAC,Webhook如果 Kubernetes 叢集是 1.19.0 版或更新版本,則您還須設定下列
apiserver引數:- --authentication-token-webhook-version=v1儲存並關閉編輯器以更新
apiserverPod。
使用叢集 API 建立的叢集
將包含驗證和授權 Webhook 組態檔的防護密碼,從工作負載叢集複製到您的機器上:
kubectl get secret azure-arc-guard-manifests -n kube-system -o yaml > azure-arc-guard-manifests.yaml將 azure-arc-guard-manifests.yaml 檔案中的
namespace欄位變更為管理叢集內的命名空間 (您要在其中套用自訂資源以建立工作負載叢集)。套用此資訊清單:
kubectl apply -f azure-arc-guard-manifests.yaml執行
kubectl edit kcp <clustername>-control-plane以編輯KubeadmControlPlane物件:在
files底下新增下列程式碼片段:- contentFrom: secret: key: guard-authn-webhook.yaml name: azure-arc-guard-manifests owner: root:root path: /etc/kubernetes/guard-authn-webhook.yaml permissions: "0644" - contentFrom: secret: key: guard-authz-webhook.yaml name: azure-arc-guard-manifests owner: root:root path: /etc/kubernetes/guard-authz-webhook.yaml permissions: "0644"在
apiServer>extraVolumes底下新增下列程式碼片段:- hostPath: /etc/kubernetes/guard-authn-webhook.yaml mountPath: /etc/guard/guard-authn-webhook.yaml name: guard-authn readOnly: true - hostPath: /etc/kubernetes/guard-authz-webhook.yaml mountPath: /etc/guard/guard-authz-webhook.yaml name: guard-authz readOnly: true在
apiServer>extraArgs底下新增下列程式碼片段:authentication-token-webhook-cache-ttl: 5m0s authentication-token-webhook-config-file: /etc/guard/guard-authn-webhook.yaml authentication-token-webhook-version: v1 authorization-mode: Node,RBAC,Webhook authorization-webhook-cache-authorized-ttl: 5m0s authorization-webhook-config-file: /etc/guard/guard-authz-webhook.yaml authorization-webhook-version: v1儲存並關閉以更新
KubeadmControlPlane物件。 等候這些變更出現在工作負載叢集上。
建立角色指派,以便使用者存取叢集
已啟用 Azure Arc 的 Kubernetes 資源的擁有者,可以使用內建角色或自訂角色為其他使用者授與 Kubernetes 叢集的存取權。
內建角色
| 角色 | 描述 |
|---|---|
| Azure Arc Kubernetes 檢視器 | 允許唯讀存取來查看命名空間中的大部分物件。 此角色不允許檢視秘密,因為秘密的 read 權限會允許存取命名空間中的 ServiceAccount 憑證。 這些認證接著將允許透過該 ServiceAccount 值進行 API 存取 (一種形式的權限提升)。 |
| Azure Arc Kubernetes 寫入器 | 允許命名空間中大部分物件的讀取/寫入存取權。 不允許檢視或修改角色或角色繫結。 然而,此角色允許以命名空間中的任何 ServiceAccount 值存取秘密並執行 Pod,因此可用來取得命名空間中任何 ServiceAccount 值的 API 存取層級。 |
| Azure Arc Kubernetes 管理員 | 允許管理員存取。 此存取權應透過 RoleBinding 在命名空間內授與。 如果在 RoleBinding 中使用,則會允許命名空間中大部分資源的讀取/寫入存取權,包括可在命名空間中建立角色和角色繫結。 此角色不允許對資源配額或命名空間本身進行寫入存取。 |
| Azure Arc Kubernetes 叢集管理員 | 允許對任何資源執行任何動作的超級使用者存取。 在 ClusterRoleBinding 中使用時,會提供對叢集中和所有命名空間中每個資源的完整控制權。 在 RoleBinding 中使用時,會提供對角色繫結命名空間中的每個資源 (包括命名空間本身) 的完整控制權。 |
您可以使用 Azure 入口網站,在叢集資源的 [存取控制 (IAM)] 窗格上,建立範圍設定為已啟用 Azure Arc 的 Kubernetes 叢集的角色指派。 您也可以使用下列 Azure CLI 命令:
az role assignment create --role "Azure Arc Kubernetes Cluster Admin" --assignee <AZURE-AD-ENTITY-ID> --scope $ARM_ID
在這些命令中,AZURE-AD-ENTITY-ID 可以是使用者名稱 (例如 testuser@mytenant.onmicrosoft.com),甚或是服務主體的 appId 值。
以下以另一個範例說明如何建立將範圍設定為叢集內特定命名空間的角色指派:
az role assignment create --role "Azure Arc Kubernetes Viewer" --assignee <AZURE-AD-ENTITY-ID> --scope $ARM_ID/namespaces/<namespace-name>
注意
您可以使用 Azure 入口網站或 Azure CLI 來建立範圍設為叢集的角色指派。 不過,僅能使用 Azure CLI 來建立範圍設定為命名空間的角色指派。
自訂角色
您可以選擇建立自己的角色定義,以用於角色指派。
以下是僅允許使用者讀取部署的角色定義範例,請加以參考。 如需詳細資訊,請參閱可用來建構角色定義之資料動作的完整清單。
將下列 JSON 物件複製到名為 custom-role.json 的檔案中。 將 <subscription-id> 預留位置取代為實際的訂用帳戶識別碼。 自訂角色會使用其中一個資料動作,並且讓您檢視角色指派建立所在的範圍 (叢集或命名空間) 中的所有部署。
{
    "Name": "Arc Deployment Viewer",
    "Description": "Lets you view all deployments in cluster/namespace.",
    "Actions": [],
    "NotActions": [],
    "DataActions": [
        "Microsoft.Kubernetes/connectedClusters/apps/deployments/read"
    ],
    "NotDataActions": [],
    "assignableScopes": [
        "/subscriptions/<subscription-id>"
    ]
}
從您儲存 custom-role.json 的資料夾執行下列命令,以建立角色定義:
az role definition create --role-definition @custom-role.json使用此自訂角色定義建立角色指派:
az role assignment create --role "Arc Deployment Viewer" --assignee <AZURE-AD-ENTITY-ID> --scope $ARM_ID/namespaces/<namespace-name>
透過使用者認證設定 kubectl
有兩種方式可取得您存取叢集所需的 kubeconfig 檔案:
- 使用已啟用 Azure Arc 的 Kubernetes 叢集中的叢集連線功能 (
az connectedk8s proxy)。 - 叢集管理員與其他每個使用者共用 kubeconfig 檔案。
使用叢集連線
執行下列命令以啟動 Proxy 程序:
az connectedk8s proxy -n <clusterName> -g <resourceGroupName>
Proxy 程序執行後,您可以在主控台開啟另一個索引標籤,開始將要求傳送至叢集。
使用共用 kubeconfig 檔案
根據您的 Kubernetes 版本,使用共用 kubeconfig 需要稍微不同的步驟。
執行下列命令來設定用戶的認證。 指定指定
serverApplicationId為6256c85f-0aad-4d50-b960-e6e9b21efe35與clientApplicationId作為 :3f4439ff-e698-4d6d-84fe-09c9d574f06bkubectl config set-credentials <testuser>@<mytenant.onmicrosoft.com> \ --auth-provider=azure \ --auth-provider-arg=environment=AzurePublicCloud \ --auth-provider-arg=client-id=<clientApplicationId> \ --auth-provider-arg=tenant-id=<tenantId> \ --auth-provider-arg=apiserver-id=<serverApplicationId>開啟您先前建立的 kubeconfig 檔案。 在
contexts底下,確認與叢集相關聯的內容指向您在上一個步驟中建立的使用者認證。 若要將目前內容設定為這些使用者憑證,請執行下列命令:kubectl config set-context --current=true --user=<testuser>@<mytenant.onmicrosoft.com>在
user>config底下新增 config-mode 設定:name: testuser@mytenant.onmicrosoft.com user: auth-provider: config: apiserver-id: $SERVER_APP_ID client-id: $CLIENT_APP_ID environment: AzurePublicCloud tenant-id: $TENANT_ID config-mode: "1" name: azure注意
Exec 外掛程式 是 Kubernetes 驗證策略,可讓
kubectl執行外部命令以接收要傳送至apiserver的使用者憑證。 自 Kubernetes 1.26 版起,預設的 Azure 授權外掛程式不再包含在client-go和kubectl中。 若在較新的版本中要使用 exec 外掛程式來接收使用者憑證,您必須使用 Azure Kubelogin,這是實作 Azure 驗證的client-go憑證 (exec) 外掛程式。安裝 Azure Kubelogin:
針對 Windows 或 Mac,請遵循 Azure Kubelogin 安裝指示。
若是 Linux 或 Ubuntu,請下載最新版本的 kubelogin,然後執行下列命令:
curl -LO https://github.com/Azure/kubelogin/releases/download/"$KUBELOGIN_VERSION"/kubelogin-linux-amd64.zip

unzip kubelogin-linux-amd64.zip

sudo mv bin/linux_amd64/kubelogin /usr/local/bin/

sudo chmod +x /usr/local/bin/kubelogin
Kubelogin 可用來向已啟用 Azure Arc 的叢集進行驗證,方法是要求擁有權證明 (PoP) 令牌。 使用 kubelogin 轉換 kubeconfig,以使用適當的 登入模式。 例如,針對使用 Microsoft Entra 使用者的裝置代碼登入,命令如下所示:
export KUBECONFIG=/path/to/kubeconfig

kubelogin convert-kubeconfig --pop-enabled --pop-claims 'u=<ARM ID of cluster>"
將要求傳送至叢集
執行任何
kubectl命令。 例如:kubectl get nodeskubectl get pods
在系統提示您進行瀏覽器型驗證後,請複製裝置登入 URL (
https://microsoft.com/devicelogin) 並在網頁瀏覽器中開啟。輸入您的主控台上列印的程式碼。 將終端機上的程式碼複製並貼到裝置驗證輸入的提示中。
輸入使用者名稱 (
testuser@mytenant.onmicrosoft.com) 和相關聯的密碼。如果您看到類似這樣的錯誤訊息,表示您未獲授權而無法存取要求的資源:
Error from server (Forbidden): nodes is forbidden: User "testuser@mytenant.onmicrosoft.com" cannot list resource "nodes" in API group "" at the cluster scope: User doesn't have access to the resource in Azure. Update role assignment to allow access.管理員必須建立新的角色指派,將資源的存取權授權給此使用者。
搭配 Microsoft Entra ID 使用條件式存取
將 Microsoft Entra ID 與已啟用 Azure Arc 的 Kubernetes 叢集整合時,您也可以使用條件式存取來控制對叢集的存取。
注意
Microsoft Entra 條件式存取是 Microsoft Entra ID P2 功能。
若要建立與叢集搭配使用的範例條件式存取原則:
在 Azure 入口網站的頂端,搜尋並選取 [Microsoft Entra ID]。
在左側 Microsoft Entra ID 功能表上,選取 [企業應用程式]。
在左側企業應用程式的功能表上,選取 [條件式存取]。
在左側 [條件式存取] 的功能表上,選取 [原則]>[新增原則]。

輸入原則的名稱,例如 arc-k8s-policy。
選取 使用者及群組。 在 [包含] 下,選擇 [選取使用者和群組]。 然後,選擇要套用原則的使用者和群組。 在此範例中,請選擇對您的叢集擁有管理員存取權的相同 Microsoft Entra 群組。
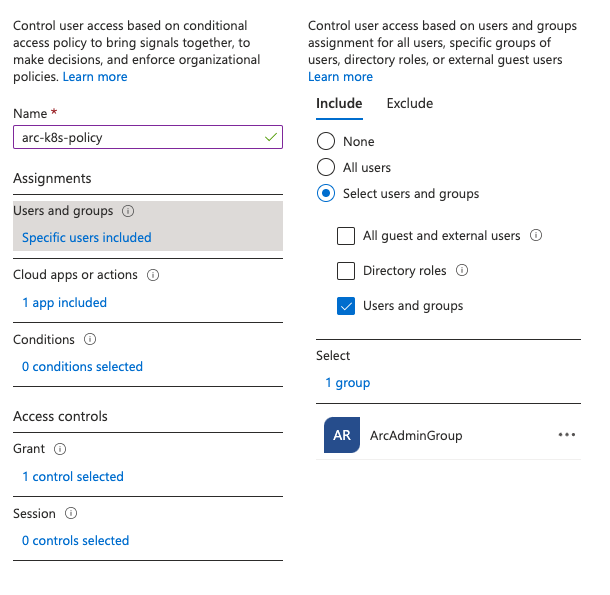
選取 [雲端應用程式或動作]。 在 [包含] 下,選擇 [選取應用程式]。 然後,搜尋並選取您先前建立的伺服器應用程式。

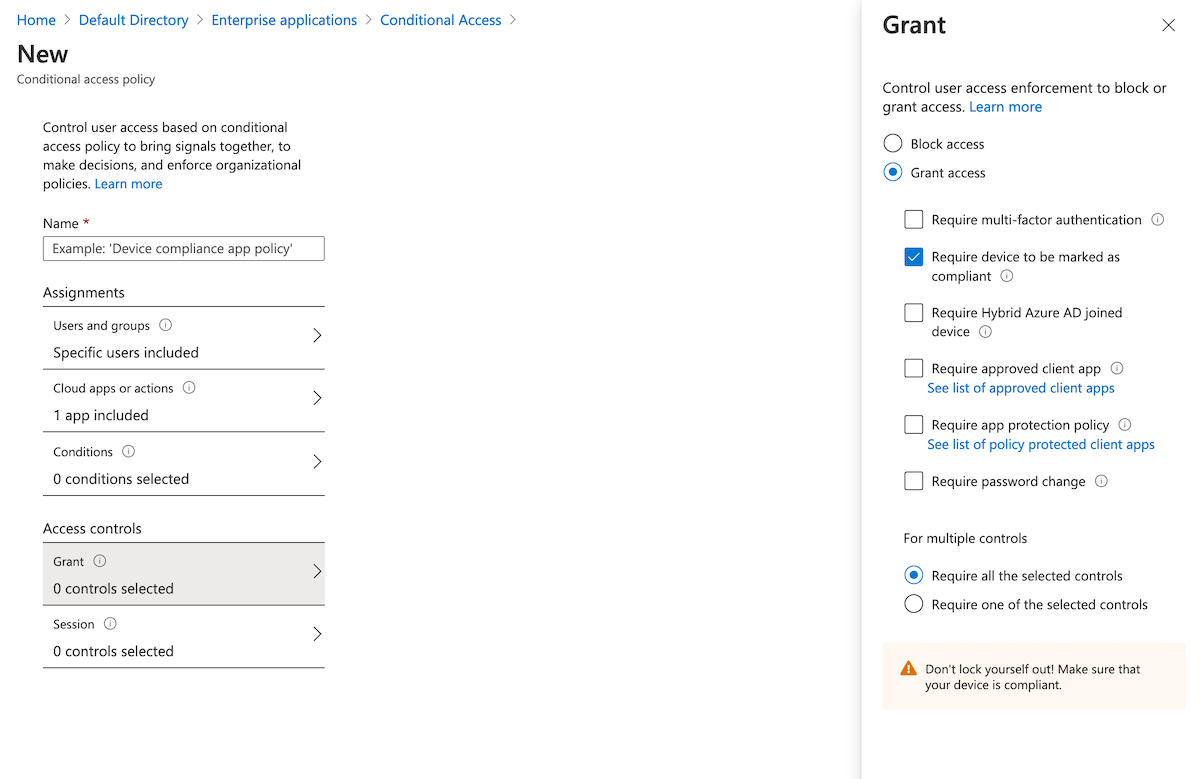
在 [存取控制] 下,選取 [授與]。 選取 [授與存取權]>[裝置需要標記為合規]。
在 [啟用原則] 底下,選取 [開啟]>[建立]。


再次存取叢集。 例如,執行 kubectl get nodes 命令以檢視叢集中的節點:
kubectl get nodes
再次遵循指示進行登入。 有錯誤訊息指出您已成功登入,但管理員要求 Microsoft Entra ID 必須管理要求存取的裝置,您才能存取資源。 執行下列步驟:
在 Azure 入口網站中,移至 [Microsoft Entra ID]。
選取 [企業應用程式]。 然後,在 [活動] 底下,選取 [登入]。
頂端的項目會顯示「失敗」的「狀態」和「成功」的「條件式存取」。 選取項目,然後在 [詳細資料] 中選取 [條件式存取]。 請注意,您的條件式存取原則已列出。


使用 Microsoft Entra ID 設定 Just-In-Time 叢集存取
叢集存取控制的另一個選項是針對 Just-In-Time 要求使用 Privileged Identity Management (PIM)。
注意
Microsoft Entra PIM 是 Microsoft Entra ID P2 功能。 如需 Microsoft Entra ID SKU 的詳細資訊,請參閱定價指南。
若要為叢集設定 Just-In-Time 存取要求,請完成下列步驟:
在 Azure 入口網站的頂端,搜尋並選取 [Microsoft Entra ID]。
記下租用戶識別碼。 在這些指示的其餘部分,我們會將該識別碼視為
<tenant-id>。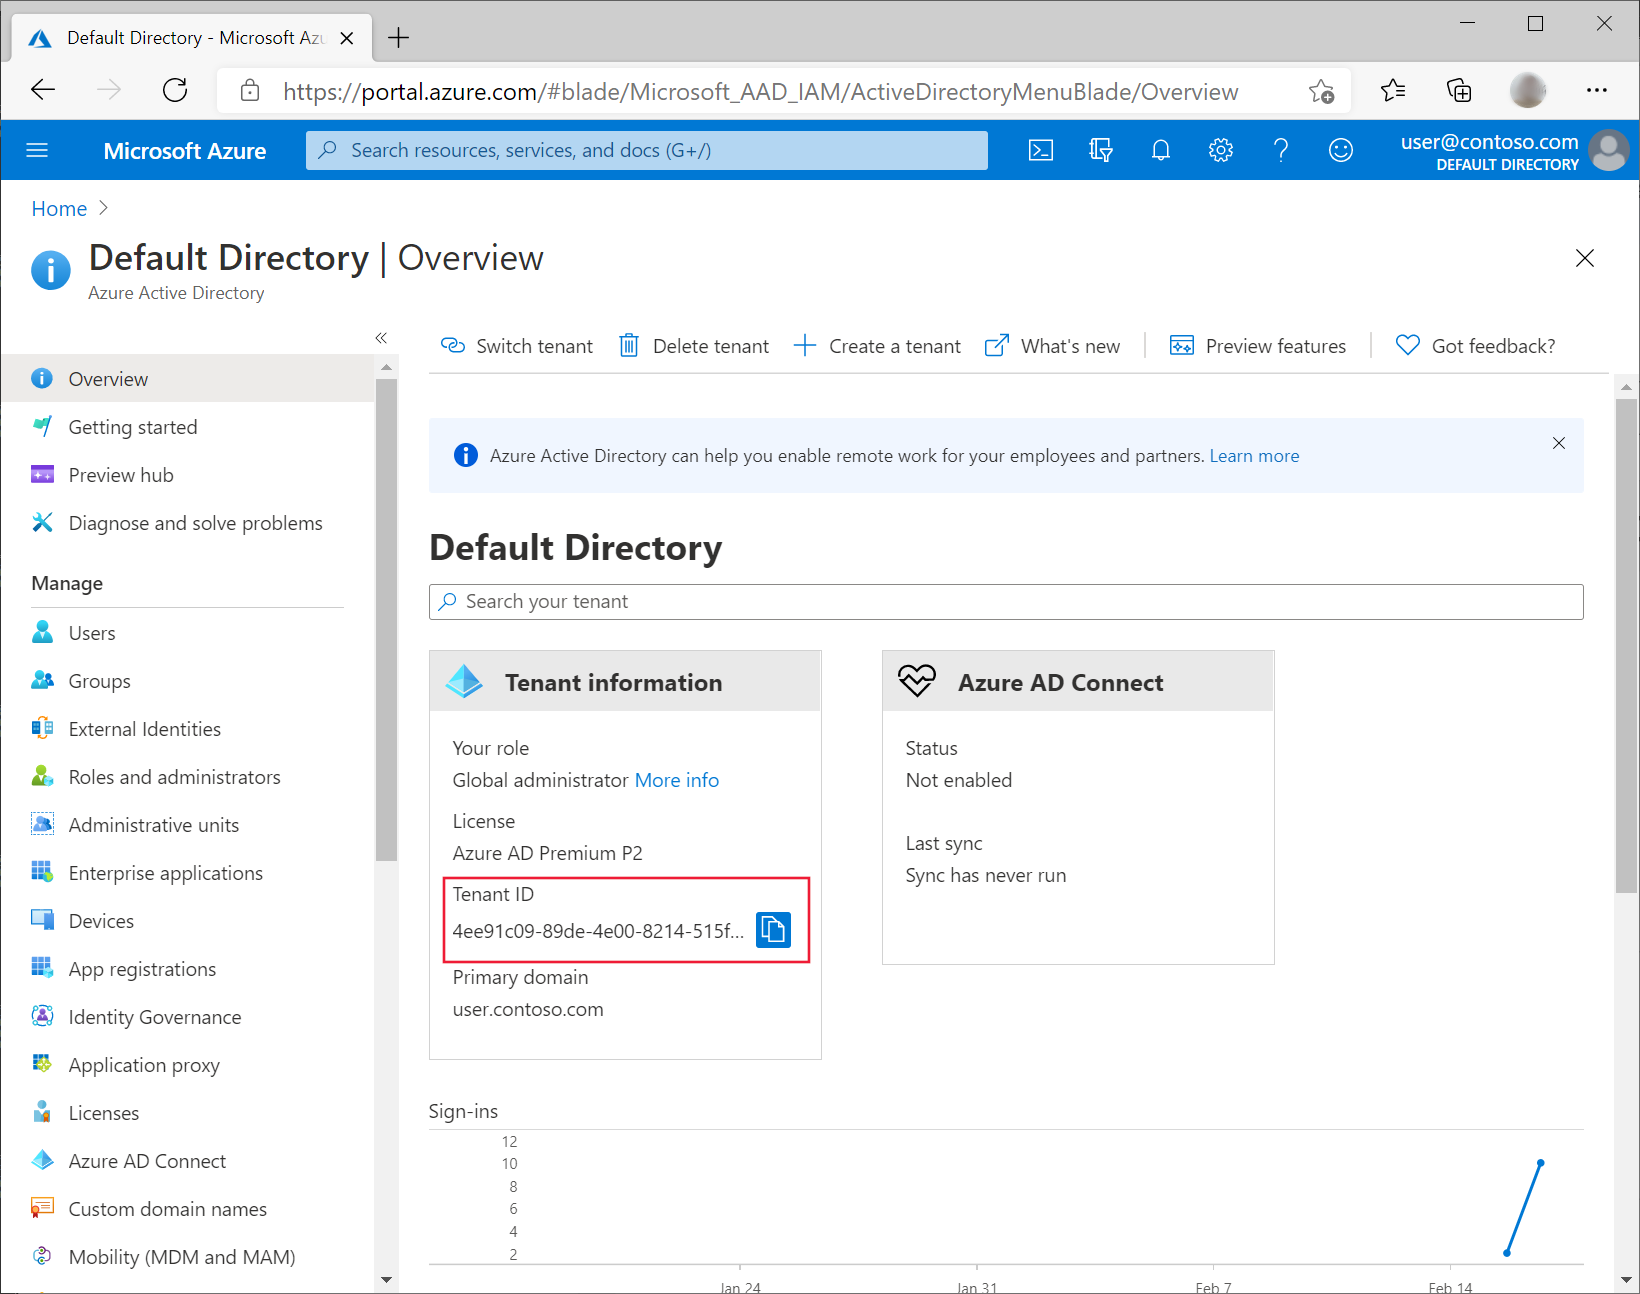
在左側 Microsoft Entra ID 的功能表上,選取 [管理] 底下的 [群組]>[新增群組]。
確定針對 [群組類型] 選取了 [安全性]。 輸入群組名稱,例如 myJITGroup。 在 [Microsoft Entra 角色可以指派給此群組 (預覽)] 下,選取 [是]。 最後,選取 [建立]。

您會回到 [群組] 頁面。 選取新建立的群組,並記下物件識別碼。 在這些指示的其餘部分,我們會將此識別碼視為
<object-id>。
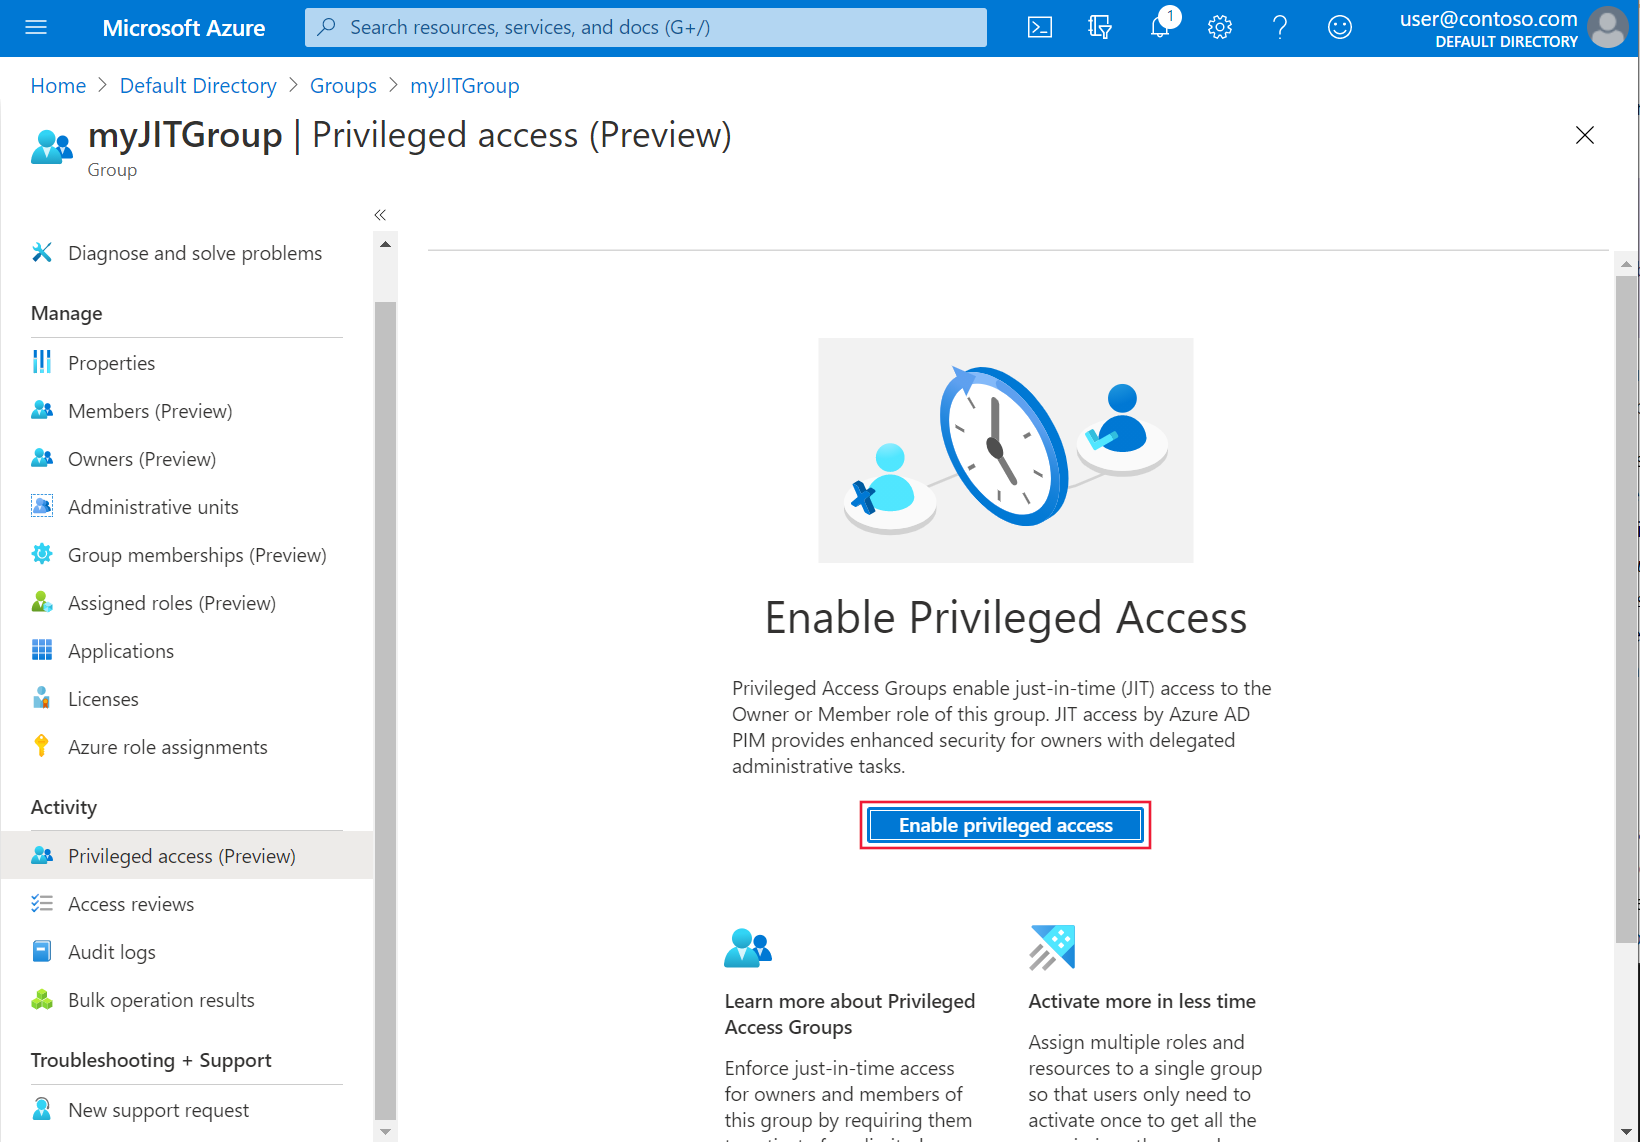
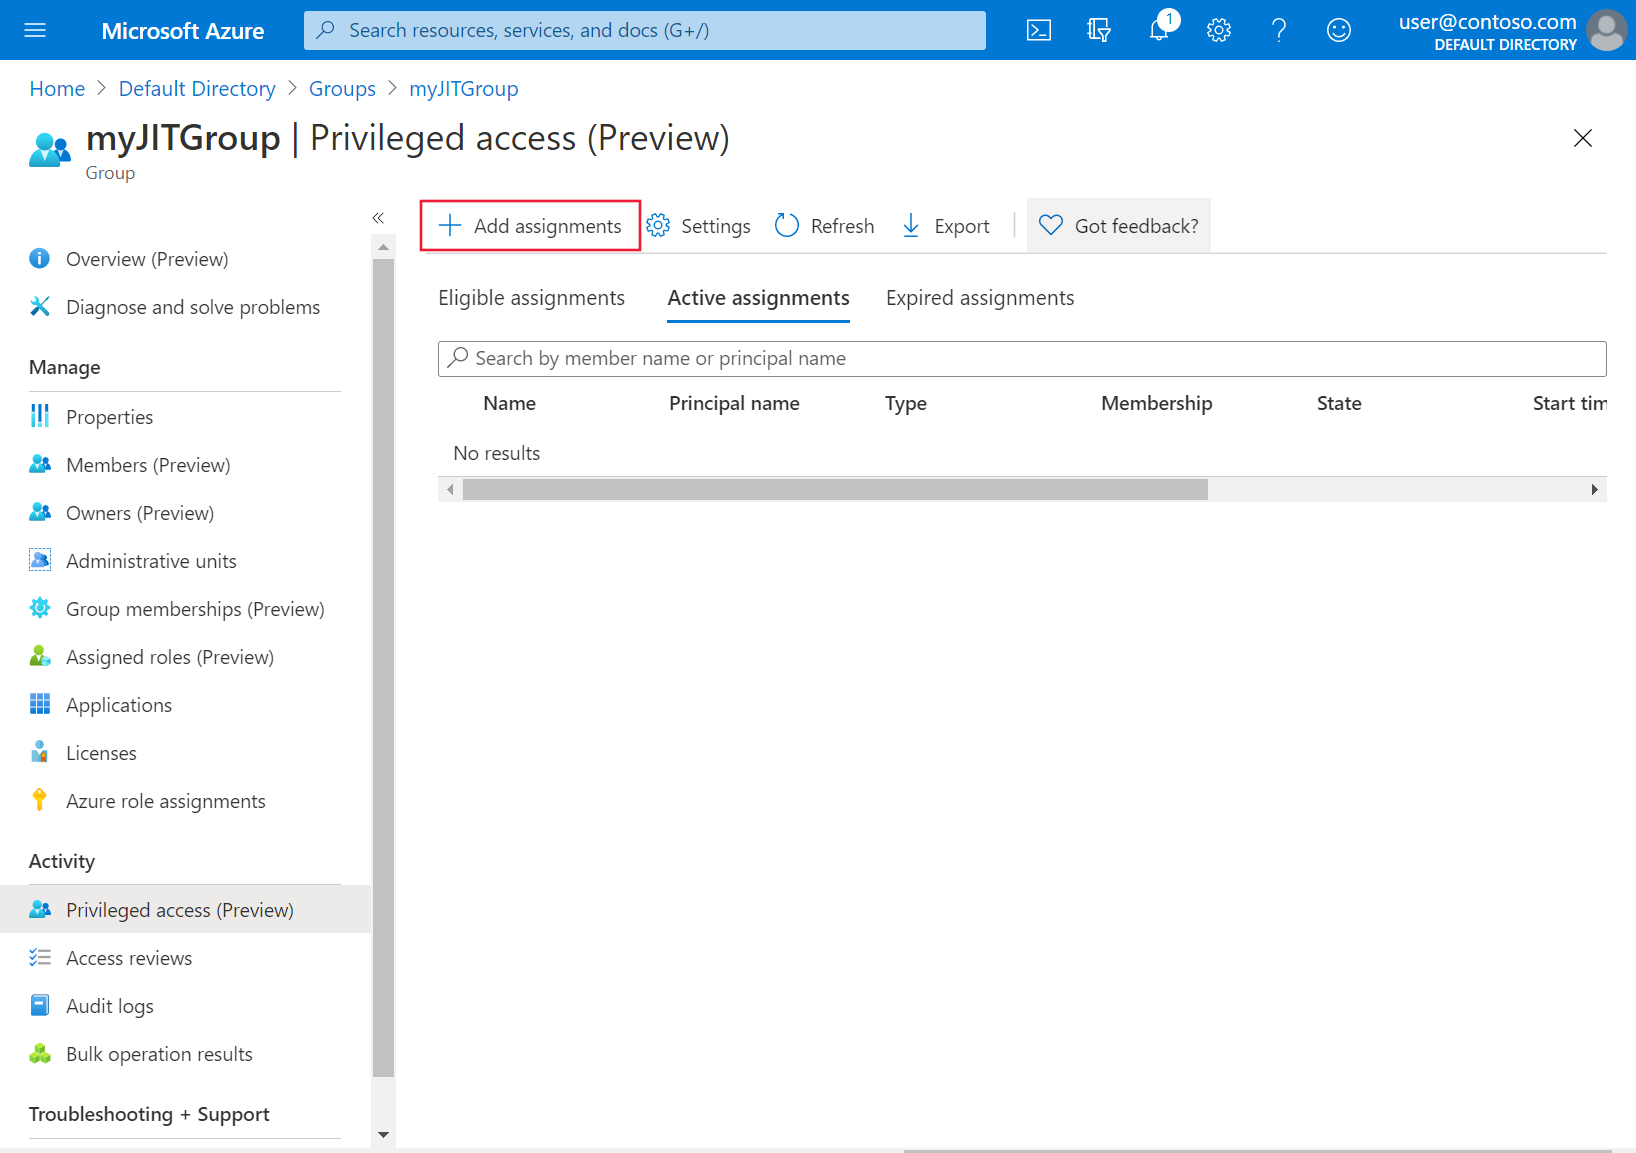
返回 Azure 入口網站,在左側的 [活動] 功能表上,選取 [特殊權限存取 (預覽)]。 然後,選取 [啟用特殊權限存取]。
選取 [新增指派] 開始授與存取權。
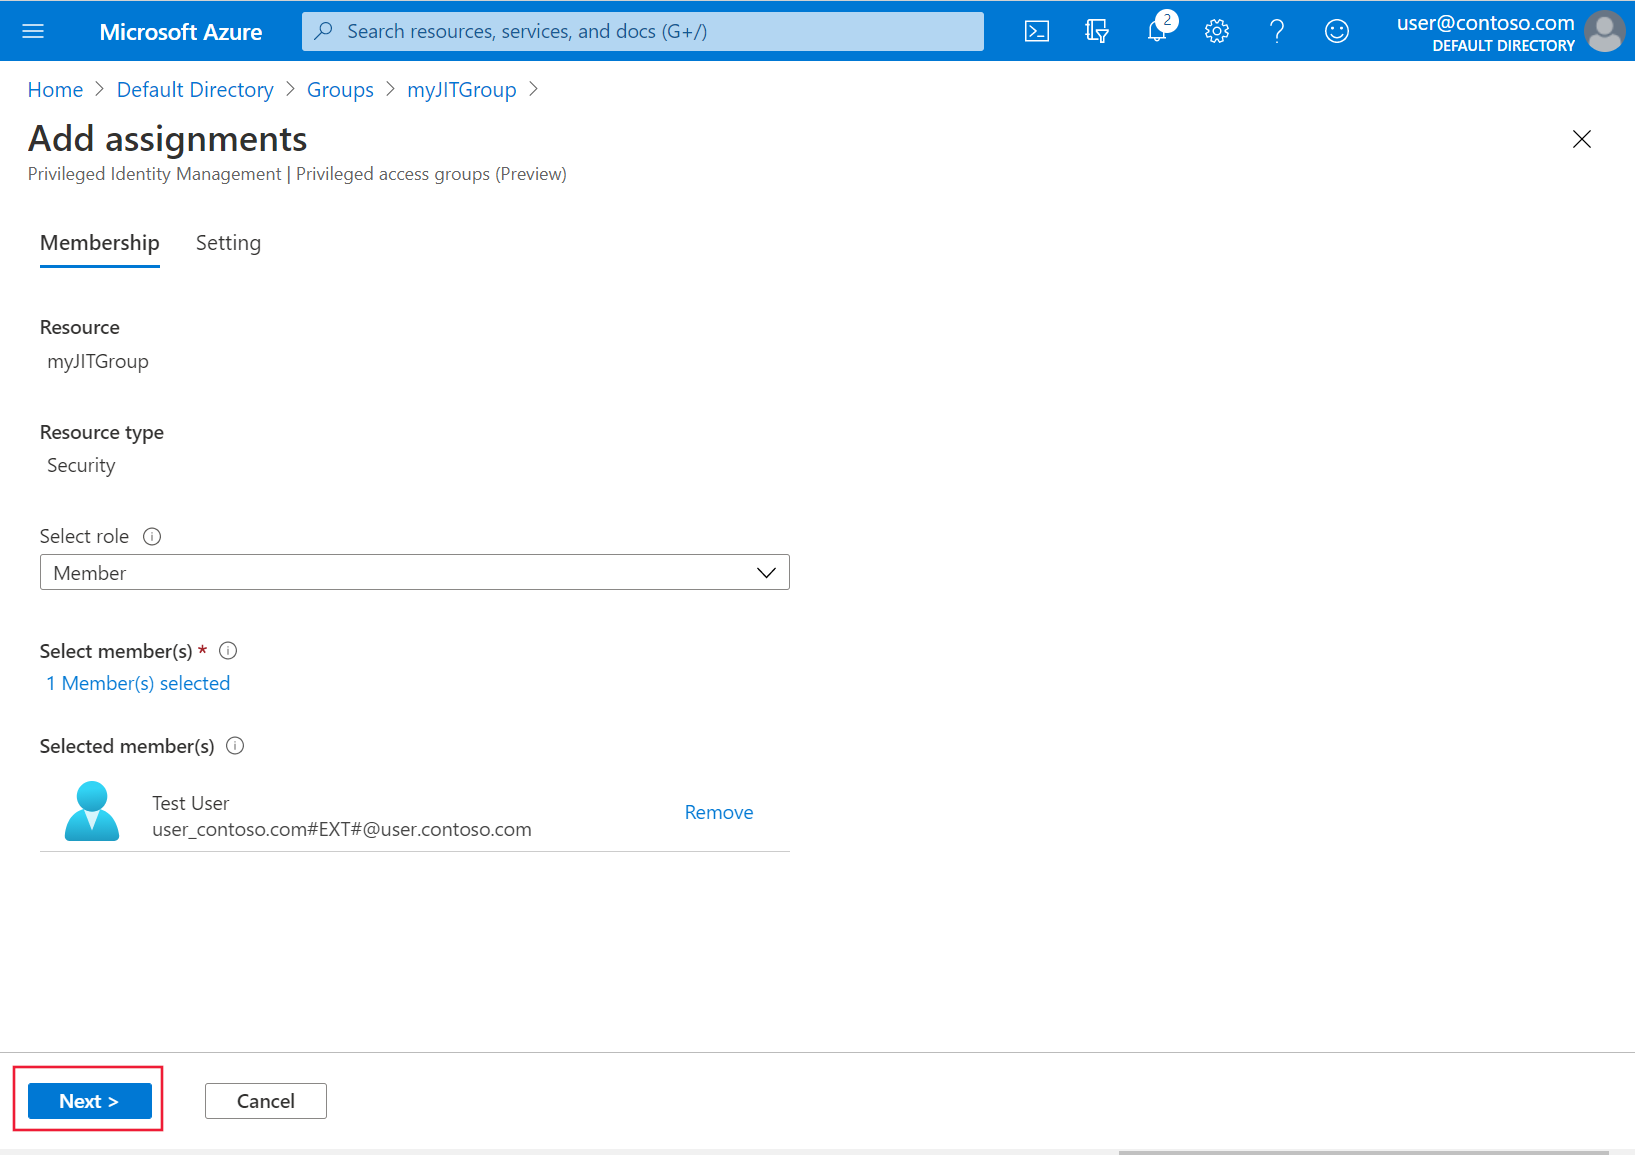
選取「成員」的角色,然後選取您要為其授與叢集存取權的使用者和群組。 群組管理員可隨時修改這些指派。 在準備好要繼續操作時,選取 [下一步]。
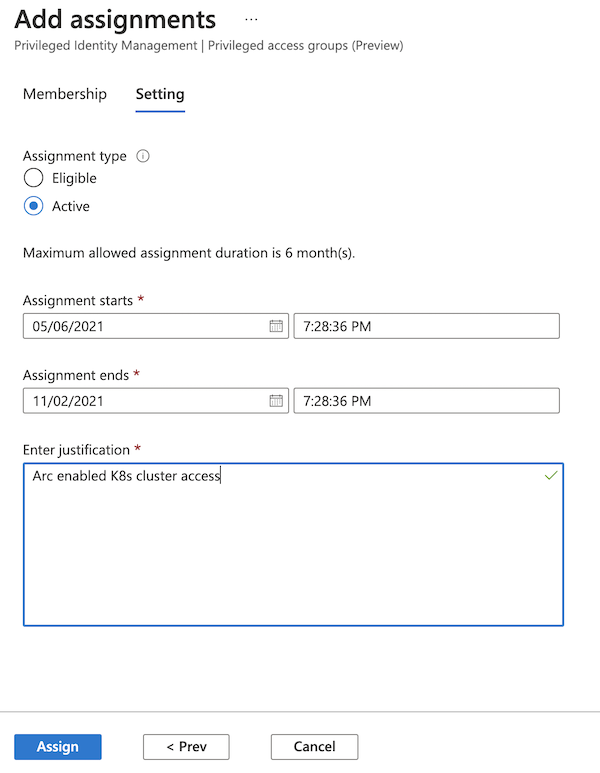
選擇 [作用中] 的指派類型,再選擇所需的持續時間,並提供理由。 當您準備繼續時,請選取 [指派]。 如需指派類型的詳細資訊,請參閱在 Privileged Identity Management 中指派特殊權限存取群組 (預覽) 的資格。


進行指派之後,請存取叢集以確認 Just-In-Time 存取正常運作。 例如,使用 kubectl get nodes 命令檢視叢集中的節點:
kubectl get nodes
請注意驗證需求,並遵循步驟進行驗證。 如果驗證成功,您應該會看到類似下列的輸出:
To sign in, use a web browser to open the page https://microsoft.com/devicelogin and enter the code AAAAAAAAA to authenticate.

NAME      STATUS   ROLES    AGE      VERSION
node-1    Ready    agent    6m36s    v1.18.14
node-2    Ready    agent    6m42s    v1.18.14
node-3    Ready    agent    6m33s    v1.18.14
下一步
- 使用叢集連線安全地連線至叢集。
- 深入閱讀已啟用 Arc 的 Kubernetes 上的 Azure RBAC 架構。
意見反應
即將登場:在 2024 年,我們將逐步淘汰 GitHub 問題作為內容的意見反應機制,並將它取代為新的意見反應系統。 如需詳細資訊,請參閱:https://aka.ms/ContentUserFeedback。
提交並檢視相關的意見反應