教學課程:在 ASP.NET 上建立暫存排行榜
在本教學課程中,您會更新 ContosoTeamStats ASP.NET Web 應用程式---在 Azure Cache for Redis 的 ASP.NET 快速入門中 建立---包含搭配 Azure Cache for Redis 快 取模式 的排行榜。 範例應用程式會顯示資料庫中的小組統計資料清單。 它也示範使用 Azure Cache for Redis 來儲存和擷取資料以提升效能的不同方式。 當您完成本教學課程時,您有一個執行中的 Web 應用程式,可讀取和寫入資料庫、使用 Azure Cache for Redis 優化,以及裝載在 Azure 中。
在本教學課程中,您會了解如何:
- 使用 Azure Cache for Redis 來儲存和擷取資料,以改善資料輸送量並降低資料庫負載。
- 使用 Redis 已排序的集合來擷取前五名小組。
- 使用 Resource Manager 範本為應用程式布建 Azure 資源。
- 使用 Visual Studio 將應用程式發佈至 Azure。
如果您沒有 Azure 訂閱,請在開始之前,先建立 Azure 免費帳戶。
必要條件
若要完成本教學課程,您必須具備下列必要條件:
- 本教學課程會繼續您在 Azure Cache for Redis 的 ASP.NET 快速入門中 離職。 如果您尚未這麼做,請先遵循快速入門。
- 使用下列工作負載安裝 Visual Studio 2019 :
- ASP.NET 和網頁程式開發
- Azure 開發
- 使用 SQL Server Express LocalDB 或 SQL Server 2017 Express 版本 進行 .NET 桌面開發。
將排行榜新增至專案
在本教學課程的本節中,您會使用排行榜來設定 ContosoTeamStats 專案,以報告虛構小組清單的勝負和系結統計資料。
將 Entity Framework 新增至專案
在 Visual Studio 中 ,開啟您在 Azure Cache for Redis ASP.NET 快速入門中建立的 ContosoTeamStats 解決方案。
選取 [工具 > NuGet 封裝管理員 封裝管理員 > 主控台 ]。
從 [封裝管理員主控台 ] 視窗執行下列命令,以安裝 EntityFramework:
Install-Package EntityFramework
如需此套件的詳細資訊,請參閱 EntityFramework NuGet 頁面。
新增小組模型
以滑鼠右鍵按一下 方案總管 中的 [模型 ],然後選擇 [ 新增 ]、 [類別 ]。
輸入
Team類別名稱,然後選取 [ 新增 ]。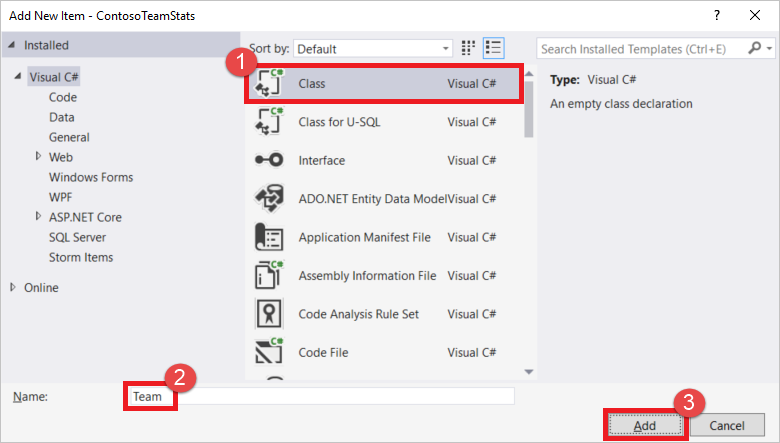
using以下列using語句取代 Team.cs 檔案頂端的 語句:using System; using System.Collections.Generic; using System.Data.Entity; using System.Data.Entity.SqlServer;將 類別的定義取代為下列程式碼片段,其中包含更新
Team的Team類別定義和其他一些 Entity Framework 協助程式類別。 本教學課程使用程式碼第一種方法搭配 Entity Framework。 此方法可讓 Entity Framework 從程式碼建立資料庫。 如需本教學課程中使用的 Entity Framework 程式碼第一種方法的詳細資訊,請參閱 程式碼第一次加入新資料庫 。public class Team { public int ID { get; set; } public string Name { get; set; } public int Wins { get; set; } public int Losses { get; set; } public int Ties { get; set; } static public void PlayGames(IEnumerable<Team> teams) { // Simple random generation of statistics. Random r = new Random(); foreach (var t in teams) { t.Wins = r.Next(33); t.Losses = r.Next(33); t.Ties = r.Next(0, 5); } } } public class TeamContext : DbContext { public TeamContext() : base("TeamContext") { } public DbSet<Team> Teams { get; set; } } public class TeamInitializer : CreateDatabaseIfNotExists<TeamContext> { protected override void Seed(TeamContext context) { var teams = new List<Team> { new Team{Name="Adventure Works Cycles"}, new Team{Name="Alpine Ski House"}, new Team{Name="Blue Yonder Airlines"}, new Team{Name="Coho Vineyard"}, new Team{Name="Contoso, Ltd."}, new Team{Name="Fabrikam, Inc."}, new Team{Name="Lucerne Publishing"}, new Team{Name="Northwind Traders"}, new Team{Name="Consolidated Messenger"}, new Team{Name="Fourth Coffee"}, new Team{Name="Graphic Design Institute"}, new Team{Name="Nod Publishers"} }; Team.PlayGames(teams); teams.ForEach(t => context.Teams.Add(t)); context.SaveChanges(); } } public class TeamConfiguration : DbConfiguration { public TeamConfiguration() { SetExecutionStrategy("System.Data.SqlClient", () => new SqlAzureExecutionStrategy()); } }在 方案總管 中,按兩下 [Web.config ] 加以開啟。

在 區段內
configuration新增下列connectionStrings區段。 連接字串的名稱必須符合 Entity Framework 資料庫內容類別別的名稱,也就是TeamContext。此連接字串假設您已符合 必要條件 並安裝 SQL Server Express LocalDB,這是隨 Visual Studio 2019 安裝之 .NET 桌面開發 工作負載的 一部分。
<connectionStrings>
    <add name="TeamContext" connectionString="Data Source=(LocalDB)\MSSQLLocalDB;AttachDbFilename=|DataDirectory|\Teams.mdf;Integrated Security=True" providerName="System.Data.SqlClient" />
</connectionStrings>
下列範例顯示 區段內的
configuration新connectionStrings區段configSections:<configuration> <configSections> <section name="entityFramework" type="System.Data.Entity.Internal.ConfigFile.EntityFrameworkSection, EntityFramework, Version=6.0.0.0, Culture=neutral, PublicKeyToken=b77a5c561934e089" requirePermission="false" /> </configSections> <connectionStrings> <add name="TeamContext" connectionString="Data Source=(LocalDB)\MSSQLLocalDB;AttachDbFilename=|DataDirectory|\Teams.mdf;Integrated Security=True" providerName="System.Data.SqlClient" /> </connectionStrings> ...
新增 TeamsController 和檢視
在 Visual Studio 中,建置專案。
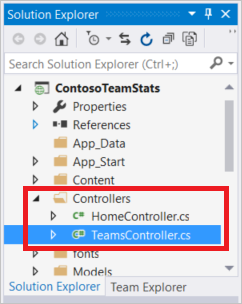
在 [方案總管 ] 中,以滑鼠右鍵按一下 Controllers 資料夾,然後選擇 [新增 ]、 [ 控制器 ]。
使用 Entity Framework 選擇 具有檢視的 MVC 5 控制器,然後選取 [ 新增 ]。 如果您在選取 [新增 ] 之後收到錯誤,請確定您已先建置專案。

從 [模型類別 ] 下拉式清單中選取 [小組] [ContosoTeamStats.Models]。 從 [ 資料內容類別別 ] 下拉式清單中選取 TeamCoNtext (ContosoTeamStats.Models)。 在 [ 控制器 名稱] 文字方塊中輸入
TeamsController(如果未自動填入的話)。 選取 [新增 ] 以建立控制器類別,並新增預設檢視。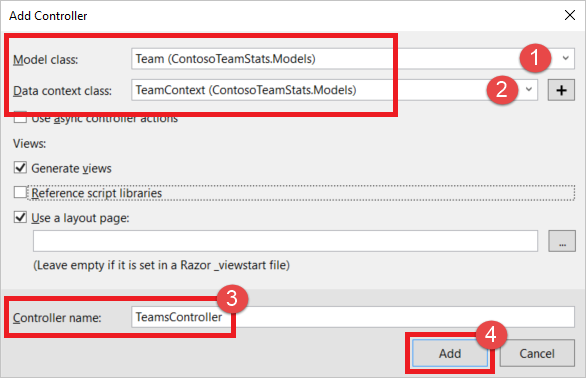
在 [方案總管] 中 ,展開 [Global.asax ],然後按兩下 [Global.asax.cs ] 加以開啟。
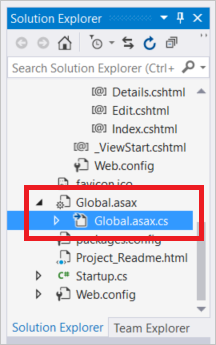
將下列兩個
using語句新增到檔案頂端的其他using語句底下:using System.Data.Entity; using ContosoTeamStats.Models;在 方法結尾
Application_Start新增下列程式程式碼:Database.SetInitializer<TeamContext>(new TeamInitializer());在 方案總管 中,展開
App_Start並按兩下RouteConfig.cs。
在
RegisterRoutes方法中Default,將 路由中的 取代controller = "Home"為controller = "Teams",如下列範例所示:routes.MapRoute( name: "Default", url: "{controller}/{action}/{id}", defaults: new { controller = "Teams", action = "Index", id = UrlParameter.Optional } );
設定版面配置檢視
在 方案總管 中,展開 [檢視] 資料夾,然後 展開 [共用資料夾 ],然後按兩下 _Layout.cshtml 。
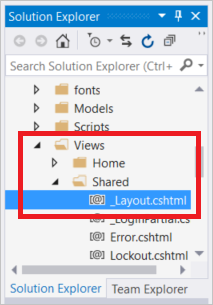
變更 專案的內容,
title並將 取代My ASP.NET Application為Contoso Team Stats,如下列範例所示:<title>@ViewBag.Title - Contoso Team Stats</title>在 區
body段中,為 Contoso Team Stats 新增下列新Html.ActionLink語句,緊接在 Azure Cache for Redis 測試 的連結 下方。@Html.ActionLink("Contoso Team Stats", "Index", "Teams", new { area = "" }, new { @class = "navbar-brand" })`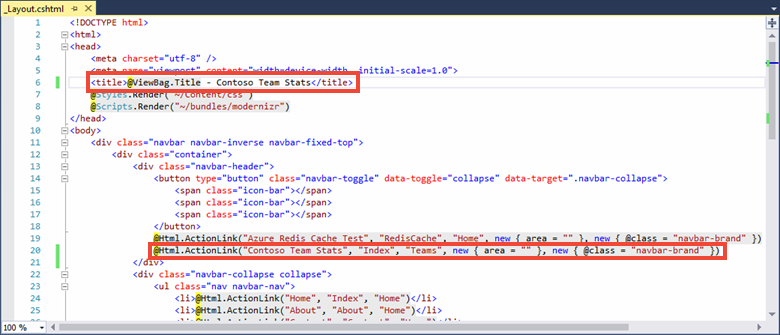
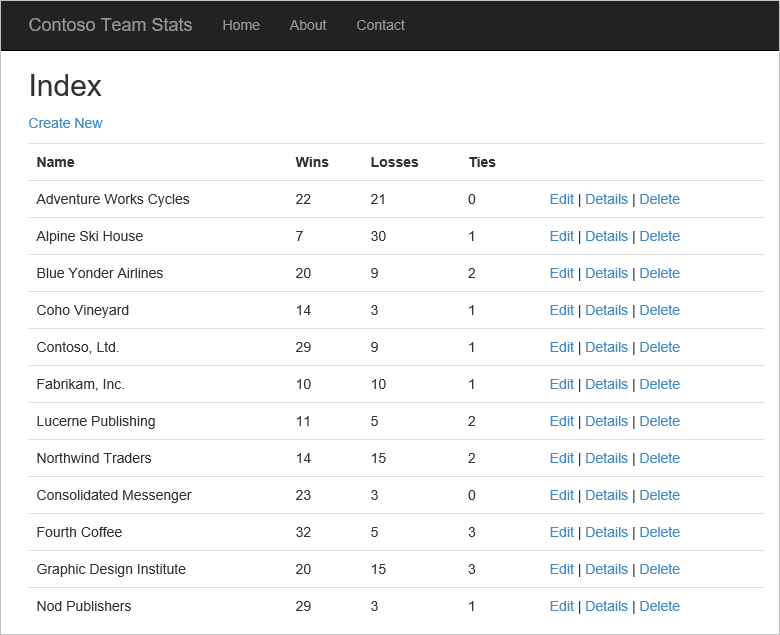
按 Ctrl+F5 建置並執行應用程式。 此版本的應用程式會直接從資料庫讀取結果。 請注意使用 Entity Framework Scaffold,MVC 5 控制器使用 Entity Framework Scaffold 自動新增至應用程式的 [新建 ]、 [編輯 ]、 [詳細資料 ] 和 [刪除 ] 動作。 在本教學課程的下一節中,您將新增 Azure Cache for Redis 以優化資料存取,並為應用程式提供更多功能。
設定 Azure Cache for Redis 的應用程式
在本教學課程的本節中,您會使用 StackExchange.Redis 快取用戶端,將範例應用程式設定為從 Azure Cache for Redis 實例儲存和擷取 Contoso 小組統計資料。
將快取連線新增至 Teams 控制器
您已在快速入門中安裝 StackExchange.Redis 用戶端程式庫套件。 您也已設定 快取連線ion 應用程式設定,以在本機使用,以及已發行的 App Service。 在 TeamsController 中使用 這個相同的用戶端程式庫和 快取連線ion 資訊。
在 方案總管 中,展開 [控制器] 資料夾,然後按兩下 [TeamsController.cs ] 加以開啟。
將下列兩個
using語句新增至 TeamsController.cs :using System.Configuration; using StackExchange.Redis;將下列兩個屬性新增至
TeamsController類別:// Redis Connection string info private static Lazy<ConnectionMultiplexer> lazyConnection = new Lazy<ConnectionMultiplexer>(() => { string cacheConnection = ConfigurationManager.AppSettings["CacheConnection"].ToString(); return ConnectionMultiplexer.Connect(cacheConnection); }); public static ConnectionMultiplexer Connection { get { return lazyConnection.Value; } }
更新 TeamsController 以從快取或資料庫讀取
在此範例中,可以從資料庫或快取擷取小組統計資料。 小組統計資料會儲存在快取中,做為序列化 List<Team> ,也儲存為使用 Redis 資料類型的已排序集合。 從已排序集合擷取專案時,您可以擷取某些專案、全部或查詢特定專案。 在此範例中,您將查詢排名前五名小組的已排序集,依獲勝次數排序。
在快取中使用 Azure Cache for Redis 時,不需要以多種格式儲存小組統計資料。 本教學課程使用多種格式來示範一些可用來快取資料的不同方式和不同資料類型。
使用其他
using語句,TeamsController.cs將下列using語句新增至頂端的 檔案:using System.Diagnostics; using Newtonsoft.Json;將目前的
public ActionResult Index()方法實作取代為下列實作:// GET: Teams public ActionResult Index(string actionType, string resultType) { List<Team> teams = null; switch(actionType) { case "playGames": // Play a new season of games. PlayGames(); break; case "clearCache": // Clear the results from the cache. ClearCachedTeams(); break; case "rebuildDB": // Rebuild the database with sample data. RebuildDB(); break; } // Measure the time it takes to retrieve the results. Stopwatch sw = Stopwatch.StartNew(); switch(resultType) { case "teamsSortedSet": // Retrieve teams from sorted set. teams = GetFromSortedSet(); break; case "teamsSortedSetTop5": // Retrieve the top 5 teams from the sorted set. teams = GetFromSortedSetTop5(); break; case "teamsList": // Retrieve teams from the cached List<Team>. teams = GetFromList(); break; case "fromDB": // Retrieve results from the database. default: teams = GetFromDB(); break; } sw.Stop(); double ms = sw.ElapsedTicks / (Stopwatch.Frequency / (1000.0)); // Add the elapsed time of the operation to the ViewBag.msg. ViewBag.msg += " MS: " + ms.ToString(); return View(teams); }將下列三種方法新增至
TeamsController類別,以playGames實作先前程式碼片段中新增之 switch 語句的 、clearCache和rebuildDB動作類型。方法
PlayGames會藉由模擬一季的比賽、將結果儲存至資料庫,以及清除快取中現在過時的資料,以更新小組統計資料。void PlayGames() { ViewBag.msg += "Updating team statistics. "; // Play a "season" of games. var teams = from t in db.Teams select t; Team.PlayGames(teams); db.SaveChanges(); // Clear any cached results ClearCachedTeams(); }方法會
RebuildDB使用預設的小組集合重新初始化資料庫、為其產生統計資料,並從快取清除現在過期的資料。void RebuildDB() { ViewBag.msg += "Rebuilding DB. "; // Delete and re-initialize the database with sample data. db.Database.Delete(); db.Database.Initialize(true); // Clear any cached results ClearCachedTeams(); }方法
ClearCachedTeams會從快取中移除任何快取的小組統計資料。void ClearCachedTeams() { IDatabase cache = Connection.GetDatabase(); cache.KeyDelete("teamsList"); cache.KeyDelete("teamsSortedSet"); ViewBag.msg += "Team data removed from cache. "; }將下列四種方法新增至
TeamsController類別,以實作從快取和資料庫擷取小組統計資料的各種方式。 每個方法都會傳回List<Team>,然後由檢視顯示。方法
GetFromDB會從資料庫讀取小組統計資料。List<Team> GetFromDB() { ViewBag.msg += "Results read from DB. "; var results = from t in db.Teams orderby t.Wins descending select t; return results.ToList<Team>(); }方法
GetFromList會將快取中的小組統計資料讀取為序列化List<Team>。 如果快取中沒有統計資料,就會發生快取遺漏。 針對快取遺漏,小組統計資料會從資料庫讀取,然後儲存在快取中供下一個要求使用。 在此範例中,JSON.NET 序列化是用來序列化快取中的 .NET 物件。 如需詳細資訊,請參閱 如何在 Azure Cache for Redis 中使用 .NET 物件。List<Team> GetFromList() { List<Team> teams = null; IDatabase cache = Connection.GetDatabase(); string serializedTeams = cache.StringGet("teamsList"); if (!String.IsNullOrEmpty(serializedTeams)) { teams = JsonConvert.DeserializeObject<List<Team>>(serializedTeams); ViewBag.msg += "List read from cache. "; } else { ViewBag.msg += "Teams list cache miss. "; // Get from database and store in cache teams = GetFromDB(); ViewBag.msg += "Storing results to cache. "; cache.StringSet("teamsList", JsonConvert.SerializeObject(teams)); } return teams; }方法
GetFromSortedSet會從快取的已排序集合讀取小組統計資料。 如果發生快取遺漏,小組統計資料會從資料庫讀取,並儲存在快取中做為已排序的集合。List<Team> GetFromSortedSet() { List<Team> teams = null; IDatabase cache = Connection.GetDatabase(); // If the key teamsSortedSet is not present, this method returns a 0 length collection. var teamsSortedSet = cache.SortedSetRangeByRankWithScores("teamsSortedSet", order: Order.Descending); if (teamsSortedSet.Count() > 0) { ViewBag.msg += "Reading sorted set from cache. "; teams = new List<Team>(); foreach (var t in teamsSortedSet) { Team tt = JsonConvert.DeserializeObject<Team>(t.Element); teams.Add(tt); } } else { ViewBag.msg += "Teams sorted set cache miss. "; // Read from DB teams = GetFromDB(); ViewBag.msg += "Storing results to cache. "; foreach (var t in teams) { Console.WriteLine("Adding to sorted set: {0} - {1}", t.Name, t.Wins); cache.SortedSetAdd("teamsSortedSet", JsonConvert.SerializeObject(t), t.Wins); } } return teams; }方法
GetFromSortedSetTop5會從快取的已排序集合讀取前五名小組。 其一開始是檢查快取中teamsSortedSet是否有索引鍵。 如果此機碼不存在,則會GetFromSortedSet呼叫 方法來讀取小組統計資料,並將其儲存在快取中。 接下來,系統會針對傳回的前五個小組查詢快取的排序集。List<Team> GetFromSortedSetTop5() { List<Team> teams = null; IDatabase cache = Connection.GetDatabase(); // If the key teamsSortedSet is not present, this method returns a 0 length collection. var teamsSortedSet = cache.SortedSetRangeByRankWithScores("teamsSortedSet", stop: 4, order: Order.Descending); if(teamsSortedSet.Count() == 0) { // Load the entire sorted set into the cache. GetFromSortedSet(); // Retrieve the top 5 teams. teamsSortedSet = cache.SortedSetRangeByRankWithScores("teamsSortedSet", stop: 4, order: Order.Descending); } ViewBag.msg += "Retrieving top 5 teams from cache. "; // Get the top 5 teams from the sorted set teams = new List<Team>(); foreach (var team in teamsSortedSet) { teams.Add(JsonConvert.DeserializeObject<Team>(team.Element)); } return teams; }
更新建立、編輯和刪除方法以使用快取
在此範例中產生的 Scaffolding 程式碼包含新增、編輯和刪除小組的方法。 每當新增、編輯或移除小組時,快取中的資料就會過期。 在本節中,您將修改這三種方法來清除快取的小組,以便重新整理快取。
流覽至
Create(Team team)類別中的TeamsController方法。 將呼叫新增至ClearCachedTeams方法,如下列範例所示:// POST: Teams/Create // To protect from overposting attacks, please enable the specific properties you want to bind to, for // more details see https://go.microsoft.com/fwlink/?LinkId=317598. [HttpPost] [ValidateAntiForgeryToken] public ActionResult Create([Bind(Include = "ID,Name,Wins,Losses,Ties")] Team team) { if (ModelState.IsValid) { db.Teams.Add(team); db.SaveChanges(); // When a team is added, the cache is out of date. // Clear the cached teams. ClearCachedTeams(); return RedirectToAction("Index"); } return View(team); }流覽至
Edit(Team team)類別中的TeamsController方法。 將呼叫新增至ClearCachedTeams方法,如下列範例所示:// POST: Teams/Edit/5 // To protect from overposting attacks, please enable the specific properties you want to bind to, for // more details see https://go.microsoft.com/fwlink/?LinkId=317598. [HttpPost] [ValidateAntiForgeryToken] public ActionResult Edit([Bind(Include = "ID,Name,Wins,Losses,Ties")] Team team) { if (ModelState.IsValid) { db.Entry(team).State = EntityState.Modified; db.SaveChanges(); // When a team is edited, the cache is out of date. // Clear the cached teams. ClearCachedTeams(); return RedirectToAction("Index"); } return View(team); }流覽至
DeleteConfirmed(int id)類別中的TeamsController方法。 將呼叫新增至ClearCachedTeams方法,如下列範例所示:// POST: Teams/Delete/5 [HttpPost, ActionName("Delete")] [ValidateAntiForgeryToken] public ActionResult DeleteConfirmed(int id) { Team team = db.Teams.Find(id); db.Teams.Remove(team); db.SaveChanges(); // When a team is deleted, the cache is out of date. // Clear the cached teams. ClearCachedTeams(); return RedirectToAction("Index"); }
將快取方法新增至 Teams 索引檢視
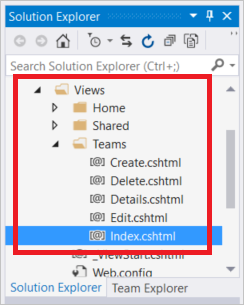
在 方案總管 中,展開 [檢視] 資料夾,然後 展開 [Teams] 資料夾,然後按兩下 Index.cshtml 。
在檔案頂端附近,尋找下列段落元素:
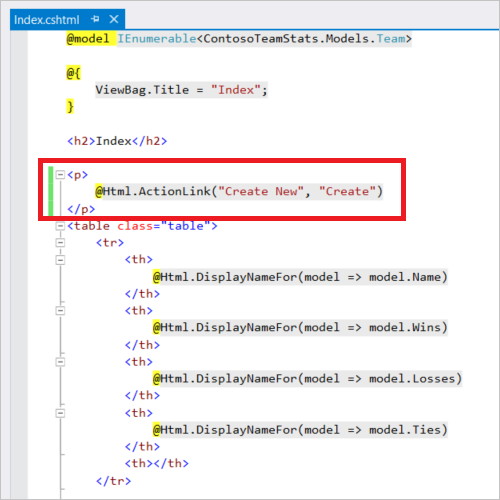
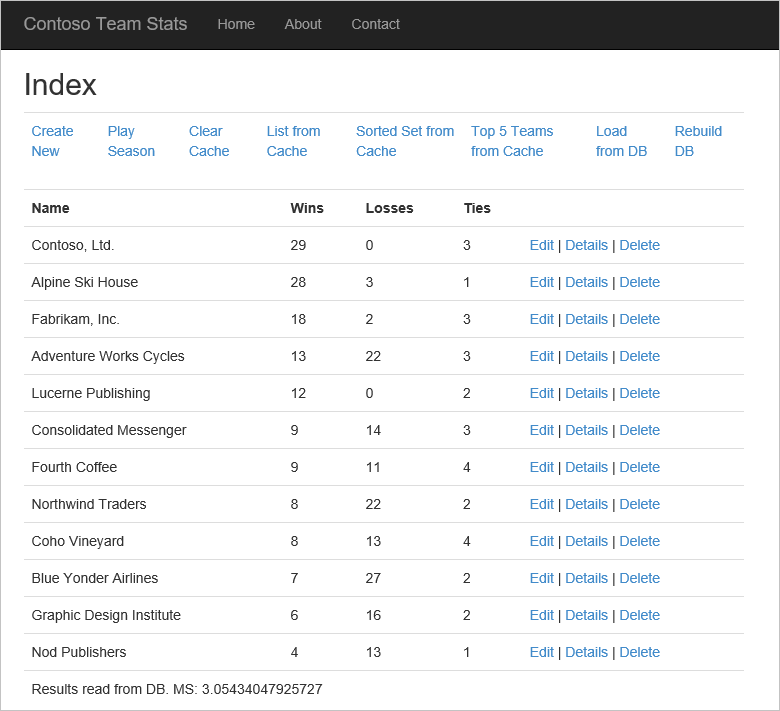
此連結會建立新的小組。 將 paragraph 元素取代為下表。 下表提供動作連結,可用來建立新團隊、玩新賽季的遊戲、清除快取、以數種格式從快取擷取小組、從資料庫擷取小組,以及使用全新的範例資料重建資料庫。
<table class="table">
    <tr>
        <td>
            @Html.ActionLink("Create New", "Create")
        </td>
        <td>
            @Html.ActionLink("Play Season", "Index", new { actionType = "playGames" })
        </td>
        <td>
            @Html.ActionLink("Clear Cache", "Index", new { actionType = "clearCache" })
        </td>
        <td>
            @Html.ActionLink("List from Cache", "Index", new { resultType = "teamsList" })
        </td>
        <td>
            @Html.ActionLink("Sorted Set from Cache", "Index", new { resultType = "teamsSortedSet" })
        </td>
        <td>
            @Html.ActionLink("Top 5 Teams from Cache", "Index", new { resultType = "teamsSortedSetTop5" })
        </td>
        <td>
            @Html.ActionLink("Load from DB", "Index", new { resultType = "fromDB" })
        </td>
        <td>
            @Html.ActionLink("Rebuild DB", "Index", new { actionType = "rebuildDB" })
        </td>
    </tr>
</table>
捲動至 Index.cshtml 檔案底部 ,並新增下列
tr元素,使其是檔案中最後一個資料表的最後一列:<tr><td colspan="5">@ViewBag.Msg</td></tr>此資料列會顯示 的值
ViewBag.Msg,其中包含目前作業的相關狀態報表。ViewBag.Msg當您從上一個步驟中選取任何動作連結時,會設定 。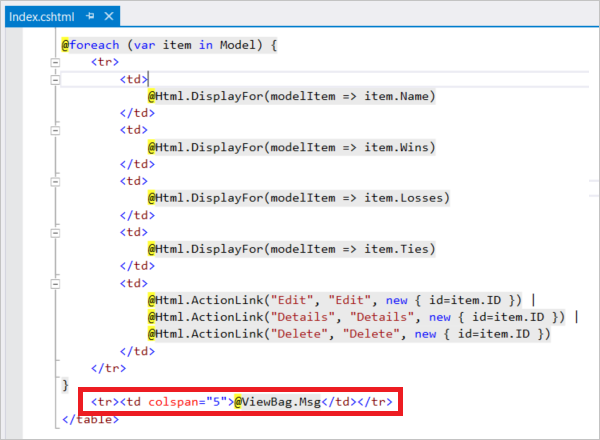
按 F6 建置專案。
在本機執行應用程式
在本機電腦上執行應用程式,以確認已新增以支援小組的功能。
在此測試中,應用程式和資料庫都在本機執行。 Azure Cache for Redis 不是本機。 它會在 Azure 中遠端裝載。 這就是為什麼快取可能會稍微執行資料庫不足的原因。 為了獲得最佳效能,用戶端應用程式和 Azure Cache for Redis 實例應該位於相同的位置。
在下一節中,您會將所有資源部署到 Azure,以查看使用快取改善的效能。
若要在本機執行應用程式:
按 Ctrl+F5 執行應用程式。
測試新增至檢視的每個新方法。 由於快取在這些測試中是遠端的,因此資料庫應該稍微優於快取。
在 Azure 中發佈並執行
布建應用程式的資料庫
在本節中,您會在 SQL 資料庫 中布建新的資料庫,讓應用程式在 Azure 中裝載時使用。
在 [新增 ] 頁面上,選取 [ 資料庫 > SQL 資料庫]。
針對新的SQL 資料庫使用下列設定:
設置 建議的值 描述 資料庫名稱 ContosoTeamsDatabase 如需有效的資料庫名稱,請參閱 資料庫識別碼 。 訂用帳戶 您的訂用帳戶 選取您用來建立快取並裝載 App Service 的相同訂用帳戶。 資源群組 TestResourceGroup 選取 [使用現有的 ],並使用您放置快取和 App Service 所在的相同資源群組。 選取來源 空白資料庫 從空白資料庫開始。 在 [伺服器] 底 下,選取 [ 設定必要設定 > 建立新的伺服器 ],並提供下列資訊,然後使用 [ 選取 ] 按鈕:
設置 建議的值 描述 伺服器名稱 任何全域唯一名稱 如需有效的伺服器名稱,請參閱命名規則和限制。 伺服器管理員登入 任何有效名稱 如需有效的登入名稱,請參閱 資料庫識別碼 。 密碼 任何有效密碼 您的密碼必須至少有 8 個字元,且必須包含下列三個類別的字元:大寫字元、小寫字元、數位和非英數位元。 位置 美國東部 選取您建立快取和 App Service 的相同區域。 選取 [釘選到儀表板 ],然後 選取 [建立] 以建立新的資料庫和伺服器。
建立新的資料庫之後,請選取 [ 顯示資料庫連接字串] ,然後複製 ADO.NET 連接字串。

在Azure 入口網站中,流覽至 App Service 並選取 [應用程式設定 ],然後在 [連線 ion 字串] 區段底下新增連接字串。
新增名為 TeamCoNtext 的新連接字串,以符合 Entity Framework 資料庫內容類別別。 將新資料庫的連接字串貼上為 值。 請務必取代連接字串中的下列預留位置,然後選取 [ 儲存 ]:
預留位置 建議的值 {your_username} 針對 您剛才建立的伺服器使用伺服器管理員登入 。 {your_password} 使用您剛才建立之伺服器的密碼。 藉由將使用者名稱和密碼新增為應用程式設定,您的使用者名稱和密碼不會包含在您的程式碼中。 這種方法有助於保護這些認證。
將應用程式更新發佈至 Azure
在本教學課程的此步驟中,您會將應用程式更新發佈至 Azure,以在雲端中執行。
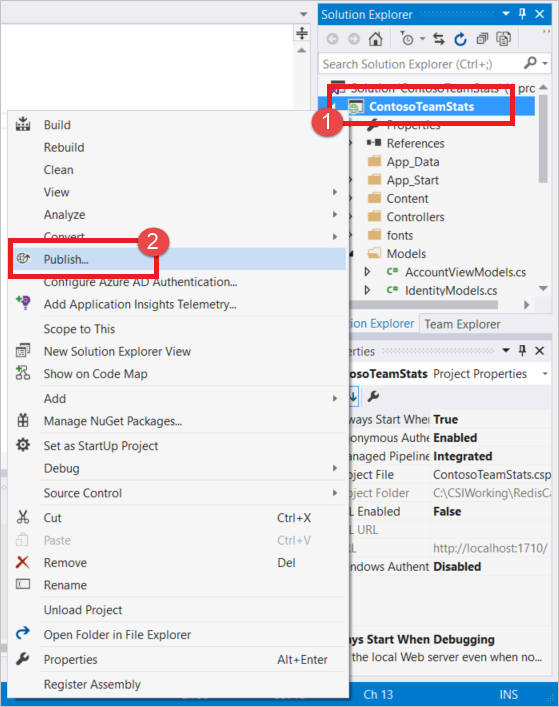
以滑鼠右鍵按一下 Visual Studio 中的 ContosoTeamStats 專案,然後選擇 [ 發佈 ]。
選取 [發佈 ] 以使用您在快速入門中建立的相同發佈設定檔。
發佈完成後,Visual Studio 會在預設網頁瀏覽器中啟動應用程式。
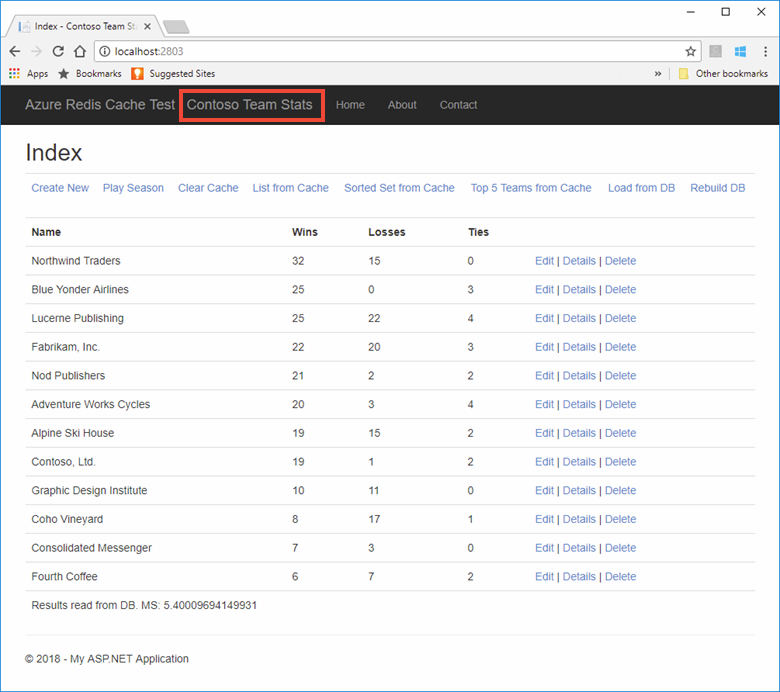
下表說明範例應用程式中的每個動作連結:
動作 描述 新建 建立新的小組。 播放季節 玩一季的遊戲,更新團隊統計資料,並從快取清除任何過時的小組資料。 清除快取 清除快取中的小組統計資料。 從快取列出 從快取擷取小組統計資料。 如果有快取遺漏,請從資料庫載入統計資料,並儲存至快取以供下一次使用。 從快取排序的集合 使用已排序的集合,從快取擷取小組統計資料。 如果有快取遺漏,請從資料庫載入統計資料,並使用已排序的集合儲存至快取。 來自快取的前 5 名 Teams 使用已排序的集合,從快取擷取前 5 名小組。 如果有快取遺漏,請從資料庫載入統計資料,並使用已排序的集合儲存至快取。 從 DB 載入 從資料庫擷取小組統計資料。 重建 DB 重建資料庫,並使用範例小組資料重載資料庫。 編輯 / 詳細資料 / 刪除 編輯小組、檢視小組的詳細資料、刪除小組。
選取一些動作,並實驗從不同的來源擷取資料。 請注意完成從資料庫和快取擷取資料的各種方式所需的時間差異。
清除資源
當您完成範例教學課程應用程式時,您可以刪除 Azure 資源以節省成本和資源。 您的所有資源都應該包含在相同的資源群組中。 您可以藉由刪除資源群組,在一個作業中一起刪除它們。 本文中的指示使用了名為 TestResources 的資源群組。
重要
刪除資源群組是無法復原的,而且資源群組及其中的所有資源都會永久刪除。 請確定您不會不小心刪除錯誤的資源群組或資源。 如果您已建立資源,以將這個範例裝載于現有的資源群組內,其中包含您想要保留的資源,則可以個別刪除左側的每個資源。
登入 Azure 入口網站 ,然後選取 [資源群組 ]。
在 [篩選項目... ] 文字方塊中輸入資源群組 的名稱。
選取 資源群組右側的 [...] ,然後選取 [ 刪除資源群組 ]。
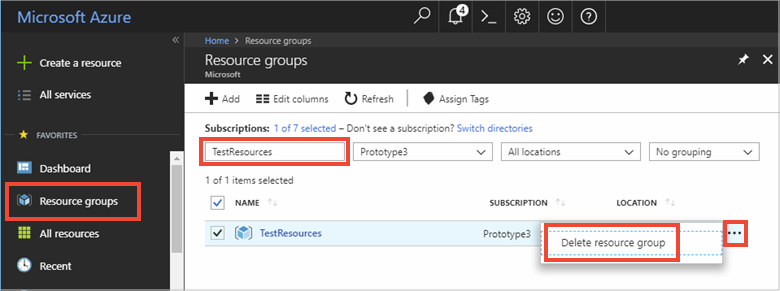
系統會要求您確認刪除資源群組。 輸入要確認的資源群組名稱,然後選取 [ 刪除 ]。
幾分鐘後,資源群組及其所有自主資源都會被刪除。