在 Azure Government 上使用儲存體 API 進行開發
Azure Government 使用與商業 Azure 相同的基礎技術,可讓您使用您已熟悉的開發工具。 如果您沒有 Azure Government 訂用帳戶,請在開始前建立免費帳戶。
必要條件
- 檢閱開發人員指導方針。 本文討論 Azure Government 用來管理環境的唯一 URL 和端點。 您必須知道這些端點,以連線到 Azure Government。
- 檢閱比較 Azure Government 與全域 Azure,然後按一下感興趣的服務,以查看 Azure Government 與全域 Azure 之間的差異。
- 下載並安裝最新版 Azure 儲存體總管。
將儲存體總管連線至 Azure Government
Microsoft Azure 儲存體總管是使用 Azure 儲存體的跨平台工具。 政府客戶現在可以利用 Azure 儲存體總管的所有最新功能,例如建立及管理 Blob、佇列、資料表和檔案共用。
開始使用儲存體 Explorer
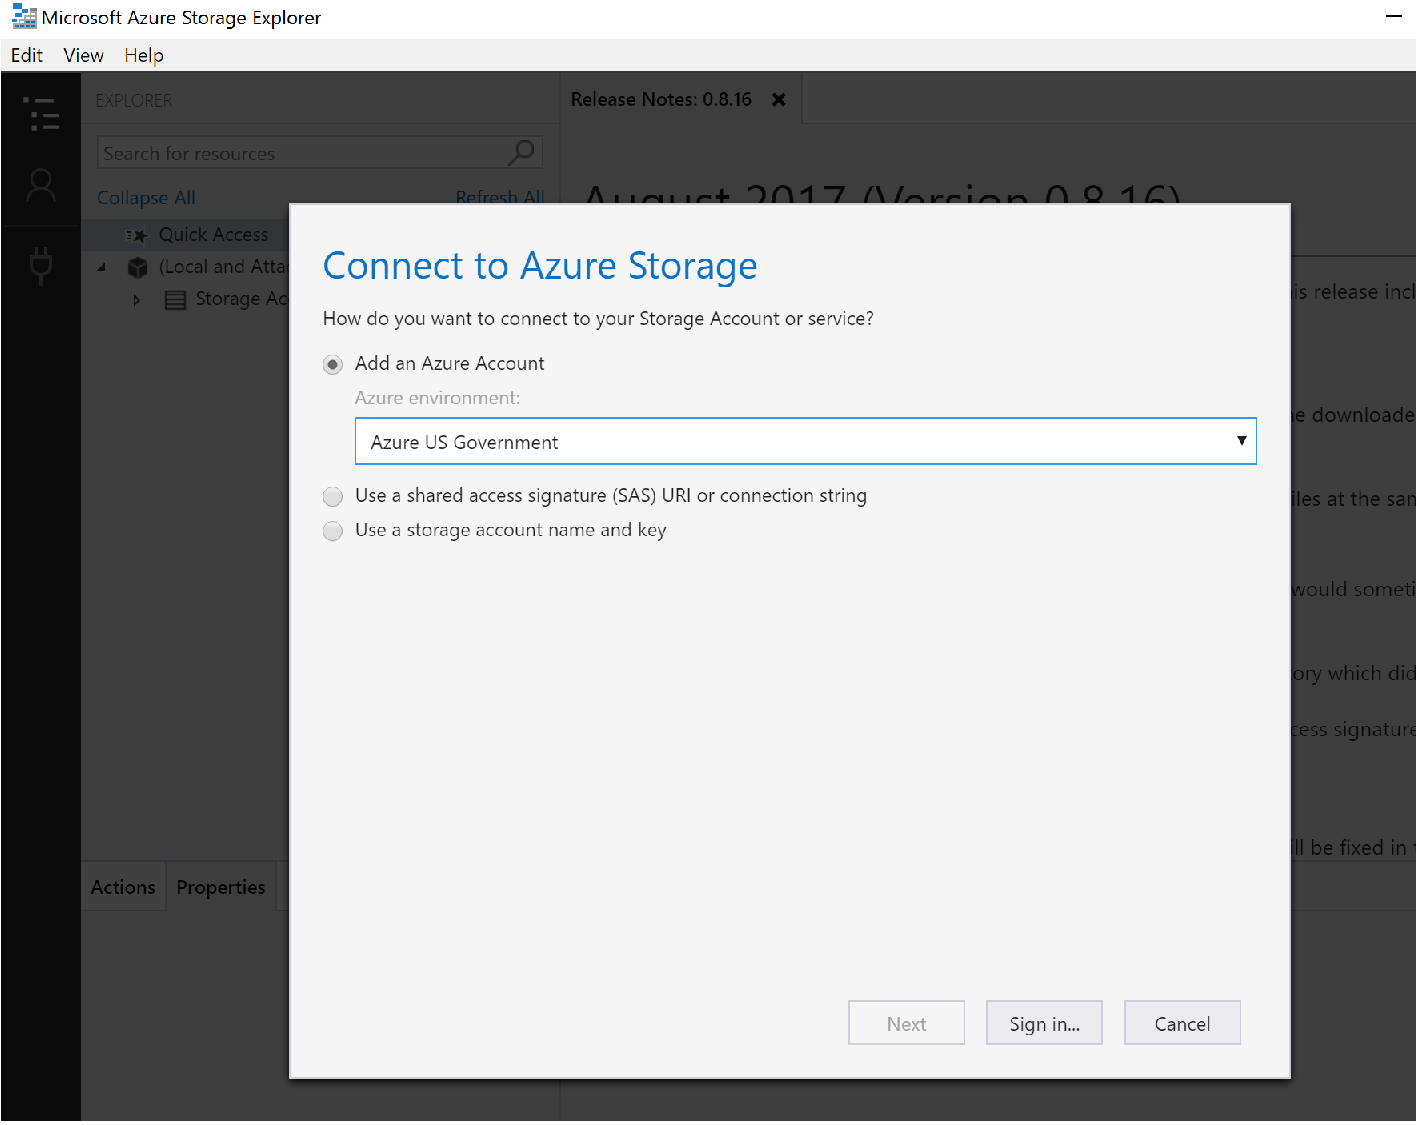
開啟 Azure 儲存體總管傳統型應用程式。
系統會提示您新增 Azure 帳戶;在下拉式清單中,選擇 [Azure 美國政府] 選項:
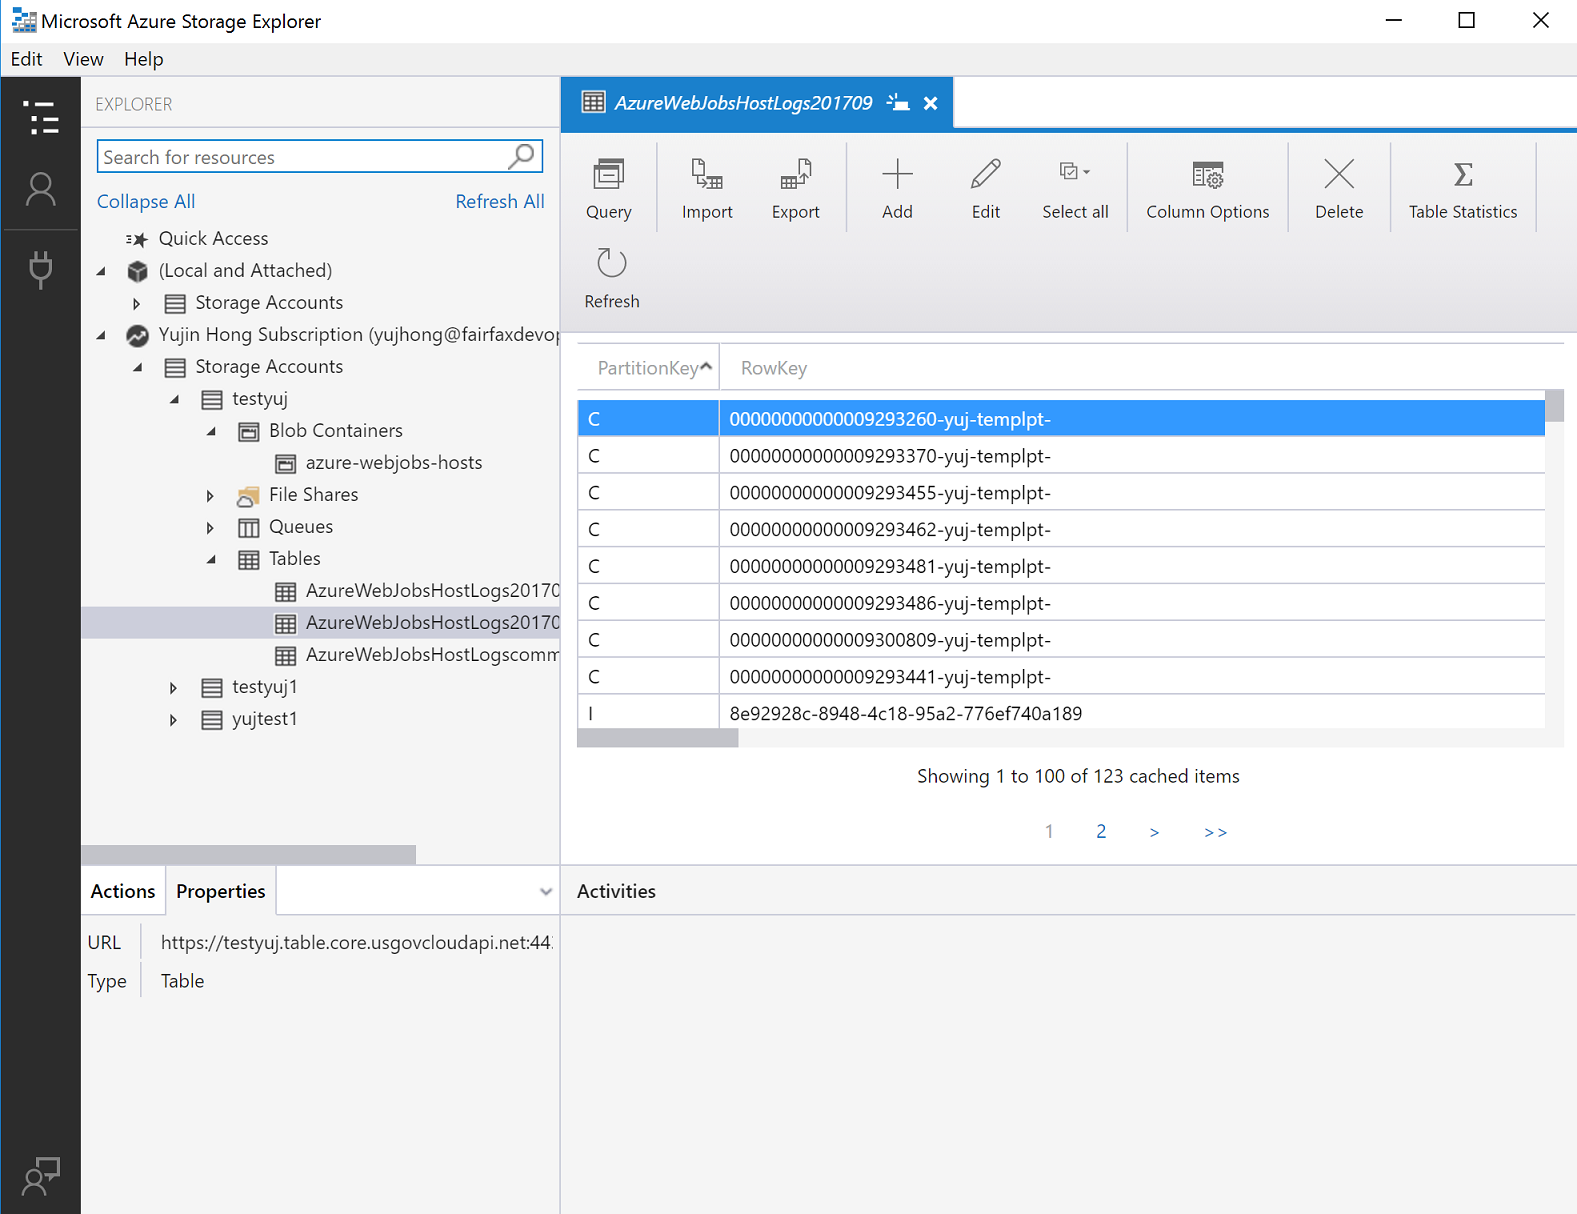
登入您的 Azure Government 帳戶,您即可看到所有資源。 儲存體總管看起來應該類似下面的螢幕擷取畫面。 按一下您的儲存體帳戶,以查看 Blob 容器、檔案共用、佇列和資料表。
如需有關 Azure 儲存體總管的詳細資訊,請參閱開始使用儲存體總管。
連線至儲存體 API
必要條件
- 擁有有效的 Azure Government 訂用帳戶。 如果您沒有 Azure Government 訂用帳戶,請在開始前建立免費帳戶。
- 下載 Visual Studio 2019。
開始使用儲存體 API
與儲存體 API 連線時要謹記的一個重要差異,是 Azure Government 中儲存體的 URL 與商業 Azure 中儲存體的 URL 不同。 具體而言,網域結尾為 "core.usgovcloudapi.net",而不是 "core.windows.net"。
當您使用 C# 連線到 Azure Government 中的儲存體時,必須考慮這些端點差異。
移至 Azure Government 入口網站並選取您的儲存體帳戶,然後按一下 [存取金鑰] 索引標籤:
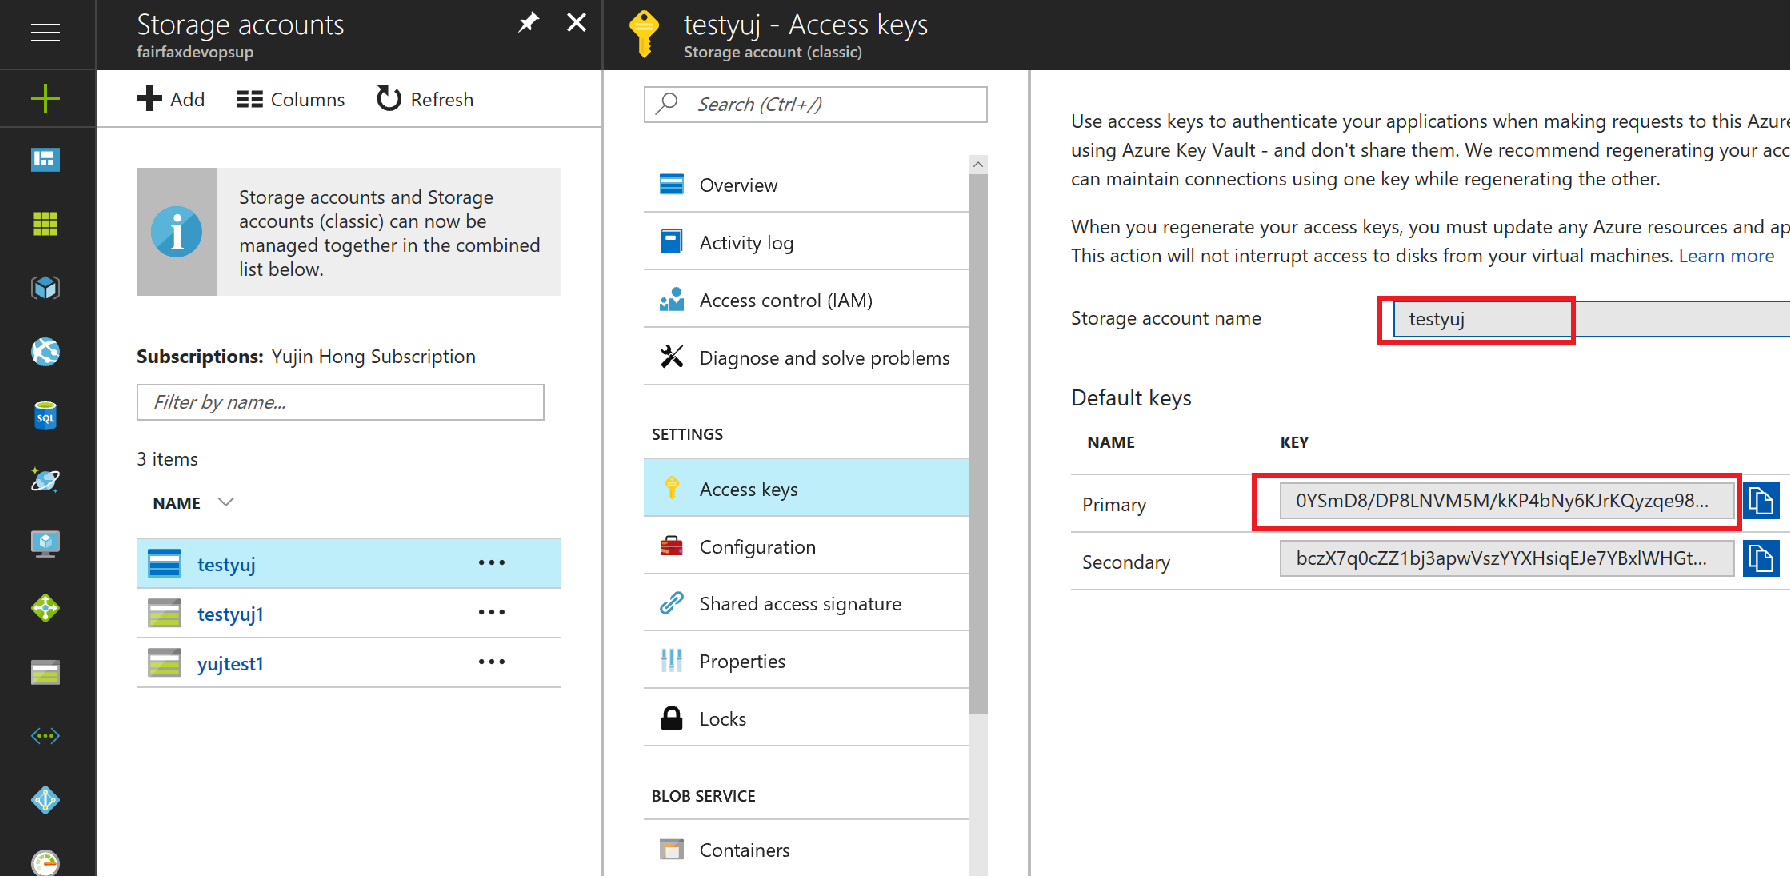
複製/貼上儲存體帳戶連接字串。
C#
開啟 Visual Studio 並建立新專案。 將參考新增至適用於 .NET 的 Azure 資料表用戶端程式庫。 此套件包含連線到儲存體資料表帳戶的類別。
新增這兩行 C# 程式碼以連線:
var credentials = new TableSharedKeyCredential(storageAccountName, Environment.GetEnvironmentVariable("STORAGE_ACCOUNT_KEY"));
var storageTableUri = Environment.GetEnvironmentVariable("STORAGE_TABLE_URI");
var tableServiceClient = new TableServiceClient(new Uri(storageTableUri), credentials);
此時,我們可以如往常一樣與儲存體互動。 例如,如果我們想要從表格儲存體擷取特定實體,我們可以執行如下動作:
 var tableClient = tableServiceClient.GetTableClient("Contacts");
 ContactEntity contact = tableClient.GetEntity<ContactEntity>("gov-partition1", "0fb52a6c-3784-4dc5-aa6d-ecda4426dbda");
 Console.WriteLine($"Contact: {contact.FirstName} {contact.LastName}");
Java
- 下載適用於 Java 的 Azure 資料表用戶端程式庫,並正確設定您的專案。
- 建立「測試」類別,我們將使用 Azure 資料表用戶端程式庫來存取 Azure 表格儲存體。
複製並貼上下列程式碼,並將儲存體帳戶連接字串貼到AZURE_STORAGE_CONNECTION_STRING環境變數中。import com.azure.data.tables.implementation.ModelHelper; import com.azure.data.tables.models.*; import java.util.HashMap; public class test { public static final String storageConnectionString = System.getEnv("AZURE_STORAGE_CONNECTION_STRING"); public static void main(String[] args) { try { // Create the table service client. TableServiceClient tableServiceClient = new TableServiceClientBuilder() .connectionString(storageConnectionString) .buildClient(); // Create the table if it doesn't exist. String tableName = "Contacts"; TableClient tableClient = tableServiceClient.createTableIfNotExists(tableName); // Create a new customer entity. TableEntity customer1 = ModelHelper.createEntity(new HashMap<String, Object>() {{ put("PartitionKey", "Brown"); put("RowKey", "Walter"); put("Email", "Walter@contoso.com"); }}); // Insert table entry into table tableClient.createEntity(customer1); } catch (Exception e) { // Output the stack trace. e.printStackTrace(); } } }
Node.js
下載適用於 Node.js 的 Azure 儲存體 Blob 用戶端程式庫,並正確設定您的應用程式。
下列程式碼會連線到 Azure Blob 儲存體,並使用 Azure 儲存體 API 建立容器。 將您的 Azure 儲存體帳戶連接字串貼到
AZURE_STORAGE_CONNECTION_STRING環境變數中。var { BlobServiceClient } = require("@azure/storage-blob"); var storageConnectionString = process.env["AZURE_STORAGE_CONNECTION_STRING"]; var blobServiceClient = BlobServiceClient.fromConnectionString(storageConnectionString); var containerClient = blobServiceClient.getContainerClient('testing'); containerClient.createIfNotExists();
Python
使用適用於 Python 的儲存體程式庫連線到 Azure Government 時,請將您的 Azure 儲存體連接字串貼到
AZURE_STORAGE_CONNECTION_STRING環境變數中。# Create the BlobServiceClient that is used to call the Blob service for the storage account connection_string = os.getenv("AZURE_STORAGE_CONNECTION_STRING") blob_service_client = BlobServiceClient.from_connection_string(conn_str=connection_string) container_name ='ml-gov-demo' container = blob_service_client.get_container_client(container=container_name) generator = container.list_blobs() for blob in generator: print("\t Blob name: " + blob.name)
PHP
下列程式碼會使用 Azure 儲存體 API 來存取 Azure 表格儲存體。 在
connectionString變數中,您會發現有TableEndpoint參數。 根據您使用的服務而定,您必須定義參數,並將其設定為該服務的端點:BlobEndpoint= //ends with 'blob.core.usgovcloudapi.net'
QueueEndpoint= //ends with 'queue.core.usgovcloudapi.net'
TableEndpoint= //ends with 'table.core.usgovcloudapi.net'
注意
您可以從入口網站瀏覽至您的儲存體帳戶,以找到這些端點。 在
connectionString變數中貼上儲存體帳戶名稱、金鑰和服務端點。<?php require_once "vendor/autoload.php"; use WindowsAzure\Common\ServicesBuilder; use MicrosoftAzure\Storage\Common\ServiceException; $connectionString = 'DefaultEndpointsProtocol=http;AccountName=<accountname>;AccountKey=<accountkey>;TableEndpoint=http://<storageaccountname>.table.core.usgovcloudapi.net/'; $tableRestProxy = ServicesBuilder::getInstance()->createTableService($connectionString); try { // Create table. $tableRestProxy->createTable("test"); } catch(ServiceException $e){ $code = $e->getCode(); $error_message = $e->getMessage(); } ?>
下一步
- 閱讀更多有關 Azure 儲存體的內容。
- 訂閱 Azure Government 部落格
- 使用 azure-gov 標記,取得 Stack Overflow 的相關說明