Azure 地圖服務 是整合至 Azure 的地理空間服務 API 組合,可讓開發人員針對IoT、行動和資產追蹤等各種案例建立位置感知應用程式。
Azure 地圖服務 REST API 支援 Python 和 R 等語言進行地理空間數據分析和機器學習,提供健全的路由 API,可根據車輛類型或可連線區域等條件來計算路線。
本教學課程會引導使用者使用 Azure 地圖服務 API 以及 VS Code 中的 Jupyter Notebook 和 Python 來路由電動汽車,以在電池不足時尋找最接近的充電站。
在此教學課程中,您需要:
必要條件
- Azure 地圖服務帳戶
- 訂用帳戶金鑰
- Visual Studio Code
- VS Code 中 Jupyter Notebook 的工作知識
- 環境設定為在 Jupyter Notebook 中使用 Python。 如需詳細資訊,請參閱 設定您的環境。
注意
如需 Azure 地圖服務中驗證的詳細資訊,請參閱管理 Azure 地圖服務中的驗證。
安裝專案層級套件
EV 路由和可連線範圍專案具有 aioHTTP 和 IPython Python 連結庫的相依性。 您可以使用 pip 在 Visual Studio 終端機中安裝這些專案:
pip install aiohttp
pip install ipython
在 Visual Studio Code 中開啟 Jupyter Notebook
接著,下載並開啟本教學課程中使用的 Notebook:
在 GitHub 的 AzureMapsJupyterSamples 存放庫中開啟 EVrouting.ipynb 檔案。
選取畫面右上角的 [ 下載源檔 ] 按鈕,在本機儲存盤案。

以滑鼠右鍵按兩下檔案,然後選取 [使用 > Visual Studio Code 開啟],或透過 VS Code 檔案總管 開啟下載的 Notebook。
載入必要的模組和架構
新增程式代碼之後,您可以使用儲存格左邊的[執行] 圖示執行儲存格,而輸出會顯示在程式碼資料格下方。
執行下列文本以載入所有必要的模組和架構。
import time
import aiohttp
import urllib.parse
from IPython.display import Image, display

要求可抵達的範圍界限
一家包裹遞送公司經營的車隊包括一些電動汽車。 這些車輛必須在白天充電,而不返回倉庫。 當剩餘的收費低於一小時時,會進行搜尋,以在可觸達的範圍內尋找充電站。 然後取得這些充電站範圍的界限資訊。
要求的 routeType 是 生態 ,以平衡經濟和速度。 下列腳本會使用與車輛耗用量模型相關的參數,呼叫 Azure 地圖服務 路由服務的取得路線範圍 API。 然後腳本會剖析回應,以 GeoJSON 格式建立多邊形物件,代表汽車可到達的最大範圍。
subscriptionKey = "Your Azure Maps key"
currentLocation = [34.028115,-118.5184279]
session = aiohttp.ClientSession()
# Parameters for the vehicle consumption model
travelMode = "car"
vehicleEngineType = "electric"
currentChargeInkWh=45
maxChargeInkWh=80
timeBudgetInSec=550
routeType="eco"
constantSpeedConsumptionInkWhPerHundredkm="50,8.2:130,21.3"
# Get boundaries for the electric vehicle's reachable range.
routeRangeResponse = await (await session.get("https://atlas.microsoft.com/route/range/json?subscription-key={}&api-version=1.0&query={}&travelMode={}&vehicleEngineType={}¤tChargeInkWh={}&maxChargeInkWh={}&timeBudgetInSec={}&routeType={}&constantSpeedConsumptionInkWhPerHundredkm={}"
.format(subscriptionKey,str(currentLocation[0])+","+str(currentLocation[1]),travelMode, vehicleEngineType, currentChargeInkWh, maxChargeInkWh, timeBudgetInSec, routeType, constantSpeedConsumptionInkWhPerHundredkm))).json()
polyBounds = routeRangeResponse["reachableRange"]["boundary"]
for i in range(len(polyBounds)):
coordList = list(polyBounds[i].values())
coordList[0], coordList[1] = coordList[1], coordList[0]
polyBounds[i] = coordList
polyBounds.pop()
polyBounds.append(polyBounds[0])
boundsData = {
"geometry": {
"type": "Polygon",
"coordinates":
[
polyBounds
]
}
}
在可抵達的範圍內搜尋電動車充電站
在確定電動汽車的可到達範圍(等時線)后,您可以搜尋該區域內的充電站。
下列腳本會使用 Azure 地圖服務 Post Search Inside Geometry API 來尋找車輛最大可觸達範圍的充電站。 然後,它會將回應剖析為可連線位置的陣列。
# Search for electric vehicle stations within reachable range.
searchPolyResponse = await (await session.post(url = "https://atlas.microsoft.com/search/geometry/json?subscription-key={}&api-version=1.0&query=electric vehicle station&idxSet=POI&limit=50".format(subscriptionKey), json = boundsData)).json()

reachableLocations = []
for loc in range(len(searchPolyResponse["results"])):
                location = list(searchPolyResponse["results"][loc]["position"].values())
                location[0], location[1] = location[1], location[0]
                reachableLocations.append(location)
在地圖上轉譯充電站和可抵達的範圍
呼叫 Azure 地圖服務 取得地圖影像服務,藉由執行下列腳本,在靜態地圖影像上轉譯充電點和最大可觸達界限:
# Get boundaries for the bounding box.
def getBounds(polyBounds):
    maxLon = max(map(lambda x: x[0], polyBounds))
    minLon = min(map(lambda x: x[0], polyBounds))

    maxLat = max(map(lambda x: x[1], polyBounds))
    minLat = min(map(lambda x: x[1], polyBounds))

    # Buffer the bounding box by 10 percent to account for the pixel size of pins at the ends of the route.
    lonBuffer = (maxLon-minLon)*0.1
    minLon -= lonBuffer
    maxLon += lonBuffer

    latBuffer = (maxLat-minLat)*0.1
    minLat -= latBuffer
    maxLat += latBuffer

    return [minLon, maxLon, minLat, maxLat]

minLon, maxLon, minLat, maxLat = getBounds(polyBounds)
polyBoundsFormatted = ('|'.join(map(str, polyBounds))).replace('[','').replace(']','').replace(',','')
reachableLocationsFormatted = ('|'.join(map(str, reachableLocations))).replace('[','').replace(']','').replace(',','')

path = "lcff3333|lw3|la0.80|fa0.35||{}".format(polyBoundsFormatted)
pins = "custom|an15 53||{}||https://raw.githubusercontent.com/Azure-Samples/AzureMapsCodeSamples/e3a684e7423075129a0857c63011e7cfdda213b7/Static/images/icons/ev_pin.png".format(reachableLocationsFormatted)

encodedPins = urllib.parse.quote(pins, safe='')

# Render the range and electric vehicle charging points on the map.
staticMapResponse =  await session.get("https://atlas.microsoft.com/map/static?api-version=2024-04-01&subscription-key={}&pins={}&path={}&bbox={}&zoom=12".format(subscriptionKey,encodedPins,path,str(minLon)+", "+str(minLat)+", "+str(maxLon)+", "+str(maxLat)))

poiRangeMap = await staticMapResponse.content.read()

display(Image(poiRangeMap))

尋找最適合前往的充電站
首先,識別車輛可到達範圍內的所有潛在充電站。 接下來,判斷哪些月臺可以在最短的可能時間記憶體取。
下列指令碼會呼叫 Azure 地圖服務矩陣路線規劃 API。 它會傳回車輛的位置、旅行時間和距離至每個充電站。 後續腳本會剖析此回應,以識別可在最少時間內到達的最接近充電站。
locationData = {
            "origins": {
              "type": "MultiPoint",
              "coordinates": [[currentLocation[1],currentLocation[0]]]
            },
            "destinations": {
              "type": "MultiPoint",
              "coordinates": reachableLocations
            }
         }

# Get the travel time and distance to each specified charging station.
searchPolyRes = await (await session.post(url = "https://atlas.microsoft.com/route/matrix/json?subscription-key={}&api-version=1.0&routeType=shortest&waitForResults=true".format(subscriptionKey), json = locationData)).json()

distances = []
for dist in range(len(reachableLocations)):
    distances.append(searchPolyRes["matrix"][0][dist]["response"]["routeSummary"]["travelTimeInSeconds"])

minDistLoc = []
minDistIndex = distances.index(min(distances))
minDistLoc.extend([reachableLocations[minDistIndex][1], reachableLocations[minDistIndex][0]])
closestChargeLoc = ",".join(str(i) for i in minDistLoc)
計算最近充電站的路線
找到最近的充電站之後,請使用 取得路線指示 API 從車輛目前位置取得詳細方向。 在下一個儲存格中執行腳本,以產生並剖析代表路由的 GeoJSON 物件。
# Get the route from the electric vehicle's current location to the closest charging station.
routeResponse = await (await session.get("https://atlas.microsoft.com/route/directions/json?subscription-key={}&api-version=1.0&query={}:{}".format(subscriptionKey, str(currentLocation[0])+","+str(currentLocation[1]), closestChargeLoc))).json()

route = []
for loc in range(len(routeResponse["routes"][0]["legs"][0]["points"])):
                location = list(routeResponse["routes"][0]["legs"][0]["points"][loc].values())
                location[0], location[1] = location[1], location[0]
                route.append(location)

routeData = {
         "type": "LineString",
         "coordinates": route
     }
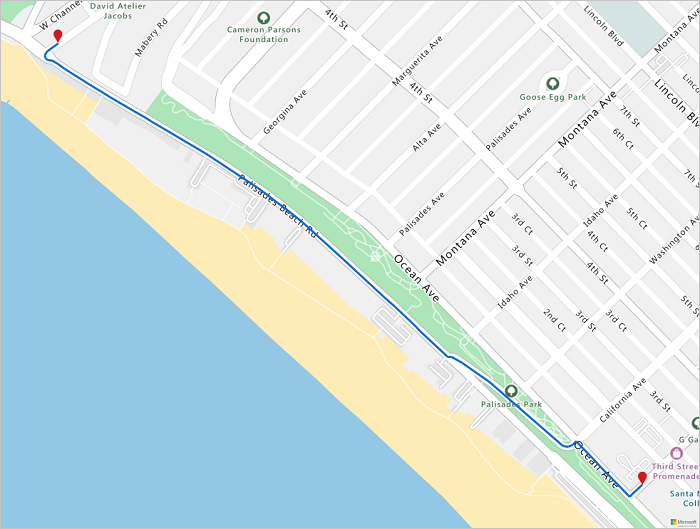
將路線視覺化
若要將路線可視化,請使用 取得地圖影像 API 在地圖上呈現。
destination = route[-1]

#destination[1], destination[0] = destination[0], destination[1]

routeFormatted = ('|'.join(map(str, route))).replace('[','').replace(']','').replace(',','')
path = "lc0f6dd9|lw6||{}".format(routeFormatted)
pins = "default|codb1818||{} {}|{} {}".format(str(currentLocation[1]),str(currentLocation[0]),destination[0],destination[1])


# Get boundaries for the bounding box.
minLon, maxLon = (float(destination[0]),currentLocation[1]) if float(destination[0])<currentLocation[1] else (currentLocation[1], float(destination[0]))
minLat, maxLat = (float(destination[1]),currentLocation[0]) if float(destination[1])<currentLocation[0] else (currentLocation[0], float(destination[1]))

# Buffer the bounding box by 10 percent to account for the pixel size of pins at the ends of the route.
lonBuffer = (maxLon-minLon)*0.1
minLon -= lonBuffer
maxLon += lonBuffer

latBuffer = (maxLat-minLat)*0.1
minLat -= latBuffer
maxLat += latBuffer

# Render the route on the map.
staticMapResponse = await session.get("https://atlas.microsoft.com/map/static?api-version=2024-04-01&subscription-key={}&&path={}&pins={}&bbox={}&zoom=16".format(subscriptionKey,path,pins,str(minLon)+", "+str(minLat)+", "+str(maxLon)+", "+str(maxLat)))

staticMapImage = await staticMapResponse.content.read()

await session.close()
display(Image(staticMapImage))
在此教學課程中,您已了解如何直接呼叫 Azure 地圖服務 REST API,並使用 Python 來將 Azure 地圖服務資料視覺化。
如需本教學課程中使用的 Azure 地圖服務 API 詳細資訊,請參閱:
如需 Azure 地圖服務 REST API 的完整清單,請參閱 Azure 地圖服務 REST API \(部分機器翻譯\)。